

Now that you've got your Raspberry Pi 2 Model B all configured and ready to go, you'll need to add some hardware to control and interface. In this chapter, you'll learn:
There are several choices when considering how to create a mobile robot. One of the more interesting choices is a robot that can walk. This normally comes in three versions: a biped robot with two legs, a biped robot with four legs, and a hexapod robot with six legs. While each offers an interesting and different set of possibilities, in this chapter, you'll build a basic, 10 DOF biped.
You'll be using a total of 10 servos for your project, as each leg has 5 points that can move, or 5 degrees of freedom (DOF). As servos are the most critical component of this project, it is perhaps useful to go through a tutorial on servos and learn how to control them.
Servo motors are somewhat similar to DC motors. However, there is an important difference. While DC motors are generally designed to move in a continuous way—rotating 360 degrees at a given speed—servos are generally designed to move to a limited set of angles. In other words, in the DC motor world, you generally want your motors to spin with a continuous rotation speed that you control. In the servo world, you want your motor to move to a specific position that you control.
This is done by sending a Pulse-Width-Modulated (PWM) signal to the control connector of the servo. The length of this pulse will control the angle of the servo like this:
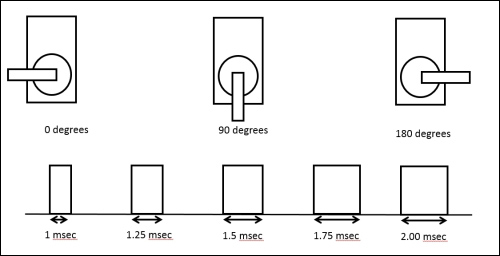
These pulses are sent out with a repetition rate of 60 Hz. You can position the servo to any angle by setting the correct control pulse.
There are several approaches to building your biped platform. Perhaps the most simple is to purchase a set of basic parts; this is the example you'll see in this chapter. There are several kit possibilities out there, including one at http://www.robotshop.com/en/lynxmotion-biped-robot-scout-bps-ns-servos.html, a kit like the one offered at http://www.ebay.com/itm/10-DOF-Biped-Robot-Mechanical-Leg-Robot-Servo-Motor-Bracket-NO-Servo-Motor-good-/131162548695?pt=LH_DefaultDomain_0&hash=item1e89e5a9d7, or the one at http://www.amazon.com/gp/product/B00DR7GA4I/ref=oh_aui_detailpage_o04_s00?ie=UTF8&psc=1. This is the specific kit we'll use in this chapter.
In the end, your biped will work more like the legs of a Tyrannosaurus Rex of a human, but this will make it easier to program, and it will power down more gracefully. It will also be a bit more stable.
You'll also need 10 standard size servos. There are several possible choices, but Hitec servos are relatively...
To make your biped walk, you first need to connect the servo motor controller to the servos. The servo controller you are going to use for this project is a simple servo motor controller utilizing the USB from Pololu—Pololu item number 1354 is available at pololu.com—that can control 18 servo motors. Here is a picture of the unit:
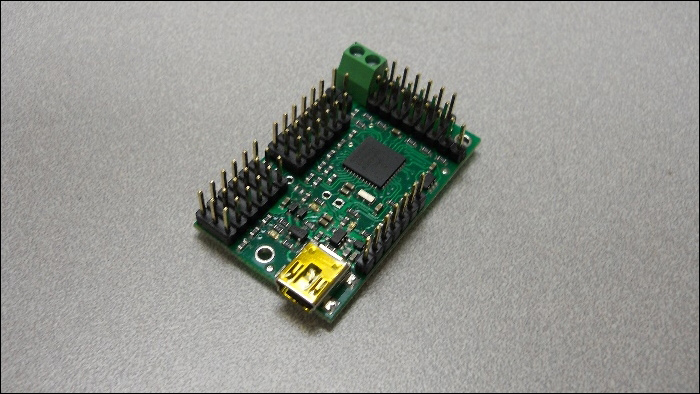
Make sure that you order the assembled version. This piece of hardware will turn USB commands from Raspberry Pi into signals that control your servo motors. Pololu creates a number of different versions of this controller, and each one is able to control a certain number of servos. In this case, you may want to choose the 18 servo version, so that you can control all 12 servos with one controller, and you may also add an additional servo to control the direction of a camera or sensor. You could also choose the 12 servo version. One advantage of the 18 servo controller is the ease of connecting power to the unit via...
Now that the hardware is connected, you can use some software provided by Polulu to control the servos. Let's do this using your personal computer. First, download the Polulu SW from www.pololu.com/docs/0J40/3.a, and install it based on the instructions on the website. Once it is installed, run the software, and you should see this screen:
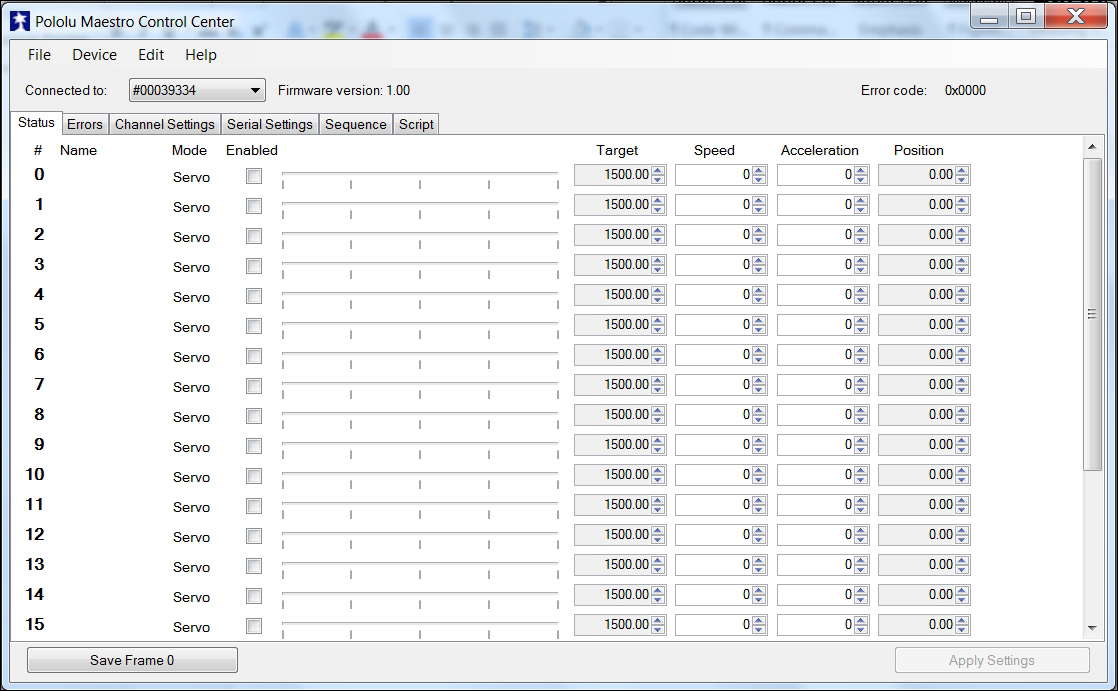
First, you will need to change the configuration in Serial Settings, so select the Serial Settings tabs, and you should see this:

Make sure that USB Chained is selected; this will allow you to connect and control the motor controller over USB. Now, go back to the main screen by selecting the Status tab; now, you can actually turn on the 10 servos. The screen should look like this:
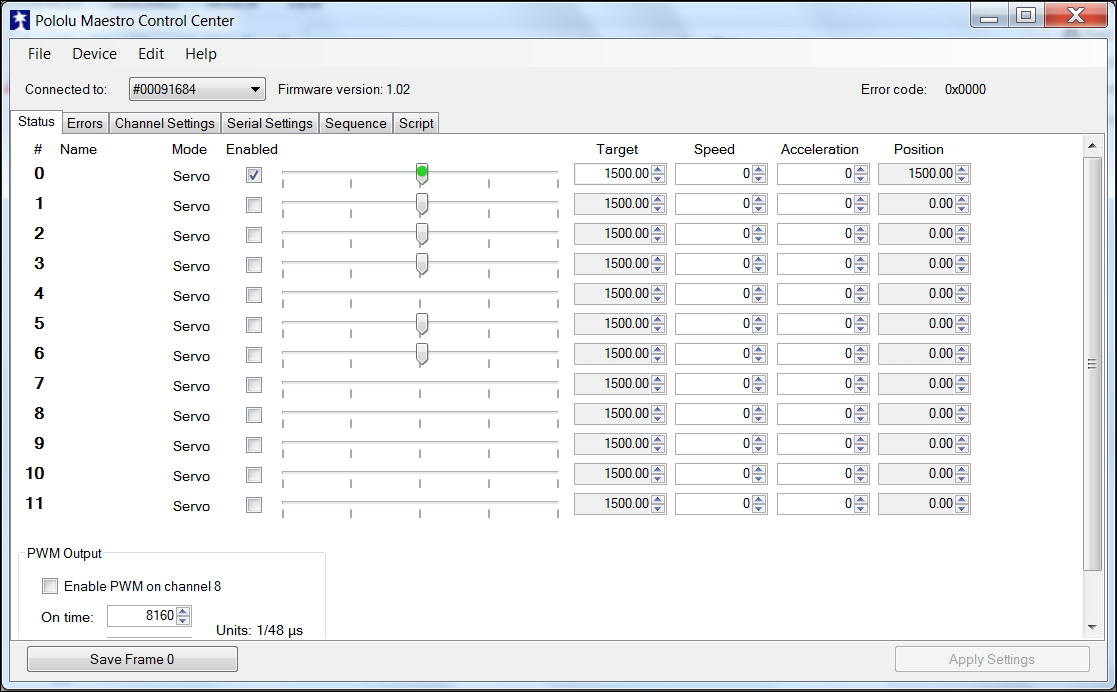
Now you can use the sliders to actually control the servos. Turn on servo 0. Make sure that servo 0 moves the lower-right ankle servo. You can also use this to center the servos. Set servo 1 so that the slider is in the middle. Now...
You've checked the servo motor controller and the servos. You can now connect the motor controller up to the Raspberry Pi and make sure that you can control the servos from it.
Now, let's talk to the motor controller. Here are the steps:
Connect Raspberry Pi to the motor controller by connecting a mini USB to a mini USB cable. Connect the cable to the USB host connection on the Raspberry Pi, like this:

Download the Linux code from Pololu at https://www.pololu.com/docs/0J40/3.b. Perhaps the best way to do this is to log on to your Raspberry Pi and then type
wget http://www.pololu.com/file/download/maestro-linux-100507.tar.gz?file_id=0J315.Then, move the file using
mv maestro-linux-100507.tar.gz\?file_id\=0J315 maestro-linux-100507.tar.gz.Unpack the file by typing
tar –xvf maestro_linux_011507.tar.gz. This will create a directory calledmaestro_linux. Go to this directory by typingcd maestro_linux, and then typels; you should see something...
Now you know that you can talk to your servo motor controller and move your servos. In this section, you'll create a Python program that will let you talk to your servos to move them at specific angles. You can use Python as it is very simple and easy to run.
Let's start with a simple program that will make your legged mobile robot's servos go to 90 degrees (which should be somewhere close to the middle between the 0 to 180 degrees you can set). Here is the code:
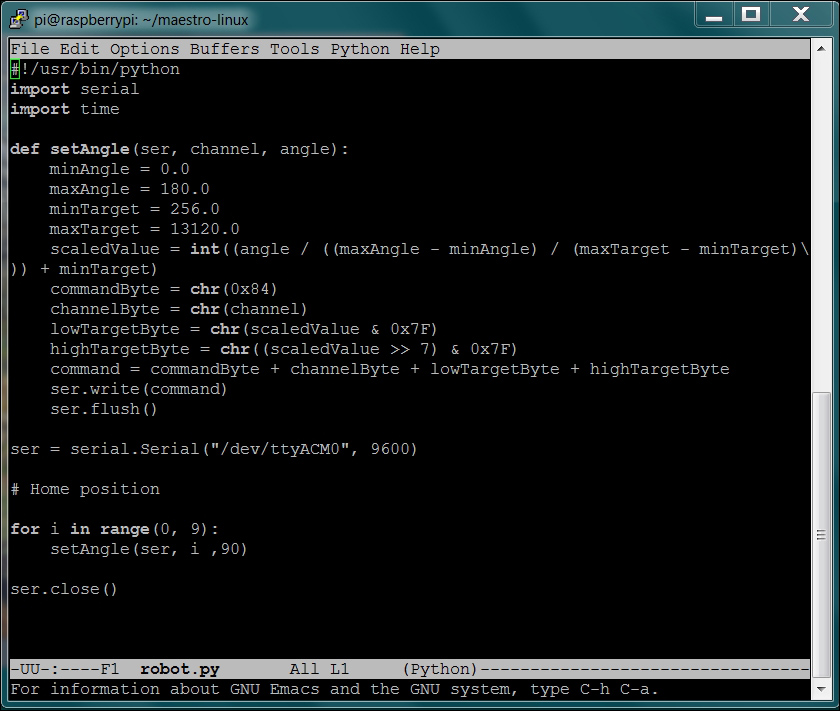
Here is an explanation of the code:
#!/usr/bin/python: This first line allows you to make this Python file execute from the command line.import serial: This line imports the serial library. You need the serial library to talk to your unit via the USB.def setAngle(ser, channel, angle):: This function converts your desired setting of servo and angle into the serial command that the servo motor controller needs. To understand the specifics of the code used to control the servos, refer to https...
The rest of the chapter is locked
You have been reading a chapter from
Raspberry Pi Robotics EssentialsPublished in: Jun 2015Publisher: ISBN-13: 9781785284847
Register for a free Packt account to unlock a world of extra content!
A free Packt account unlocks extra newsletters, articles, discounted offers, and much more. Start advancing your knowledge today.
undefined
Unlock this book and the full library FREE for 7 days
Get unlimited access to 7000+ expert-authored eBooks and videos courses covering every tech area you can think of
Renews at $15.99/month. Cancel anytime