Reader small image

You're reading from  Raspberry Pi Robotic Projects - Third Edition

Product typeBook
Published inOct 2016
Reading LevelBeginner
Publisher
ISBN-139781786467966
Edition3rd Edition
Languages
Concepts
Right arrow
Authors (2):
Richard Grimmett
Richard Grimmett
author image
Richard Grimmett

Dr. Richard Grimmett has been fascinated by computers and electronics from his very first programming project, which used Fortran on punch cards. He has bachelor's and master's degrees in electrical engineering and a PhD in leadership studies. He also has 26 years of experience in the radar and telecommunications industries, and even has one of the original brick phones. He now teaches computer science and electrical engineering at Brigham Young University, Idaho, where his office is filled with his many robotics projects.
Read more about Richard Grimmett

Jon Witts
Jon Witts
author image
Jon Witts

Jon Witts has been working within the IT industry since 2002 and specifically within Educational IT since 2004. He was introduced to Linux back in 2001 through his collaboration with two German artists who were visiting the arts organisation he was then working with. Having studied Fine Arts and Educational Technology and sought to innovate with open and accessible digital technologies within his creative practice, Jon is happiest when deconstructing technology and finding its limits. Jon has embedded within his school the use of Raspberry Pi computers, as an integral part of the delivery of the school's Computer Science curriculum as well as to run various school clubs and projects. Jon is a Raspberry Pi Certified Educator and also helps to organise and run the Hull Raspberry Jam events. I would like to thank my wife, Sally and our three daughters for putting up with all the cables and compoents around the house, and not least for being so tolerant of the need to dodge the robots racing round the kitchen floor!
Read more about Jon Witts

View More author details
Right arrow

Chapter 2. Building Your Own Futuristic Robot

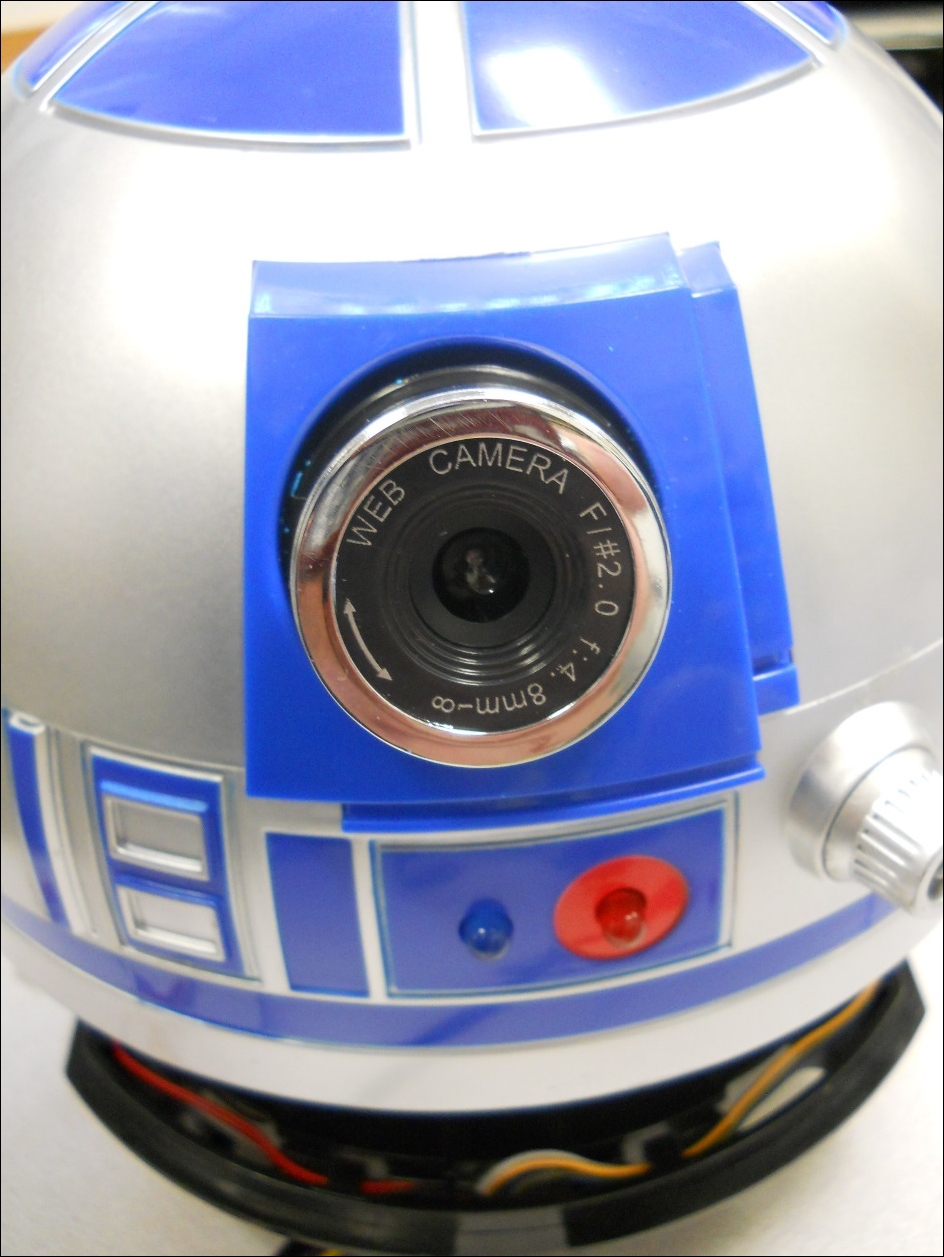
Now that you are up and running, let's start with a simple but impressive project in which you'll take a toy robot and give it much more functionality. You'll start with an R2D2 toy robot and modify it to add a webcam, voice recognition, and motors so that it can get around.

In this chapter, we'll cover the following topics:

  • Using the Raspberry Pi to control two DC motors

  • Hooking up the hardware to make and input sound

  • Using eSpeak to allow our projects to respond with a robot voice

  • Using PocketSphinx to accept your voice commands

  • Using Python and the other tools to interpret commands and initiate actions

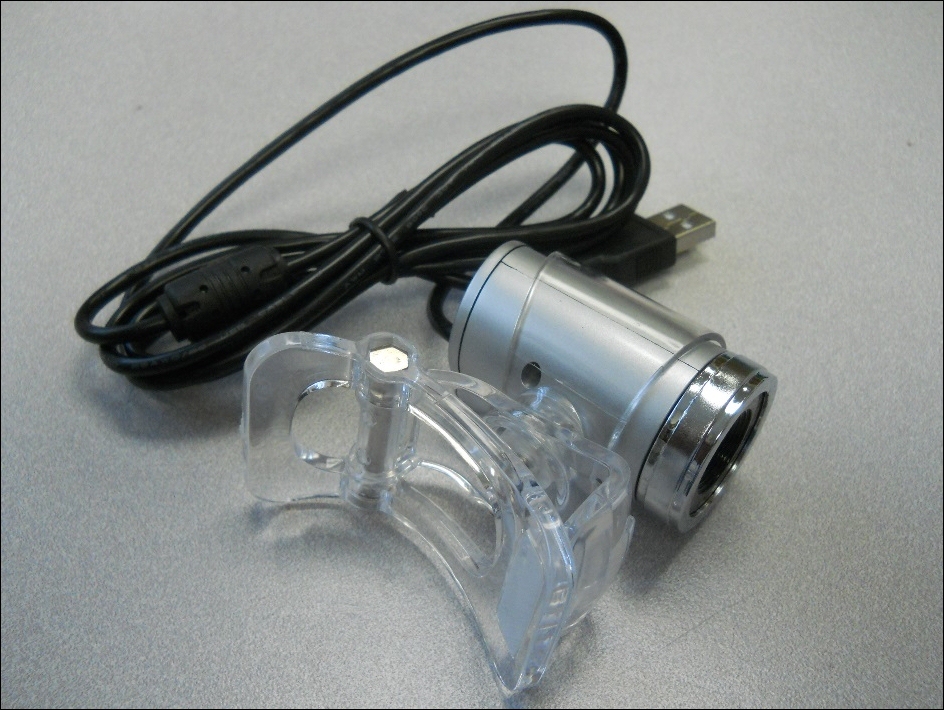
  • Hooking up a USB webcam so that you can add vision to your project

  • Downloading and configuring OpenCV so that your project can use this amazing open source software to detect objects, faces, colors, and motion

Creating your own R2D2 will require a bit of mechanical work; you'll need a drill and perhaps a Dremel tool, but most of the mechanical work will...

Modifying the R2D2


There are several R2D2 toys that can provide the basis for this project. They are available from online retailers. This project will use one that is inexpensive but also provides such interesting features as a top that turns and a wonderful place to put a webcam. It is the Imperial Toy R2D2 bubble machine. Here is a picture of the unit:

The unit can be purchased at websites such as Amazon, Toys R Us, and a number of other e-retailers. It is normally used as a bubble machine that uses a canister of soap to produce bubbles, but you'll take all of that capability out to make your R2D2 much more like the original robot.

Adding wheels and motors

In order to make your R2D2 a reality, the first thing you'll want to do is add wheels to the robot. In order to do this, you'll need to take the robot apart, separating the two main plastic pieces that make up the lower body of the robot. Once you have done this, both the right and left arms can be removed from the body. You'll need...

Controlling R2D2 using the Raspberry Pi in Python


The hardware is ready; now you can access all this functionality from the Raspberry Pi. First, install the library associated with the control board, found at http://www.monkmakes.com/rrb3/. Perform the following steps:

  1. Type cd ~.

  2. Run the command git clone https://github.com/simonmonk/raspirobotboard3.git —this will retrieve the library.

  3. Then type cd raspirobotboard3/python to go to the raspirobotboard3/python directory.

  4. Type sudo python setup.py install—this will install the files.

  5. Now you'll create some Python code that will allow you to access both the DC motor to turn the top and/or light the LED. Here is that code:

#!/usr/bin/python 
import time 
import RPi.GPIO as io 
from rrb3 import * 
 
io.setmode(io.BCM) 
 
forward_pin = 27 
backward_pin = 22 
led1 = 24 
led2 = 23 
 
def forward(): 
    io.output(forward_pin, True) 
    io.output(backward_pin, False) 
 
...

Adding voice recognition


Now that your robot is mobile, it is time to allow your robot to speak and respond to voice commands as well. This will make your R2D2 more interactive. To do this, you'll need to add some hardware. This project requires a USB microphone and a speaker adapter. The Raspberry Pi has an audio output, but does not have an audio input, so you'll need the following three pieces of hardware:

  • A USB device that supports microphone in and speaker out:

  • A microphone that can plug into the USB device:

  • A powered speaker that can plug into the USB device. In particular, you'll want one that has an internal battery that can connect to a USB port for charging, like this:

Fortunately, these devices are very inexpensive and widely available.

Tip

Make sure the speaker is powered because your board will generally not be able to drive a passive speaker with enough power for your applications.

Now, on to allowing the Raspberry Pi access to these devices. You can execute all of the following...

Using eSpeak to allow your robot to speak


Sound is an important tool in our robotic toolkit, but you will want to do more than just play music. Let's make our robot speak. You're going to start by enabling eSpeak, an open source application that provides us with a computer voice. eSpeak is an open source voice generation application. To get this free functionality, download the eSpeak library by typing sudo apt-get install espeak in the prompt. The download may take a while, but the prompt will reappear when it is complete. Now, let's see if our Raspberry Pi has a voice. Type the espeak "hello" command. The speaker should emit a computer-voiced hello. If it does not, check the speakers and the volume level.

Now that we have a computer voice, you may want to customize it. eSpeak offers a fairly complete set of customization features, including a large number of languages, voices, and other options. To access these, you can type in the options at the command prompt. For example, type in espeak...

Using PocketSphinx to accept your voice commands


Now that your robot can speak, you'll want it to also obey voice commands. This section will show you how to add speech recognition to your robotic projects. This isn't nearly as simple as the speaking part, but thankfully, you have some significant help from the open source development community. You are going to download a set of capabilities named PocketSphinx, which will allow our project to listen to our commands.

The first step is downloading the PocketSphinx capabilities. Unfortunately, this is not quite as user friendly as the espeak process, so follow along carefully. There are two possible ways to do this. If you have a keyboard, mouse, and display connected, or want to connect through vncserver, you can do this graphically by performing the following steps:

  1. Go to the Sphinx website hosted by Carnegie Mellon University (CMU) at http://cmusphinx.sourceforge.net/ using a web browser window. This is an open source project that provides...

Interpreting commands and initiating actions


Now that the system can both hear and speak, you'll want to provide the capability to respond to your speech and execute some commands based on the speech input. Next, you're going to configure the system to respond to simple commands.

In order to respond, you're going to edit the continuous.c code in the /home/pi/ pocketsphinx-0.8/src/programs directory. You could create our own C file, but this file is already set up in the makefile system and is an excellent starting spot. You can save a copy of the current file in continuous.c.old so that you can always get back to the starting program, if required. Then, you will need to edit the continuous.c file. It is very long and a bit complicated, but you are specifically looking for the section in the code, which is shown in the following screenshot. Look for the /* Exit if the first word spoken was GOODBYE */ comment line:

In this section of the code, the word has already been decoded and is held...

Adding video capability


No self-respecting R2D2 robot would be complete without the ability to see. Fortunately, your R2D2 has just the right spot for a webcam. Once you remove the bubble blowing port, you have the perfect spot for a round webcam.

Here is a picture of a round webcam, which is available on amazon.com and other online retailers:

Here is a picture of the webcam mounted in the slot:

You now need to connect the USB camera to the USB port of the Raspberry Pi. To access the USB webcam directly on the Raspberry Pi, you can use a Linux program called guvcview. Install this by powering up the Raspberry Pi, logging in, and entering the sudo apt-get install guvcview command.

To try your USB camera, connect it and reboot your Raspberry Pi. To check if the Raspberry Pi has found your USB camera, go to the /dev directory and type ls. You should see something similar to the following screenshot:

Look for video0, as this is the entry for your webcam. If you see it, the system knows your...

Controlling your R2D2 remotely


Now, via vncserver, you can access a video feed and control your robot. Simply access vncserver, open two Terminal windows, and in one Terminal window run camera.py, while in the other Terminal window run r2d2Control.py, like this:

In this instance, there is a third window so that you can use aplay to play R2D2 WAV files that you have downloaded from the Internet. Now you can remotely pilot your R2D2 from a host computer or tablet. If you'd like to do it via a tablet or phone, you'll want to download an SSH app; there are several available from the different app stores. You can use your Wi-Fi settings to connect to the R2D2 access point. Then run the SSH app to access your R2D2 and start vncserver. Then you'll need a vncviewer app; again, there are several available, to access your R2D2 and run a similar configuration from your tablet or phone.

OpenCV is an amazing, powerful library of functions. You can do all sorts of incredible things with just a few lines...

Summary


You've completed your first project, your own R2D2. You can now move it around, program it to respond to voice commands, or run it remotely from a computer, tablet, or phone. Following in this theme, your next robot will look and act like WALL-E.

lock icon
The rest of the chapter is locked
You have been reading a chapter from
Raspberry Pi Robotic Projects - Third Edition
Published in: Oct 2016Publisher: ISBN-13: 9781786467966
Register for a free Packt account to unlock a world of extra content!
A free Packt account unlocks extra newsletters, articles, discounted offers, and much more. Start advancing your knowledge today.
undefined
Unlock this book and the full library FREE for 7 days
Get unlimited access to 7000+ expert-authored eBooks and videos courses covering every tech area you can think of
Renews at $15.99/month. Cancel anytime

Authors (2)

author image
Richard Grimmett

Dr. Richard Grimmett has been fascinated by computers and electronics from his very first programming project, which used Fortran on punch cards. He has bachelor's and master's degrees in electrical engineering and a PhD in leadership studies. He also has 26 years of experience in the radar and telecommunications industries, and even has one of the original brick phones. He now teaches computer science and electrical engineering at Brigham Young University, Idaho, where his office is filled with his many robotics projects.
Read more about Richard Grimmett

author image
Jon Witts

Jon Witts has been working within the IT industry since 2002 and specifically within Educational IT since 2004. He was introduced to Linux back in 2001 through his collaboration with two German artists who were visiting the arts organisation he was then working with. Having studied Fine Arts and Educational Technology and sought to innovate with open and accessible digital technologies within his creative practice, Jon is happiest when deconstructing technology and finding its limits. Jon has embedded within his school the use of Raspberry Pi computers, as an integral part of the delivery of the school's Computer Science curriculum as well as to run various school clubs and projects. Jon is a Raspberry Pi Certified Educator and also helps to organise and run the Hull Raspberry Jam events. I would like to thank my wife, Sally and our three daughters for putting up with all the cables and compoents around the house, and not least for being so tolerant of the need to dodge the robots racing round the kitchen floor!
Read more about Jon Witts