Search icon
Arrow left icon
All Products
Best Sellers
New Releases
Books
Videos
Audiobooks
Learning Hub
Newsletters
Free Learning
Arrow right icon
Raspberry Pi 3 Projects for Java Programmers

You're reading from  Raspberry Pi 3 Projects for Java Programmers

Product type Book
Published in May 2017
Publisher Packt
ISBN-13 9781786462121
Pages 286 pages
Edition 1st Edition
Languages
Authors (3):
Rajdeep Chandra Rajdeep Chandra
John Sirach John Sirach
Profile icon John Sirach
Pradeeka Seneviratne Pradeeka Seneviratne
Profile icon Pradeeka Seneviratne
View More author details

Table of Contents (8) Chapters

Preface Setting up Your Raspberry Pi Automatic Light Switch Using Presence Detection A Social and Personal Digital Photo Frame Integrating a Real-Time IoT Dashboard Wireless Controlled Robot Building a Multipurpose IoT Controller Security Camera with Face Recognition

Wireless Controlled Robot

Raspberry Pi-based robotic applications have become more popular because it is more than powerful enough to control a robot with a range of embedded operating systems. The Raspberry Pi is physically small in size and allows you to build more compact robots by attaching various sensors and actuators. The behavior of a robot can be simple (move forward or turn left) to complex (line following or solving a maze) depending on the problem it has to solve.

Pololu (https://www.pololu.com) provides series of do-it-yourself robotic chassis kits such as Romi, Zumo, 3pi, and Tamiya. In this chapter, we will be choosing the Zumo chassis kit to build our Raspberry Pi-based wirelessly-controlled Zumo robot because it is cheap, easy to assemble, and easy to use.

In this chapter, you will:

  • Learn how to assemble the Zumo chassis kit with motors (external reference)
  • Assemble the Raspberry Pi 3 and motor...

Prerequisites

Let's get started by preparing our tool box with the following hardware:

The Zumo chassis kit

The Pololu Zumo chassis is a small, tracked robot platform, less than 10 cm on each side. It allows you to build custom robotic applications by connecting a variety of Micro Metal Gear motors to get a combination of torque and speed. The Zumo chassis can be purchased as a kit to build our Raspberry Pi wireless controlled robot.

The Zumo Chassis Kit contains the following mechanical components, shown in Figure 5-1:

  • Zumo chassis main body
  • 1/16″ black acrylic mounting plate
  • Two drive sprockets
  • Two idler sprockets
  • Two 22-tooth silicone tracks
  • Two shoulder bolts with washers and M3 nuts
  • Four 1/4″ #2-56 screws and nuts
  • Battery terminals
Figure 5-1: Zumo chassis kit components. Image credits: Courtesy of Plololu (https://www.pololu.com)

Assembling Zumo chassis

...

Writing your Java program

Open the NetBeans IDE and create a new project named ZumoRobot.

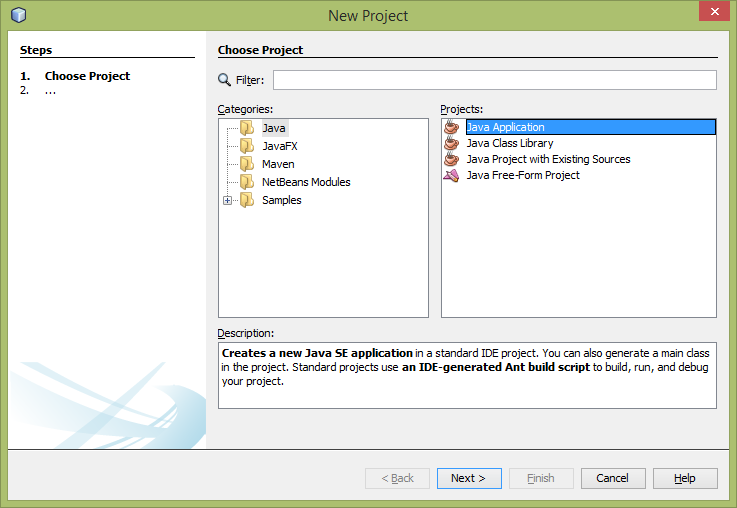
  1. In the menu bar, click File|New Project. The New Project wizard will appear. In the New Project wizard, click on Java under Categories and click on Java Application under Projects. Then click the Next button:
Figure 5-20: Creating ZumoRobot project with NetBeans IDE - step 1. Image credits: Courtesy of Adafruit (https://www.adafruit.com/)
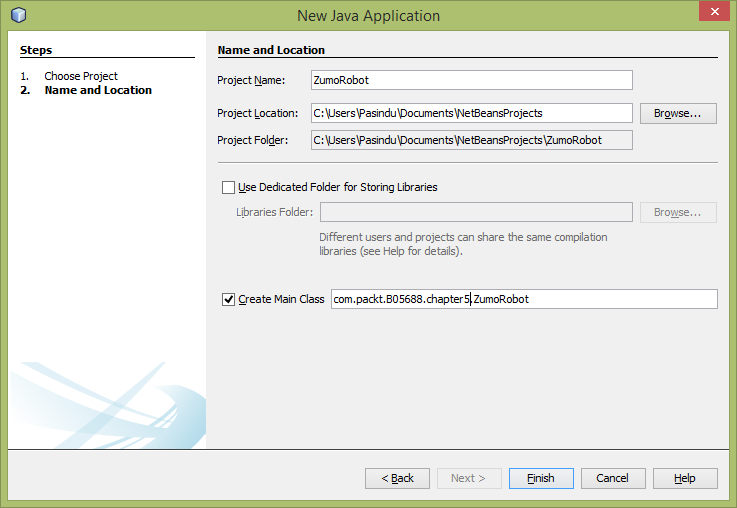
  1. In the Name and Location step, type ZumoRobot for the Project Name and com.packt.B05688.chapter5.ZumoRobot for the Create Main Class. Click the Finish button to create the project:
Figure 5-21: Creating ZumoRobot project with NetBeans IDE - step 2. Image credits: Courtesy of Adafruit (https://www.adafruit.com/)
  1. The NetBeans IDE will create a file named ZumoRobot.java and the project environment for you.
  2. To work with Raspberry Pi GPIO pins, you should add the Pi4j library to your...

Running and testing your Java program

First, insert four rechargeable NiMH AA batteries into the battery compartment of the Zumo chassis. Then take the USB battery pack, shown in Figure 5-22, to power your Raspberry Pi:

Figure 5-22: USB battery pack for Raspberry Pi - 10000mAh - 2 x 5V outputs

The ROMOSS USB battery pack has two USB A ports for regulated 5V output. The port placed on top can provide 1 A and the bottom one can provide 2 A. Make sure to use the 2 A USB port marked with double flash icons to power the Raspberry Pi (Figure 5-23). Now connect the USB battery pack to the Raspberry Pi using the micro USB cable:

Figure 5-23: 2A output marked with double flash icons
  1. Using the NetBeans IDE, build the Java project ZumoRobot by clicking Run|Bulid Project (ZumoRobot) in the menu bar or pressing F11 on your keyboard. Fix any errors you encountered during the build process. After successfully building the...

Summary

In this chapter, you have learned how to build a wirelessly-controlled robot with the Zumo chassis kit. The quick learning curve presented how to assemble the Zumo chassis kit with the Raspberry Pi 3 and a motor driver to drive two gear motors and form the engine. Also, you connected to the robot using the PuTTY terminal installed on your computer with SSH. The built-in Wi-Fi module of the Raspberry Pi 3 allowed you to connect wirelessly from your computer, and then you execute the jar file located in the SD card of the Pi through SSH, using the keyboard.

You can connect an external Wi-Fi antenna to the Raspberry Pi 3 to achieve long-range connectivity with your Wi-Fi network, but it will violate FCC regulations.

The Chapter 6, Building a Multipurpose IoT Controller, shows how to build a multipurpose IoT controller with simple web services and a SQLite database. This project allows you to gather and store...

lock icon The rest of the chapter is locked
You have been reading a chapter from
Raspberry Pi 3 Projects for Java Programmers
Published in: May 2017 Publisher: Packt ISBN-13: 9781786462121
Register for a free Packt account to unlock a world of extra content!
A free Packt account unlocks extra newsletters, articles, discounted offers, and much more. Start advancing your knowledge today.
Unlock this book and the full library FREE for 7 days
Get unlimited access to 7000+ expert-authored eBooks and videos courses covering every tech area you can think of
Renews at $15.99/month. Cancel anytime}