Reader small image

You're reading from  QlikView Server and Publisher

Product typeBook
Published inJan 2014
Publisher
ISBN-139781782179856
Edition1st Edition
Right arrow
Author (1)
Stephen Redmond
Stephen Redmond
author image
Stephen Redmond

Stephen Redmond is the CTO and Qlik Luminary at CapricornVentis - a QlikView Elite Partner. He is the author of several books, including QlikView for Developers Cookbook and QlikView Server and Publisher, both published by Packt Publishing. He is also the author of the popular DevLogixseries for SalesLogix developers. In 2006, after many years of working with CRM systems, reporting and analysis solutions, and data integration, Stephen started working with QlikView. Since then, CapricornVentis has become QlikView's top partner in the UK and Ireland territories, and with Stephen as the head of the team, they have implemented QlikView in a wide variety of enterprise and large-business customers across a wide range of sectors, from public sector to financial services to large retailers. In 2014, Stephen was awarded the Luminary status by Qlik in recognition of his product advocacy. He regularly contributes to online forums, including the Qlik Community.
Read more about Stephen Redmond

Right arrow

Chapter 5. Installing QlikView Server Enterprise

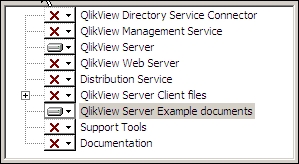
QlikView has spread extensively into enterprise accounts over the last several years. To serve large applications and a large user population, one server with all of the services running on it will not be sufficient. Therefore, we need to think about deploying services on different servers.

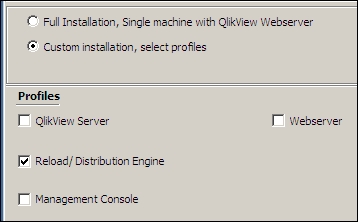
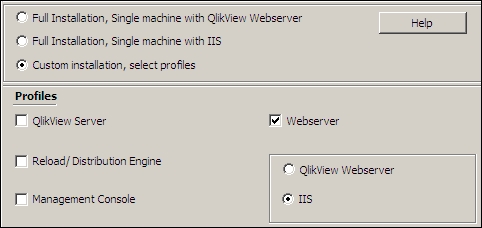
In a multiserver environment, QlikView Server should sit on its own server to give it maximum access to the hardware resources, without having to share those resources with other services.

For resilience, QlikView Server can be deployed on several servers with a shared document store and shared licenses. In the default configuration for a cluster, the QlikView Web Server service can query the QlikView servers for resource-load information and make the intelligent choice as to which QlikView Server in the cluster will serve the document to an user. If one of the servers in the cluster goes down, the other servers will pick up its load.

The demonstration in...

Installing the QMS and DSC service


A domain user called QVService has been established on the domain and has been added to the local administrators group on Server1, and then logged in before starting the installation. It is not critical, but I generally recommend logging in as this user to perform the installation.

These are the steps to install the QlikView Management Service (QMS) and Directory Services Connector (DSC) services on Server1:

  1. Locate the installation file on the server, QlikViewServer_xYYSetup.exe (YY is 32 bit or 64 bit depending on the server), and double-click on the file to kick it off.

  2. Click on Next > through all of the dialogs, as previously shown, until you arrive at the Profiles screen. Select the Custom installation, select profiles option. The different profile options become available on the screen.

    We will not be using these profiles right now (clicking on the Help button will tell you what each profile does), because they do not exactly match our requirement to...

Testing the services installation


By selecting the Use digital certificates option in the installation process, some configuration changes will have been made. We can check them now.

QMC config

Locate the QVManagementService.exe.config file, which is colocated with the QVManagementService.exe file. By default, this will be installed at C:\Program Files\QlikView\Management Service, but that depends on the installation location chosen earlier.

Open this file in Notepad or any other text editor, look for the UseWinAuthentication entry, and double-check that it is set to false.

Tip

Ignore this check if you went for the Use QlikView Adminstrators Group option. However, if this is not false (perhaps, because it is an existing installation or you accidentally chose Use QlikView Adminstrators Group instead of Use digital certificates during the installation), then you can manually set the value in the file, but you will need to stop the service first. Alternatively, you can do a quick uninstall and re...

Establishing the shared folder


For QlikView clustering, the server root and document folders must be on a shared folder, so that all members of the cluster will have access to the same documents. This share must be from a Windows Server—folders shared directly from SAN or NAS devices are not supported. If you are using a SAN device, it must be mounted to a Windows Server and the folders must be shared from this Server.

For our purpose, using Server1 to host this share will be ideal. It is critical, however, that there be extremely low latency between this share and the QlikView Servers, which are writing to and reading from the files. Effectively, this means that the cluster servers and the share server must be colocated on the same fast network.

Tip

If you want to have servers in different countries to improve the speed for users in those countries, then clustering will not be the correct solution. Instead, you will have to deploy standalone servers in the different countries, and use QlikView...

Installing the QVS service


As mentioned earlier, it is generally recommended to log in as the QVService user to perform the installation. Again, we need to take custom options for the installation, as the default profile for QlikView Server also includes the Directory Service Connector.

Let us now install the QVS services on Server2 and Server3, as shown in the following steps:

  1. As before, locate the installation file on the server, and double-click on the file to kick it off.

  2. Follow the prompts until you get to the Profiles screen. As before, select the Custom installation, select profiles option, and then click on the Config button. Deselect everything except QlikView Server and, optionally, QlikView Server Example documents (although, the only purpose here would be to extract them from the installer as reference documents). Click on Next.

  3. Enter the QVService user credentials and click on Next. As before, on the Service Authentication screen, select the Use digital certificates option, and...

Testing the QVS installation


As before, the base configuration to support the certificate authentication should have been established during the installation; so, this is just a quick test to ensure that all is OK.

The Settings file

Locate the Settings.ini file in the ProgramData\QlikTech\Server folder.

Check the EnableSSL setting is set to 1 (EnableSSL = 1). If this is not set to 1, it means that either something has gone wrong in the installation, or you have missed a step above. You should perform a quick uninstall and retry the installation with the correct options.

Installing the QDS (Publisher) service


As earlier, log in as the QVService user for this installation.

These are the steps to install the QDS service on Server4:

  1. As before, locate the installation file on the server, and double-click on the file to kick it off. Follow the prompts until you get to the Profiles screen.

  2. This time, we can just click on the Reload/Distribution Engine option under Profiles. Click on Next.

  3. Enter the credentials as before, click on Next, and then select Use digital certificates. Click on Next, and then click on Install.

  4. Once the installation is complete, restart the server.

Testing the QDS installation


Again, the base configuration to support the certificate authentication should have been established during the installation; so, this is just a quick test to ensure that all is OK.

QDS config

Locate the QVDistributionService.exe.config file, which is colocated with the QVDistributionService.exe file. By default, this will be located at C:\Program Files\QlikView\Distribution Service.

Again, double-check that the UseWinAuthentication entry is set to false.

Creating the Publisher folders


The Publisher server will perform all of the reloads and then distribute the final QVW files to QlikView Server. So, while we only need the UserApp folders on the QVS, we will need all of the folder sets (as discussed in the QVS folder structure section in Chapter 3, Exploring the QlikView Management Console in Detail) on the Publisher.

Follow these steps to establish the Publisher folders:

  1. Connect to the QDS server (Server4).

  2. Create a new folder on the server named QVP. As with the server folders on Server1, the owner of this folder should be the QVService user (default if you are logged in as this user when creating the folder), and the QVService user should have full read-and-write access to the folder.

  3. Create a subfolder in this folder named Sales. Within Sales, create subfolders named UserApp, Loader, QVD, and Sources.

  4. Create a new folder under QVP named Finance, and create the same set of subfolders as per the Sales folder. Repeat the same for HR. Essentially...

Installing the QlikView Web Service on IIS


Because our Web Service is standalone, and not a part of the domain, we cannot use the same QVService domain user that we used on all of the other servers. Instead, I have created a local user on that server called QVService.local, which will run the services. This user is added to the local administrators group on Server5.

These are the steps to install the Web Service on IIS on Server5:

  1. As before, locate the installation file on the server, and double-click on the file to kick it off. Follow the prompts until you get to the Profiles screen, as follows:

  2. Note that the installer has added options for IIS, as it has detected that IIS is installed on the server. Select the Webserver option under Profiles, and then select the IIS option. Click on Next .

  3. On the website screen, select the website that you are going to install. If there is only one website, select the Default Web Site option. Click on Next.

  4. Enter the credentials for the local QVService user...

Testing the web installation


There are a few items that we need to check, to confirm that the Web Services are all configured correctly.

QSS config

When QlikView is installed on IIS, a new service called QlikView Settings Service (QSS) is installed to manage the settings via QMS. This service works off the same ports as QVWS.

Locate the QVWebServerSettingsService.exe.config file, which is colocated with the QVWebServerSettingsService.exe file. By default, this will be located at C:\Program Files\QlikView\Server\Web Server Settings.

As before, double-check that the UseWinAuthentication entry is set to false.

IIS settings

In IIS, an application pool is a collection of resources and settings that can be shared by different web applications. The installation should have added one application pool, QlikView IIS. It should also have created four virtual folders.

Check in the application pools for the website to ensure there is a new application pool called QlikView IIS. This should be a v4.0 Framework...

Connecting servers to QMS


When you install all of the services on one box, they are all automatically connected to QMS. In this case, we have installed services on several servers; so, we must tell the QMS where each of the services are located. We will also need to establish secure connections using certificates.

Directory Service Connector

We installed the DSC on the same server as the QMS, so that the service will already have the same server certificates as that of QMS.

A quick way to confirm that this is running using certificates is to use Internet Explorer to connect to the service address, and confirm that you get a WSDL(Web Services Description Language) response. The service address on Server1 is https://server1:4730/DSC/Service.

Without certificates, the service address for the DSC will be http://server1:4730/DSC/Service. This address should fail to connect when certificates are in use.

QlikView Servers

Now, we need to attach two servers. We will attach and configure the first for the...

Summary


There has been quite a bit of information in this chapter. We have installed different services on multiple servers, and made sure they can communicate without having to be part of the same domain.

It is important to understand that while this is a good option for implementing QlikView across multiple servers, it is possible to implement on fewer servers (as we have seen in Chapter 2, Standard Installation Process, we can implement all of them on only one server) by selecting different custom options during installation, and configuring the correct options within the QMC. In this demonstration, we looked at installing only one web server, but we can have as many as we need. Often, companies will install two or three web servers, and use a Network Load Balancer (NLB) device to control which web server a user connects to.

In the next chapter, we will look in detail at the Publisher settings and how to configure different reload options.

lock icon
The rest of the chapter is locked
You have been reading a chapter from
QlikView Server and Publisher
Published in: Jan 2014Publisher: ISBN-13: 9781782179856
Register for a free Packt account to unlock a world of extra content!
A free Packt account unlocks extra newsletters, articles, discounted offers, and much more. Start advancing your knowledge today.
undefined
Unlock this book and the full library FREE for 7 days
Get unlimited access to 7000+ expert-authored eBooks and videos courses covering every tech area you can think of
Renews at $15.99/month. Cancel anytime

Author (1)

author image
Stephen Redmond

Stephen Redmond is the CTO and Qlik Luminary at CapricornVentis - a QlikView Elite Partner. He is the author of several books, including QlikView for Developers Cookbook and QlikView Server and Publisher, both published by Packt Publishing. He is also the author of the popular DevLogixseries for SalesLogix developers. In 2006, after many years of working with CRM systems, reporting and analysis solutions, and data integration, Stephen started working with QlikView. Since then, CapricornVentis has become QlikView's top partner in the UK and Ireland territories, and with Stephen as the head of the team, they have implemented QlikView in a wide variety of enterprise and large-business customers across a wide range of sectors, from public sector to financial services to large retailers. In 2014, Stephen was awarded the Luminary status by Qlik in recognition of his product advocacy. He regularly contributes to online forums, including the Qlik Community.
Read more about Stephen Redmond