Reader small image

You're reading from  OpenCV 3.0 Computer Vision with Java

Product typeBook
Published inJul 2015
Reading LevelIntermediate
Publisher
ISBN-139781783283972
Edition1st Edition
Languages
Tools
Right arrow
Author (1)
Daniel Lelis Baggio
Daniel Lelis Baggio
author image
Daniel Lelis Baggio

Daniel Lélis Baggio has started his works in computer vision through medical image processing at InCor (Instituto do Coração – Heart Institute) in São Paulo, Brazil, where he worked with intra-vascular ultrasound (IVUS) image segmentation. After that he has focused on GPGPU and ported that algorithm to work with NVidia's Cuda. He has also dived into 6 degrees of freedom head tracking with Natural User Interface group through a project called EHCI (http://code.google.com/p/ehci/ ). He also wrote “Mastering OpenCV with Practical Computer Vision Projects” from Packt Publishing.
Read more about Daniel Lelis Baggio

Right arrow

The Java OpenCV project in Eclipse


Using OpenCV in any IDE is pretty simple. It is as simple as adding OpenCV JAR, that is, opencv-300.jar to your classpath. But, as it relies on the native code, you need to point out the dynamic link libraries—so for Linux, .dll for Windows, and dylib for MacOsX.

  1. In Eclipse, go to File | New | Java Project.

  2. Give the new project a descriptive name, such as SimpleSample. Select the project in the Package Explorer, go to the Project menu and click on Properties. On the Java Build Path tab, go to the Libraries tab, and click on the Add Library… button on the right-hand side, as shown in the following screenshot:

  3. Select User Library in the Add Library dialog, and then click Next.

  4. Now, click on the User Libraries… button.

  5. Click on New…. Name your library appropriately, for example, opencv-3.0.0. It's time to reference the JAR files.

  6. Click on Add JARs….

  7. Select the opencv-300.jar file in your filesystem; it should be in the opencv\build\java folder. Then, point to the native library location expanding your JAR as in the following screenshot:

  8. Now, select Native library location by clicking on the Edit… button on the right-hand side of the window and set your native libraries' location folder, for example, opencv\build\java\x64\.

  9. Now that OpenCV is properly configured, just select it in your Add library dialog by pressing Finish.

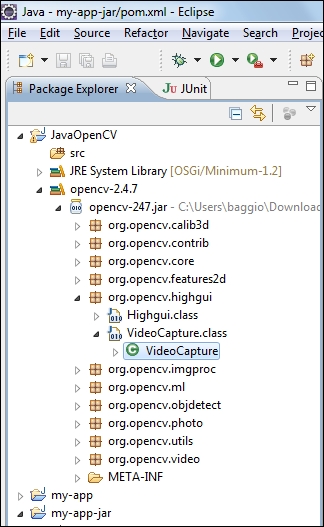
Notice that your project now points to the OpenCV JAR. You can also browse the main classes from the Package Explorer, as seen in the following screenshot:
After the The NetBeans configuration section, a source code to create a simple OpenCV application can be found.

Previous PageNext Page
You have been reading a chapter from
OpenCV 3.0 Computer Vision with Java
Published in: Jul 2015Publisher: ISBN-13: 9781783283972
Register for a free Packt account to unlock a world of extra content!
A free Packt account unlocks extra newsletters, articles, discounted offers, and much more. Start advancing your knowledge today.
undefined
Unlock this book and the full library FREE for 7 days
Get unlimited access to 7000+ expert-authored eBooks and videos courses covering every tech area you can think of
Renews at $15.99/month. Cancel anytime

Author (1)

author image
Daniel Lelis Baggio

Daniel Lélis Baggio has started his works in computer vision through medical image processing at InCor (Instituto do Coração – Heart Institute) in São Paulo, Brazil, where he worked with intra-vascular ultrasound (IVUS) image segmentation. After that he has focused on GPGPU and ported that algorithm to work with NVidia's Cuda. He has also dived into 6 degrees of freedom head tracking with Natural User Interface group through a project called EHCI (http://code.google.com/p/ehci/ ). He also wrote “Mastering OpenCV with Practical Computer Vision Projects” from Packt Publishing.
Read more about Daniel Lelis Baggio