Reader small image

You're reading from  Mastering Sublime Text

Product typeBook
Published inDec 2013
PublisherPackt
ISBN-139781849698429
Edition1st Edition
Right arrow
Author (1)
Dan Peleg
Dan Peleg
author image
Dan Peleg

Dan Peleg is an accomplished software engineer. As a former developer in the Israeli Intelligence Force, he holds extensive experience in both defense and robotic industries, and has previously lectured at DefCon conventions. Dan has developed unique algorithms for robotic platforms, specializes in a variety of software platforms, and currently works as the CTO for an American startup company.
Read more about Dan Peleg

Right arrow

Chapter 8. Developing Your Own Plugin

This chapter takes you step-by-step through the process of developing a plugin for Sublime Text and publishing it to the community. In this chapter we will cover the following topics:

  • Warming up before starting a plugin

  • Starting a plugin

  • Developing the plugin

  • Publishing our plugin

Warming up before starting a plugin


We have seen that plugins can be very helpful in many situations, so it's time for us to develop our own! Before starting, we need to know a few things; the first is an idea for a plugin. In our case, we will develop a Ruby on Rails plugin that will help us identify relationships between ActiveRecord models. ActiveRecord models can define relationships with other ActiveRecord models that are defined across different files, creating a plugin that will automatically open all the related files. This plugin can be very helpful for a Rails developer.

It is also important to have the Sublime Text API open simultaneously. It can be found at http://www.sublimetext.com/docs/3/api_reference.html. Lets not forget a name for our plugin! In our case, we will call the plugin RelationsFinder. The Default Packages folder is full of useful open source plugins with code snippets and examples.

Starting a plugin


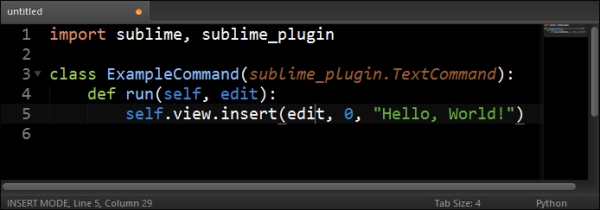
Sublime can generate a plugin template for us. To generate a plugin, navigate to Tools | New Plugin…. Then we should see a screen similar to that shown in the following screenshot:

The previous screenshot is what a "Hello, World!" plugin looks like. Before starting to write our own code, let's test the following code by saving the file by pressing Ctrl + S on Windows or Linux and Command + S on OS X. The Save dialog will open in the Packages/User folder. We don't have to save the file there. We will browse one folder up and create a new folder named RelationsFinder. Now let's save the file as RelationsFinder.py. The filename doesn't really matter, but the convention is that the file name should be the same as the plugin name. After we've saved the plugin, let's try running it. To run the file, we'll need to open the console by pressing Ctrl + ` on Windows or Linux and Control + ` on OS X. Enter the following line in the console to test your new plugin:

view.run_command('example...

Developing the plugin


Now that we have a plugin with a basic command that shows up in the command palette, we can start developing our plugin; we'll start with hiding the command when it's unusable. We'll do it by overriding the is_visible function and checking that the current file extension is .rb and the first line contains a ActiveRecord::Base inheritance. Let's import the python os lib by adding import os below the import sublime line. Add the following to our command:

def is_visible(self):
   view = self.window.active_view()
   file_name, file_extension = os.path.splitext(view.file_name())
   return file_extension == ".rb" and "ActiveRecord::Base" in view.substr(view.line(0))

When the command palette is being opened, it will run all the is_visible functions of all the exposed commands to check whether or not they should be shown. We are checking whether or not the current view (file) extension is set as .rb and the first line of the file contains ActiveRecord::Base and only if both conditions...

Publishing our plugin


We are going to publish our plugin to Package Control, so everyone can download and install it. To publish our plugin, we'll need to have git installed on our system and a GitHub account. Let's first start by creating a repository for our plugin and committing all files to it by running the following commands in the plugin folder:

git init
git add .
git commit –m "Initial Commit"

Create a new public repository in GitHub by going to http://github.com/new and pushing our local repository there by running:

git remote add origin https://github.com/USERNAME/REPO-NAME.git
git push -u origin master

In the preceding code, USERNAME is your username and REPO-NAME is the repository name you just created. GitHub will prompt you for the username and password.

Tip

You can also add a README.md file to your repository.

Now for the tricky part: we'll need to select Fork on the https://github.com/wbond/package_control_channel page, as shown in the following screenshot:

After forking, we...

Summary


By the end of this chapter, we have developed a simple plugin and published it for the public so that everyone can install it using Package Control!

It is important to know that plugins can have a lot more complicated features and that the Sublime API reference is full of useful functions that help us develop awesome plugins.

That's it; you are now Master of Sublime Text! We would love to see your plugins on the Web.

lock icon
The rest of the chapter is locked
You have been reading a chapter from
Mastering Sublime Text
Published in: Dec 2013Publisher: PacktISBN-13: 9781849698429
Register for a free Packt account to unlock a world of extra content!
A free Packt account unlocks extra newsletters, articles, discounted offers, and much more. Start advancing your knowledge today.
undefined
Unlock this book and the full library FREE for 7 days
Get unlimited access to 7000+ expert-authored eBooks and videos courses covering every tech area you can think of
Renews at $15.99/month. Cancel anytime

Author (1)

author image
Dan Peleg

Dan Peleg is an accomplished software engineer. As a former developer in the Israeli Intelligence Force, he holds extensive experience in both defense and robotic industries, and has previously lectured at DefCon conventions. Dan has developed unique algorithms for robotic platforms, specializes in a variety of software platforms, and currently works as the CTO for an American startup company.
Read more about Dan Peleg