

When the card is ready, an Explorer window might appear, and the IoT Desktop window gives you instructions to remove the card and insert it into your device. Do so, and make sure you connect your device correctly. Then power it on. Meanwhile, go to the My Devices view in the IoT Dashboard. It might take a short while to boot the device up the first time. Don't worry, after first-time initialization, your Raspberry Pi, with Windows 10, should appear. This process can take from a couple of minutes to a quarter of an hour, depending on the memory card used:

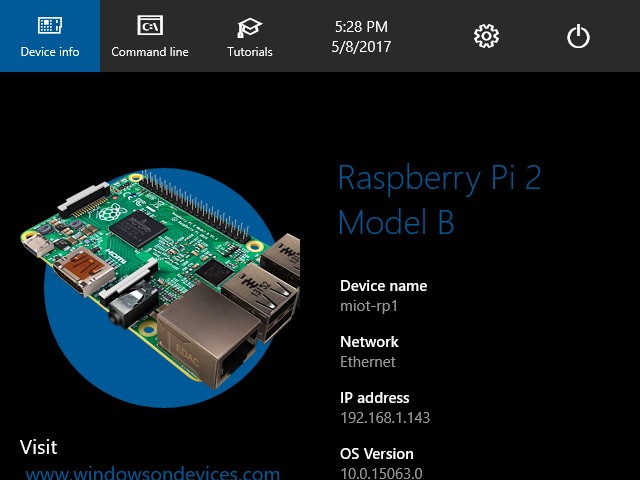
Device ready for use
When the device appears in your list of devices, right-click on it, and select Open in Device Portal. Your browser should open and prompt you to login. The username is Administrator. Enter the password you provided when you prepared your memory chip.
The Device Portal is a very handy and powerful web portal for your device. In it you can:
- Configure basic device settings (you should update your
time zoneat this point). - Update your password.
- Remotely view what's on the screen. This will come in handy, especially for devices that are not connected to monitors. Press the
Capture Screenshotbutton to try this out. - Control installed apps.
- Access files.
- View processes and system performance.
- Access a command prompt.
- Access debugging tools.
- Control system devices.
- Manage network connectivity.
- Update Windows (make sure you have the latest version by clicking on the
Check for updatesbutton):
Windows 10 start screen
Note
Since the Device Portal is so powerful and only protected by a simple username and password, of which the username is known beforehand, you need to take extra care by protecting it from outside access. Always keep your devices protected by firewalls. Don't allow anybody on the outside to connect to your devices, unless you have full control of what happens, and can make appropriate security decisions. We will present methods in this book, allowing you to develop IoT applications that will allow outside access in a simple way, but not through connecting to the device directly. This is much more secure. Using these techniques avoids risking the device needlessly.
In projects where you want to use the Arduino in conjunction with the Raspberry Pi, you typically use an Arduino board that is mounted on top of the Raspberry Pi. This board also needs to be prepared. You do this using the Arduino IDE software, which can be downloaded from this link: https://www.arduino.cc/en/Main/Software. There are setup applications for Windows, Linux, and MAC.
To access analog sensors on a Raspberry Pi, you need to add circuitry supporting serial communication to your board since it's not supported by default. One way is to use I2C or SPI circuits with analog to digital converters. Another way, which we explore in this book, is to use an Arduino board. The Arduino is a programmable chip, and, as such, you can program your own firmware with your own serial protocol inside. A simpler method, is to use the well-used and battle-tested Firmata protocol. Software for this already exists, and is available in the Arduino IDE directly. Libraries for Firmata exist in many languages.
To install Firmata on your Arduino board, simply follow the following procedure:
- Connect your Arduino board to your PC using a short USB cable.
- Load the Firmata application into the IDE. This is done by selecting
File, thenExamples,FirmataandStandard Firmatafrom the menu in the Arduino IDE. - Specify the serial port you connected the Arduino board to. This is done under
ToolsandPortin the Arduino IDE.
- Next you need to specify the type of Arduino you're using. If using an Arduino Starter Kit, the name should be listed in the specification. You select the board under
ToolsandBoardin the Arduino IDE. - Finally, you upload the firmware to the Arduino board. You do this by clicking on the
Uploadbutton, formed as an arrow.
Note
If unsure about what type of Arduino you've connected, try the Tools and Get Board Info command.
Your Arduino board is now prepared with the Firmata firmware. You can close the Arduino IDE. You will not use it any more in this book.
Without disconnecting your Arduino board from your PC, you can test that it works as it should. Since the Firmata protocol is well known, there exist a lot of applications on varying operating systems, that can read sensors and control devices connected to the Arduino. Since we demonstrate Windows 10 in this book, you can use the Windows Remote Arduino Experience App for this purpose. It can be downloaded at https://www.microsoft.com/sv-se/store/p/windows-remote-arduino-experience/9nblggh2041m.
To test this software, we also need to connect some devices to it for testing. Let's connect our light sensor, PIR sensor, and relay module to it to see if we can access them. Make sure to connect ground, power and signal correctly. Also make sure to differentiate between digital pins and analog pins on your Arduino board. For the purposes of our example, I connected the PIR sensor to digital pin 8, and the relay to digital pin 9. The light sensor was connected to the analog pin A0.
Note
In my Starter Kit, ground (GND or -) is always black, power (3.3V, 5V or +) is always red. Analog pins are colored blue, while digital are colored green.While digital pins 0 and 1 can be used on some Arduino boards for general purpose input and output, other boards use them for serial communication only. That's why we've selected pins 8 and 9 instead of 0 and 1.Also, consider using anantistatic wrist strapto protect your hardware from electrostatic discharges.
When opening the Windows Remote Arduino Experience App, you must first choose how the app will communicate with your Arduino board. Since it's connected to a USB port, select USB in the Connection box, and select a communication speed of 57600 baud. Next, the app makes a search, and a list of devices will be presented. The Arduino board should appear. Select it and click the Connect button.
You should now be able to interact with the hardware you connected. First go to the Analog tab. Set the A0 pin to Input, and then watch how the value changes as you cover or illuminate the sensor accordingly:
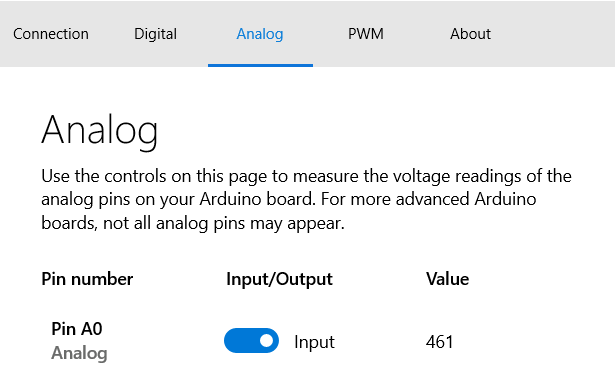
Analog peripherals
Similarly, on the Digital tab, set the 8 pin to Input. Move your hand in front of the PIR sensor to activate it, and watch how the value jumps to a high voltage level. Set the 9 pin to Output and control it by setting the value correspondingly. You should hear the relay clicking as it changes position:
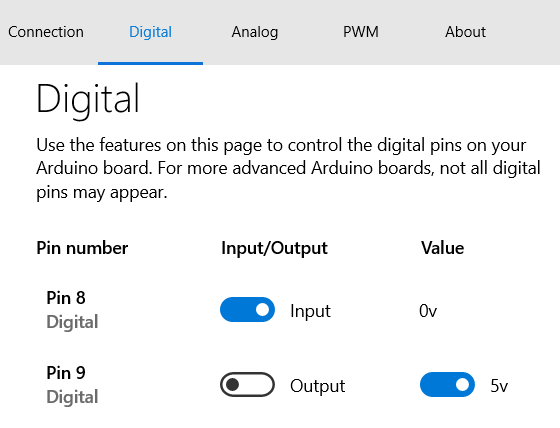
Digital peripherals
Now that you know your Arduino is programmed correctly, and that values are reported as they should be over the USB serial cable, you're ready to start programming.
You're now ready to start actual coding. The first step is to choose a development environment. Since this book focuses on C# and .NET, including .NET Core 2, an obvious choice is to use Visual Studio. But it's not your only option.
For .NET Core development, you can also choose to use Roslyn, which, apart from being open source, can also be run directly on Windows 10 IoT Core, including the version we use on the Raspberry Pi. For more information about Roslyn, see https://msdn.microsoft.com/magazine/mt808499.
Another option, is to use Xamarin Studio. It's a development tool focusing on cross platform development using C#. With Xamarin you can develop applications for IoT devices, smart phones and tablets, as well as PCs using the same code base. It runs on both Windows and MAC. The community-edition is free. For more information, see https://www.xamarin.com/studio.
Since Microsoft acquired Xamarin, its cross-platform capabilities are also available in Visual Studio. A free version also exists. And Visual Studio can be run on MACs. The examples published in this book have been developed using Visual Studio 2017. For more information, see https://www.visualstudio.com/.
The projects presented in this book are all available on GitHub at https://github.com/PeterWaher/MIoT. To simplify development and prototyping, these projects use several libraries. These are available as downloadable and updateable packages (NuGets), most of which are open source, available on GitHub in the IoT Gateway repository at https://github.com/PeterWaher/IoTGateway. The IoT Gateway repository is available free for personal or academic use, or for security analysis. Commercial use requires a commercial license. The repository includes communication libraries, an encrypted object database, event logging infrastructure, application hosting, web server, content management, scripting, runtime-tools, and so on. Things that are good to have, to prototype real-world embedded IoT applications easily and quickly.