Search icon
Arrow left icon
All Products
Best Sellers
New Releases
Books
Videos
Audiobooks
Learning Hub
Newsletters
Free Learning
Arrow right icon
Learning SAP Analytics Cloud

You're reading from  Learning SAP Analytics Cloud

Product type Book
Published in Jul 2017
Publisher Packt
ISBN-13 9781788290883
Pages 420 pages
Edition 1st Edition
Languages

Table of Contents (11) Chapters

Preface Getting Started with SAP Analytics Cloud Models in SAP Analytics Cloud Planning model Creating Stories Using Charts Extending Stories with KPI, Filters, and Other Handy Objects Analyzing Data Using Geomaps and Other Objects Working with Tables and Grids Collaboration Digital Boardroom System Administration

System Administration

System administration is a key task in computing which includes upkeep, configuration, and reliable operation of the system. Uptime, performance, resources, and security of the system are the major responsibilities of a system administrator. In SAP Analytics Cloud, a system administrator takes care of the following segments:

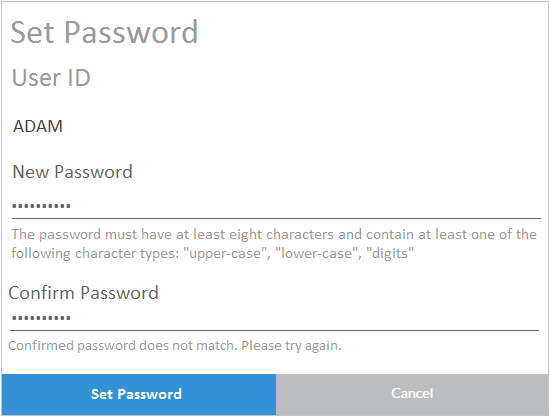
  • Creating users and setting their passwords
  • Importing users from another data source
  • Exporting users' profiles for other apps
  • Deleting unwanted user accounts from the system
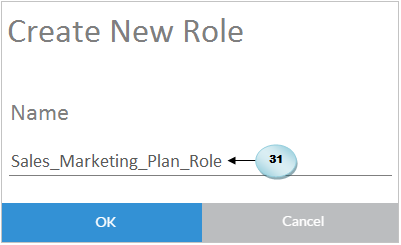
  • Creating roles and assigning them to users
  • Setting permissions for roles
  • Forming teams
  • Setting security for models
  • Monitoring users' activities
  • Monitoring data changes
  • Monitoring system performance
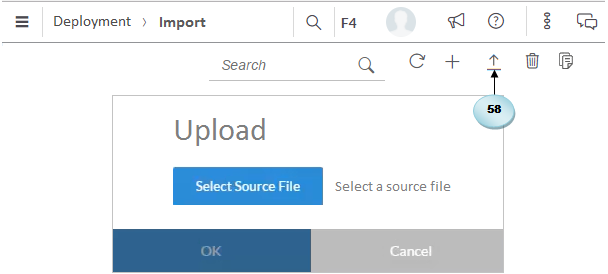
  • System deployment via export and import

Creating users

When a new user joins a company, the system administrator has the privilege of creating the account of this user in SAP Analytics Cloud. This task is performed through the Users page. Here are the steps to add a new user account:

  1. Go to Main Menu | Security | Users to access the Users page.
  2. On the Users page, choose New (+) on the toolbar. A blank row will be appended to the user management table, where you can input the credentials of the new user.
  3. Enter an ID for the new user, which should be unique. Note that spaces are not allowed in this field. You can use uppercase letters, digits, underscore, hash, and ampersand in user IDs.
  4. Enter the user's first, last, and display names in relevant cells.
  5. In the E-Mail address cell, enter the user's email address. After creating the account, a welcome email with login information will be sent to this address.
  6. ...

Setting a user password

When you click on the Save icon in step 6, the Set Password dialog opens to set an initial password for the new user. If you do not use SAP Cloud ID, a temporary password must be set for all new users.

  1. Enter a password, and then confirm this password in the second text box. Passwords must be at least eight characters long and should have uppercase and lowercase letters and digits. After entering the passwords, click on the Set Password button in the dialog box.

A welcome email including first-time login credentials will be sent to the user. The user will be prompted to change the temporary password when s/he logs in with these initial credentials:

Changing passwords

As a security measure, users often need to change their passwords. There are two ways to change a password: an administrator can change a password for users in the Users list, or users can change passwords in their user profile. Users that connect using the SAP Cloud platform Identity Authentication service (IAS) can select Forgot password? on the login page to create a new password. As an administrator, you can execute the following steps to create or change a password:

  1. On the Users page, select one or more rows in the users list.
  2. Click on the Set Password icon () on the toolbar.
  3. Enter a password, and then confirm it.
  4. Click on the Set Password button to end the process. If valid email addresses exist for the users, the system automatically sends emails containing the user name and new password to the users.

Importing users

If you have to create a few user accounts, you should use the steps mentioned in the Create Users section. However, if the users list is large, you can use the import utility, which fetches user data from a CSV file into SAP Analytics Cloud. Here are the steps for this process:

  1. On the Users page, click on Import Users from File ().
  2. In the Import Users dialog, choose Select Source File to upload your CSV file.
  3. Map your user data from the CSV file to the fields in user management by selecting Define Mapping.
  4. The Map Source to Target dialog appears, where you have to select the appropriate entries for Header, Line Separator, Delimiter, and Text Qualifier.
  5. Check the preview of the mapped data. If the mapping is correct, click on the Define Mapping button.
  6. Click on Import in the Import Users dialog to upload data from the CSV file.
...

Exporting users

In addition to importing user data from other sources, you can use SAP Analytics Cloud user data in some other systems with the help of its export utility.

  1. Click on the Export icon () on the Users page. The user data will be exported to a CSV file, which you can find in the default download folder set in your browser.

Deleting users

You can delete the accounts of those employees who have left your company. This privilege is specifically allowed only to administrators, and any private data associated with the user will also be deleted when you perform this action. So, make sure that you have archived that user's private data before removing the account.

  1. In the user's management table, select the user ID you want to delete by clicking on the user number in the leftmost column of the table. This selects the complete row.
  2. Click on the Delete icon () on the toolbar.
  3. Click on OK to confirm the removal.

Assigning roles

After you create user accounts, you must assign roles to the new users, which will determine what a user can or can't do in an application. It doesn't matter whether you create users first or roles first. A default role is applied if no role is assigned when users are created or imported. As a system administrator, you usually handle two situations in which you assign roles to users. In the first situation, you assign one role to multiple users, and in the second one, you update the role for individual users. The steps to handle both these situations are listed next.

Assigning a single role to multiple users

Here is how assign a single role to multiple users:

  1. Go to Main Menu | Security | Roles to...

Built-in roles

SAP Analytics Cloud comes with some out-of-the-box roles. In addition to assigning these built-in roles directly to end users, you can use them as a template for defining new roles.

The following table lists these roles:

Role Description
System owner

Full privileges

At the top of the role hierarchy is the system owner. This is a mandatory power-user role, which must always be assigned to a user who (after being assigned the role) possesses unrestricted access to all the areas of the application.

Admin

Planning administrator: full privileges

This role includes all task authorizations available in SAP Analytics Cloud. The person who is assigned this task acts as the system administrator and is made responsible for setting up roles, creating users, and perform system transports via import and export.

Modeler

Planning modeler: modeling privileges

The holders...

Creating a new role

As a system administrator, you often encounter situations in which you have to create some special roles. For example, you might be asked to create a role for a new employee who is authorized to access just one planning model. Note that you can create a new role from scratch or use the built-in roles as a template for creating a new role. Here are the steps to create a new custom role:

  1. Go to Main Menu | Security | Roles to access the Roles page.

  1. On the Roles page toolbar, click on the New icon to add a new row to the roles management table.
  1. Type a unique name (for example, Sales_Marketing_Plan_Role) for the roles name in the Create New Role dialog, and click on OK, as shown in the previous screenshot. Note that blanks are not allowed in the role name.

The role is created, and its permission page (discussed in a subsequent sub-section) is displayed...

Role settings

The Settings option in the toolbar lets you review the role settings. Click on the Settings icon (A), which displays the following options in the Settings dialog:

  • Enable Self-Service: If you activate this option, any business user can request this role for himself using the Request Roles option (B). Once the approver is notified that a role assignment has been requested, he goes to Security | Requests page from the main menu and approves the request by selecting User ID and then choosing Approve. After confirmation, the requested roles are immediately assigned to the user. The request can be rejected in the same manner. A dialog is displayed where the approver enters a reason explaining why the request was rejected.
  • Use as Default Role: The role is assigned by default to all new users if no role is specified when users are imported or created.
  • Full Data Access:...

Permissions

When an administrator creates a new role or modifies one, he is greeted with the Permissions screen, where he can view or edit the permissions associated with that particular role. The following table describes the basic permissions you can assign to different file types and other items. It is recommended you create and edit custom roles rather than editing the default roles since default roles are reset during updates:

The basic permissions that you can set for each type of item are listed in the following table, which is taken from an SAP source. Some of these items, such as Dimension, Currency, Planning Model, Analytic Model, Data Change Log, and Value Driver Tree, can be assigned permissions globally for all items of that type or individually on specific items. Recall how you went through an instance of this scenario in a previous section, where you removed global...

Test role permissions

When you create the account of a new user and assign her relevant roles, the user receives an email that provides her the username, initial password, and a link to access SAP Analytics Cloud. When she successfully logs in, she is prompted to reset her password. After fulfilling these formalities, when she goes to the Models area, she gets the following screen. Note that the only model she can access is Sales Marketing Plan due to the permissions assigned to her in the previous section:

Update user profile

Users can update their own profile, which includes adding a picture, entering Job Title, E-mail address, and Function Area, as shown in the following screenshot. Users can access their respective profiles...

Forming teams

A team is a group of users who perform a similar type of task. In SAP Analytics Cloud, you can group individual users together to create teams. There are many benefits to forming teams. For example, you can share a story with all the members of a team without having to select users individually. Similarly, you can create a role and assign it to a team. If you make any changes to the permissions set for the role, the changes are inherited to the team and consequently to each member of the team. Here are the steps to create teams:

  1. Go to Main Menu | Security | Teams to access the Teams page, as illustrated in the following screenshot. The Teams page lets you add, modify (A), and delete (B) a team.
  2. Click on the Create Team icon on the toolbar to form a new team.
  1. Enter a unique name in the Team Name box. Spaces are not allowed in the team name. You can use uppercase...

Transferring the system owner role

One user must always be assigned the system owner role. The user who possesses this role can access all areas of the application without any restrictions. This role is transferable. If, for any reason, you want to transfer this role, you can do that. You must be logged in as a user with the system information update privilege. By default, the system information update privilege is enabled for Admin, BI Admin, System Owner, and BI System Owner.

Here are the steps to transfer this role:

  1. Go to Main Menu | Security | Users.
  2. On the Users page, select the user you want to assign the system owner role.
  3. Click on the Assign as System Owner icon (
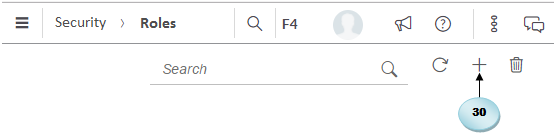
) on the toolbar. The Transfer System Owner Role dialog appears, which shows the selected user as the new system owner and also displays the name of the Previous System owner section.
  4. Under New Role, click on...

Setting security for models

You can also make your models secure. The following options are available for this purpose:

  • Model security: You can make your model secure by turning on the Privacy option (A) in model preferences. When this option is turned on, the model is accessible only to the owner and other users who are explicitly granted access through roles by the administrator:

  • Dimension security: You can also apply security at the dimension level by enabling Data Access Control (B). With this type of security, access to individual values in the model output can be restricted to specific users. You can apply this security to a new dimension (C) or to an existing dimension by selecting it and clicking on Preferences (D). When you enable Data Access Control, the Read and Write columns are added to the dimension. Using these columns, you can specify the users you want to...

Monitoring user activities

SAP Analytics Cloud logs all activities performed by users on business objects, such as models, dimensions, KPIs, stories, and discussions. For example, if a user makes any changes to a model, the activity is logged by the system for auditing. Here are the steps to monitor users activities:

  1. Go to Main Menu | Security | Activities to access the Activities page.

On this page, you can see object type, object name, user name, activity, transaction type, status, and timestamp. The navigation control (A) provided at the top of the page lets you page through the activity records. The search box that you have seen on every segment page comes in handy for this segment of the application, which carries thousands of records. In addition to the search utility, you can apply filters to locate specific types of activities, such as restricting the list to view the...

Monitoring the system

Another important task that an administrator performs is system monitoring. By monitoring the system, administrators can identify the key areas of usage and performance. Using this information, they can evaluate the current state of the system and can also go back in time to compare the current state with historical information. Here is the step to access the monitoring screen:

  1. From the main menu, go to System | Monitor. The Monitor page appears, comprising the following four tabs:
    • Overview: This is a dashboard that shows basic system information, such as licenses in use, number of active users, number of logins, and memory usage.
    • System Usage by Memory: This tab has two charts that display Memory Use by Model and Memory Use by User. Hover the mouse pointer over the data points to view the respective details. Both the charts are also equipped with the Sort...

Deployment

The system administrator also takes care of deployment, which includes creation and management of exports and imports of content. The Export option in the Deployment menu item lets you export the following components, while the Import option reinstates these components in the system:

  • Dimensions
  • Models
  • Currency tables
  • Roles
  • KPIs
  • Events
  • Event categories
  • Event processes
  • Allocation steps, processes, and pool mappings
  • Value driver trees
  • Files, including folders, stories, and boardroom agendas
  • External connections, including import data connections and live data connections

The export process

The main advantage of the export process is that it backs up the current state of your objects and data that can be used to revert in the future. To export objects from SAP Analytics Cloud, execute the following steps:

  1. Go to Main Menu | Deployment | Export to access the Export page.
  2. On the Export page toolbar, click on the New icon (+) to create a new export.

The left pane on the New page lists all the object categories that you can export. You can export all the objects of any category or expand the list to select individual components. Note that when you select an option from this list, all dependent objects are selected automatically. For example, if you select a story (A), the underlying model and dimensions (B) are also added to the export. However, if you do not need these dependencies, you can exclude them by removing checks from their relevant boxes...

The import process

You can upload an export unit that you saved on your local machine, or you can import one that was saved within your system. Here are the steps for this process:

  1. Click on the Main Menu icon, and go to Deployment | Import.
  2. Execute this step if you are uploading the export unit from your local drive. On the Import page, click on the Upload icon on the toolbar. In the Upload dialog, choose Select Source File, and pick the file from the saved location:
  1. To import objects and data from an exported unit saved in the system, click on the New icon (+) on the toolbar. From the list of exported units, pick one to import (A). You will be presented with a preview of all the objects in the export unit from where you can select or deselect items. After picking your objects, click on the Import icon at the top right of the screen. A small window appears, which provides...

Summary

System administration is the most important area in computing, especially in a large multi-user environment. The chapter briefed you on different aspects of this key area with respect to SAP Analytics Cloud. You were guided on how to add users to the system and how to set their passwords. In addition to creating user accounts manually, you can also import bulk user data from another system through a CSV file. Similarly, you can export user profiles from SAP Analytics Cloud to a CSV file that you can use in another system.

Next, you learned how to assign roles to the system users. You can assign a single role to multiple users or multiple roles to a single user. To save your time, SAP Analytics Cloud comes with some built-in roles, which you can assign directly to your users. You can also add new roles to the system and define custom settings and permissions for these new...

lock icon The rest of the chapter is locked
arrow left Previous Chapter
You have been reading a chapter from
Learning SAP Analytics Cloud
Published in: Jul 2017 Publisher: Packt ISBN-13: 9781788290883
Register for a free Packt account to unlock a world of extra content!
A free Packt account unlocks extra newsletters, articles, discounted offers, and much more. Start advancing your knowledge today.
Unlock this book and the full library FREE for 7 days
Get unlimited access to 7000+ expert-authored eBooks and videos courses covering every tech area you can think of
Renews at $15.99/month. Cancel anytime}