

All of these recipes around building have left out one key step—deploying. This is something I would have done from the start, typically. Ideally, as you show progress to a product owner or work with a team, your work is not truly done until it is merged with other work and seen on a staging area. Having something work on your machine is really half the battle.
This chapter will go over some key steps to getting you application to deploy. I will look at the easy-to-use workflow with Forge, but then I will also add a bit extra to it. Also, I will then cover testing your production app with Behat and managing your .env file.
Finally, I will pull out the client that I have been using all along to make a library, that out of it shrinking down the code I am testing and deploying.
Forge has changed the game. Taylor Otwell did an amazing job of making it super easy to put an app online. I want to show you how to use this with AWS and CodeDeploy. Digital Ocean is an amazing service, but sometimes, you need to use AWS as per the customer requirement, or more importantly, you want to benefit from a lot of the features that it provides.
Second, I want to show CodeDeploy since it can deploy Artifacts. The killer feature I know is that what is working on Travis CI will work on the server, since I do not need to do another Git pull, composer install, Gulp, and so on. But I am just copying over a zipped artifact of the application in a passing state.
In the steps that follow, we are going to perform the following:
Level 0 of any work should be getting a deployment workflow set up. What this means in this case is that a push to GitHub will trigger our CI. And then from the CI, if the tests are passing, we trigger the deployment. In this example, I am not going to hit the URL that Forge gives you, but I am going to send an Artifact to S3, and then have CodeDeploy to deploy this Artifact.
As you will see in Chapter 4, Building Views and Adding Style under the Using Travis to run tests on every push section, I have covered setting up this app in Travis CI (https://travis-ci.org/); in this section, I will cover adding CodeDeploy as a part of this step.
You really need to see the section before this, otherwise continuing to know this will make no sense.
The following are the steps:
Install the
traviscommand-line tool in Homestead as noted in their docs at https://github.com/travis-ci/travis.rb#installation. Make sure to use Ruby...
The workflow around this can be tricky. Going from Local, to Travis CI, to CodeDeploy, and then to AWS without storing your information in .env on GitHub can be a challenge. What I will show here are some tools and techniques to do this well.
A base installation is fine; I will use the existing installation to show some tricks around this.
Minimize the
.envvariable using Conventions as much as possible:config/queue.phpI can do this to have one or more Queues:
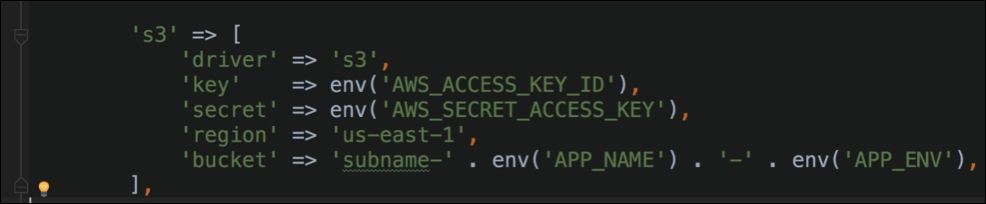
config/filesystems.php:
Use the
Configfile as much as possible. For example, this is in my.env:
But I can also add
config/marvel.php, and then make it look like this:
My
.envfile can be trimmed down byKEY=VALUESlater on I can call to those:Config::get('marvel.MARVEL_API_VERSION)Config::get('marvel.MARVEL_API_BASE_URL')

Now, to easily send to Staging or Production using the
EnvDeployerlibrary, run the following:>composer require alfred-nutile-inc/env-deployer:dev-master...
So, your application is now on Production! Start clicking away at hundreds of little and big features, so you can make sure everything went okay; or, better yet, run Behat! Behat on Production? Sounds crazy, but I will cover some tips on how to do this, including how to set up some remote conditions and clean up when you are done.
Any application will do. In my case, I am going to hit production with some tests I made earlier.
The following are the steps to be followed:
Tag a Behat test called
@smokeor just a scenario that you know is safe to run on Production, for example,features/home/search.feature:
Update
behat.ymlby adding a profile to it calledproduction:
Then run the following:
> vendor/bin/behat -shome_ui --tags=@smoke --profile=productionThen, you will see it hit the production URL and only the scenarios you feel are safe for Behat.
One practice you will start to do a lot is making packages you can use in other projects. In this example, I will start to move the Marvel client into its own namespace and rename it UniversalComicClient. Then, once this is working, I will pull it completely out and put it onto Packagist.
A fresh installation of Laravel is fine. The code for the client can just be moved around in there.
Make a new folder called
app\UniversalComicsClient\srcas we are going to make this a universal client.app/UniversalComicsClient/src/MarvelApiClient.phpapp/UniversalComicsClient/src/ComicClientInterface.phpapp/UniversalComicsClient/src/MarvelApi.php
Update all these namespaces to be
YourGithubName\Package, so in my caseAlnutile\UniversalComicsClientexample:
Provider Boot