Reader small image

You're reading from  Laravel 5.x Cookbook

Product typeBook
Published inSep 2016
Reading LevelIntermediate
PublisherPackt
ISBN-139781786462084
Edition1st Edition
Languages
Tools
Right arrow
Authors (2):
Terry Matula
Terry Matula
author image
Terry Matula

Terry Matula is a web developer and Laravel advocate based in Austin, TX. He's been a passionate computer enthusiast since he first played Oregon Trail on an Apple//e. He started programming in BASIC at a young age, making simple Scott Adams-like games on a Commodore Vic-20. Since then, he's worked as a developer using Flash/ActionScript, ASP.NET, PHP, and numerous PHP frameworks, with Laravel being his favorite by far. He blogs web development tips and tricks at his website http://terrymatula.com
Read more about Terry Matula

Alfred Nutile
Alfred Nutile
author image
Alfred Nutile

Alfred Nutile is an Enterprise Architect and Laravel lead based in Western Massachusetts. He's been working in the industry since the mid 90's. He started in PHP and MySQL back around that time and has worked with Ruby on Rails, Drupal, and Angular along the way. He introduced Laravel into an enterprise web stack, where he is currently contracted at, as Laravel proved itself as an amazing framework to build API's and Angular heavy application. You can read more about him and checkout his blog at http://www.alfrednutile.info/ or follow him on Twitter at https://twitter.com/alnutile Make sure to checkout the discount LaraCasts is offering those who buy the book! Get a coupon for 50% on your first bill. Make it a yearly subscription and save $43! Coupon Code: LaracastsLovesPackt https://laracasts.com/signup?plan=yearly&coupon=LaracastsLovesPackt.
Read more about Alfred Nutile

View More author details
Right arrow

Chapter 1. Setting Up and Installing Laravel

In this chapter, we will cover the following topics:

  • Setting up Homestead

  • Setting up composer and PHP on your local machine for faster Workflows

  • Using .env for your local build

  • Using sequel pro and connecting to local and remote databases

  • Setting up your first application in Homestead

  • Setting up Gulp and Elixir

Introduction


In this chapter, we will cover installing and setting up Laravel and Homestead. As I have often said in this book, the online Laravel docs are great, and I will refer to them as needed. This book should be regarded as a complement to the official documentation, expanding on the explanations found there and adding some tips and tricks for everyday use. Also, I will show a number of shortcuts to help speed up your workflow. Finally, I will touch on Gulp and Elixir.

Setting up Homestead


This section will work off the existing Laravel docs to make sure your Homestead is set up correctly, as well as give you some background as to what is going on.

Getting ready

You will need a terminal application, access to the Git command, and decent Internet. As for the terminal on Mac, I suggest iTerm, available at https://www.iterm2.com/; it really is a nice tool for something you are going to use quite often. For Windows, git for Windows https://git-for-windows.github.io/ got me going quickly both for git and a Bash such as terminal. Linux has a nice terminal to begin with, and installing git is easy. As far as Vagrant and VirtualBox are concerned, I will link you to the related sites since they do a good job at explaining how to install each of them on your system.

How to do it...

The following are the steps to set up Homestead:

  1. First, install VirtualBox as noted on their site at https://www.virtualbox.org/wiki/Downloads.

  2. Once this is in place, install Vagrant from https://www.vagrantup.com/.

    At this point, Vagrant will be ready to use at the command line:

    You will not really need to open VirtualBox.

    Tip

    For Windows users, this link helped me a lot to get started with Homestead: http://blog.teamtreehouse.com/laravel-homestead-on-windows.

  3. Make a folder in your home directory called Code with a capital C.

    On a Mac, this will look like—/Users/alfrednutile/Code.

  4. From here, the online docs do a great job of getting you going on the final Homestead installation and setup—https://laravel.com/docs/5.2/homestead.

How it works...

When done, you will have the Homestead.yml configuration information in the ~/.homestead folder to modify as needed. On Mac, this would be /Users/alfrednutile/.homestead/Homestead.yml.

Tip

Laravel Docs talk about shortcuts in the Daily Usage section at https://laravel.com/docs/5.2/homestead#daily-usage.

Also, you should have made a new folder called ~/Code to be the base folder for all your projects. For example, my folder looks like this:

  • /Users/alfrednutile/Code/app1

  • /Users/alfrednutile/Code/app2

You can have multiple applications within your code folder. In this example, app1 is the root folder for the app1 application, and app2 is the root folder for the app2 code. Keep in mind that the Vagrant box will later on mount this Code folder into the /home/vagrant/Code folder inside the Vagrant client.

Tip

I do my migration and PHPUnit work inside Homestead using the ssh shortcut that the online documents show you. But I do a lot of work outside Homestead inside the Code/app1 directory, such as all the Git commands and much of composer. This creates a much faster workflow for the file intense commands.

There's more...

You can, of course, manually set up your own machine for Nginx, PHP, MySQL, and all the rest, but there are a lot of reasons why the preceding one is best. On a team or alone, having your environment contained like this makes upgrading your machine, going from desktop to laptop, pushing code to production, having up-to-date libraries for new apps and older libraries for legacy apps, and more so much easier.

Setting composer and PHP on your local machine for faster Workflows


In this section, we will cover some tips on using PHP and composer outside of the Homestead box to help with your workflow.

Getting ready

As with the preceding sections, you will need to have a terminal and decent internet. I will cover this using a Mac, but Windows and Linux have their systems to install the software. By default, you can install Xcode on a Mac and get pretty far with PHP, but it tends to be an older version of PHP. Here, we will use Homebrew to install PHP 5.6. We will also use Homebrew later on in this book as well.

How to do it...

  1. Visit the http://brew.sh/ site, and run the command they show there to install Homebrew on your Mac.

  2. Follow the instructions at https://github.com/Homebrew/homebrew-php to get the PHP5.6 setup.

  3. After you are done with step 2, add to your ~/.bash_profile so that we can use this version of PHP:

    export PATH="$(brew --prefix php56)/bin:$PATH"
    
  4. Then, update your current session:

    >source ~/.bash_profile
    
  5. Then, we will make sure our PHP is set up properly:

    >which php
    

    You will see the/usr/local/opt/php56/bin/php output and type:

    >php –v 
    

    This will show that you are running 5.6.19 or a higher version.

  6. Set up mycrypt as follows:

    >brew install php56-mcrypt
    
  7. Then, we will install composer as seen at https://getcomposer.org/download/:

    >php -r "readfile('https://getcomposer.org/installer');" > composer-setup.php
    >php -r "if (hash('SHA384', file_get_contents('composer-setup.php')) === 
    
    625196afcca95a5abf44391188c695c6c1456e16154c75a211d238cc3bc5cb47') { echo 'Installer verified'; } else { echo 'Installer corrupt'; unlink('composer-setup.php'); } echo PHP_EOL;"
    >php composer-setup.php
    >php -r "unlink('composer-setup.php');"
    >sudo mv composer.phar /usr/local/composer
    

Tip

What is ~/? That is shorthand for your Home directory. When I use this, for example, >source ~/.bash_profile, your operating system will know it is in your home folder, for example, /Users/alfrednutile/.bash_profile.

How it works...

That was a lot of steps! Let's cover what we did and why. We began by installing Homebrew to make installing packages easier. We will periodically need to install packages such as Wget, Webdriver, and more as we progress through this book. Using the brew command supplied by Homebrew makes installing these packages a snap.

Then, we used Brew to make sure we have a current version of PHP on our Mac. But considering we already have Homestead, why do this? There is some work you do outside of Homestead, for example, getting and installing Laravel using composer, running envoy, and more. And some of these you can run in Homestead, but you will see some speed difference outside of it. So, you still need it on your machine, but in this case, we are not so worried about it being the wrong version for one of our many applications.

The mcrypt part of the installation took care of the extension that we need to run common commands such as php artisan key:generate and other commands in Laravel.

We finalized the PHP setup with Bash shortcuts, so when we open the terminal, we are ready to use PHP and not the version that comes with Xcode on Mac.

We then use PHP to download and install composer, the biggest advancement in PHP since I started 15 years ago in my opinion, and you will see more of composer shortly.

Finally, we are ready to download Laravel!

There's more...

You could, of course, use Brew to install MySQL and more. But for now, we are going to leave all of this inside the Homestead box that we set up earlier.

See also

Setting up your first application in Homestead


In this section, we will download Laravel and set up our local site to use for the rest of our recipes taking advantage of Homestead.

Getting ready

We have Homestead installed. My home folder called ~/Code is where we will be working.

How to do it...

  1. Type the following in the terminal:

    >cd ~/Code
    
  2. Then, download Laravel to a new folder:

    >composer create-project --prefer-dist laravel/laravel recipes 
    
  3. Move into the directory for your new application:

    >cd recipes
    
  4. Now we need to tell Homestead about our new application:

    >cd ~/.homestead && subl Homestead.yml
    
  5. Once the editor pops open, you can add your new site:

  6. Under database:

  7. Click on Save and close the editor.

  8. Then, start up Homestead or just provision it:

    >homestead provision
    

    You may be asked for a password, which is your system admin password and not the Homestead password.

  9. Then, we need to edit our system Host file (in this case, our local computer and not Vagrant and Homestead); this will again ask for our system password:

    >sudo subl /etc/hosts
    

    Tip

    I will show a shortcut command in the How it works… section.

  10. Next, edit the host file to set your recipes.dev domain right next to the default Homestead IP of 192.168.10.10; then, save and close the editor:

  11. Then, visit your site at https://recipes.dev! You may get an SSL warning but click on Advanced and Proceed:

How it works...

The composer command that we ran gets Laravel from its database of applications and libraries at https://packagist.org/ then download it. We began by installing Homebrew to make installing packages easier. We will periodically need to install packages such as Wget, Webdriver, and more as we progress through this book. Using the brew command supplied by Homebrew makes installing these packages a snap.

I also used some shortcuts. One shortcut was subl, which was what you get when you install http://www.sublimetext.com/. But you can use whatever editor you want.

Using some of the preceding tips will make a shortcut called hedit adding to my ~/.bash_profile:

alias homesteadedit='cd ~/.homestead && subl Homestead.yml'

So, we are editing the main file that Laravel uses for all its Homestead settings. You will be here a lot, so shortcuts really pay off.

The same is applicable with the hostedit command that I used:

alias hostedit='sudo subl /etc/hosts'

Here, we are adding to our .bash_profile a quick way to edit the file and add the needed domain recipes.dev and save and exit. Now, when you visit https://recipes.dev, your operating system will know that it is really for Homestead.

See also

Using .env for your local build


This was one of the best changes to Laravel from version 4 and 5 in my opinion. When I was doing Ruby on Rails work, it also had this feature, and this is the key to help create an application that falls in the Twelve Factor App workflow. You will learn how to use this file for setting keys to some recipes later on in the book. In this example, we will start using it to set up our database.

For the rest of this book, I will use PHPStorm for my editor, which helped me a ton to explore Laravel and PHP code when I first started. Make sure your editor has plugins to easily click and explore classes.

Getting ready

When you installed Laravel, it copied the .env file into place. So, just open your editor of choice and open the application directory.

How to do it...

  1. Open .env in your editor.

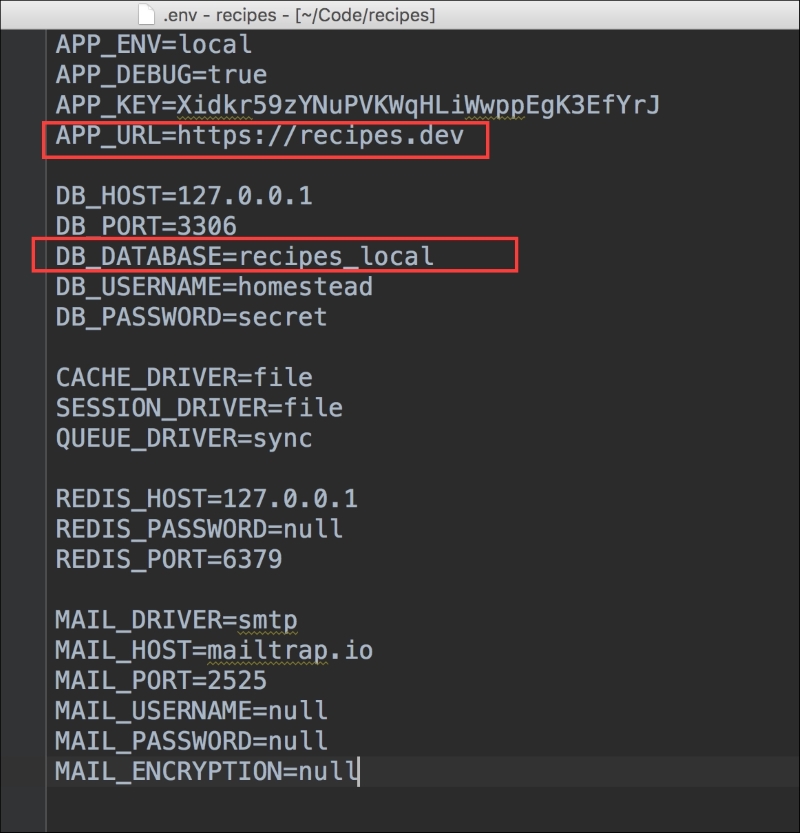
  2. Alter the file as follows, so the database name and the URL match what we would put in our Homestead setup file:

How it works...

First of all, this is a hidden file. The . in front of it makes it hard to see in File Managers and even the command line. When at the command line, ls -a * is how to show this hidden file. Most code editors or IDEs will show you these.

Also note that Laravel comes with a .gitignore file that includes this file:

We will have to consider the addition or changes of any settings in env, as we push this application to Production for everyone to see when we are done. I will cover this more in Chapter 10, Deploying Your App.

So, what did we change in this file? Most of what you see was already there; we just set two things:

  • DB_DATABASE=recipes_local

  • APP_URL=https://recipes.dev

This is it, really! If you look back, this is what we set in the Homestead.yml file. You can see what we called the database and domain name. So now we need to tell our application what database table to use and which Homestead is made for us. Yeah, for Homestead!

See also

Using sequel pro and connecting to local and remote databases


Soon, we will be doing migrations, saving data to the database, and other day-to-day workflows, but sometimes, it is nice to look into the database. For example, you may want to export Production and the environment that has your live data down to local to review some bug. This section will show how to use Sequel Pro to do secure, over SSH, connections to your database. This allows you to get to your database with almost zero risk other than SSH.

How to do it...

The following are the steps to connect sequel pro to local and remote databases:

  1. Download and install Sequel Pro from http://www.sequelpro.com/.

  2. Add a new connection to Homestead:

  3. Add new connection to a remote Host:

How it works...

In the past, I have used phpMyAdmin, and it was better than just the command line. But Sequel Pro really was a game changer. For one, I did not have to install phpMyAdmin on my servers and risk issues related to security. Second, it is a good interface and makes it really easy to check out data, tables, do queries, and so on when needed.

So, what you saw previously was simply a setup for Homestead using the Standard tab and Port 33060, which is what Homestead forwards its MySQL port to.

When we deploy our first server, it will have SSH port 22 open, but never will I have MySQL open only on 127.0.0.1.

Tip

For the most part, you only want three ports open on your server: 22 for SSH, 80 to redirect web requests to SSL/HTTPS, and 443 to serve your website.

So, to connect to this we select the SSH tab, and enter the information for the database on the server, since we will be on the server after the SSH step. Then, we enter the information for SSH; in this case, I had to go into my home folder to use my SSH public key. If you did not set up a key on your server, then most likely, you are using a password, so enter that instead.

Tip

If you do not have the a.ssh folder in your Home directory (~/), then take a moment to create it. From the command line, run ssh-keygen –t rsa and just answer yes to all the questions. Do not add a password. You now have a public key.

It is really this simple. Now, you have this great UI to look into your database once in a while; though after using Laravel with php artisan migrate and eloquent, I am not in the database often.

See also

Setting up Gulp and Elixir


Elixir is new in Laravel 5.x and is a wrapper around Gulp, which is a well-known JavaScript build system. We will use it to manage assets later on in the book. For now, we just want to get it installed.

How to do it...

  1. SSH into Homestead:

    >homestead ssh
    >cd ~/Code/recipes
  2. Install Gulp using the following:

    >npm install
  3. When it is done, try the following:

    > node_modules/gulp/bin/gulp.js -v

How it works...

Once again, Homestead is making our work easier; NPM is already installed! So, we can use this to not only install Gulp but also other JavaScript libraries that we need. How to do this? If you look into the Laravel application that we downloaded, you will now see the =package.json file:

This is the file that NPM uses, just as PHP uses composer.json, to know what to install. Here, it is getting Elixir, Gulp, and Sass for us. Elixir is new in Laravel 5.x and is a wrapper around Gulp, which is a well-known JavaScript build system.

Notice too that if you type which gulp, it is installed globally, thanks to Homestead again!

Elixir will come in later, but for now, note gulpfile.js that is right above the package.json file; this is where we will set up our asset workflow later on.

You have been reading a chapter from
Laravel 5.x Cookbook
Published in: Sep 2016Publisher: PacktISBN-13: 9781786462084
Register for a free Packt account to unlock a world of extra content!
A free Packt account unlocks extra newsletters, articles, discounted offers, and much more. Start advancing your knowledge today.
undefined
Unlock this book and the full library FREE for 7 days
Get unlimited access to 7000+ expert-authored eBooks and videos courses covering every tech area you can think of
Renews at $15.99/month. Cancel anytime

Authors (2)

author image
Terry Matula

Terry Matula is a web developer and Laravel advocate based in Austin, TX. He's been a passionate computer enthusiast since he first played Oregon Trail on an Apple//e. He started programming in BASIC at a young age, making simple Scott Adams-like games on a Commodore Vic-20. Since then, he's worked as a developer using Flash/ActionScript, ASP.NET, PHP, and numerous PHP frameworks, with Laravel being his favorite by far. He blogs web development tips and tricks at his website http://terrymatula.com
Read more about Terry Matula

author image
Alfred Nutile

Alfred Nutile is an Enterprise Architect and Laravel lead based in Western Massachusetts. He's been working in the industry since the mid 90's. He started in PHP and MySQL back around that time and has worked with Ruby on Rails, Drupal, and Angular along the way. He introduced Laravel into an enterprise web stack, where he is currently contracted at, as Laravel proved itself as an amazing framework to build API's and Angular heavy application. You can read more about him and checkout his blog at http://www.alfrednutile.info/ or follow him on Twitter at https://twitter.com/alnutile Make sure to checkout the discount LaraCasts is offering those who buy the book! Get a coupon for 50% on your first bill. Make it a yearly subscription and save $43! Coupon Code: LaracastsLovesPackt https://laracasts.com/signup?plan=yearly&coupon=LaracastsLovesPackt.
Read more about Alfred Nutile