Chapter 7. Sharing Your Code
In this chapter, we will cover the following recipes:
- Using a Notebook server
- Using a web server
- Sharing your Notebook through a public server
- Sharing your Notebook through Docker
- Sharing your Notebook using nbviewer
- Converting Notebooks to HTML
- Converting Notebooks to Markdown
- Converting Notebooks to reStructedText
- Converting Notebooks to Latex
- Converting Notebooks to PDF
This chapter shows you several methods for sharing your Notebook with others, including using different software packages and converting the Notebook into a different form for readers without access to Jupyter.
Sharing your Notebook using server software
There are several software mechanisms available for sharing your Notebook with others. This section describes several of the currently available tools. I would expect the list to grow over time.
The typical mechanism for sharing Notebooks is to provide your Notebook on a website. A website runs on a server or allocated machine space. The server takes care of all the bookkeeping involved in running a website, such as keeping track of multiple users and logging people on and off.
In order for the Notebook to be of use, though, the website must have Notebook/Jupyter logic installed. A typical website knows how to deliver content as HTML given some source files. The most basic form is pure HTML, where every page you access on the website...
Built into the Jupyter process is the ability to expose a Notebook as its own web server. Assuming the server is a machine accessible by other users, you can configure Jupyter to run on that server. You must provide the configuration information to Jupyter so that it knows how to proceed. The command to generate a configuration file for your Jupyter installation is:
jupyter notebook --generate-config
This command will generate a jupyter_notebook_config.py file in your ~./jupyter directory. For Microsoft users, that directory is a sub-directory of your home User directory.
The configuration file, shown as follows, contains the settings that you can use to expose your Notebook as a server:
c.NotebookApp.certfile = u'/path/to/your/cert/cert.pem'
c.NotebookApp.keyfile = u'/ path/to/your/cert/key.key'
c.NotebookApp.ip = '*'
c.NotebookApp.password = u'hashed-password'
c.NotebookApp.open_browser = False
c.NotebookApp.port = 8888
The following table describes each of the settings...
So, built into Jupyter, you can access the configuration you need to expose a Jupyter Notebook on its own. If you were to take it to the next step and apply the Notebook to a regular web server, there would be just a few more steps in addition to the previous section.
In order to add your Notebook to an existing web server, you need to perform the preceding steps and add a little more information to the Notebook configuration file, as in:
c.NotebookApp.tornado_settings = {
 'headers': {
 'Content-Security-Policy': "frame-ancestors 'https://yourwebsite.com' 'self' "
 }
}
Replace yourwebsite.com with the URL of your website. Once complete, you can access the Notebook through your website.
Sharing your Notebook through a public server
Currently there is one hosting company that allows you to host your Notebooks for free: GitHub. GitHub is the standard web provider for source control (GIT source control) systems. Source control is used to maintain historical versions of your files to allow you to retrace your steps.
GitHub's implementation includes all the tools that you need to use in your Notebook, already installed on the server. For example, to use R programming in your Notebook, you would have had to install the R tool set on your machine and possibly some of the packages used by your script. But GitHub has already done all of these steps.
- In order to host your Notebook on GitHub, go to the GitHub website and sign up for a free website.
- Once logged in you are provided with a website that can be added to. If you have development tools to use (
git push commands are programmer commands to store files on a git server) you can do that or simply drag and drop your...
Sharing your Notebook through Docker
Docker is an open lightweight container for distributing software. A typical Docker instance has an entire web server and a specific web application running on a machine (accessible through a specific port on the machine where Docker is running). In this manner, Docker can have many applications running on the machine, each addressable through a different port address.
The specifics about the software running in a Docker instance are governed by the Dockerfile. This file provides commands to the Docker environment as to which components to use to configure this instance. Sample Dockerfile contents for a Jupyter implementation would be:
ENV TINI_VERSION v0.6.0
ADD https://github.com/krallin/tini/releases/download/${TINI_VERSION}/tini /usr/bin/tini
RUN chmod +x /usr/bin/tini
ENTRYPOINT ["/usr/bin/tini", "--"]
EXPOSE 8888
CMD ["jupyter", "notebook", "--port=8888", "--no-browser", "--ip=0.0.0.0"]
Here is a discussion on each of the commands of...
Sharing your Notebook using nbviewer
Built into Jupyter is a tool called nbviewer, responsible for exposing your Notebook as a web page. nbviewer is used through a public Notebook sharing service, the Notebook Viewer, at http://nbviewer.ipython.org.
nbviewer is fully supported by the Jupyter project. So, if you encounter any issues they will help.
You can use nbviewer in conjunction with Docker or standalone.
To use nbviewer with Docker, you can use Docker commands directly to load your Notebook:
$ docker pull jupyter/nbviewer
$ docker run -p 8080:8080 jupyter/nbviewer
These commands are as follows:
- The
docker pull command downloads nbviewer from the code repository where all Jupyter products are maintained onto your machine - The
docker run command executes nbviewer (just downloaded) and exposes Jupyter at port 8080 (which is a standard HTTP port address)
Once executed, if you open a browser to the local machine and port 8080, you see the standard Jupyter home page. You can then add...
Converting your Notebook into a different format
Another mechanism is to convert your Notebook into a different, normally non-interactive format. This allows you to distribute the Notebook result to users without access to your server. A Notebook can be converted to a set of formats discussed in this section.
Note
Sharing your Notebook using kyso: kyso is a Notebook sharing site particularly for scientists to exchange Notebook information.
I do not think it would be a good idea for me to push a sample Notebook onto the site.
You can get various sorts of subscription access to kyso.
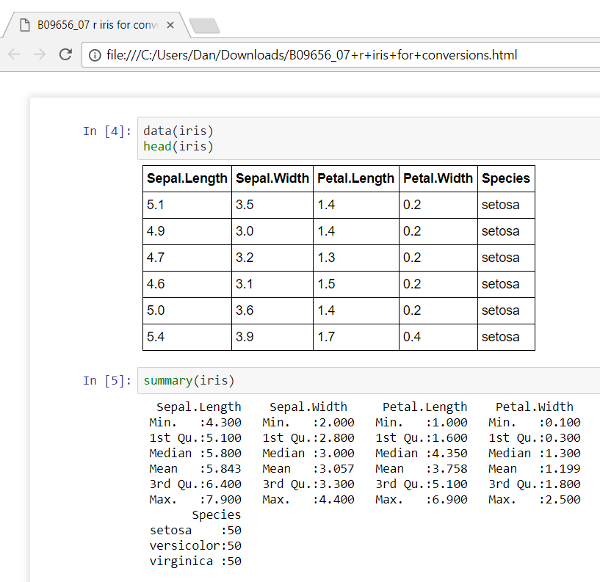
For the conversions, we will be using a minimal R script that describes the iris dataset. The code is:
data(iris)
head(iris)
summary(iris)
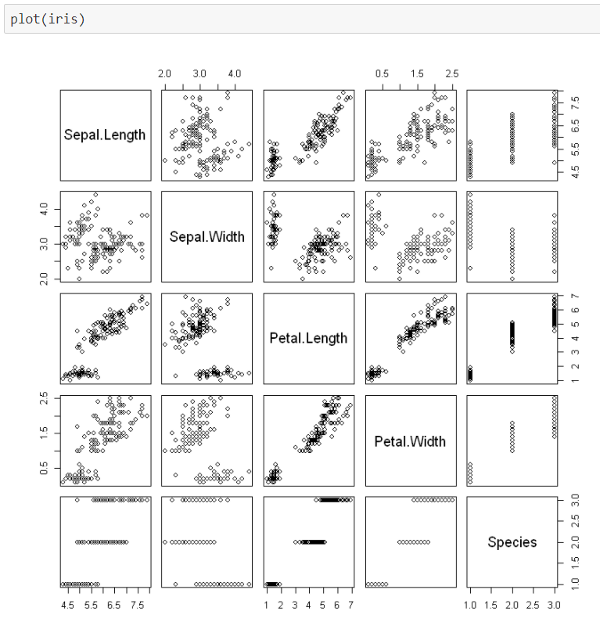
plot(iris)
Producing the now-familiar data points for the iris set and the corresponding plot:
With the corresponding graph of the iris data:
We will be using the Jupyter File menu options for this section, as you can see here:
Where the choices listed are:
Converting Notebooks to R
Again, this section corresponds to the language choice in use for the Notebook. The choice downloads an R file from Jupyter to your machine.
You are on the Notebook in Jupyter. Selecting the choice will prompt for a location and then Jupyter will extract the Notebook code to the location specified using a filename containing the title of the Notebook with an R extension. In this case, the file was named B09656_07+r+iris+for+conversions.r, where I had titled the Notebook B09656_07 r iris for conversions.
- We can open the downloaded R script, and we have just the R script in the Notebook:
- So, as it is a good R script, we can run it. I had already installed Anaconda with the corresponding R Studio. So, I ran the script in R studio with the expected result:
- The graphic is in a pop-up window for R Studio:
Converting Notebooks to HTML
We can also download an HTML version of the Notebook.
Similar to the other formats, once we have the Notebook open in Jupyter, we can extract an HTML representation by the appropriate selection from the menu. The system will prompt you for a location for the download.
The Notebook will be downloaded to a filename with the Notebook title and the extension HTML. In my case, the file was called B09656_07+r+iris+for+conversions.html.
As with any HTML file, we can open and display it using a browser. In this case, I ended up with a display like the following:
With the following graphic further down the page:
So, it looks exactly the same. There is no interactivity though.
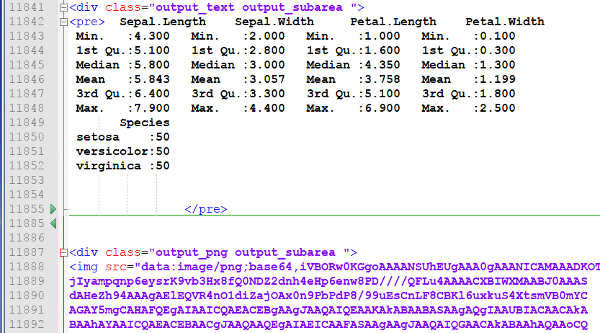
I was curious about the contents of the downloaded HTML file and saw code like this:
The results are laid out as they were shown in Jupyter. The follow-on img tag at the bottom of the screenshot is the hex storage format of the generated graphic.
Converting Notebooks to Markdown
The Markdown (files with .md extension) format is a looser version of HTML, which is another Markdown format. The README files of many software distribution packages are stored in Markdown format.
Once we have a Notebook in use in Jupyter, we can select the Download Markdown menu choice. As with others, Jupyter prompts you for the location to store the file.
The downloaded Markdown file is named with the name of your Notebook followed by the file extension .zip, as there are multiple components to the Markdown. Using the same example, my download was named B09656_07+r+iris+for+conversions.zip. In my .zip file, there were:
B09656_07 r iris for conversions.md: The Markdown fileoutput_2_0.png: The corresponding graphic
If we use an md file viewer (there are many available), we get a familiar-looking screenshot:
And the corresponding graphic is an exact match.
Looking inside of the .md file, we see a lot of HTML tags used for the table...
Converting Notebooks to reStructedText
The reStructuredText (.rst) format is a simple, plain-text markup language that is used for programming documentation.
With the Notebook loaded into Jupyter, you can select the Download reST format file. You are then prompted to handle the download to your machine.
As with some of the other downloads, the downloaded file is in .zip format, containing the .rst file and a .png of the graphic. The files are all named as the name of the Notebook followed by the appropriate extension (.zip, .rst, and .png). My files used the Notebook name of B09656_07+r+iris+for+conversions.
There are many .rst file viewers available. In the one I picked, the display looks like:
Which, I think, is one of the better renderings of this information.
The plot graphic .png is also included; it looks as shown earlier.
The internals of the .rst file look like a combination of HTML and markup:
This is similar to other generated formats, especially HTML. There...
Converting Notebooks to Latex
Latex is a typesetting system that has been in use for some time. It is widely used for scholastic papers.
We can download a Latex version of the Notebook from the File Download menu. There will be a resulting .zip file downloaded to your machine. The filename will be the name of your Notebook, in this case, B09656_07+r+iris+for+conversions. The .zip file contains:
B09656_07+r+iris+for+conversions.tex: The Latex fileoutput_2_0.png: The corresponding graphic
There are many Latex viewers (and editors) available. The display of my downloaded Latex file looks like:
I think it looks very much like one of the papers you might see published by a college.
The plot graphic .png is also included; it looks as shown earlier.
The underlying code is very specific to Latex. I don't imagine anyone would normally work directly with Latex, but they would use a graphical editor that generates Latex to develop pages:
Converting Notebooks to PDF
Lastly, we can download a PDF version of the Notebook. With the name of the menu item '', I would expect the resulting PDF to look very much like the Latex version in the previous section.
With our Notebook loaded into Jupyter, we can select to Download PDF menu choice. We will be prompted to handle the download file.
Surprisingly, this did not work. I got a 500 error when I tried to download the PDF:
It turns out that the name of the menu choice, PDF via Latex, is indicative of the failure. We need to install software that can take a Latex file and generate a PDF. Following along the URL mentioned in the failure message (https://nbconvert.readthedocs.io/en/latest/install.html#installing-tex), there are instructions for installing Latex on different operating systems. After installing, you need to stop and restart Jupyter for the new software to take effect.
Trying again after installing Latex, the resulting PDF file name uses the name...