Search icon
Subscription
0
Cart icon
Close icon
You have no products in your basket yet
Save more on your purchases!
Savings automatically calculated. No voucher code required
Arrow left icon
All Products
Best Sellers
New Releases
Books
Videos
Audiobooks
Learning Hub
Newsletters
Free Learning
Arrow right icon
Internet of Things with Arduino Blueprints

You're reading from  Internet of Things with Arduino Blueprints

Product type Book
Published in Oct 2015
Publisher
ISBN-13 9781785285486
Pages 210 pages
Edition 1st Edition
Languages
Concepts
Author (1):
Pradeeka Seneviratne Pradeeka Seneviratne
Profile icon Pradeeka Seneviratne

Table of Contents (15) Chapters

Internet of Things with Arduino Blueprints
Credits
About the Author
About the Reviewers
www.PacktPub.com
Preface
1. Internet-Controlled PowerSwitch 2. Wi-Fi Signal Strength Reader and Haptic Feedback 3. Internet-Connected Smart Water Meter 4. Arduino Security Camera with Motion Detection 5. Solar Panel Voltage Logging with NearBus Cloud Connector and Xively 6. GPS Location Tracker with Temboo, Twilio, and Google Maps 7. Tweet-a-Light – Twitter-Enabled Electric Light 8. Controlling Infrared Devices Using IR Remote Index

Reading the serial data using Arduino


You can read incoming data from the serial port where we wrote data using the Python script in the previous section using Arduino. The following Arduino sketch will read the incoming data from the serial port and turn on the PowerSwitch Tail if it finds 1, and turn off the PowerSwich Tail if it finds 0.

The sample code, B04844_07_01.ino, can be found in the Chapter 7 codes folder, so you can copy and paste it on a new Arduino IDE and upload it to your Arduino UNO board.

Connecting the PowerSwitch Tail with Arduino

Connect the PowerSwitch Tail to your Arduino UNO board, as shown in the following Fritzing diagram. For this project, we will use a 240V AC PowerSwitch Tail:

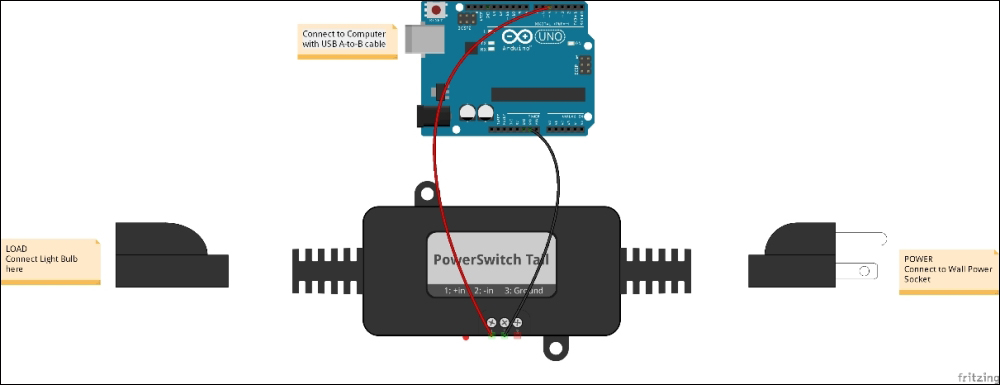
  1. Using a hook-up wire, connect the Arduino digital pin 5 with the PowerSwitch Tail positive (+ in) connecter.

  2. Using another hook-up wire, connect the Arduino ground pin with the PowerSwitch Tail negative (- in) connector.

  3. Connect a 240V AC light bulb to the LOAD end of the PowerSwitch Tail.

  4. Connect...

lock icon The rest of the chapter is locked
Register for a free Packt account to unlock a world of extra content!
A free Packt account unlocks extra newsletters, articles, discounted offers, and much more. Start advancing your knowledge today.
Unlock this book and the full library FREE for 7 days
Get unlimited access to 7000+ expert-authored eBooks and videos courses covering every tech area you can think of
Renews at $15.99/month. Cancel anytime}