Reader small image

You're reading from  Hands-On GPU Computing with Python

Product typeBook
Published inMay 2019
Reading LevelIntermediate
PublisherPackt
ISBN-139781789341072
Edition1st Edition
Languages
Right arrow
Author (1)
Avimanyu Bandyopadhyay
author image
Avimanyu Bandyopadhyay

Avimanyu Bandyopadhyay is currently pursuing a PhD degree in Bioinformatics based on applied GPU computing in Computational Biology at Heritage Institute of Technology, Kolkata, India. Since 2014, he developed a keen interest in GPU computing, and used CUDA for his master's thesis. He has experience as a systems administrator as well, particularly on the Linux platform. Avimanyu is also a scientific writer, technology communicator, and a passionate gamer. He has published technical writing on open source computing and has actively participated in NVIDIA's GPU computing conferences since 2016. A big-time Linux fan, he strongly believes in the significance of Linux and an open source approach in scientific research. Deep learning with GPUs is his new passion!
Read more about Avimanyu Bandyopadhyay

Right arrow

Working with ROCm and PyOpenCL

In this chapter, we will continue with our hands-on experience with PyOpenCL. We will follow our CUDA program example that we discussed in the previous chapter and will try to make it a cross-platform venture with ROCm's HIP. In order to do this, we will use the hipify tool that we learned to build in Chapter 4, Fundamentals of GPU Programming. With hipify, we will try to create .cpp files from .cu files. With a practical approach, we will see the entire process of converting CUDA code into HIP code.

C programming enthusiasts will be encouraged to invoke AMD and NVIDIA GPUs within their program code with HIP, while Python programming enthusiasts will be motivated to use PyOpenCL to invoke AMD and NVIDIA GPUs within their program code. We will first start with the understanding of how a ROCm HIP-C program works. The fundamental concepts behind...

Technical requirements

Understanding how ROCm-C/C++ works with hipify, HIP, and OpenCL

In this section, we will learn how CUDA code is converted into cross-platform HIP code and how to use the HIP compiler to compile the ported code. Finally, we will explore an OpenCL example by comparing it to CUDA through its documentation, so as to understand the open computing language in an easier manner.

Converting CUDA code into cross-platform HIP code with hipify

As we begin understanding ROCm for both AMD and NVIDIA GPUs, what can be more practical than a hands-on approach to converting our first CUDA program in this book into an ROCm HIP version? Follow these steps to achieve that:

  1. Make sure you have the Terminal open at the location where you have the...

Installing PyOpenCL for Python (AMD and NVIDIA)

Through our documented source code on OpenCL, we now know the basic ways of OpenCL implementation compared to CUDA syntax. So, let's get started with our PyOpenCL installation procedure for Python. Once again, note that you need not install Python, as it is already available (both 2.x and 3.x) with a freshly installed version of an Ubuntu 18.04 Linux operating system.

Setting up PyOpenCL will enable implementing OpenCL kernels within your existing Python setup of choice and then compute them on your AMD or NVIDIA GPU.

Once again, we will re-examine our two primary ways of installation, as we illustrated previously for PyCUDA. Note that these steps are independent of the previous chapter and can be used as a standalone reference for installing PyOpenCL.

...

Configuring PyOpenCL on your Python IDE

To configure PyOpenCL with PyCharm, we again have to follow up the two ways of installation we discussed in the previous section. The following steps are independent of the previous chapter and can be used as a standalone reference guide for getting started with PyOpenCL directly.

Conda-based virtual environment

Now, let's create a virtual environment with Conda as a new PyCharm pure Python project:

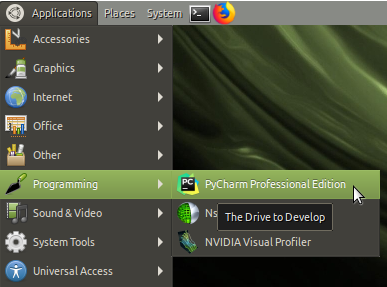
  1. Launch PyCharm Professional Edition:
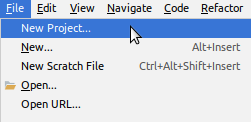
  1. Choose New Project from the PyCharm main menu. Skip this step if you've already created a project:
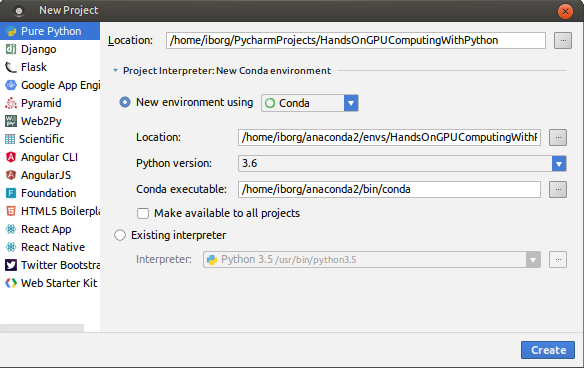
  1. Create a new virtual environment with Conda if not already present:
  1. Wait while the Conda environment gets created:

After creating the...

How computing in PyOpenCL works on Python

Like PyCUDA, PyOpenCL can help us solve a number of computational problems based on GPU computations via Python, with or without OpenCL-C/C++ code. PyOpenCL is important in regards to OpenCL because it significantly minimizes the latter's code complexity and makes it much easier and user-friendly—thanks to the simplicity of Python code. We will try to understand this through an example in this section. All PyOpenCL code in this chapter has been tested on a new AMD Radeon VII GPU.

Following our first C++ versus CUDA and OpenCL examples, we will look into a very simple PyOpenCL example with a similar approach, hands-on with PyCharm. Following this, we'll again shift our focus toward actual GPU-accelerated computations for solving specific computational problems with PyOpenCL.

We will now write a PyOpenCL program to initialize...

Comparing PyOpenCL to HIP and OpenCL – revisiting the reduction perspective

As in the previous chapter, let's compare PyOpenCL to HIP and OpenCL in terms of simplicity in parallelization before we write our first PyCUDA programs on PyCharm.

In the following table, we are exploring the scope of PyOpenCL with respect to HIP and OpenCL to note when to prefer PyOpenCL over OpenCL:

HIP

OpenCL

PyOpenCL

Based on C/C++ programming language.

Based on C/C++ programming language.

Based on Python programming language.

Includes both device and host code in a single .c or .cpp file.

Requires creation of a separate .cl file for device code along with a .c or .cpp file that calls the same code from the host for parallelization.

Includes both device and host code in a single .py file.

Uses C/C++ combined with specialized code to accelerate computations.

...

Writing your first PyOpenCL programs to compute a general-purpose solution

As we discussed in the previous section, PyOpenCL has a clear advantage with respect to code length over OpenCL and HIP as the former is Python-based. Now, let's get our hands dirty and write our first PyOpenCL code. Follow these steps to get started:

  1. First, open a new file on PyCharm:
  1. Now, let's use the following code to implement OpenCL code within a single .py Python file. This is a regular and basic format in PyOpenCL:
import pyopencl as cl # Importing the OpenCL API
import numpy # Import Numpy for using numbers
from time import time # Import access to the current time

N = 500000000 # 500 Million Elements

a = numpy.zeros(N).astype(numpy.double) # Create a numpy array with all zeroes
b = numpy.zeros(N).astype(numpy.double) # Create a second numpy array with all zeroes

a.fill(23.0) # set all...

Useful exercise on computational problem solving

You must have heard about the Body Mass Index (BMI). It is very useful for monitoring a person's health, especially in the cases of obesity and diabetes. You might have already undergone a process to determine your BMI during a routine medical checkup. BMI can also be quite significant in understanding other medical conditions. It is calculated as follows:

So, we divide the person's weight in kilograms by their squared height (in meters).

Now, suppose we have a database of millions of people with a record of their weights, along with their corresponding heights. Through GPU-accelerated computing, we can conveniently deduce the average BMI in a particular region.

Before you try to computationally solve the problem, remember to follow the four steps we discussed earlier for computing the solution.

So, our first dataset...

Summary

In this chapter, the general syntax of HIP and OpenCL code was explained with documented examples. The steps to install PyOpenCL with or without Anaconda were illustrated within an existing NVIDIA or AMD OpenCL environment. The configuration measures to set up PyOpenCL were explained step by step, we learned how computing works in Python, and the significance of computational problem solving was highlighted. With a comparison of PyOpenCL, HIP, and OpenCL, the concept of parallel reduction was revisited.

Now that this chapter is at its end, you should now be able to test your own HIP or OpenCL program. You should also be able to install and configure PyOpenCL within an existing OpenCL environment. Porting your own CUDA code to a cross-platform HIP format that can be run on both NVIDIA and AMD GPUs will also be very convenient from now on. You can now start experimenting...

Further reading

  • To maximize OpenCL CPU-GPU optimization, the following links are very much...
lock icon
The rest of the chapter is locked
You have been reading a chapter from
Hands-On GPU Computing with Python
Published in: May 2019Publisher: PacktISBN-13: 9781789341072
Register for a free Packt account to unlock a world of extra content!
A free Packt account unlocks extra newsletters, articles, discounted offers, and much more. Start advancing your knowledge today.
undefined
Unlock this book and the full library FREE for 7 days
Get unlimited access to 7000+ expert-authored eBooks and videos courses covering every tech area you can think of
Renews at $15.99/month. Cancel anytime

Author (1)

author image
Avimanyu Bandyopadhyay

Avimanyu Bandyopadhyay is currently pursuing a PhD degree in Bioinformatics based on applied GPU computing in Computational Biology at Heritage Institute of Technology, Kolkata, India. Since 2014, he developed a keen interest in GPU computing, and used CUDA for his master's thesis. He has experience as a systems administrator as well, particularly on the Linux platform. Avimanyu is also a scientific writer, technology communicator, and a passionate gamer. He has published technical writing on open source computing and has actively participated in NVIDIA's GPU computing conferences since 2016. A big-time Linux fan, he strongly believes in the significance of Linux and an open source approach in scientific research. Deep learning with GPUs is his new passion!
Read more about Avimanyu Bandyopadhyay