Reader small image

You're reading from  Hands-On Deep Learning with TensorFlow

Product typeBook
Published inJul 2017
Reading LevelBeginner
PublisherPackt
ISBN-139781787282773
Edition1st Edition
Languages
Right arrow
Author (1)
Dan Van Boxel
Dan Van Boxel
author image
Dan Van Boxel

Dan Van Boxel is a data scientist and machine learning engineer with over 10 years of experience. He is most well-known for Dan Does Data, a YouTube livestream demonstrating the power and pitfalls of neural networks. He has developed and applied novel statistical models of machine learning to topics such as accounting for truck traffic on highways, travel time outlier detection, and other areas. Dan has also published research articles and presented findings at the Transportation Research Board and other academic journals.
Read more about Dan Van Boxel

Right arrow

Chapter 3. Convolutional Neural Networks

In the previous chapter we explored deep neural networks, which required ever more parameters to fit. This chapter will guide you through one of the most powerful developments in deep learning and let us use some of our knowledge about the problem space to improve the model. First we're going to explain what a convolutional layer is in a neural net followed by a TensorFlow example. Then we'll do the same for what's called a pooling layer. Finally, we'll adapt our font classification model into a Convolutional Neural Network (CNN) and see how it does.

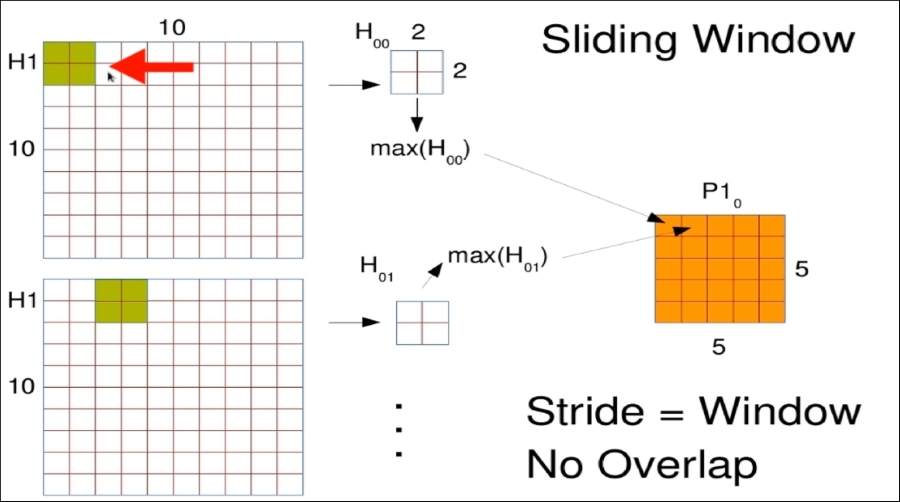
In this chapter, we will look at the background of convolutional neural nets. We will also implement a convolutional layer in TensorFlow. We will learn max pooling layers and put them into practice and implement a single pooling layer as an example.

At the end of this chapter, you will have great control over the following concepts:

  • Convolutional layer motivation

  • Convolutional layer application

  • Pooling layer...

Convolutional layer motivation


In this section, we're going to walk through using a convolutional layer on an example image. We'll graphically see how convolution is just a sliding window. Further we'll learn how to extract multiple features from a window as well as accept multiple layers of input to a window.

In a classic dense layer of a neural network for a given neuron every input feature gets its own weight.

This is great if the input features are totally independent and measure different things, but what if there is structure among your features. The easiest example to imagine this happening is if your input features are pixels from an image. Some pixels are next to each other, others are far away.

For a task like image classification, and font classification especially, it often doesn't matter where a small scale feature occurs in an image. We can look for small scale features in a larger image by sliding a smaller window throughout the image, and this is key to using the same weight...

Convolutional layer application


Now let's implement a simple convolutional layer in TensorFlow. First, we're going to go over the explicit shapes used in this example, as that's often tricky. Then we'll walk through the implementation and TensorFlow call for convolutions. Finally, we'll visually inspect the results of our convolution by passing in a simple example image.

Exploring the convolution layer

Let's jump right into the code with a fresh IPython session.

This is just a small example to help us get familiar with using TensorFlow for convolution layers.

After importing the necessary tools, let's make a fake 10x10 image but with larger values on the diagonal:

# Make some fake data, 1 data points
image = np.random.randint(10,size=[1,10,10]) + np.eye(10)*10

Note the unusual size specified in the preceding code. The 10, 10 is just the image dimensions but the 1 refers to the number of input channels. In this case, we're using one input channel, which is like a gray scale image. If you had a...

Pooling layer motivation


Now let's understand a common partner to pooling layers. In this section, we're going to learn about max pooling layers being similar to convolutional layers, although they have some differences in common usage. We'll wrap up by showing how these layers can be combined for maximum effect.

Max pooling layers

Suppose you've used a convolutional layer to extract a feature from an image and suppose hypothetically, you had a small weight matrix that detects a dog shape in the window of the image.

When you convolve this around your output is likely to report many nearby regions with dog shapes. But this is really just due to the overlap. There probably aren't many dogs all next to each other, though maybe an image of puppies would. You'd really only like to see that feature once and preferably wherever it is strongest. The max pooling layer attempts to do this. Like a convolutional layer a pooling layer works on a small sliding windows of an image.

Typically, researchers add...

Pooling layer application


In this section, we're going to take a look at the TensorFlow function for max pooling, then we'll talk about transitioning from a pooling layer back to a fully connected layer. Finally, we'll visually look at the pooling output to verify its reduced size.

Let's pick up in our example from where we left off in the previous section. Make sure you've executed everything up to the pound pooling layer before starting this exercise.

Recall we've put a 10x10 image through a 3x3 convolution and rectified linear activation. Now, let's add a 2x2 max pooling layer that comes after our convolutional layer.

p1 = tf.nn.max_pool(h1, ksize=[1, 2, 2, 1],
          strides=[1, 2, 2, 1], padding='VALID')

The key to this is tf.nn.max_pool. The first argument is just the output of our previous convolutional layer, h1. Next we have the strange ksize. This really just defines the window size of our pooling. In this case, 2x2. The first 1 refers to how many data points to pull over at once...

Deep CNN


Now, in this section, let's think big. In this section, we're going to add a convolutional and pooling layer combo to our font classification model. We'll make sure to feed this into a dense layer and we'll see how this model does. Before jumping into the new convolutional model, make sure to start a fresh IPython session. Execute everything up to num_filters = 4 and you'll be ready to go.

Adding convolutional and pooling layer combo

For our convolutional layer we're going to use a 5x5 window with four features extracted. This is a little bigger than the example.

We really want the model to learn something now. First we should use tf.reshape to put our 36x36 image into a tensor of size 36x36x1.

x_im = tf.reshape(x, [-1,36,36,1])

This is only important to keep the number of channels straight. Now we'll just set up the constants for our number of filters and window as just described:

num_filters = 4
winx = 5
winy = 5

We can set up our weight tensor just like we did in the example problem...

Deeper CNN


In this section, we're going to add another convolutional layer to our model. Don't worry, we'll walk through the parameters to make sizing line up and we'll learn what dropout training is.

Adding a layer to another layer of CNN

As usual, when starting a new model, make a fresh IPython session and execute the code up to num_filters1. Great, now you're all set to start learning. Let's jump into our convolutional model.

Why don't we be ambitious and set the first convolutional layer to have 16 filters, far more than the 4 from our old model. But, we'll use a smaller window size this time. Just 3x3. Also note that we changed some variable names such as num_filters to num_filters1. This is because we're going to have another convolutional layer in just a moment and we might want a different number of filters on each. The rest of this layer is exactly as it was before, we can convolve and do 2x2 max pooling and we use the rectified linear activation unit.

Now we add another convolutional...

Wrapping up deep CNN


We're going to wrap-up deep CNN by evaluating our model's accuracy. Last time, we set up the final font recognition model. Now, let's see how it does. In this section, we're going to learn how to handle dropouts during training. Then, we'll see what accuracy the model achieved. Finally, we'll visualize the weights to understand what the model learned.

Make sure you pick up in your IPython session after training in the previous model. Recall that when we trained our model, we used dropout to remove some outputs.

While this helps with overfitting, during testing we want to make sure to use every neuron. This both increases the accuracy and makes sure that we don't forget to evaluate part of the model. And that's why in the following code lines we have, keep_prob is 1.0, to always keep all the neurons.

# Check accuracy on train set
        A = accuracy.eval(feed_dict={x: train,
            y_: onehot_train, keep_prob: 1.0})
        train_acc[i//10] = A
        # And now the...

Summary


In this chapter, we walked through the convolutional layer on an example image. We tackled the practical aspects of understanding the convolutions. They can be convoluted but hopefully no longer confusing. We eventually applied this concept to a simple example in TensorFlow. We explored a common partner to convolutions, pooling layers. We explained the workings of max pooling layers, a common convolutional partner. Then, as we progressed, we put this into practice by adding a pooling layer to our example. We also practiced creating a max pooling layer in TensorFlow. We started adding convolutional neural nets to the font classification problem.

In the next chapter, we'll look at models with a time component, Recurrent Neural Networks (RNNs).

lock icon
The rest of the chapter is locked
You have been reading a chapter from
Hands-On Deep Learning with TensorFlow
Published in: Jul 2017Publisher: PacktISBN-13: 9781787282773
Register for a free Packt account to unlock a world of extra content!
A free Packt account unlocks extra newsletters, articles, discounted offers, and much more. Start advancing your knowledge today.
undefined
Unlock this book and the full library FREE for 7 days
Get unlimited access to 7000+ expert-authored eBooks and videos courses covering every tech area you can think of
Renews at $15.99/month. Cancel anytime

Author (1)

author image
Dan Van Boxel

Dan Van Boxel is a data scientist and machine learning engineer with over 10 years of experience. He is most well-known for Dan Does Data, a YouTube livestream demonstrating the power and pitfalls of neural networks. He has developed and applied novel statistical models of machine learning to topics such as accounting for truck traffic on highways, travel time outlier detection, and other areas. Dan has also published research articles and presented findings at the Transportation Research Board and other academic journals.
Read more about Dan Van Boxel