Reader small image

You're reading from  Arduino By Example

Product typeBook
Published inSep 2015
Reading LevelIntermediate
Publisher
ISBN-139781785289088
Edition1st Edition
Languages
Tools
Right arrow
Authors (2):
 Adith Jagadish Boloor
Adith Jagadish Boloor
author image
Adith Jagadish Boloor

Adith Jagadish Boloor was born in Mangalore, India. He grew up tinkering with toys and gadgets that kindled his interest in how things work. His admiration for science and technology, specifically in the fields of robotics, 3D printing, and smart systems, grew into a passion that he is working towards, nurturing it into a career. He completed his higher studies at Purdue University, USA and Shanghai Jiao Tong University, China and is working towards obtaining a masters degree in robotics. Adith has experience working on robots ranging from simple obstacle—avoiding robots built at home to complex humanoid robots such as the Darwin-OP in Purdue University's research lab. He has coauthored a research paper and has two patents on his name. He enjoys traveling and grabs every opportunity he can to explore the different parts of the world. He is also an international chess player.
Read more about Adith Jagadish Boloor

Adith Jagdish Boloor
author image
Adith Jagdish Boloor

<p>Adith Jagadish Boloor was born in Mangalore, India. He grew up tinkering with toys and gadgets that kindled his interest in how things work. His admiration for science and technology, specifically in the fields of robotics, 3D printing, and smart systems, grew into a passion that he is working towards, nurturing it into a career. He completed his higher studies at Purdue University, USA and Shanghai Jiao Tong University, China and is working towards obtaining a masters degree in robotics.</p> <p>Adith has experience working on robots ranging from simple obstacle—avoiding robots built at home to complex humanoid robots such as the Darwin-OP in Purdue University's research lab. He has coauthored a research paper and has two patents on his name.</p> <p>He enjoys traveling and grabs every opportunity he can to explore the different parts of the world. He is also an international chess player.</p>
Read more about Adith Jagdish Boloor

View More author details
Right arrow

Chapter 8. Robot Dog – Part 1

We've finally made it to the last project. More than the destination, I hope the journey so far has been enjoyable and educational. The previous chapter was on relays, relays, and more relays. Home automation is a very much an upcoming field, and I am glad that we had the opportunity to build a project that helped us to learn about it. We learned to communicate through Wi-Fi via the CC3000 Arduino shield. Using this, we were able to control the Arduino using our smart device, and ultimately we controlled all electrical home appliances. We also used BitVoicer, running on the computer, to enable speech control.

Now, coming back to this chapter, we will be building a robot dog. Cool! That's right. This is one of my personal favorites. We will be using everything that we have learned so far in order to create a small quadruped (four-legged) robot with a lot of capabilities, which you will learn about soon. You are warned that this project is very hard. Why? This...

Prerequisites


To minimize the cost of this project, while also trying to teach you that sometimes household items can be used in creative ways as materials for a project, we will be using ice cream sticks to create the chassis (ice-cream sticks should be available in your local stationery store; if you, however, choose to acquire the ice cream sticks by visiting your local ice cream parlor every day and get sick of doing so, I am not responsible; nevertheless, this is the way to go).

The rest of the components needed for this project are as follows:

  • 1x Arduino MEGA 2560

  • 1x USB cable A to B (also known as the printer cable)

  • 12 x 9g Micro servos (2+ extra servos recommended)

  • 1x Breadboard

  • 40x Male-to-male connecting wires

  • 20x Male-to-female connecting wires

  • 20x Ice cream/popsicle sticks

  • 1x Wood glue

  • 1x Ruler/measuring tape

  • 1x Regular-type screwdriver

  • 1x Multimeter

  • 1x 7.4V (2 Cell) 2200 mAh (or above) LiPo battery

  • 1x 3A UBEC (Universal Battery Elimination Circuit)

  • 1x XT60 male

  • 1x 7.4V 500 mAh LiPo battery

  • 1x...

Introducing Arduino MEGA 2560


In this section, we will briefly go through the Arduino MEGA 2560 board. We will understand how it is different from the Arduino UNO, and also see why we chose this board over the Arduino UNO.

The microcontroller

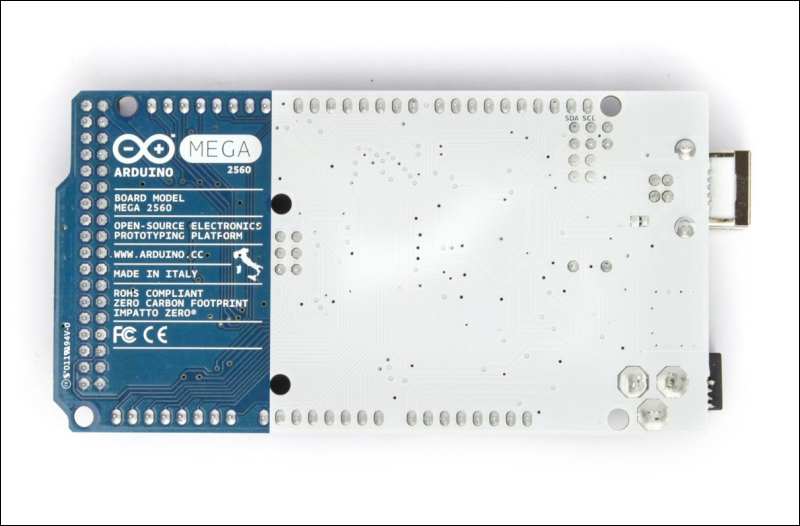
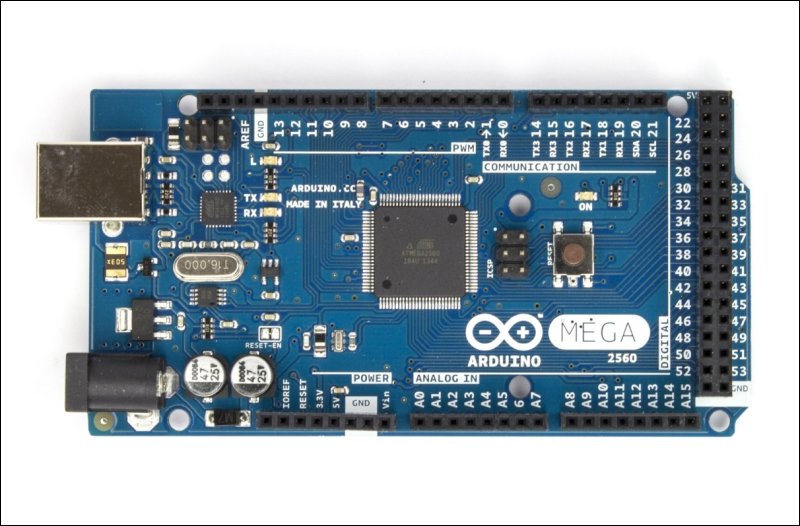
As mentioned before, Arduino MEGA 2560 is like a big brother of Arduino UNO. It is almost twice as long and way more powerful; Arduino MEGA 2560 is the successor of Arduino MEGA. Unlike Arduino UNO, MEGA 2560 has 54 digital input and output pins, as shown in the following image:

With the bottom looking like this:

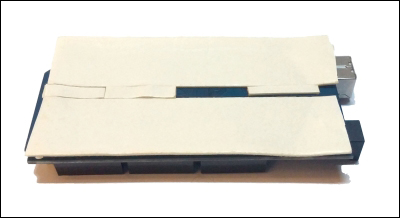
Before we get started with using the board, it is a good idea to use one side of the double-sided tape to cover the base of the board. This is to ensure that, while in use, the Arduino does not get short-circuited if the base makes contact with a conductive material. Stick a double sided tape to the bottom of the Arduino like this:

On the right side of the MEGA (short for Arduino MEGA 2560), you will notice some missing labels. The following image...

Understanding power requirements


The basic necessity for any electro-mechanical device is a power source. Selecting the right power source for a particular device is an important trick of trade that every Arduino tinkerer needs to know. This is exactly what will be taught in this section.

Limitations of Arduino MEGA 2560

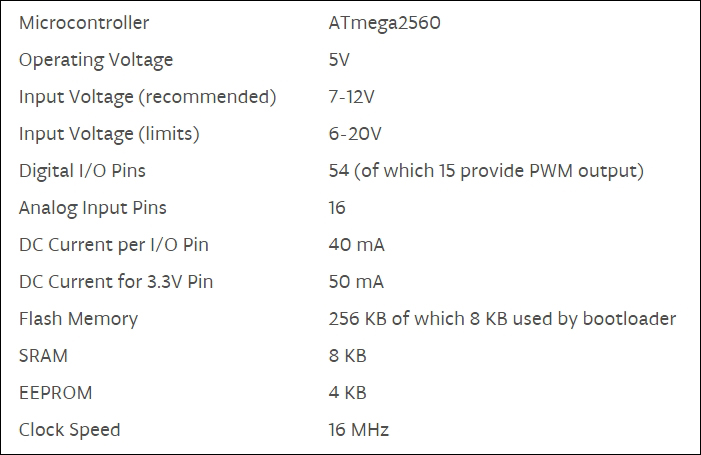
If you look at the specifications of Arduino MEGA 2560 on the Arduino website, you will see the following:

The important thing to note is the operating voltage that says 5V. This means that no matter how large of an input voltage you put in, the MEGA will always convert it to 5V. In reality, it will be slightly less than 5V due to miscellaneous resistances. Another thing to note is the DC current per I/O pin that says 40 mA. An average micro servo has a voltage rating of 4.8 - 6V, and under heavy load, its current consumption can reach up to 1A that is 1000mA. So, it is surprising that MEGA could even power one servo sufficiently.

Choosing the right power source

Since we are...

Building the chassis


A robot always comprises of three fundamental fields. They are mechanical, electrical, and programming. Working out the power requirements falls into the electrical aspect. Writing code to control the motion of the servos falls under the programming category. Building and ensuring the chassis can support the weight of all the components that the bot is carrying is a mechanical challenge that will be addressed in this section.

Using prior art

Before rushing into the building phase of the body of the robot, let us take a moment to understand what we are even trying to build in the first place. We are making a robot dog. So, let us look at the nature and see how a dog stands and moves.

It is very hard for us to replicate the dog at its entirety. This is mostly because an actual dog uses strong muscles in its legs to walk (jump), and we are using servos. Now, let us look at the following bone anatomy of a dog to get a deeper look at the skeletal structure that allows the dog...

Summary


This chapter is very different from the previous chapters that we have gone through. This is because, in this chapter, we looked at every detail to ensure that the learning process aids in your future projects. We started by introducing ourselves to the Arduino MEGA 2560 and even ran the Blink example, which we had executed a long while ago in the very first chapter with Arduino UNO. After that we learnt about servos. What they are and how they are programmed. While programming multiple servos, we faced issues that were concerned with the power requirements for the servos. In the subsequent section, we learned how to select a suitable battery to nullify the issue. We even tested this out and were able to successfully control all the 12 servos through the Arduino MEGA. Then, we imitated the process of building the chassis by looking at the prior art of dogs, and created a simple sketch that helped us visualize what we are ultimately going to build.

In the next chapter, we will actually...

lock icon
The rest of the chapter is locked
You have been reading a chapter from
Arduino By Example
Published in: Sep 2015Publisher: ISBN-13: 9781785289088
Register for a free Packt account to unlock a world of extra content!
A free Packt account unlocks extra newsletters, articles, discounted offers, and much more. Start advancing your knowledge today.
undefined
Unlock this book and the full library FREE for 7 days
Get unlimited access to 7000+ expert-authored eBooks and videos courses covering every tech area you can think of
Renews at $15.99/month. Cancel anytime

Authors (2)

author image
Adith Jagadish Boloor

Adith Jagadish Boloor was born in Mangalore, India. He grew up tinkering with toys and gadgets that kindled his interest in how things work. His admiration for science and technology, specifically in the fields of robotics, 3D printing, and smart systems, grew into a passion that he is working towards, nurturing it into a career. He completed his higher studies at Purdue University, USA and Shanghai Jiao Tong University, China and is working towards obtaining a masters degree in robotics. Adith has experience working on robots ranging from simple obstacle—avoiding robots built at home to complex humanoid robots such as the Darwin-OP in Purdue University's research lab. He has coauthored a research paper and has two patents on his name. He enjoys traveling and grabs every opportunity he can to explore the different parts of the world. He is also an international chess player.
Read more about Adith Jagadish Boloor

author image
Adith Jagdish Boloor

<p>Adith Jagadish Boloor was born in Mangalore, India. He grew up tinkering with toys and gadgets that kindled his interest in how things work. His admiration for science and technology, specifically in the fields of robotics, 3D printing, and smart systems, grew into a passion that he is working towards, nurturing it into a career. He completed his higher studies at Purdue University, USA and Shanghai Jiao Tong University, China and is working towards obtaining a masters degree in robotics.</p> <p>Adith has experience working on robots ranging from simple obstacle—avoiding robots built at home to complex humanoid robots such as the Darwin-OP in Purdue University's research lab. He has coauthored a research paper and has two patents on his name.</p> <p>He enjoys traveling and grabs every opportunity he can to explore the different parts of the world. He is also an international chess player.</p>
Read more about Adith Jagdish Boloor