Reader small image

You're reading from  Arduino Data Communications

Product typeBook
Published inNov 2023
PublisherPackt
ISBN-139781837632619
Edition1st Edition
Right arrow
Author (1)
Robert Thas John
Robert Thas John
author image
Robert Thas John

Robert Thas John is a data engineer with a career that spans two decades. He manages a team of data engineers, analysts, and machine learning engineers – roles that he has held in the past. He leads a number of efforts aimed at increasing the adoption of machine learning on embedded devices through various programs from Google Developers and ARM Ltd, which licenses the chips found in Arduinos and other microcontrollers. He started his career as a software engineer with work that has spanned various industries. His first experience with embedded systems was in programming payment terminals.
Read more about Robert Thas John

Right arrow

Implementing REST and MQTT Protocols for Communication

Database management systems (DBMSs) are good at storing and retrieving data, but they are not normally designed for communicating over the internet. Furthermore, while they can handle large amounts of data, they are not designed to handle this from thousands of sources. This is where REpresentational State Transfer (REST) and Message Queueing Telemetry Transport (MQTT) come in handy. These two protocols make it possible for us to build third-party applications to communicate with a DBMS at scale. You will be setting up REST and MQTT services in this chapter.

In this chapter, we are going to cover the following main topics:

  • Working with RESTful APIs in Node.js and JavaScript
  • Working with RESTful APIs in Python
  • Working with MQTT

By the end of this chapter, you will have set up infrastructure that makes it possible to communicate with your DBMS over a network or the internet.

Technical requirements

You will be working with Structured Query Language (SQL), Python, and JavaScript in this chapter. The code for this chapter is available at the following GitHub URL: https://github.com/PacktPublishing/Arduino-Data-Communications/tree/main/chapter-5.

Working with REST

Most DBMSs will ship with an interface that makes it possible to interact with the server, type in commands, and get responses. You have seen this at play when logging into the server remotely and typing in mysql from the command line.

REST makes it possible to communicate with an application server over HyperText Transfer Protocol (HTTP), which, in turn, communicates with a DBMS using any native technology that is supported. HTTP and HTTPS are normally the first part of most URLs that you type into the address bar of a browser. HTTPS is HTTP with a secure component.

Both HTTP and HTTPS tell the browser how to communicate with the server that it is connecting to. Most DBMSs are not designed to work with HTTP or HTTPS, so we will need to set up a separate component (called middleware) that will communicate with the DBMS while exposing an HTTP or HTTPS interface.

Before we do that, let’s set up some tables within the telemetry schema in our MySQL database...

Working with SQL

Creating tables in SQL falls into a class of operations called data definition language (DDL). However, working with data falls into a class called data manipulation language (DML). DML falls into four categories that are frequently called create, retrieve, update, and delete (CRUD). Let’s take a brief look at CRUD.

Project 2 – Inserting data into a MySQL table

We must create operations and insert data into a table. This uses an INSERT statement in SQL. The script for this project is available at https://github.com/PacktPublishing/Arduino-Data-Communications/blob/main/chapter-5/MySQL-Create-Tables/insert_data.sql.

Follow these steps to insert data into the tables:

  1. Log into the remote server using the following shell command, making sure you replace the IP address with your server’s:
    ssh username@192.168.68.127
  2. Log into MySQL using the following shell command, making sure you replace the username with the appropriate value:
    mysql...

Implementing a REST API using JavaScript

So far, we have learned about creating tables, as well as inserting, updating, and deleting data using a relational database and a terminal. However, we do not have access to this terminal from our microcontrollers. To communicate with our database server from the microcontrollers, we will introduce a middleware, called an API server. There are various types of APIs but we will utilize REST.

We will implement a REST API using a server-side version of JavaScript called Node.js. From the website, it is described as an asynchronous, event-driven JavaScript runtime that lets you run JavaScript code outside of a web browser. You can learn more about it at https://nodejs.org/en. Let’s begin by installing the Node.js CLI from the Ubuntu CLI.

Installing Node.js

Follow these steps to install Node.js on your instance of Ubuntu Server:

  1. Log into the remote server using the following shell command, making sure you replace the IP address...

Implementing a REST API using Python

If you are familiar with Python programming, then you might find yourself wondering whether you can write your APIs using Python instead of JavaScript. The answer is in the affirmative, and we are going to do just that.

We will make use of Python 3 and FastAPI to create the REST API that we need. FastAPI is a Python framework for building APIs. Python can be downloaded at https://www.python.org/downloads/.

Follow these steps to confirm that you have Python installed:

  1. The first thing that you need to do is confirm that you have a version of Python installed that is at least 3.7. You can do that by running the following command from your CLI:
    python -V

    You should get an output similar to the following if you have Python installed:

Figure 5.18 – The result of checking the Python version

Figure 5.18 – The result of checking the Python version

  1. If you don’t have Python installed, please visit the Python downloads page to get the right version...

REST API for InfluxDB

InfluxDB has an API baked in that makes it possible to make CRUD calls without having to implement a separate application.

Let’s begin by getting some sample data into our instance of InfluxDB.

Getting sample data into InfluxDB

Follow these steps to create a bucket and populate it with some sample data:

  1. Browse to the URL of the server that hosts your InfluxDB instance. The format of the URL is http://192.168.68.127:8086/. Ensure that you replace the IP address in the URL with the one for your server.
  2. Sign in with your username and password.
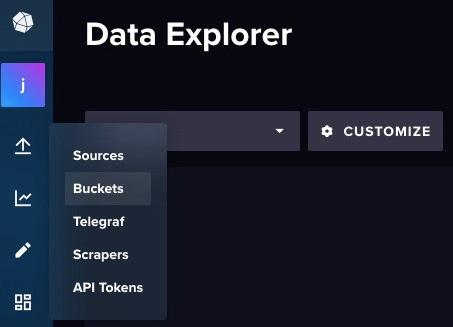
  3. Use the menu on the left to navigate to the Buckets screen, as shown in the following screenshot:
Figure 5.21 – Navigating to the Buckets screen

Figure 5.21 – Navigating to the Buckets screen

  1. Click on the + CREATE BUCKET button on the right of the screen, then fill in noaa in the Name field. Since this is a private server, I will set Delete Data to NEVER. If you would like to have InfluxDB manage...

Working with MQTT

MQTT implements publish-subscribe machine-to-machine (M2M) communications in a lightweight manner. This makes it possible to communicate over limited bandwidth. It implements a broker, which you can think of as a stand-in for the post office. Brokers have topics, and endpoints publish messages into these topics. Other endpoints then subscribe to these topics and are notified when new messages are published.

MQTT brokers make it possible for IoT devices to communicate without knowing their addresses using topics. They also keep track of which clients are connected to the network using a keep-alive messaging system. MQTT has three key benefits:

  • Efficiency: The implementation uses the least amount of energy and data to send messages across
  • Reliability: The implementation has various quality-of-service levels that determine how messages are stored by the broker and either sent to clients or received by clients
  • Flexibility: The implementation lets developers...

Summary

In this chapter, you learned how to configure a REST API layer so that you can communicate with an RDBMS over the internet. You also learned how to communicate with InfluxDB over a REST API. Finally, you learned about MQTT and also configured an MQTT broker and Telegraf so that data sent over MQTT can end up in the database.

In the next chapter, we will discuss the various communication technologies that you can utilize to move data from your Arduino board into these databases.

Further reading

To learn more about the topics that were covered in this chapter, take a look at the following resources:

lock icon
The rest of the chapter is locked
You have been reading a chapter from
Arduino Data Communications
Published in: Nov 2023Publisher: PacktISBN-13: 9781837632619
Register for a free Packt account to unlock a world of extra content!
A free Packt account unlocks extra newsletters, articles, discounted offers, and much more. Start advancing your knowledge today.
undefined
Unlock this book and the full library FREE for 7 days
Get unlimited access to 7000+ expert-authored eBooks and videos courses covering every tech area you can think of
Renews at $15.99/month. Cancel anytime

Author (1)

author image
Robert Thas John

Robert Thas John is a data engineer with a career that spans two decades. He manages a team of data engineers, analysts, and machine learning engineers – roles that he has held in the past. He leads a number of efforts aimed at increasing the adoption of machine learning on embedded devices through various programs from Google Developers and ARM Ltd, which licenses the chips found in Arduinos and other microcontrollers. He started his career as a software engineer with work that has spanned various industries. His first experience with embedded systems was in programming payment terminals.
Read more about Robert Thas John