Search icon
Arrow left icon
All Products
Best Sellers
New Releases
Books
Videos
Audiobooks
Learning Hub
Newsletters
Free Learning
Arrow right icon
Creative Motion Mastery with Adobe After Effects

You're reading from  Creative Motion Mastery with Adobe After Effects

Product type Book
Published in Feb 2024
Publisher Packt
ISBN-13 9781804617281
Pages 332 pages
Edition 1st Edition
Languages
Author (1):
Vishu Aggarwal Vishu Aggarwal
Profile icon Vishu Aggarwal

Table of Contents (18) Chapters

Preface 1. Part 1: Working with Motion Graphics
2. Chapter 1: Getting to Know the User Interface and Workflow 3. Chapter 2: Applying Effects and Presets to Create Animated Graphics 4. Chapter 3: Deep-Dive into Text Animations 5. Chapter 4: Animating Shape Layers 6. Chapter 5: Adding Motion to Photoshop and Illustrator Graphics 7. Chapter 6: Creating Motion Graphic Templates for Premiere Pro 8. Part 2: Post-Production and Visual Effects
9. Chapter 7: Color Correction and Color Grading 10. Chapter 8: Rotoscoping and Mask Tracking Techniques 11. Chapter 9: Chroma Keying 12. Chapter 10: Working with Particle Simulations 13. Part 3: 2D and 3D Tracking, and Rendering
14. Chapter 11: Working with 2D and 3D Tracking 15. Chapter 12: Exporting and Managing Projects 16. Index 17. Other Books You May Enjoy

Adding Motion to Photoshop and Illustrator Graphics

Adobe After Effects is one of the best tools for creating animations, with a wide range of applications. With the cross-suite compatibility of Adobe Photoshop and Adobe Illustrator, creating animations for various purposes such as social media posts has become convenient and hassle-free.

In this chapter, we are going to learn how to use various pre-defined options in Adobe After Effects, along with other animation concepts such as parenting layers, using the Graph Editor, working with loop expressions, adding audio, and much more.

The main topics we’ll cover in the chapter are as follows:

  • Creating a master composition
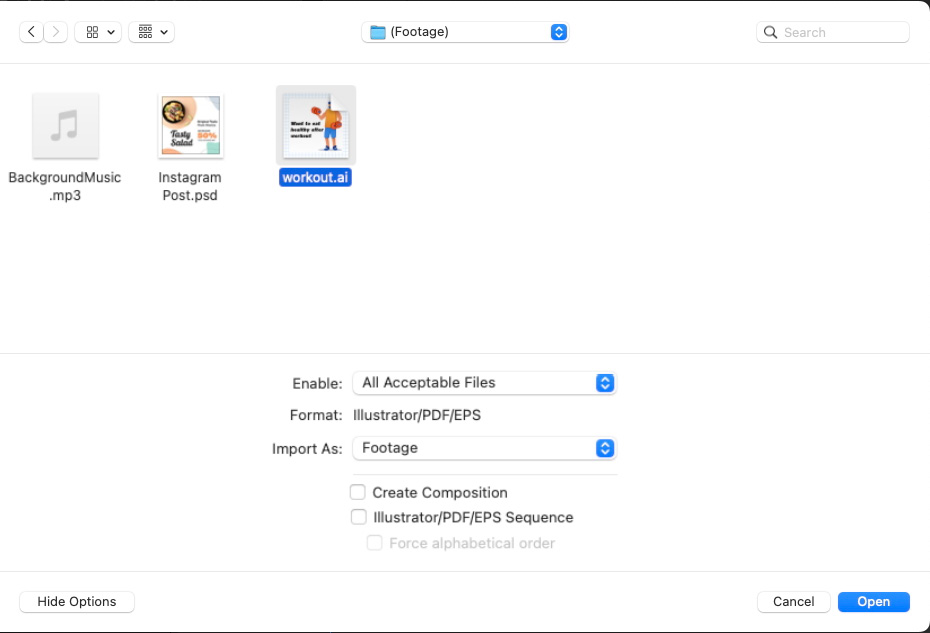
  • Importing files from Photoshop and Illustrator in After Effects
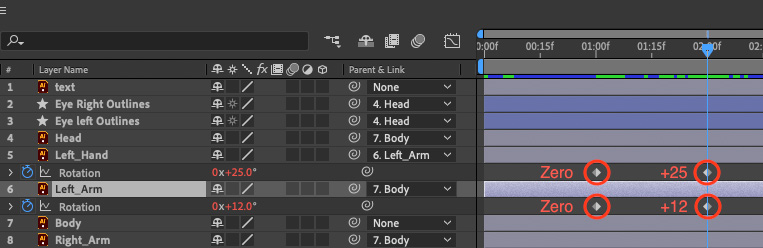
  • Parenting layers
  • Animating layers in After Effects
  • Working with the Graph Editor
  • Adding audio

Technical requirements

The lesson files for this chapter can be found at https://packt.link/gbz/9781804617281.

Before starting the chapter, it would be good to preview the final output and end project file with the Chapter 5 | Lesson 5 exercise files. By doing so, you can gain a clear understanding of the desired outcome and have a visual representation of what you will be working towards throughout the chapter.

Previewing the final output allows you to see the completed project, demonstrating how the various elements, effects, and animations come together. You can observe the overall look and feel, the arrangement of the different components, and how they interact with each other. This preview serves as a reference point, giving you a target to aim for as you progress through the chapter.

Creating a master composition

Before we import the required lesson files and start working with them, let’s create one empty composition as a master composition, which we will use at the end of the lesson to combine any two compositions. Create the master composition as follows:

  1. Go to composition in the main menu | New Composition….
  2. In the Composition Settings pop-up window, change the composition name to Master_Comp.
  3. Change the Preset setting to Social Media Square • 1080x1080 • 30 fps.
  4. Change the duration to 15 seconds, and click OK.

Figure 5.1 shows these steps:

Figure 5.1: The new composition settings

Figure 5.1: The new composition settings

We create this composition to establish it as the default setting for the compositions that After Effects will automatically generate when we import an Illustrator file as a composition. Now, we are ready to import the required files for this project.

Importing Illustrator and Photoshop files

In this section, we will look into how to import the layered files of Illustrator and Photoshop in After Effects and convert them into a composition in After Effects, allowing individual layers to be animated.

Importing Illustrator files

Before we start working on shape layers and tools, let us create a new project and import the Illustrator file, as follows:

  1. Go to File | New | New project.
  2. Then, double-click in the Project window to open the import window, or go to File | Import | File….
  3. Select the workout.ai file from the project file in the footage folder.
  4. Keep the import options as the default, and then click Open:
Figure 5.2: The import options settings

Figure 5.2: The import options settings

Now, a pop-up window will appear for the import options. This appears whenever an Adobe Illustrator or Photoshop file is imported in After Effects, but only if you import a single file at a time.

  1. In the pop-up window...

Setting up the workout composition for animation

First, we will start with the animation of the workout composition. We will learn how to animate the Illustrator layers of in the workout composition, creating an animation of the character in the Illustrator file, and we will learn how to link the layers using the parent and link feature in After Effects.

Before we start animating the layers, we need to fix the layers’ anchor points and convert the eye layers into the shape layers of After Effects.

Fixing anchor points

Let’s start by fixing the layers’ anchor points so that the layers can animate as per the movement of body joints. Change the anchor points as follows:

  1. Select the Head layer in the timeline and go to the toolbar to select the Pan Behind tool and move the anchor point of the Head layer to the bottom center of the head, near the neck point. We are going to do a similar setup for the rest of the layers as well.
Figure 5.6: The Head layer anchor point mapped ...

Animating the workout composition

We have set up everything needed to animate the workout animation. We have set up anchor points and linked the layers, which was essential for the character animation. Now, we will look at the animation of the layers, working with the Graph Editor and using expressions in After Effects.

Animating the hand layers

Let us start by animating the hands of the character, as follows:

  1. Select both the Left_Arm and Left_Hand layers, and reveal the rotation property by using the R shortcut.
  2. Now, place the playhead at 1 second, and enable the stopwatch of the Left_Arm and Left_Hand layers.
  3. Then, place the playhead at 2 seconds, and change the values of Left_Arm to +25.0 and Left_Hand to +12.0:
Figure 5.14: The Left_Arm and Left_Hand layers’ animations

Figure 5.14: The Left_Arm and Left_Hand layers’ animations

Now, we will perform similar steps for the Right_Arm and Right_Hand layers.

  1. Select both the Right_Arm and Right_Hand layers, and reveal the rotation...

Animating the Instagram Post 2 composition

For this composition, we are mainly going to use preset animations and see how Photoshop layers can be animated in After Effects.

Animating graphic layers

Let’s start first by animating the black line in the composition, which is named the lines layer. We will convert the lines layer into dashed animated lines. To do so, follow these steps:

  1. Select the lines layer in the timeline, go to the Effects menu | Distort, and then select the Wave Warp effect.
  2. Now, in the Effects Controls panel, change Wave Type from Sine to Square:
Figure 5.27: The Wave Warp type changed to Square in the lines layer

Figure 5.27: The Wave Warp type changed to Square in the lines layer

This animates the lines and gives them a motion effect.

  1. Now, move the playhead to 1 second, change the opacity of the lines layer to 0%, and enable the stopwatch to add a keyframe.
  2. Place the playhead at 2 seconds, and change the opacity to 100%.

    This will reveal the lines layer from 1...

Combining compositions in a master composition

Now, we will add the workout and Instagram Post 2 compositions to one master composition, which we created in the Creating a master composition section, named Master_Comp. We will also add audio to this composition. Follow these steps to achieve this:

  1. Locate the Master_Comp composition in the Project panel, and double-click to open it in the Timeline panel.
  2. Now, locate the workout and Instagram Post 2 compositions in the Project panel, and drag and drop them into Master_Comp:
Figure 5.37: The workout and Instagram Post 2 composition placed in Master_Comp

Figure 5.37: The workout and Instagram Post 2 composition placed in Master_Comp

  1. We will trim the end of the workout composition by 6 seconds. To do so, place the playhead at 6 seconds, select the workout composition, and use the Alt + ] (Windows) or Opt + ] (Mac) shortcut to trim the end of it by 6 seconds.
  2. Place the playhead at 5 seconds, select the Instagram Post 2 composition, and use the [ (left square bracket...

Summary

In this chapter, we created an animated Instagram post. We learned how to import files with different file formats in After Effects. We saw how easily Adobe Illustrator and Photoshop files can be imported into After Effects, and we saw how we can animate them to quickly create motion graphics without designing anything ourselves.

We also looked at how parenting and links work and how it is helpful in the animation of characters. We also saw how the Graph Editor can be useful to bring animations to life and what expressions are available in After Effects. Expressions are pretty useful, so explore more about them yourself. We also explored the concepts of applying animation presets, timing keyframes, animating layer properties, and so on.

In the next chapter, we will learn how we can create motion graphic templates for Premiere Pro, using the Essential Graphics panel in After Effects. We will also see how we can add customization controls to templates so that they can be...

lock icon The rest of the chapter is locked
You have been reading a chapter from
Creative Motion Mastery with Adobe After Effects
Published in: Feb 2024 Publisher: Packt ISBN-13: 9781804617281
Register for a free Packt account to unlock a world of extra content!
A free Packt account unlocks extra newsletters, articles, discounted offers, and much more. Start advancing your knowledge today.
Unlock this book and the full library FREE for 7 days
Get unlimited access to 7000+ expert-authored eBooks and videos courses covering every tech area you can think of
Renews at $15.99/month. Cancel anytime}