Chapter 5. Customizing the Scene View
Unity's component system and also the ability it offers to see the scene you are building in real time makes it very easy to work with. The Scene View in Unity provides the tools to interact with all the objects of the scene, and also offers the ability to navigate between them just to check whether everything is place.
There are a few Editor classes that allow you to interact with the Scene View through code, offering the ability to make customizations. Understanding how to achieve these kinds of things is very important when you start creating more interactive and complex tools for your video game projects.
Here we are going to learn how to customize the Scene View to make it suitable for our Level Creator tool requirements, such as creating, editing, and deleting level piece prefabs from the level scene.
In this chapter, we will cover the following topics:
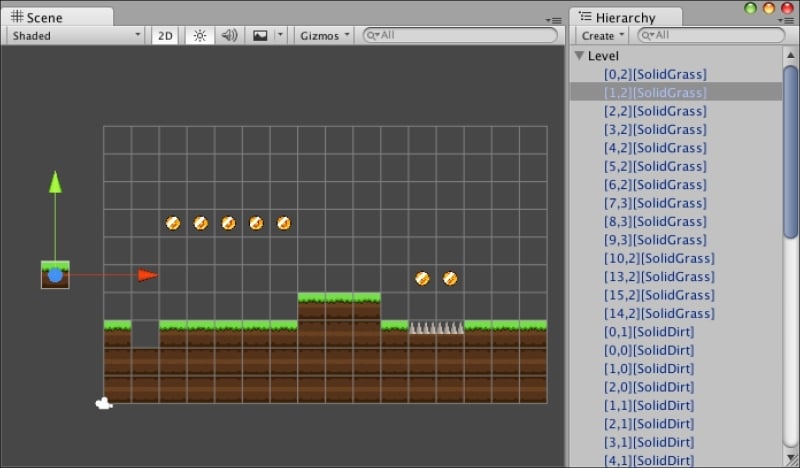
The Scene View is an editor window that allows you to look around your game scene and manipulate its contents. The following screenshot illustrates the Scene View:
At this point you know that almost everything in Unity is customizable, and the Scene View is no exception.
In this chapter, we will cover how to add GUI to the Scene View and change the common behavior it has to make it work specifically for our Level Creator tool.
Defining the chapter goals
In this chapter we want to customize the Scene View to follow the workflow of the Level Creator tool, this means the user is capable of viewing the level and adding, deleting, and editing level piece prefabs.
The goals here are:
Defining the Level Creator interaction modes
Adding the necessary GUI to support the mode selection
Capturing mouse events
Implementing the functionality of each mode
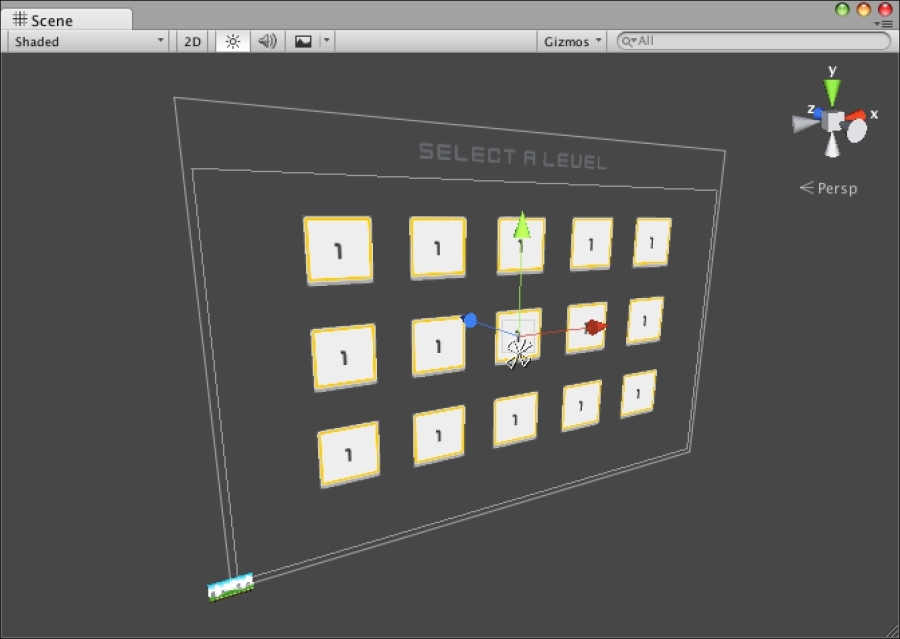
The final result that we will achieve looks like this:
Note
As we mentioned in Chapter 2, Using Gizmos in the Scene View, we will assume that the Level...
Defining the Editor modes
The Level Creator tool is going to have four different modes:
View: You can move, orbit, or zoom around the level grid. This is just the default behavior Unity has when you select the hand tool.
Paint: By clicking or dragging the mouse on the level grid, you can add level piece prefabs to it. The piece you will be "painting" in the level grid is the one you selected on the Palette window.
Edit: By clicking on a piece from the level grid you can access its properties in the Level Inspector and make tweaks to it if necessary.
Erase: By clicking or dragging the mouse on the level grid over existing pieces, you can remove them.
In the LevelInspector class, we are going to add an enum to list these modes and a variable to save the one that is currently active:
Customizing the Scene View
In this section we are going to take a look how to create a custom GUI in the Scene View and change its default behavior.
Using the OnSeceneGUI message method
To start rendering a GUI in Scene View, we are going to make use of a message method part of the Editor class, OnSeceneGUI.
In terms of GUI creation, we can make use of all the techniques we learned in the previous chapters working with custom inspectors and editor windows. In this case, we are going to use a toolbar component like the one used in the Palette window to simulate the tabs.
To see how this works, we are going to create a toolbar attached to the left top corner of the scene view. Each item of this toolbar will be one of the possible modes.
Let's add this method with the following code inside the LevelInspector class:
Detecting Scene View events
Most of the interaction with Level Creator is going to be performed through the mouse. In this section, will learn how to capture events in the Scene View.
Getting the mouse position
The Event class, part of the UnityEngine namespace, allows you to handle user inputs such as key presses or mouse actions.
Let's update the method EventHandler inside the LevelInspector class:
The variable Event.current has the information about the current event that's being processed in the Scene View.
From current, we are accessing the variable mousePosition to determine in which X and Y positions, relative to the Scene View coordinate system, the cursor of the mouse is found.
Save the changes and wait for Unity to compile. Now create a new level scene, select...
Implementing the Level Creator modes
Until this point, we have specified the four modes the Level Creator tool would support and a way to switch between modes, thanks to the custom GUI we added in the top-left corner of the Scene View.
In this section, we discuss how to implement each of them.
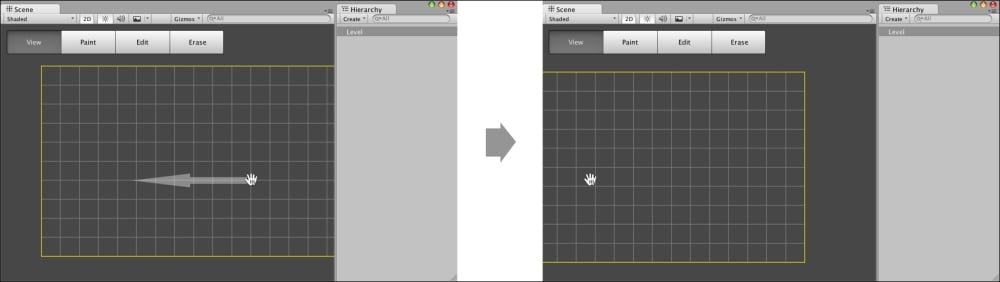
When you select View on Level Creator, you can move or zoom around the level grid.
In the method ModeHandler we defined, this mode will behave like the Unity View Transform tool. Let's take a look at following screenshot:
By default, you will see the hand icon on this mode; by clicking and dragging, you can move all the content in the Scene View.
We started implementing part of the workflow related to this mode in the previous chapters. When this mode is selected, the user must select a piece from the Palette window, and a reference to this selection will be saved in the variable _pieceSelected in the LevelInspector class.
When the user starts clicking and dragging the mouse over...
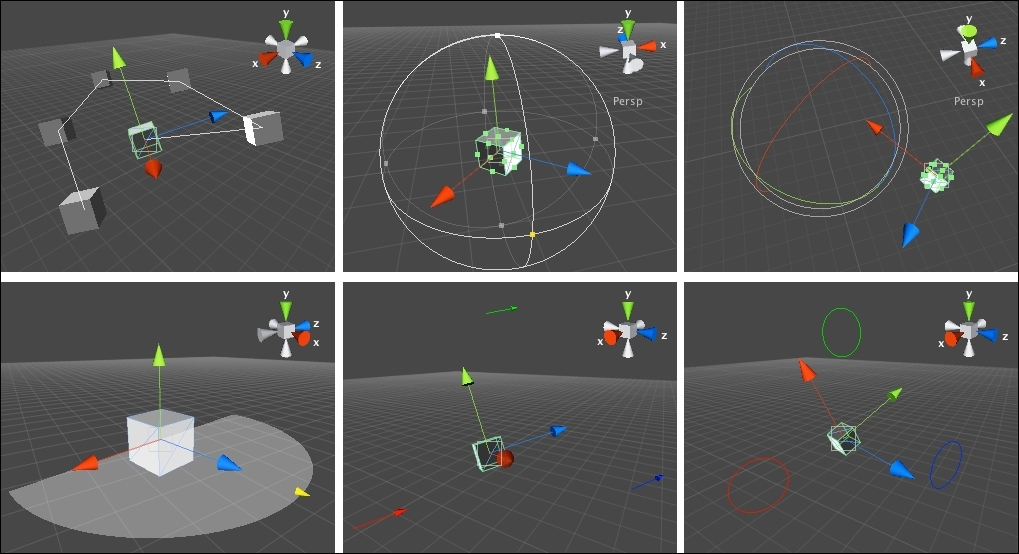
In this section, we are going to extend the capabilities to the Edit mode, allowing the user to also reallocate the position of the pieces in the grid. To achieve this, we will use the class Handles.
In Unity, a handle is a 3D control you use to manipulate items in the Scene View. The Handles class allows you to use several built-in handle GUIs, such as the tools to position, scale, and rotate an object via the Transform component. Let's take a look at the following screenshot:
The Handles class is also used to add the GUI to the Scene View. We did that at the beginning of the chapter using the methods BeginGUI and EndGUI.
Let's make the necessary changes to make this work. Let's add this code snippet defining two variables to the LevelInspector class to save the original position of the piece:
Then we will create a new method called Move:
Adding the final details to Level Creator
The Level Creator is almost ready, but before finishing this chapter, let's make a few improvements to make this tool better.
Currently, each time we paint pieces on the level, they are created and nested in the level game object. We are still able to access the objects directly; this means it is possible to move a piece by error outside the grid. Let's take a look at the following screenshot:
To control the visibility of the level pieces in the hierarchy, we are going to use HidingFlags, bit masks that control object destruction, saving, and visibility in inspectors. Here is a list of available flags that could be applied to Unity objects:
None: A normal and visible object. This is the default.
HideInHierarchy: It does not appear in the hierarchy.
HideInInspector: It is not visible in the inspector.
DontSaveInEditor: It is not saved to the scene in the editor.
NotEditable: It is not editable in the inspector.
DontUnloadUnusedAsset...
In this chapter, we learned about how to add a GUI to the Scene View and change its common behavior.
The Scene View is an editor window that allows you to preview and interact with your scene. You can add a custom GUI using the methods BeginGUI and EndGUI from the Handles class.
The Handles class is also useful to help us to manipulate game objects in the scene, creating specific GUI that allows modification of the transform of these objects.
We also learned to use the HidingFlags, allowing us to manipulate the visibility of our game objects in the Editor and also to control whether they are going to be saved to disk or not. This becomes handy when you need extra control to make your custom tools.
You can capture events in the Scene View using the Event class, and can use that input to trigger your custom methods.
We now have all the GUI and workflow implemented for our Level Creator. In the next chapter, we will pay attention to the look and feel of our tool.