Chapter 2. Using Gizmos in the Scene View
When you are working on a video game and you need to debug features, it's very helpful to have a visual representation of certain structures you are using in the code. For example, imagine that you have a set of waypoints to model the movement of a Non Playable Character (NPC) in your video game. If it is possible for you to see the waypoints, it will be easier for you to make tweaks and readjust the movement paths.
Thankfully, in Unity there's a class called Gizmos that allow us to add visual aids to the Scene View in an easy way.
Here, you will learn about the Gizmos class and how to use this to create a visual grid that will help level designers position the level piece prefabs with more control in the level.
In this chapter we will cover the following topics:
In Unity, a gizmo is a visual aid rendered in Unity's Scene View to help us in the development process. Several components in Unity use gizmos to tell the developers where in the 3D world these are located.
Take a look at the following screenshot. The two icons, the movie camera and the light bulb, are gizmos that indicate the game object position of the camera and the point light components, respectively.
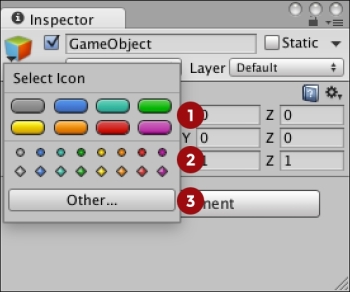
You can do the same with a specific game object if you click on the cube icon in their inspector pane:
Here you have three options to choose:
You will see the following three results, respectively, in the Scene View:
Any of these gizmos will be attached to the game object and will persist in the scene and in any prefab containing this game object.
All these examples use the Unity editor to do the required setup, but there is an additional way in which gizmos can be created, allowing greater...
Creating gizmos through code
We explored how to add simple gizmos through the Unity editor. This section will cover how to properly implement the OnDrawGizmos and OnDrawGizmosSelected methods to achieve a similar but more flexible solution.
Note
All the scripts in this section are examples, and are not meant to be used in the Level Creator tool.
The OnDrawGizmos and OnDrawGizmosSelected methods
To get started, in a new project, create a script called GizmoExample.cs. We will use this as a guinea pig for our first gizmos experiments (don't worry, the script is not going to suffer too much!)
Write the following code in GizmoExample.cs:
When you implement the OnDrawGizmos method, you can add gizmos that always drawn in the Scene View and also allows the possibility to be selected with a click.
In this case, the method is empty. However, if you come back to Unity and wait for the compiler...
Adding a structure to our levels
Open the Run & Jump project and look for the folder Scripts/Level. Inside this folder, you will find all the related to the video game. The Level class is responsible for making our levels work.
As you may have noticed, in Chapter 1, Getting Started with Editor Scripting, all the level piece prefabs are added to the scene and used by the level without a problem, but we don't have control over the size of the level or any way to guarantee that the level piece prefabs are going to be in the right position. Most important, the Level class is not aware about the level piece prefabs present on the level.
We are going to fix this situation making changes to the Level class, adding an array to save references to the level piece prefabs and define it size based in the total columns and rows supported by that array.
Visually, you are going to see the size of the level with the help of a grid made with gizmos.
As this chapter requires changes on the Level class, there...
Implementing the gizmo grid
When you open the script Level.cs. You will see the following code:
This script holds the variables that you saw in the inspector and the properties to access and change these values.
Note
As you may have noticed, making your variables public is not the only way to expose them in the...
Implementing the snap to grid behaviour
To create our first level in Chapter 1, Getting Started with Editor Scripting, we used a hot key to snap the level piece prefabs between them. Here, we will do the same, but instead of using the hot key, the level piece prefabs are going to snap to the grid automatically.
Here, we will assume that the Level game object position and rotation is always (0,0,0) and the scale is (1,1,1). Also, the 2D mode is selected by default.
Later, we will work on how keep this configuration by default. Based on the grid we created, we need to implement a few things to achieve our goal:
Inside the Level class, add the following methods in the Level.cs script:
In this chapter, you learned about how to use gizmos and continued working with the features of the Level Creator tool by implementing a gizmo grid with an snap to grid feature.
The Gizmos class is part of the UnityEngine namespace and allows you to create visual aids in the Scene View to work with our scripts.
To render gizmos, we must implement the OnDrawGizmos and OnDrawGizmosSelected methods in our MonoBehaviour classes, and call methods of the Gizmos class to draw the visuals. When it is not possible to access the code of the MonoBehaviour class to implement these methods directly, an alternative way is to use the DrawGizmo attribute, allowing you to implement the gizmo logic in a second class.
When you work with gizmos, you can change they color and the matrix used to be rendered. To achieve this, you need to overwrite the variables Gizmos.color and Gizmos.matrix, respectively. Because these variables are static, it's recommended to always save the current value of the variables...