Reader small image

You're reading from  OpenStack Essentials. - Second Edition

Product typeBook
Published inAug 2016
PublisherPackt
ISBN-139781786462664
Edition2nd Edition
Right arrow
Author (1)
Dan Radez
Dan Radez
author image
Dan Radez

Dan Radez joined the OpenStack community in 2012 in an operator role. His experience is focused on installing, maintaining, and integrating OpenStack clusters. He has been given the opportunity to internationally present OpenStack content to a range of audiences of varying expertise. In January 2015, Dan joined the OPNFV community and has been working to integrate RDO Manager with SDN controllers and the networking features necessary for NFV. Dan's experience includes web application programming, systems release engineering, and virtualization product development. Most of these roles have had an open source community focus to them. In his spare time, Dan enjoys spending time with his wife and three boys, training for and racing triathlons, and tinkering with electronics projects.
Read more about Dan Radez

Right arrow

Chapter 5. Instance Management

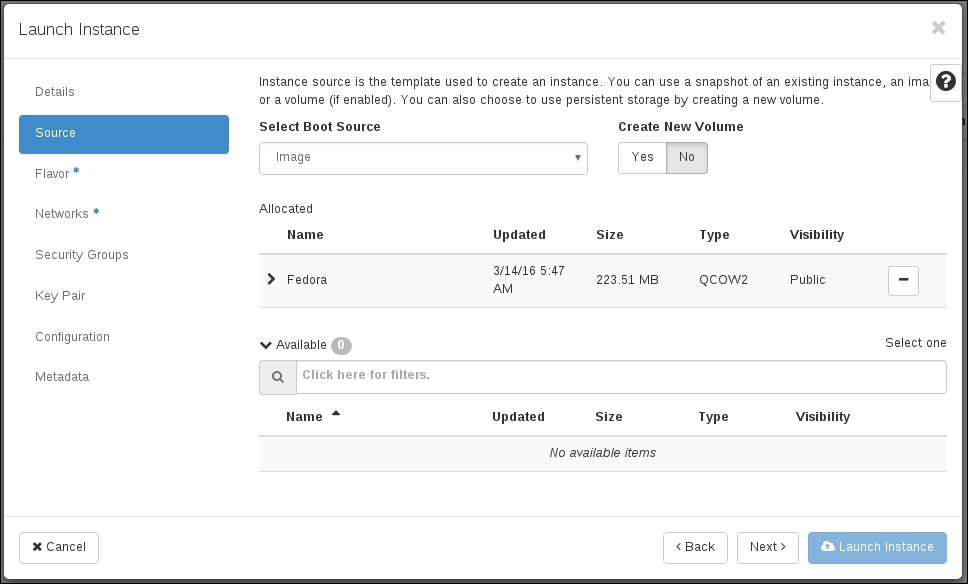
In the past few chapters, we collected resources that laid the foundation to launch an instance. We have created a project – a place for our resources to live in. We added a disk image using Glance that the instance will use as its boot device. We created a network for the instance using Neutron. Now it is time to launch the instance. Nova is the instance management component in OpenStack. In this chapter, we will look at managing the following:

  • Flavors

  • Key pairs

  • Instances

  • Floating IPs

  • Security groups

Managing flavors


When an instance is launched, there has to be a definition of the amount of resources that will be allocated to the instance. In OpenStack, this is defined by what are called flavors. A flavor defines the allocation of virtual CPUs, RAM, and disk space that an instance will use when it launches. When Triple-O installed your system earlier, it created a few flavors for you. Let's take a look at those. Go ahead and source an overcloudrc file. Once you have one sourced, list the flavors, as follows:

undercloud# openstack flavor list

You can create your own flavors if these do not fit your needs exactly, though only the admin user can create new flavors. There is nothing magical about the flavors that Triple-O has created. They have been created close to what the rest of the cloud industry uses for convenience. We are not going to get too deep into flavors; we'll just use the preconfigured flavors that you have just listed.

Managing key pairs


Since a cloud image is a copy of an already existing disk image with an operating system already installed, the root users are generally disabled, and if the root password is set, it is usually not distributed. To overcome the inability to authenticate without a password, OpenStack uses SSH key pairs. If you remember, in Chapter 3, Image Management, we discussed the need for cloud-init to be installed in a cloud image. Then, in Chapter 4, Network Management, we discussed how cloud-init would connect to the metadata service via the IP address provided by the router. One of the primary roles of this cloud-init process is to pull down the public SSH key that will be used for authentication. OpenStack provides a facility for you to manage your SSH key pairs so that you can select which will be used when you launch an instance. Let's start by generating a new key pair and listing it, as shown in the following commands:

undercloud# openstack keypair create my_keypair
-----BEGIN...

Launching an instance


At this point, there has been what may seem like an excessive amount of groundwork laid to get to launching an instance. We now have a project for the instance to live in, an image using which it can boot off, a network for it to live in, and a key pair to authenticate with. These are all the necessary resources to create in order to launch an instance, and now that these resources have been created, they can be reused for future instances that will be launched. Without further delay, let's launch the first instance in this OpenStack environment as follows:

undercloud# openstack server create --flavor 2 --image Fedora --key-name openstack --nic net-id={internal net-id} "My First Instance"

This launches an instance using the small flavor, the key pair we just imported, the Fedora image from Chapter 3, Image Management, and the project network from Chapter 4, Network Management. This instance will go through a few different states before it is ready to use. You can see...

Managing floating IP addresses


Now that an instance is running, the next step is to communicate with it in a fashion other than with the console through a web browser. In the instance list you just saw, an IP address on the tenant network will be listed once it's been assigned. The IP address that is initially assigned to the instance is not a routable IP address; to communicate with the instance, you will need to assign a floating IP address from the external network. The floating IP address will be mapped to the project network IP address, and you will be able to communicate with the instance by way of the floating IP address.

Before a floating IP address can be associated with an instance, it needs to be allocated to your project. Floating IP addresses are managed through Neutron, as follows:

undercloud# openstack ip floating create external

This allocates a floating IP address to the project. It uses the allocation pool from the external network that you created in Chapter 4, Network...

Managing security groups


At this point, you may think that you should be able to connect to your instance. Not quite yet. There is a layer of security built into OpenStack called security groups. Security groups are firewalls that can be assigned to one or more instances. You can define multiple security groups; you can assign multiple instances to a security group; you can even assign multiple security groups to a running instance. A security group named default is created for each project when the tenant is created. List the existing security groups and you will see multiple with a description Default security group. Then list the rules in the project you are authenticating to:

undercloud# neutron security group list
undercloud# openstack security group rule list 

If you list all projects that exist and get their IDs, they should map to the project IDs that the security groups you have just listed are assigned to. When you list the rules defined in a security group and do not pass a specific...

Communicating with the instance


The instance we booted was assigned the default security group. Edits made to a security group are immediately applied to the instances operating in them. We just added the ping and SSH rules to allow incoming traffic to the instances running in the default security group, so you should be able to ping and SSH to the instance you launched. Here is the output summary:

undercloud# 
ping -c 3 192.0.2.101
PING 192.0.2.101 56(84) bytes of data.
64 bytes from 192.0.2.101: icmp_seq=1 ttl=64 time=0.040 ms
64 bytes from 192.0.2.101: icmp_seq=2 ttl=64 time=0.041 ms
64 bytes from 192.0.2.101: icmp_seq=3 ttl=64 time=0.040 ms
--- 192.0.2.101 ping statistics ---
3 packets transmitted, 3 received, 0% packet loss, time 1999ms
rtt min/avg/max/mdev = 0.040/0.040/0.041/0.005 ms
undercloud# ssh fedora@192.0.2.101                 
The authenticity of host '' 192.0.2.101 (192.0.2.101)'' can''t be established.
RSA key fingerprint is 83:d8:f4:7e:01:db:4e:50:8a:bd:f6:dc:77:2c:31:d7...

Launching an instance using the web interface


Now that we've booted an instance on the command line, let's take a look at doing the same thing in the web interface:

  1. Go ahead and log in to the web interface as the non-administrative user you created in Chapter 2, Identity Management.

  2. Under the Compute menu, select Instances and then click on the Launch Instance button.

  3. In the Launch Instance dialog, start by filling in a name for the instance, as shown in the following screenshot. Also, note that there are blue asterisks next to Source, Flavor, and Networks. These are the required sections of the dialog to visit:

  4. Click the Next button to get to the Source section of the dialog. There will be a + button next to the Fedora image you uploaded in Chapter 3, Image Management. Click that to select the Fedora image as the boot source for the instance, as shown in the following screenshot:

  5. Click the Next button to get to the Flavor section of the dialog. There will be a + button next to the available...

Summary


In this chapter, we looked at managing flavors, key pairs, instances, security groups, and floating IP addresses. Now that we have a running OpenStack instance, let's attach some virtual storage to it. A running instance's storage is ephemeral by design. This means that any data stored in the instance's local disk is lost upon the instance's termination. In the next chapter, we will attach a virtual block storage device to the running instance. This storage will persist after an instance that it is attached to is terminated.

lock icon
The rest of the chapter is locked
You have been reading a chapter from
OpenStack Essentials. - Second Edition
Published in: Aug 2016Publisher: PacktISBN-13: 9781786462664
Register for a free Packt account to unlock a world of extra content!
A free Packt account unlocks extra newsletters, articles, discounted offers, and much more. Start advancing your knowledge today.
undefined
Unlock this book and the full library FREE for 7 days
Get unlimited access to 7000+ expert-authored eBooks and videos courses covering every tech area you can think of
Renews at £13.99/month. Cancel anytime

Author (1)

author image
Dan Radez

Dan Radez joined the OpenStack community in 2012 in an operator role. His experience is focused on installing, maintaining, and integrating OpenStack clusters. He has been given the opportunity to internationally present OpenStack content to a range of audiences of varying expertise. In January 2015, Dan joined the OPNFV community and has been working to integrate RDO Manager with SDN controllers and the networking features necessary for NFV. Dan's experience includes web application programming, systems release engineering, and virtualization product development. Most of these roles have had an open source community focus to them. In his spare time, Dan enjoys spending time with his wife and three boys, training for and racing triathlons, and tinkering with electronics projects.
Read more about Dan Radez