Reader small image

You're reading from  Microsoft Intune Cookbook

Product typeBook
Published inJan 2024
PublisherPackt
ISBN-139781805126546
Edition1st Edition
Right arrow
Author (1)
Andrew Taylor
Andrew Taylor
author image
Andrew Taylor

Andrew Taylor is an End-User Compute architect with 20 years IT experience across industries and a particular interest in Microsoft Cloud technologies, PowerShell and Microsoft Graph. Andrew graduated with a degree in Business Studies in 2004 from Lancaster University and since then has obtained numerous Microsoft certifications including Microsoft 365 Enterprise Administrator Expert, Azure Solutions Architect Expert and Cybersecurity Architect Expert amongst others. He currently working as an EUC Architect for an IT Company in the United Kingdom, planning and automating the products across the EUC space. Andrew lives on the coast in the North East of England with his wife and two daughters.
Read more about Andrew Taylor

Right arrow

iOS Device Management

We have covered Windows and Android enrollment, so the next logical step is iOS devices. This chapter looks at iOS device management, configuring policies to manage enterprise-owned and managed devices, and app protection policies for protecting your user-owned Bring Your own Device (BYOD). For our enterprise devices, we will be using Apple Business Manager (ABM) (or Apple Education). Configuring this is explained in the Technical requirements section.

We will also run through the process of configuring Intune to work with ABM and deploying applications using the Volume Purchase Program (VPP).

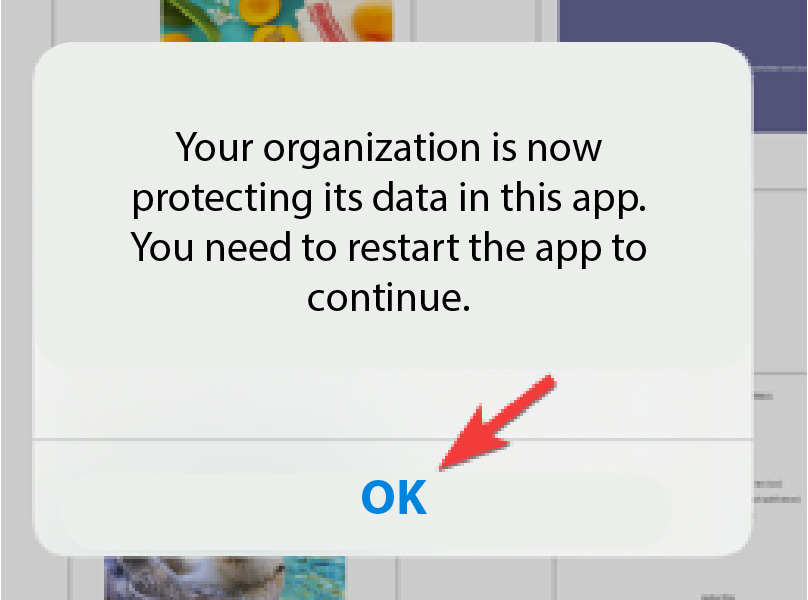
Finally, we will enroll both a managed device and a BYOD.

This chapter will include the following recipes:

  • Configuring a connector between Apple and Intune
  • Configuring an Apple VPP token
  • Adding enrollment profile tokens
  • Configuring iOS policies using the settings catalog
  • Configuring iOS policies using device restrictions
  • Deploying applications...

Chapter materials

As with Chapters 2 and 5, this chapter will not cover all available policy types, so we will run through them all now to get a better understanding of what is available for iOS devices. You will notice more similarities with Windows profile types than with Android here, including the migration to the unified settings catalog.

The available profile types are as follows:

  • Settings catalog: The unified settings catalog is the more modern way to deploy settings. We will cover this in the Configuring iOS policies using the settings catalog section.
  • Derived credential: This is used for certificate authentication within apps. You can read more at https://learn.microsoft.com/en-gb/mem/intune/protect/derived-credentials.
  • Device restrictions: This is an alternative to the settings catalog for your standard restrictions. We will cover it in the Configuring iOS policies using device restrictions section.
  • Device features: Device restrictions are used to protect...

Important notes

It is important when dealing with Apple devices to keep an eye on the certificate renewal dates and to record them somewhere with a reminder. You could also use Azure Automation to automate the reminders for you. See more at https://andrewstaylor.com/2022/06/07/alerting-when-my-apple-certificates-expire-in-intune-using-azure-automation/.

The MDM push certificate connects your devices to the Intune MDM service. If this one expires, you can contact Apple directly within 30 days of expiry to renew it. If they cannot, or if 30 days have passed, your only option is to wipe and re-enroll all your devices. Yes, this is a full wipe, data destruction, everything.

An enrollment token is used to enroll your devices initially. If this one expires, you must create a new enrollment profile and transfer your devices to it. It is not quite as bad as a wipe, but it can result in the devices looking less healthy within the Intune portal itself.

The Apple VPP certificate is used...

Technical requirements

For this chapter, you will need a modern web browser and a PowerShell code editor such as Visual Studio Code or the PowerShell ISE. You will also need to be connected to Microsoft Graph, as outlined in Chapter 1.

All of the scripts referenced can be found here: https://github.com/PacktPublishing/Microsoft-Intune-Cookbook

You will need an ABM account set up and ready to be configured with Intune. You can find instructions for setting up your ABM account at https://www.apple.com/business/docs/site/Apple_Business_Manager_Getting_Started_Guide.pdf and https://www.intuneirl.com/onboarding-to-abm/.

Your hardware supplier or service provider should be able to add your devices to ABM, but you can also use Apple Configurator on a device running macOS or iOS: https://support.apple.com/en-gb/apple-configurator

Alternatively, you can follow these videos:

https://www.youtube.com/watch?v=G_9bPrsJHGY&t=34s

https://www.youtube.com/watch?v=G-rvHUY4iA0

...

Configuring a connector between Apple and Intune

Before we can enroll or configure devices, we need to set up a connector to link Intune to ABM or Apple Education. We will cover that here.

Getting started

Before starting this recipe, log in to your ABM account and navigate to your account preferences. From here, we can add an MDM server.

It is worth having Intune in a different tab, as we will be switching between the two when configuring the certificates.

How to do it…

Follow these instructions:

  1. In the Intune portal, navigate to Devices and then iOS.
  2. Next, click on iOS/iPadOS Enrollment.
  3. You will notice there is only one option available here, which is Apple MDM Push certificate, so click on that.
  4. In the popup, check the box and download the CSR certificate.
  5. Then, click on the Create your MDM push Certificate link, which will take you to the Apple portal.
  6. Click Create a certificate.
  7. Check the box and click Accept.
  8. Upload the...

Configuring an Apple VPP token

Now we have our environments linked, we need to configure our VPP token for application deployment.

Getting started

Open two tabs, one on Apple Business Manager and one in the Intune portal. We will again be switching between them for certificates.

How to do it…

Follow these instructions:

  1. Within Apple Business Manager’s preferences, click Payments and Billing.
  2. At the bottom of the page, download the content token.
  3. Now return to Intune, navigate to Tenant administration, and click on Connectors and tokens.
  4. Click on Apple VPP Tokens.
  5. Click Create at the top.
  6. Enter a name and your Apple ID, upload the certificate from before, and click Next.
  7. This is our only MDM server, so we can leave the top option as No.
  8. Set the region, set the account type (usually Business, unless you are configuring for an education establishment), and select whether you want to allow automatic app updates. Finally, agree...

Adding enrollment profile tokens

The last step before we can enroll devices is to configure an enrollment profile token. We then configure ABM to use this token when deploying devices.

How to do it…

Follow these instructions:

  1. Start by clicking Devices and then iOS/iPadOS.
  2. Then, click iOS/iPadOS enrollment.
  3. Click Enrollment program tokens.
  4. Click Add at the top.
  5. Check Agree and download the public key, as we will need that in Apple Business Manager.
  6. Navigate to Apple Business Manager via the link:
Figure 6.4 – The Apple Business Manager and Apple School Manager links

Figure 6.4 – The Apple Business Manager and Apple School Manager links

  1. In Apple Business Manager, within your profile, click Add next to Your MDM Servers.
  2. Enter a name, upload the certificate, and click Save.
Figure 6.5 – Uploading the server token

Figure 6.5 – Uploading the server token

  1. Click Download Token.
  2. Back in the Intune portal, enter the Apple ID, select the certificate just downloaded...

Configuring iOS policies using the settings catalog

Our connection between ABM and Intune is now complete. We could enroll devices now if we wanted, but we have not configured any policies or applications yet, so we want to configure those first. Policies can be configured using either the settings catalog or device restrictions. Both configure the same settings. Using the settings catalog is more modern, but either will work. For this recipe, we will use the settings catalog, and in the next one, we will use device restrictions.

How to do it…

Follow these instructions:

  1. In the Intune console, select Devices and then iOS/iPadOS.
  2. Click Configuration profiles and click New policy.
  3. In the flyout menu, select Settings catalog and click Create.
  4. As usual, provide a name and description and click Next.

    You will now see the settings picker we covered earlier during Windows profile creation (Chapter 2). Here, you can select the settings applicable to your environment...

Configuring iOS policies using device restrictions

The preceding recipe demonstrated how to use the new settings catalog to create a new profile for your iOS devices, but there is also the option to use a device restrictions policy, which is similar to that used with the Android devices in the previous chapter.

This recipe will demonstrate how to configure and automate your policy using the device restrictions profile type.

How to do it…

Follow these instructions:

  1. As before, in the Intune console, select Devices and then iOS/iPadOS.
  2. Click Configuration profiles and click New policy.
  3. This time, instead of settings catalog, pick Templates and then Device restrictions. Click Create.
  4. As usual, populate the basic details and click Next.

    Here, you can find all of the device restrictions grouped, but without the useful search functionality found in the settings catalog.

    We are going to configure the same three settings as earlier to block iCloud backups ...

Deploying applications via Apple VPP

We now have our restrictions configured so we know the devices are secure, but our users will not be happy if they cannot access the App Store and do not have any applications available centrally.

This recipe is going to concentrate on Apple VPP applications, as they are the preferred choice for application deployment in an enterprise environment. It is worth covering the other application options for awareness of what is available:

  • iOS store app: This adds applications that are effectively shortcuts to the App Store. Users will need an Apple ID and you will need your restrictions policy configured to leave the store unblocked, which obviously means users can install anything they want.
  • iOS/iPadOS web clip: This adds a shortcut to a web app to the device’s home screen.
  • Web link: This deploys a web link to devices to the home screen.
  • Built-in app: These are pre-approved and curated applications that can be deployed without...

Configuring iOS update settings

We may also want to manage software updates on our iOS and iPadOS devices in a similar way to feature updates on Windows devices. This could be ensuring they are always up to date, restricting devices to a certain version, or specifying when to install an update. To do this, we use an update policy.

One important thing to note is that this does not stop users from manually searching for and installing updates, but you can set a deferral of up to 90 days using device restrictions (either in a device restrictions policy or the settings catalog).

How to do it…

Follow these instructions:

  1. To create the new policy, navigate to Devices and then iOS/iPadOS.
  2. Now select Update policies for iOS/iPadOS and click Create profile.
  3. As usual, input a basic name and description and click Next.

    On the next screen, we set the policy itself. The first option lets you select which OS version to install on your devices. If you leave it set to...

Configuring an app protection policy

For our BYOD devices, we cannot rely on device restrictions, as they are limited to corporate devices that have been fully enrolled. As with Android devices, which were covered in Chapter 5, we want to implement app protection policies to ensure the data is securely stored on user-owned devices.

Unlike Android, iOS does not support multiple profiles, so while the data is protected in the same way, it is less segregated on the device.

Getting started

The Conditional access policy configured in the Android app protection policy in Chapter 5 was configured for both Android and iOS devices, so rather than run through the same steps in this recipe (if you have not configured that yet), read the Android recipe and configure the policy appropriately. This is used to force your devices to only connect if the application is policy-managed.

How to do it…

Follow these instructions:

  1. First, we need to navigate to Apps and click...

Enrolling your device – corporate

We have our environment configured, so now we can start enrolling our devices, starting with corporate-owned and managed devices.

Getting started

First, make sure you have a factory reset iOS/iPadOS device enrolled in either ABM or Apple Education Manager.

How to do it…

Follow these instructions:

  1. First, set your language and region on your device.
  2. On the Quick Start screen, click Set Up Manually.
  3. Connect to your Wi-Fi network, if required, or use mobile data.
  4. You will then see the Remote Management screen. Click Next.
  5. Sign in with your credentials and click Next.

If your policy requires a passcode, you will be asked to set and confirm it after signing in.

Finally, after a couple of minutes, you will see your home screen with any required applications deployed.

There’s more

A recent addition to Intune is the availability of Just in Time enrollment for iOS and iPadOS. This uses...

Enrolling your device – BYOD

Due to the differences between Android and iOS (no work profile, VPP, and Google Play differences), there are no real advantages to be gained from allowing personal devices to be enrolled over simply using app protection policies. Therefore, in this recipe, we will just demonstrate how to enroll using app protection only.

Getting started

For this recipe, you will need an Apple iOS/iPadOS device set up and signed into with an Apple ID to access Microsoft Store applications.

How to do it…

Follow these instructions:

  1. Load up the App Store and search for an application. In this case, we are using Microsoft Word. After installing, click Open.
  2. Click Existing Microsoft 365 Users? Sign In.
  3. Enter your email address and click Next.
  4. Enter your password and click Sign In.
  5. After signing in, you will see the message in Figure 6.19. Click OK to restart the app:
Figure 6.19 – Click OK to restart

Figure 6.19 – Click OK...

lock icon
The rest of the chapter is locked
You have been reading a chapter from
Microsoft Intune Cookbook
Published in: Jan 2024Publisher: PacktISBN-13: 9781805126546
Register for a free Packt account to unlock a world of extra content!
A free Packt account unlocks extra newsletters, articles, discounted offers, and much more. Start advancing your knowledge today.
undefined
Unlock this book and the full library FREE for 7 days
Get unlimited access to 7000+ expert-authored eBooks and videos courses covering every tech area you can think of
Renews at €14.99/month. Cancel anytime

Author (1)

author image
Andrew Taylor

Andrew Taylor is an End-User Compute architect with 20 years IT experience across industries and a particular interest in Microsoft Cloud technologies, PowerShell and Microsoft Graph. Andrew graduated with a degree in Business Studies in 2004 from Lancaster University and since then has obtained numerous Microsoft certifications including Microsoft 365 Enterprise Administrator Expert, Azure Solutions Architect Expert and Cybersecurity Architect Expert amongst others. He currently working as an EUC Architect for an IT Company in the United Kingdom, planning and automating the products across the EUC space. Andrew lives on the coast in the North East of England with his wife and two daughters.
Read more about Andrew Taylor