

Chapter 1 - Anatomy of Portable C++ Software
Activity 1: Adding a New Source-Header File Pair to the Project
In this activity, we will create a new source-header file pair that contains a new function named sum. It takes two parameters and returns their sum. This file pair will be added to the existing project. Follow these steps to implement this activity:
- First, open the Eclipse IDE with the existing project that we created in Exercise 3, Adding New Source Files to CMake and Eclipse CDT. Right-click on the src folder in the Project Explorer pane.
Note
We can either create the .cpp and .h files separately or use the new class wizard and later remove the class code. Using the new class wizard is handy since it also creates useful boilerplate code.
- Select New | Class from the pop-up menu. Type SumFunc and click on the Finish button.
- Next, edit the SumFunc.h file to look like the following code:
#ifndef SRC_SUMFUNC_H_
#define SRC_SUMFUNC_H_
int sum(int a, int b);
#endif /* SRC_SUMFUNC_H_ */
Note that we will actually delete the class and provide a single function instead. We could have created these two files separately. However, the add class function creates them both and adds some boilerplate code that we will make use of. Here, our file starts and ends with an include guard, which is a common strategy to prevent the double-inclusion problem. We have the forward declaration of our function, which lets other files call the function after including this header file.
- Next, edit the SumFunc.cpp file as illustrated here:
#include "SumFunc.h"
#include <iostream>
int sum(int a, int b) {
return a + b;
}
In this file, we include header files and provide the body of our function, which adds and returns two given integers.
- Edit the CMakeFiles.txt file so that its add_executable section reflects the following code:
add_executable(CxxTemplate
src/CxxTemplate.cpp
src/ANewClass.cpp
src/SumFunc.cpp
)
Here, we added the src/SumFunc.cpp file to the list of executable source files so that it is linked into the executable.
- Make the following changes in CxxTemplate.cpp:
#include "CxxTemplate.h"
#include "ANewClass.h"
#include "SumFunc.h" //add this line
...
CxxApplication::CxxApplication( int argc, char *argv[] ) {
std::cout << "Hello CMake." << std::endl;
ANewClass anew;
anew.run();
std::cout << sum(3, 4) << std::endl; // add this line
}
Note
The complete code of this file can be found here: https://github.com/TrainingByPackt/Advanced-CPlusPlus/blob/master/Lesson1/Activity01/src/CxxTemplate.cpp.
Here, we added a line in which we call the sum function with 3 and 4 and print the result to the console.
- Build and run the project (Project | Build All | Run | Run). The output you see should be as follows:

Figure 1.57: The output
With this activity, you practiced adding a new source-header file pair to your project. These file pairs are a very common pattern in C++ development. They can host global functions such as the ones we had in this activity. More commonly, they host classes and their definitions. Throughout your development effort, you will be adding many more source-header file pairs to your application. Therefore, it is important to get used to adding them and not dragging your feet, which would result in large monolithic files that are difficult to maintain and test.
Activity 2: Adding a New Class and Its Test
In this activity, we will add a new class that simulates 1D linear motion. The class will have double fields for position and velocity. It will also have a advanceTimeBy() method, which receives a double dt parameter, which modifies position based on the value of velocity. Use EXPECT_DOUBLE_EQ instead of EXPECT_EQ for double values. In this activity, we will add a new class and its test to the project. Follow these steps to perform this activity:
- Open the Eclipse IDE with our existing project. To create a new class, right-click the src folder in the Project Explorer pane and select New | Class. Type LinearMotion1D as the name and create the class.
- Open the LinearMotion1D.h file that we created in the previous step. Add the position and velocity double fields into it. Also, add the forward reference to the advanceTimeBy method, which takes a double dt variable as a parameter. The constructors and destructors were already in the class. The following is the end result of these changes in LinearMotion1D.h:
#ifndef SRC_LINEARMOTION1D_H_
#define SRC_LINEARMOTION1D_H_
class LinearMotion1D {
public:
double position;
double velocity;
void advanceTimeBy(double dt);
LinearMotion1D();
virtual ~LinearMotion1D();
};
#endif /* SRC_LINEARMOTION1D_H_ */
- Now open LinearMotion1D.cpp and add the implementation for the advanceTimeBy method. Our velocity is a field in our class and the time difference is a parameter to this method. A change in position is equal to the velocity multiplied by the time change, so we calculate the result and add it to the position variable. We also use the existing constructor code to initialize position and velocity to 0. The following is the end result of these changes in LinearMotion1D.cpp:
#include "LinearMotion1D.h"
void LinearMotion1D::advanceTimeBy(double dt) {
position += velocity * dt;
}
LinearMotion1D::LinearMotion1D() {
position = 0;
velocity = 0;
}
LinearMotion1D::~LinearMotion1D() {
}
- Create a test for this class. Right-click the tests folder and select New | Source File. Type LinearMotion1DTest.cpp as the name and create it.
- Now open LinearMotion1DTest.cpp. Create two tests for motions in two different directions, left and right. For each of them, create a LinearMotion1D object, initialize its position and velocity, and call advanceTimeBy to actually have the motion happen. Then, check whether it moved to the same location that we expected. The following is the end result of these changes in LinearMotion1DTest.cpp:
#include "gtest/gtest.h"
#include "../src/LinearMotion1D.h"
namespace {
class LinearMotion1DTest: public ::testing::Test {};
TEST_F(LinearMotion1DTest, CanMoveRight) {
LinearMotion1D l;
l.position = 10;
l.velocity = 2;
l.advanceTimeBy(3);
EXPECT_DOUBLE_EQ(16, l.position);
}
TEST_F(LinearMotion1DTest, CanMoveLeft) {
LinearMotion1D l;
l.position = 10;
l.velocity = -2;
l.advanceTimeBy(3);
EXPECT_DOUBLE_EQ(4, l.position);
}
}
- Now modify our CMake configuration files so that these source files that we generated are also used. For the LinearMotion1D class, add its .cpp file as an executable so that it is compiled and linked together with the other source files. Here is what the add_executable section of CMakeLists.txt becomes:
add_executable(CxxTemplate
src/CxxTemplate.cpp
src/ANewClass.cpp
src/SumFunc.cpp
src/LinearMotion1D.cpp # added
)
- For the tests that we just created, edit tests/CMakeLists.txt. There, we need to add both the test source file, LinearMotion1DTest.cpp, and the source file of the class that it uses, LinearMotion1D.cpp. Since they are in different directories, access them as ../src/LinearMotion1D.cpp. Here is what the add_executable section of tests/CMakeLists.txt becomes:
add_executable(tests
CanTest.cpp
SumFuncTest.cpp
../src/SumFunc.cpp
LinearMotion1DTest.cpp # added
../src/LinearMotion1D.cpp # added
)
- Build the project and run the tests. We will see that all the tests are successful:
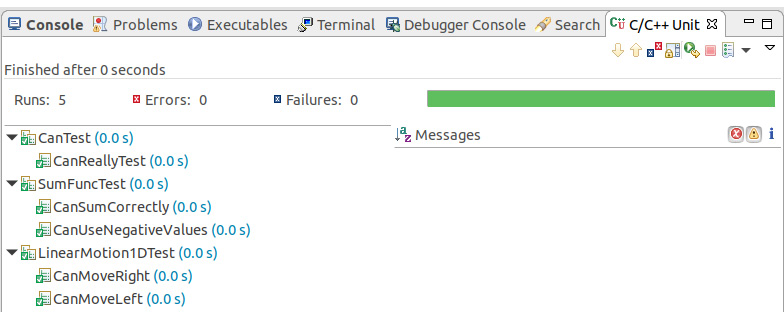
Figure 1.58: All tests are successful
With this activity, you performed the task of adding a new class and its test to the project. You created a class that simulates one-dimensional motion and you wrote unit tests to ensure that it is working properly.
Activity 3: Making Code More Readable
In this activity, you will practice improving the quality of a given code. Follow these steps to implement this activity:
- Open Eclipse CDT and create a class in a source-header file pair in Eclipse. To do this, right-click the src folder in Project Explorer. Select New | Class from the pop-up menu.
- Type SpeedCalculator as the header filename and click Finish. It will create two files: SpeedCalculator.h and SpeedCalculator.cpp. We provided the code for both files above. Add the code that was provided for each file.
- Now we need to add the class to the CMake project. Open the CMakeLists.txt file in the root of your project (outside the src folder) and make the following change in the file:
src/LinearMotion1D.cpp
src/SpeedCalculator.cpp # add this line
)
- Now select File | Save All to save all the files and build the project by selecting Project | Build All. Make sure there are no errors.
- Create an instance of the SpeedCalculator class in our main() function and call its run() method. Open CxxTemplate.cpp and include our new class, then edit the main function by adding the following code:
#include "SpeedCalculator.h"
int main( int argc, char *argv[] ) {
cxxt::CxxApplication app( argc, argv );
// add these three lines
SpeedCalculator speedCalculator;
speedCalculator.initializeData(10);
speedCalculator.calculateAndPrintSpeedData();
return 0;
}
- To fix the style, simply use Source | Format and choose to format the entire file. Luckily, the variable names do not have any problems.
- Simplify the code to make it more understandable. The loop in calculateAndPrintSpeedData is doing a couple of things at the same time. It's calculating the speed, finding the minimum and maximum values of it, checking whether we crossed a threshold, and storing the speed. If the speed was a transient value, taking it apart would mean storing it somewhere to loop on it one more time. However, since we are storing it in the speeds array anyway, we can loop one more time on it for clarity of code. Here is the updated version of the loop:
for (int i = 0; i < numEntries; ++i) {
double dt = timesInSeconds[i + 1] - timesInSeconds[i];
assert(dt > 0);
double speed = (positions[i + 1] - positions[i]) / dt;
speeds[i] = speed;
}
for (int i = 0; i < numEntries; ++i) {
double speed = speeds[i];
if (maxSpeed < speed) {
maxSpeed = speed;
}
if (minSpeed > speed) {
minSpeed = speed;
}
}
for (int i = 0; i < numEntries; ++i) {
double speed = speeds[i];
double dt = timesInSeconds[i + 1] - timesInSeconds[i];
if (speed > speedLimit) {
limitCrossDuration += dt;
}
}
This is somewhat a matter of taste, but making the big for loop lighter helps with the readability. In addition, it separates the tasks and removes the possibility of them interacting with each other during a loop iteration. The first loop creates and saves the speed values. The second loop finds the minimum and maximum speed values. The third loop determines how long the speed limit was crossed for. Note that this is a slightly less efficient implementation; however, it clearly separates the actions taken and we do not have to mentally separate the discrete actions in the long iteration of a loop.
- Run the preceding code and observe the problem at runtime. While the code is better in terms of style now, it suffers from several mistakes, some of which will create runtime errors. First, when we run the application, we see the following output in Eclipse:

Figure 1.59: Program output in Eclipse CDT
Note exit value: -1 at the top. When this is not 0, it means there was a problem with our code.
- Execute the program manually in the console. Here's the output we get:

Figure 1.60: Program output in the terminal with the error
Unfortunately, we do not get the segmentation fault error output in Eclipse, therefore you have to check the exit value in the Eclipse console view. To find the problem, we will use the debugger in the next step.
- Press the debug toolbar button in Eclipse to start the application in debug mode. Press the resume button to continue execution. It will stop at line 40 of SpeedCalculator.cpp, right when an error is about to happen. If you hover over speeds, you realize that it is an invalid memory reference:

Figure 1.61: Invalid memory reference
- Upon further examination, we realize that we never initialized the speeds pointer to anything. Allocate memory for it in our speed calculator function:
void SpeedCalculator::calculateAndPrintSpeedData() {
speeds = new double[numEntries]; // add this line
double maxSpeed = 0;
- Run it again. We get the following output:
Hello CMake.
Hello from ANewClass.
7
CxxTemplate: SpeedCalculator.cpp:38: void SpeedCalculator::calculateAndPrintSpeedData(): Assertion `dt > 0' failed.
Note that this was an assertion that the code had to make sure that the calculated dt was always larger than zero. This is something that we are sure of, and we would like it to help us catch errors during development. Assert statements are ignored in the production builds, so you can place them liberally in your code as safeguards to catch errors during development. Especially since C++ lacks many safety checks compared to higher-level languages, placing assert statements in potentially unsafe code helps catch errors.
- Let's investigate why our dt ended up not larger than zero. For this, we fire up the debugger again. It stops at this strange place:

Figure 1.62: Debugger stopped at a library without source code
- The actual error is raised deep inside a library. However, our own functions are still on the stack and we can investigate their state at that time. Click on SpeedCalculator above main in the tree to the left:

Figure 1.63: Value of dt as the program is running
It seems our dt becomes -43 here (the exact value is not important). Looking at the Variables view, we realize that i is 9, which is the last element of our input array:

Figure 1.64: Values of variables
This feels like a boundary problem. Looking closely at the code, we realize that we are using timesInSeconds[10], which is the non-existent eleventh element of the array. Thinking further, we realize that we can only have 9 position-pair subtractions, thus 9 speeds, when we have 10 positions. This is a very common and hard-to-catch mistake as C++ does not enforce you to stay within the array.
- Rework our whole code for this problem:
void SpeedCalculator::calculateAndPrintSpeedData() {
speeds = new double[numEntries - 1];
double maxSpeed = 0;
...
for (int i = 0; i < numEntries - 1; ++i) {
double dt = timesInSeconds[i + 1] - timesInSeconds[i];
...
for (int i = 0; i < numEntries - 1; ++i) {
double speed = speeds[i];
....
for (int i = 0; i < numEntries - 1; ++i) {
double speed = speeds[i];
Finally, our code seems to run without any errors as we can see in the following output:

Figure 1.65: Program output
- However, there is a curious point here: Min speed is always 0, no matter how many times you run it. To investigate, let's put a breakpoint at the following line:

Figure 1.66: Placing a breakpoint
- When we debug our code, we see that it never stops here. This is obviously wrong. Upon further investigation, we realize that minSpeed is initially 0, and every other speed value is larger than that. We should initialize it to either something very large, or we need to get the very first element as the minimum value. Here, we choose the second approach:
for (int i = 0; i < numEntries - 1; ++i) {
double speed = speeds[i];
if (i == 0 || maxSpeed < speed) { // changed
maxSpeed = speed;
}
if (i == 0 || minSpeed > speed) { // changed
minSpeed = speed;
}
}
While maxSpeed did not need this, it's good to be consistent. Now when we run the code, we see that we do not get 0 as our minimum speed anymore:

Figure 1.67: Program output
- Our code seems to be running fine. However, there is another mistake that we have made. When we debug our code, we see that our first elements are not zero:

Figure 1.68: Values of variables
- The pointer dereferenced the first element in the array. We had initialized elements to zero here, but they do not seem to be zero. Here is the updated code:
// add these two lines:
timesInSeconds[0] = 0.0;
positions[0] = 0.0;
for (int i = 0; i < numEntries; ++i) {
positions[i] = positions[i - 1] + (rand() % 500);
timesInSeconds[i] = timesInSeconds[i - 1] + ((rand() % 10) + 1);
}
When we investigate, we realize that we start the loop at zero and overwrite the first items. Furthermore, we try to access positions[0 - 1], which is a mistake and another example of C++ not enforcing array boundaries. When we let the loop start from 1, all these problems are gone:
timesInSeconds[0] = 0.0;
positions[0] = 0.0;
for (int i = 1; i < numEntries; ++i) {
positions[i] = positions[i - 1] + (rand() % 500);
timesInSeconds[i] = timesInSeconds[i - 1] + ((rand() % 10) + 1);
}
Here is the output generated with the updated code:
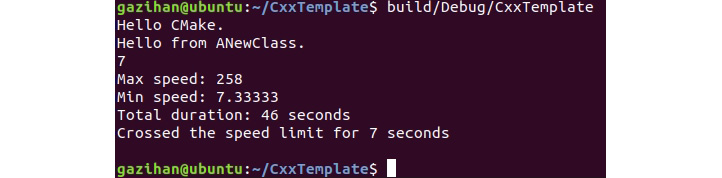
Figure 1.69: Program output
Just by looking at this code, we cannot tell the difference. It's all random values that do not look very different than before. Such bugs are very hard to find and can cause random behavior, leaving us with hard-to-track errors. Things that you can do to avoid such errors include being extra careful when dereferencing pointers, especially in loops; separating code into functions and writing unit tests for them; and using assert statements liberally to enforce things that the compiler or the runtime does not.