Reader small image

You're reading from  Raspberry Pi Robotic Projects - Third Edition

Product typeBook
Published inOct 2016
Reading LevelBeginner
Publisher
ISBN-139781786467966
Edition3rd Edition
Languages
Concepts
Right arrow
Authors (2):
Richard Grimmett
Richard Grimmett
author image
Richard Grimmett

Dr. Richard Grimmett has been fascinated by computers and electronics from his very first programming project, which used Fortran on punch cards. He has bachelor's and master's degrees in electrical engineering and a PhD in leadership studies. He also has 26 years of experience in the radar and telecommunications industries, and even has one of the original brick phones. He now teaches computer science and electrical engineering at Brigham Young University, Idaho, where his office is filled with his many robotics projects.
Read more about Richard Grimmett

Jon Witts
Jon Witts
author image
Jon Witts

Jon Witts has been working within the IT industry since 2002 and specifically within Educational IT since 2004. He was introduced to Linux back in 2001 through his collaboration with two German artists who were visiting the arts organisation he was then working with. Having studied Fine Arts and Educational Technology and sought to innovate with open and accessible digital technologies within his creative practice, Jon is happiest when deconstructing technology and finding its limits. Jon has embedded within his school the use of Raspberry Pi computers, as an integral part of the delivery of the school's Computer Science curriculum as well as to run various school clubs and projects. Jon is a Raspberry Pi Certified Educator and also helps to organise and run the Hull Raspberry Jam events. I would like to thank my wife, Sally and our three daughters for putting up with all the cables and compoents around the house, and not least for being so tolerant of the need to dodge the robots racing round the kitchen floor!
Read more about Jon Witts

View More author details
Right arrow

Chapter 3. Building a Wall-E Robot

Now that you've built an R2D2, and you know how to control DC motors and provide sight for your robot, now let's build a robot that you almost certainly have heard of. I am talking about Wall-E. Your robot will have some cool capabilities, including rolling around on two tracks, two arms that move, and a vision system that, thanks to the Microsoft Kinect, will give you not Now your arm with the hand is completeonly a video image but also a depth image.

In this chapter, you'll learn the following:

  • Using the Raspberry Pi to control two DC motors for a track system

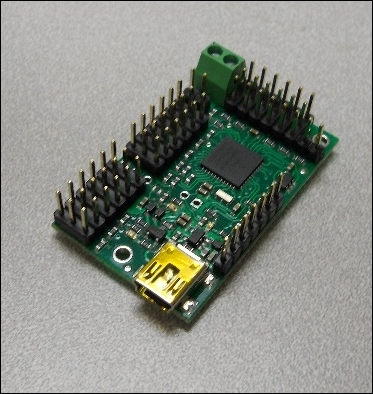
  • Using an external servo controller to control servos to position simple arms and hands

  • Creating a program in Linux to control servos and motors

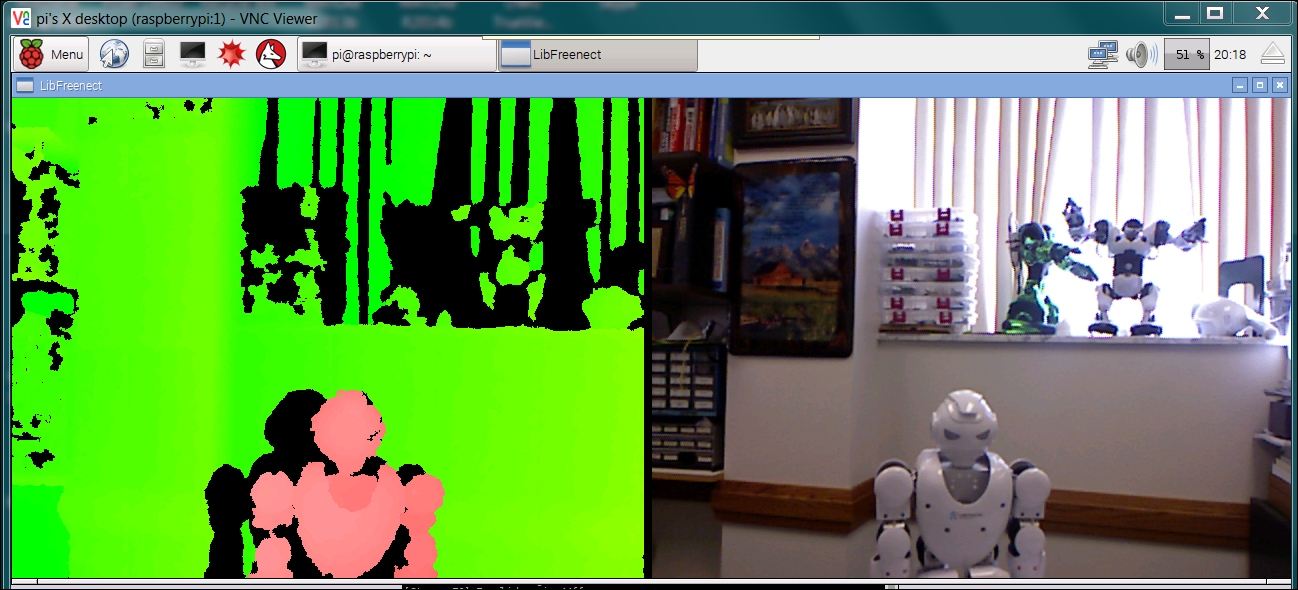
  • Adding the Microsoft Kinect 360 for not only vision but depth as well

Since you will be creating your own Wall-E without the benefit having the head start of an existing toy, it will be more difficult mechanically, but will provide a robot with lots of capabilities...

Creating the hardware platform


There are several inexpensive, basic tracked vehicles that can be the base for your robot. Here is a picture just such a unit:

The unit can be purchased at many different online electronics outlets, such as eBay, Amazon, Banggood, and other vendors. This example uses the Wali SUV SN1100 V2 available on eBay. It, of course, comes unassembled, so let's briefly look at how to build the unit. Here is a picture of all the parts:

Here are the steps to assemble the unit:

  1. The first step is to open up the plastic bag and look at all the parts. Here they are:

  1. Now you'll need to put the wheels together. These fit inside the tracks. Two of them, the ones with the outer rim that is spoked, will be connected to the DC motors. But let's start with ones that don't have spikes on the outer rim. Here is a picture of one of the wheels assembled:

  2. Half of the wheels have three holes, the other half six, although you'll only need to assemble the wheels with three. Here is the...

Building Wall-E's arms


There are many ways to do this, but let's start with some Lynxmotion pieces that are readily available at most online robotics outlets, including eBay and Robotshop. You'll want some servo brackets and other robotics hardware.

The item on the right is a standard servo bracket, and the item on the left is an extended body bracket. You'll need seven servo brackets and one main body bracket. Here are two additional pieces you'll need:

The one on the left is a C servo bracket, and the item on the right is an L connector bracket. You'll need three C servo brackets, and two L connector brackets. You'll also need six standard size servos for this project.

Note

You can purchase each of these separately, but if you'd like you can buy the 17DOF Biped Robotic Educational Robot Humanoid Robot Kit Servo Bracket on eBay, which will come with all the servo bracket parts you'll need to build your Wall-E.

You'll also need three lengths of aluminum tubing, 3 inches in length, and six...

Controlling Wall-E's tracks using a Raspberry Pi in Python


The hardware is ready; now you can access this functionality from a Raspberry Pi. First, install the library associated with the control board, found at http://www.monkmakes.com/rrb3/. Perform the following steps:

  1. Type cd ~.

  2. Run the git clone https://github.com/simonmonk/raspirobotboard3.git—command this will retrieve the library.

  3. Then type cd raspirobotboard3/python to go to the raspirobotboard3/python directory.

  4. Type sudo python setup.py install—this will install the files.

Now you'll create some Python code that will allow you to access both the DC motors on your tracked platform. Here is some basic code that allows you to do this:

#!/usr/bin/python                                                               
 
import time 
from rrb3 import * 
 
rr = RRB3(9, 6) 
rr.set_motors(1, 0, 1, 0) 
time.sleep(1) 
rr.set_motors(0, 0, 0, 0) 
rr.sw1_closed() 

The lines of the code import the time...

How servo motors work


Servo motors are somewhat similar to DC motors; however, there is an important difference. While DC motors are generally designed to move in a continuous way—rotating 360 degrees at a given speed—servos are generally designed to move to a limited set of angles. In other words, in the DC motor world, you generally want your motors to spin with a continuous rotation speed that you control. In the servo world, you want your motor to move to a specific position that you control. This is done by sending a Pulse-Width-Modulated (PWM) signal to the control connector of the servo. PWM simply means that you are going to change the length of each pulse of electrical energy in order to control something. In this case, the length of this pulse will control the angle of the servo, like this:

These pulses are sent out with a repetition rate of 60 Hz. You can position the servo at any angle by sending the correct control pulse.

Using a servo controller to control the servos


To make your arms move, you first need to connect the servo motor controller to the servos. The servo controller you are going to use for this project is a simple servo motor controller utilizing USB from Pololu, Pololu item #: 1354 available at http://www.pololu.com, which can control 18 servo motors.

Here is a picture of the unit:

Make sure you order the assembled version. This piece of hardware will turn USB commands from the Raspberry Pi Zero into signals that control your servo motors. Pololu makes a number of different versions of this controller, each able to control a certain number of servos. In this case, you may want to choose the 18-servo version so you can control all 12 servos with one controller and also add an additional servo to control the direction of a camera or sensor. You could also choose the 12-servo version. One advantage of the 18-servo controller is the ease of connecting power to the unit via screw connectors.

There...

Communicating between the servo controller and a PC


Now that the servo controller is connected ,you can use some software provided by Pololu to control the servos. This is done just to make sure you have everything hooked up correctly, and to set the controller's setting. Unfortunately, the software won't run on the Raspberry Pi; you'll need to do this using your personal computer. First, download the Pololu Software from www.pololu.com/docs/0J40/3.a and install it according to the instructions on the website.

Once it is installed, run the software, and you should see this screen:

You will first need to change the configuration on Serial Settings, so select the Serial Settings tab, and you should see this:

Make sure that the USB Chained is selected; this will allow you to connect and control the motor controller over USB. Now go back to the main screen by selecting the Status tab, and now you can actually turn on the 12 servos. The screen should look like this:

Now you can use the sliders...

Controlling the Servo Controller with the Raspberry Pi


You've checked the servo motor controller, and the servos, you'll now connect the motor controller up to the Raspberry Pi and make sure you can control the servos from it. Remove the USB cable from the PC and connect it to the Raspberry Pi.

Let's now talk to the motor controller by downloading the Linux code from Pololu at www.pololu.com/docs/0J40/3.b. Perhaps the best way is to log onto your Raspberry Pi Zero with putty, then type wget to get the latest download from the site. Then move the file using mv maestro-linux-******.tar.gz\?file_id\=0J315 maestro-linux-******.tar.gz, where ******* is the current version number of the file.

Unpack the file by typing tar -xzfv maestro-linux-******.tar.gz. This will create a directory called maestro_linux. Go to that directory by typing cd maestro_linux, and then type ls -l. You should see something like this:

The README.txt document will give you explicit instructions on how to install the software...

Creating a program in Linux to control Wall-E's arms


You now know that you can talk to your servo motor controller, and move your servos. In this section you'll create a Python program that will let you talk to your servos to move them to specific angles.

Let's start with a simple program that will set Wall-E's arms to an initial position. To access the serial port, you'll need to make sure you have the Python serial library. Type sudo apt-get install python-serial.

Now you'll want to enter your program. Here is the code:

#!/usr/bin/python 
import serial 
import time 
 
def setAngle(ser, channel, angle): 
    minAngle = 0.0 
    maxAngle = 180.0 
    minTarget = 256.0 
    maxTarget = 13120.0 
    scaledValue = int((angle/((maxAngle - minAngle) / (maxTarget - minTarget))) + minTarget) 
    commandByte = chr(0x84) 
    channelByte = chr(channel) 
    lowTargetByte = chr(scaledValue & 0x7F) 
    highTargetByte = chr(scaledValue...

Adding the Kinect 360 to your Wall-E


Now that you can move around you should add a way for your Wall-E to see so that it won't run into walls. To do this, you'll use a Kinect 360, an amazing device from Microsoft that will not only give you a picture but also a depth image of your surroundings.

The Kinect 360 is particularly interesting because it provides all this in one package, and has a set of libraries that support the entire process. First, you'll need to connect the Kinect to the Raspberry Pi 3. This is a little difficult because the power and USB connections on the Kinect 360 are designed to connect to the Xbox 360 and a standard power outlet. So you'll need to do some modifications to the wires.

The Kinect 360 plugs into a connector that provides a USB connector that connects to the Raspberry Pi. That's the easy part. This connection also plugs into a standard wall socket. You'll need to cut the cable that comes out of the wall socket transformer/adapter and expose the wires, like...

Accessing the Kinect 360 using the Raspberry Pi


Once you have the unit connected and up and working, you can access the images. First, you'll need to install a library called freenect, which will make it very easy to access both the regular and depth images from the Kinect 360. To do this, type sudo apt-get install freenect. You'll also need a library to allow you to access freenect from Python; to get this, type sudo apt-get install python-freenect. Once you have the libraries installed, you'll also need to install a library that will allow you to access the images on the Raspberry Pi graphics system. To do this, type sudo apt-get install libgl1-mesa-swx11.

You can check to see if everything is working by opening a vncserver window and typing freenect-glview. You should see something like this:

This shows both the depth and regular image. The depth image is color coded: white is closer, then red, then yellow, then green.

This is neat, but you'll want to access both images using OpenCV just...

Controlling your Wall-E remotely


As in Chapter 2, Building Your Own Futuristic Robot, now you can have access, via vncserver, to a video feed or a depth image, and control the arms and tracks of your robot. Simply access vncserver, open a Terminal window, and run the desired programs. Now you can remotely control Wall-E using a host computer, tablet, or even cell phone.

Summary


Now you have your own Wall-E robot that can run autonomously or be controlled remotely. You could also use the principles described in Chapter 2, Building Your Own Futuristic Robot, to add the ability to respond to voice commands. You've now mastered these two projects that let you explore on land. Your next project will be a fish so that you can explore underwater.

lock icon
The rest of the chapter is locked
You have been reading a chapter from
Raspberry Pi Robotic Projects - Third Edition
Published in: Oct 2016Publisher: ISBN-13: 9781786467966
Register for a free Packt account to unlock a world of extra content!
A free Packt account unlocks extra newsletters, articles, discounted offers, and much more. Start advancing your knowledge today.
undefined
Unlock this book and the full library FREE for 7 days
Get unlimited access to 7000+ expert-authored eBooks and videos courses covering every tech area you can think of
Renews at €14.99/month. Cancel anytime

Authors (2)

author image
Richard Grimmett

Dr. Richard Grimmett has been fascinated by computers and electronics from his very first programming project, which used Fortran on punch cards. He has bachelor's and master's degrees in electrical engineering and a PhD in leadership studies. He also has 26 years of experience in the radar and telecommunications industries, and even has one of the original brick phones. He now teaches computer science and electrical engineering at Brigham Young University, Idaho, where his office is filled with his many robotics projects.
Read more about Richard Grimmett

author image
Jon Witts

Jon Witts has been working within the IT industry since 2002 and specifically within Educational IT since 2004. He was introduced to Linux back in 2001 through his collaboration with two German artists who were visiting the arts organisation he was then working with. Having studied Fine Arts and Educational Technology and sought to innovate with open and accessible digital technologies within his creative practice, Jon is happiest when deconstructing technology and finding its limits. Jon has embedded within his school the use of Raspberry Pi computers, as an integral part of the delivery of the school's Computer Science curriculum as well as to run various school clubs and projects. Jon is a Raspberry Pi Certified Educator and also helps to organise and run the Hull Raspberry Jam events. I would like to thank my wife, Sally and our three daughters for putting up with all the cables and compoents around the house, and not least for being so tolerant of the need to dodge the robots racing round the kitchen floor!
Read more about Jon Witts