


 Download code from GitHub
Introduction and Environment Setup
In this chapter, we will cover the following recipes:
- Understanding and choosing a distribution
- Installing VirtualBox
- Installing our chosen distribution manually
- Connecting to our virtual machine (VM)
- Accessing and updating our VM
- Understanding how VMs differ
- Quick sudo explanation
- Using Vagrant to automatically provision VMs
- Anecdote (try, try, and try again)
Introduction
Before we get into the nitty-gritty of what distribution (sometimes shortened to "distro") we're going to use, we must first take a rather large step backwards and consider the concept of Linux in a somewhat philosophical way.
A good description of "what Linux is" can be hard to pin down, due in no small part to a level of confusion willfully propagated by IT professionals, because it makes them sound much smarter than they actually are when they come to explain it.
Because you're reading this book, I'm going to assume that you know of Linux at a high level; you know that it's an operating system (OS) like Windows or macOS, that it's not seen much of the limelight, and that it's not generally used on the desktop.
This assessment is both right and wrong, depending on who you're speaking to.
Laid-back systems administrators (sysadmins) will lean back further, nod their 80s era mohawk, and agree that Linux is an OS—and a decent one at that. They will then go back to playing with whatever trendy software they're learning this week so that they can try and shoehorn it into the infrastructure next week.
Self-proclaimed graybeards will stop what they're doing, sigh audibly, and pick up their fourth cup of coffee before swiveling around to give you a lecture on the difference between GNU/Linux (or GNU+Linux) and the Linux kernel.
The lecture you receive will be tedious, will involve names such as Richard Stallman, Linus Torvalds, and possibly even Andrew Tanenbaum, and may even take upwards of an hour, but the main takeaway will be that Linux is the accepted name of the OS you're learning about, while also being technically incorrect. They will say that Linux is really just the kernel, and everything beyond that is a distribution wrapped atop the GNU tools suite.
It is considered sensible to avoid this debate at all costs.
Understanding and choosing a distribution
Linux, as hinted at in the preceding section, is fragmented. There's no better way to describe this, due to the sheer number of different distributions you can download from a multitude of different vendors. Some of these vendors are for-profit, offering support contracts and SLAs with your purchase of their OS, and some are entirely voluntary, manned by one person in their garage.
There are literally hundreds of distributions to choose from, and each has their advocate-army to tell you why theirs is "the one true distribution" and "there's really no reason to go shopping around for a different one."
The truth of the matter is that most businesses use the Linux distribution they do because it was:
- The first one that popped up when the owner Googled free OS
- The one the first IT Administrator liked
- The one that offers a contract they can invoke when something breaks
Going through each distribution that's around at the moment would be futile, as they're being created or abandoned on an almost weekly basis. Instead, I'm going to run through a popular selection (in the server space, rather than the desktop), explain some key differences, and then talk about which I'll be using for the rest of this book.
Don't be deterred if the distribution your business uses isn't one we talk about here – most of the tooling is consistent across distributions, and where it differs, documentation exists to help you out.
Ubuntu
Ubuntu is the first Linux distribution I ever installed, and I'd wager the same could be said for a lot of people who started in Linux around the mid-2000s. It's also the distribution I'm using to write this book.
It has enjoyed consistent mindshare on the desktop, thanks to its decent attempt at marketing (including its position in Google's rankings when searching Linux), its perception as Linux for Human Beings, and its user-friendliness.
Downstream from Debian, Ubuntu's development is headed by Canonical, and while they started with an emphasis on making a rock-solid desktop OS, they have since moved into the lofty realms of attempting to dominate the server space, and have entered the IoT device market too.
Known also for its cutesy naming convention (18.04 being Bionic Beaver), the fact Ubuntu was so popular on the desktop meant it was the obvious distribution of choice for sysadmins to install on their servers, reaching for what they were already familiar with.
More recently, it's become increasingly common to find Ubuntu installations when dealing with inherited systems, usually a long-term support (LTS) release (so that confusion and headaches around OS upgrades can be avoided for a reasonable length of time.)
Ubuntu releases on a six-monthly cycle, with every two years being an LTS release (14.04, 16.04, and 18.04, most recently). Their numbering convention is year-released, followed by month (so April 2018 is 18.04). It is possible to upgrade from version to version of Ubuntu.
Canonical also aren't shy of introducing new technology and software in Ubuntu, even when it diverges from their Debian base. Recent examples of this include the following:
- Snaps: A way of distributing distribution-agnostic software
- Upstart: A replacement initialization system that was later also replaced by systemd
- Mir: A display server, which was initially conceived as a way to replace the ageing X Window System
Debian
As mentioned previously, Debian (the universal OS) is the basis for a lot of other distributions that came later, but it has consistently been one of the most popular, both on the desktop and on servers. It is still highly likely that you will choose to install Debian yourself, or will inherit a system running this distribution, with its reputation for stability.
Traditionally, the server-space war was fought between two camps, the Debian Druids and the CentOS Cardinals. In more recent years, newcomers have entered the fray (like Ubuntu,) but these two still hold a considerable amount of hardware to ransom.
Releasing every two or three years, the Debian versions are named after Toy Story characters (7—Wheezy, 8—Jessie, 9—Stretch). They have a reputation for being one of the most stable Linux distributions around, with tried and tested versions of software, as well as sensibly backported fixes.
Some criticism is sometimes leveled at Debian because it generally has older versions of packages available in its release version, which may not include all the trendy and cool features a systems administrator wants, or a developer desires. This isn't fair, given that people generally look for stability and security in the server world, over the latest and greatest version of Node.js.
Debian has staunch defenders, and it holds a special place in a lot of hearts, though it's unusual to see it in some Enterprise environments because it's developed by the Debian Project, rather than a traditional company that can offer support contracts. In my anecdotally dismissible experience, I have more often seen Debian in smaller companies who needed a quick solution, and slightly larger companies who still run some legacy systems.
CentOS - the one we'll mostly be using
The other part of the traditional server-space war, CentOS features its own soldiers and martyrs. It is still widely used, and has a reputation for stability and boredom that rivals Debian's.
The Community Enterprise Operating System (CentOS) is a freely available and compiled version of the Red Hat Enterprise Linux distribution, which aims to offer functional compatibility, generally replacing the Red Hat logo with the CentOS logo to avoid trademark infringement. (In January of 2014 it was announced that Red Hat was joining forces with CentOS, to help drive and invest in CentOS development.)
Because of its nature, a lot of systems administrators have installed CentOS to better understand the Red Hat world, because (as mentioned previously) Red Hat has a good reputation in Enterprise companies, so it would make sense to install something so strikingly similar.
This installation trend goes both ways. I have seen companies who started out by installing CentOS because it was readily available and allowed them to design their infrastructure easily, utilizing publicly available and free repos, before moving to a RHEL deployment for the finished product.
I have also seen companies who deployed RHEL everywhere, only to realise that they were spending a lot of money, and never invoking the support they'd bought because their operations team was just that good! They would then gradually phase out their Red Hat deployments and move to CentOS, changing very little in the process.
Releases come about every few years, with version 7 being released in 2014, and getting consistent updates since then. However, it should be noted that version 6, which was released in 2011, will be getting maintenance updates until 2020.
Red Hat Enterprise Linux
Red Hat Enterprise Linux, or RHEL as it's more commonly known (because it's a long name), has a very firm footing in Enterprises. It targets the commercial space very well, and as a result it is not uncommon to find yourself on a RHEL box, which you've initially assumed to be a CentOS installation.
What makes RHEL different is the support offered by Red Hat, Inc. and the various services that you can utilize if you've bought an official package.
While Red Hat still offers the source code for their distribution without question (hence CentOS), they sell versions and packages for everything from the desktop up to data centre installations.
There's an adage that states "no one got fired for buying IBM," which is a little dated in this day and age, but I've heard people invoke this philosophy to describe Red Hat on more than one occasion. No one will get fired for buying Red Hat (but you might be asked what the benefits are of paying for something that's available for free under another name.)
Aside from the support, the business-like attitude that other businesses like, and the contributions back to the community as a whole, Red Hat also offer something which has been variously described as "a waste of time" and "crucial for this role."
Exams are looked at with both affection and derision, depending on who you speak to in the Linux community (as with many things, there's something of a holy war about them). Red Hat offers two of the most popular, and many more to boot. You can study for and become a Red Hat Certified System Administrator, followed by a Red Hat Certified Engineer, which are widely seen as very acceptable qualifications to have.
As a college dropout, I'm quite happy to have an RHCE qualification under my belt.
Some people see these exams as a way of getting past the first line of those hiring (as in the people who scan your CV, and look for badges they recognize). Others see them as proof that you know what you're doing around a Linux system due to the fact that these exams are practical, (meaning they sit you in front of a computer and give you a set of steps to finish.) Some people dismiss exams altogether, although they're usually the ones who've never bothered trying the exam.
Installing VirtualBox
As I said in the previous section, I've chosen to mostly use CentOS for the recipes in this book. Hopefully, this gives you a good baseline for learning about Linux Administration, but also gives you a bit of a head start if you plan on going for any of the Red Hat exams.
Instead of requiring you to have a spare laptop handy, or renting a server somewhere, I'm going to advocate using VMs for testing and running through the examples given.
VMs are exactly as they sound – a way of virtualizing computer hardware on one or a cluster of physical machines, thus allowing you to test, break, and play to your heart's content, without risking rendering your own computer unbootable.
There are many ways of creating a VM: macOS has xhyve, Windows has Hyper-V, and Linux has a native implementation called Kernel Virtual Machine (KVM).
Another way of creating and managing VMs is a program called VirtualBox, which is now developed by Oracle. The nice thing about this software, and the reason I shall be using it here, is that it's cross-platform, being produced for macOS, Windows, and Linux.
Installing VirtualBox on Ubuntu
I'm using Ubuntu to write this book, so I'll run through the basic way of installing VirtualBox on an Ubuntu desktop.
This will be slightly different to installing it on other distributions, but a good number of them package it for installation, and should provide a guide for installing it.
Command-line installation
Open your Terminal and run the following:
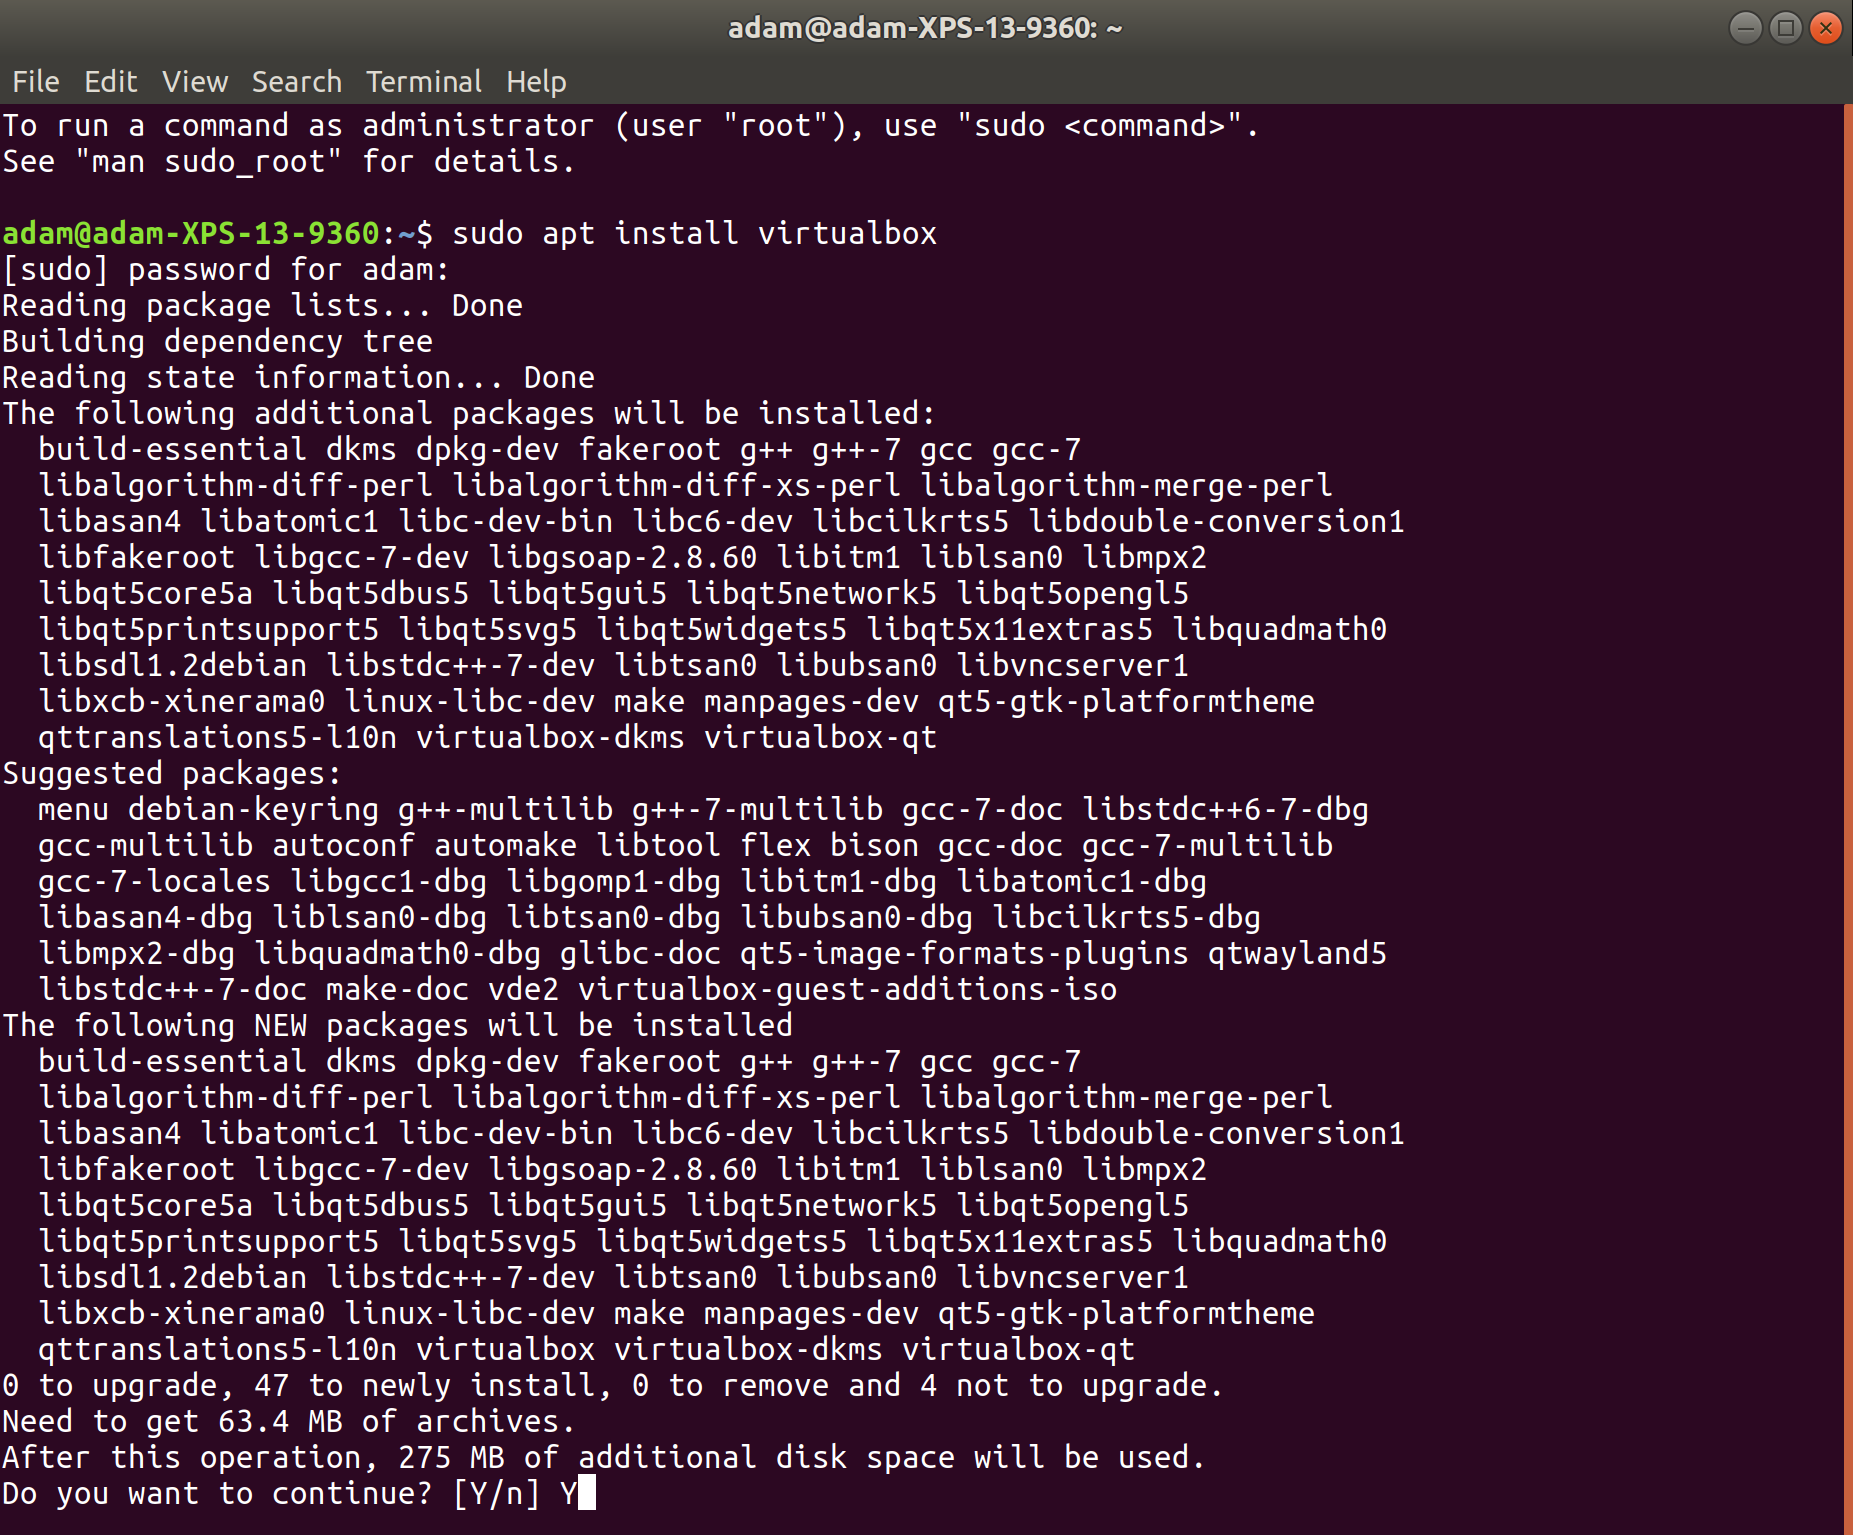
$ sudo apt install virtualbox
You will likely be prompted to confirm installation of VirtualBox and its dependencies (there may be a lot—it's a complex program and if you haven't updated in a while, you may get a few dependency updates too).
Hit Y and Enter to continue. The following screenshot shows an example of the installation if started from the command line:
Once done, you should have a working VirtualBox installation.
Graphical installation
If you'd like, you can also install VirtualBox through Ubuntu software.
Simply search for the software you desire, in this case, VirtualBox, and click through to its store page.
Once there, click Install and the package will be installed, no Terminal required!
After installation, your screen will change to show Launch and Remove options.
Installing VirtualBox on macOS
Although I'm using Ubuntu, it's not the end of the world if you're not. macOS is a fine OS too, and handily it supports VirtualBox.
In this recipe, we'll run through a couple of ways of installing VirtualBox in macOS. You'll find that the layout is extremely similar, regardless of the OS you use.
Command-line installation
If you already have the command-line program brew installed, then getting VirtualBox is as easy as running the following command:
$ brew cask install virtualbox
You may be prompted for a superuser password to complete the installation.
Graphical installation
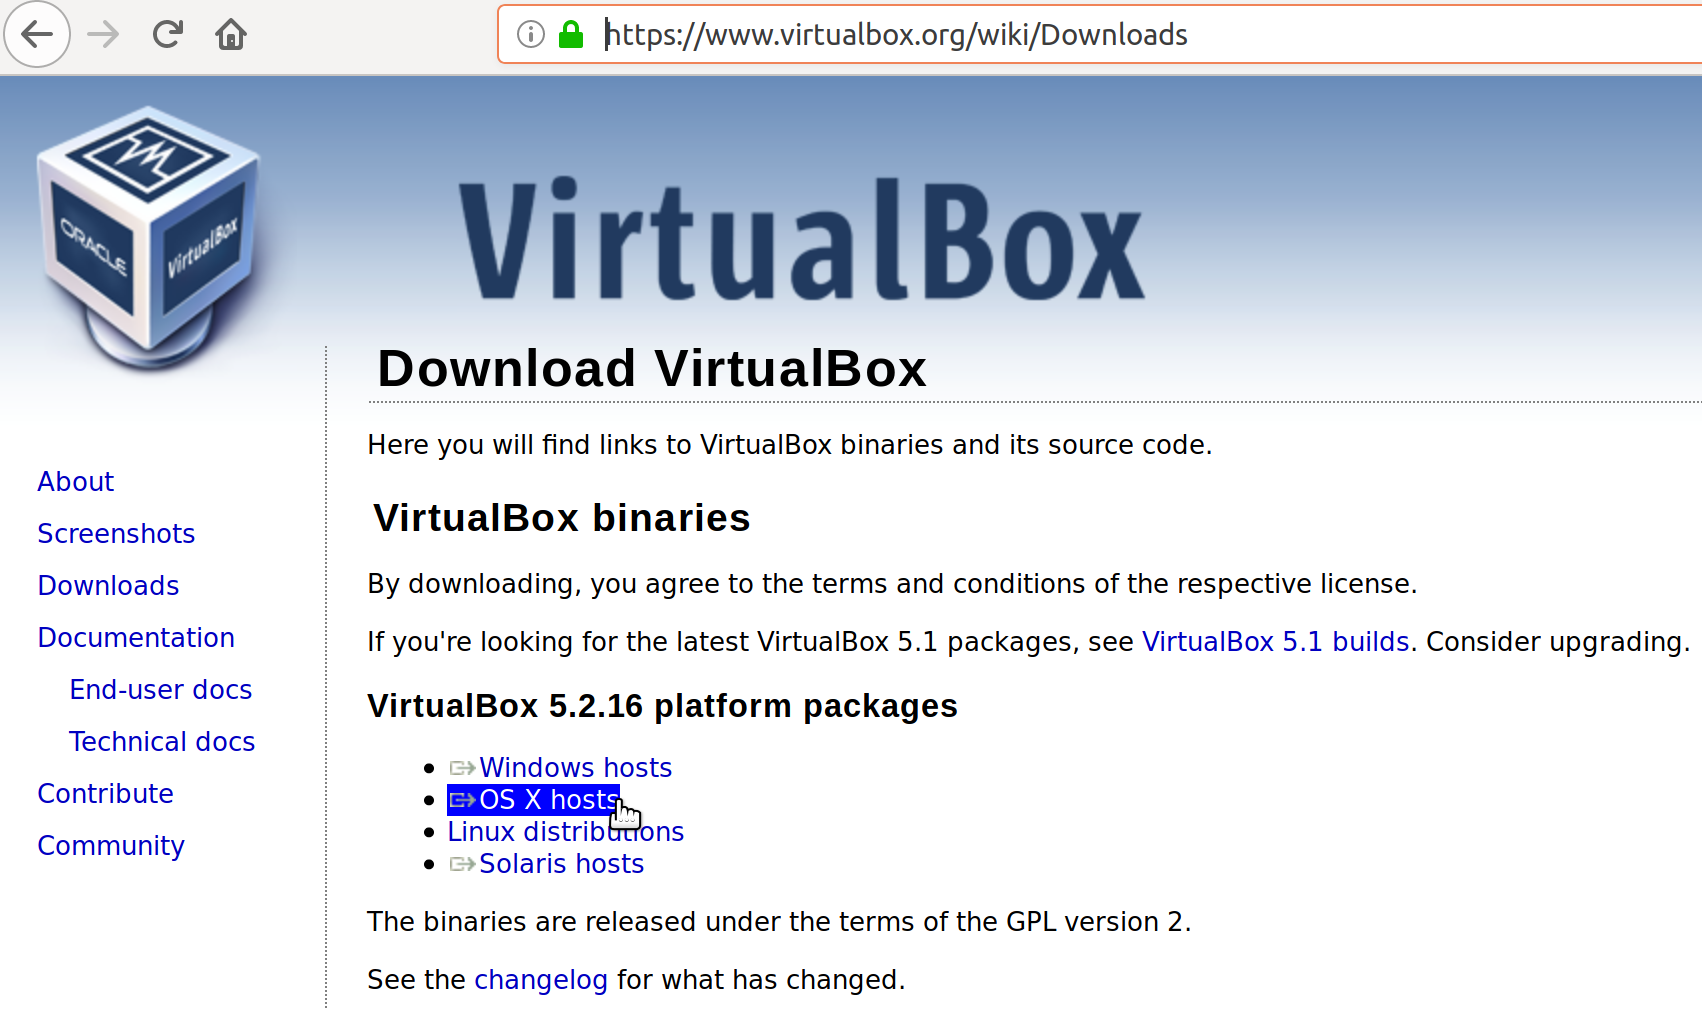
Oracle also provides an installation image for macOS, if you'd like to install it in the more traditional way.
Simply navigate to https://www.virtualbox.org/wiki/Downloads and select the OS X hosts option.
This will prompt you to download the installer to your local system, which you can unpack and install.
Running through the installation, you may be prompted for your superuser password.
Installing VirtualBox on Windows
If you're not using a Linux flavor on your computer, and you're not using macOS, it's a good bet that you're running Windows (unless you've delved into FreeBSD on the desktop or similar, in which case I can't help you here—we'd need an entire afternoon).
If using Windows, I can suggest VirtualBox again, due to its cross-OS nature, and it can again be installed from Oracle's site.
Graphical installation
Like the macOS installation, navigate to https://www.virtualbox.org/wiki/Downloads and select the Windows hosts option:
This will download an executable that can be run.
Installing our chosen distribution manually
Phew, that was a journey, and we've not even started properly!
Next, we're going to look at setting up a VM manually. But fear not! We will also be looking at automating this procedure with Vagrant to avoid having to perform repetitive steps in the rest of the book.
Obtaining our CentOS installation media
The main way Linux distributions are distributed is in the form of ISO images. These images can then be burned onto a DVD as appropriate, or mounted for a VM to boot from.
Head over to https://centos.org/download/ and have a look at the options on offer.
I'm going to download the Minimal ISO, for reasons that will become clear shortly.
Clicking through should bring you to a mirror page:
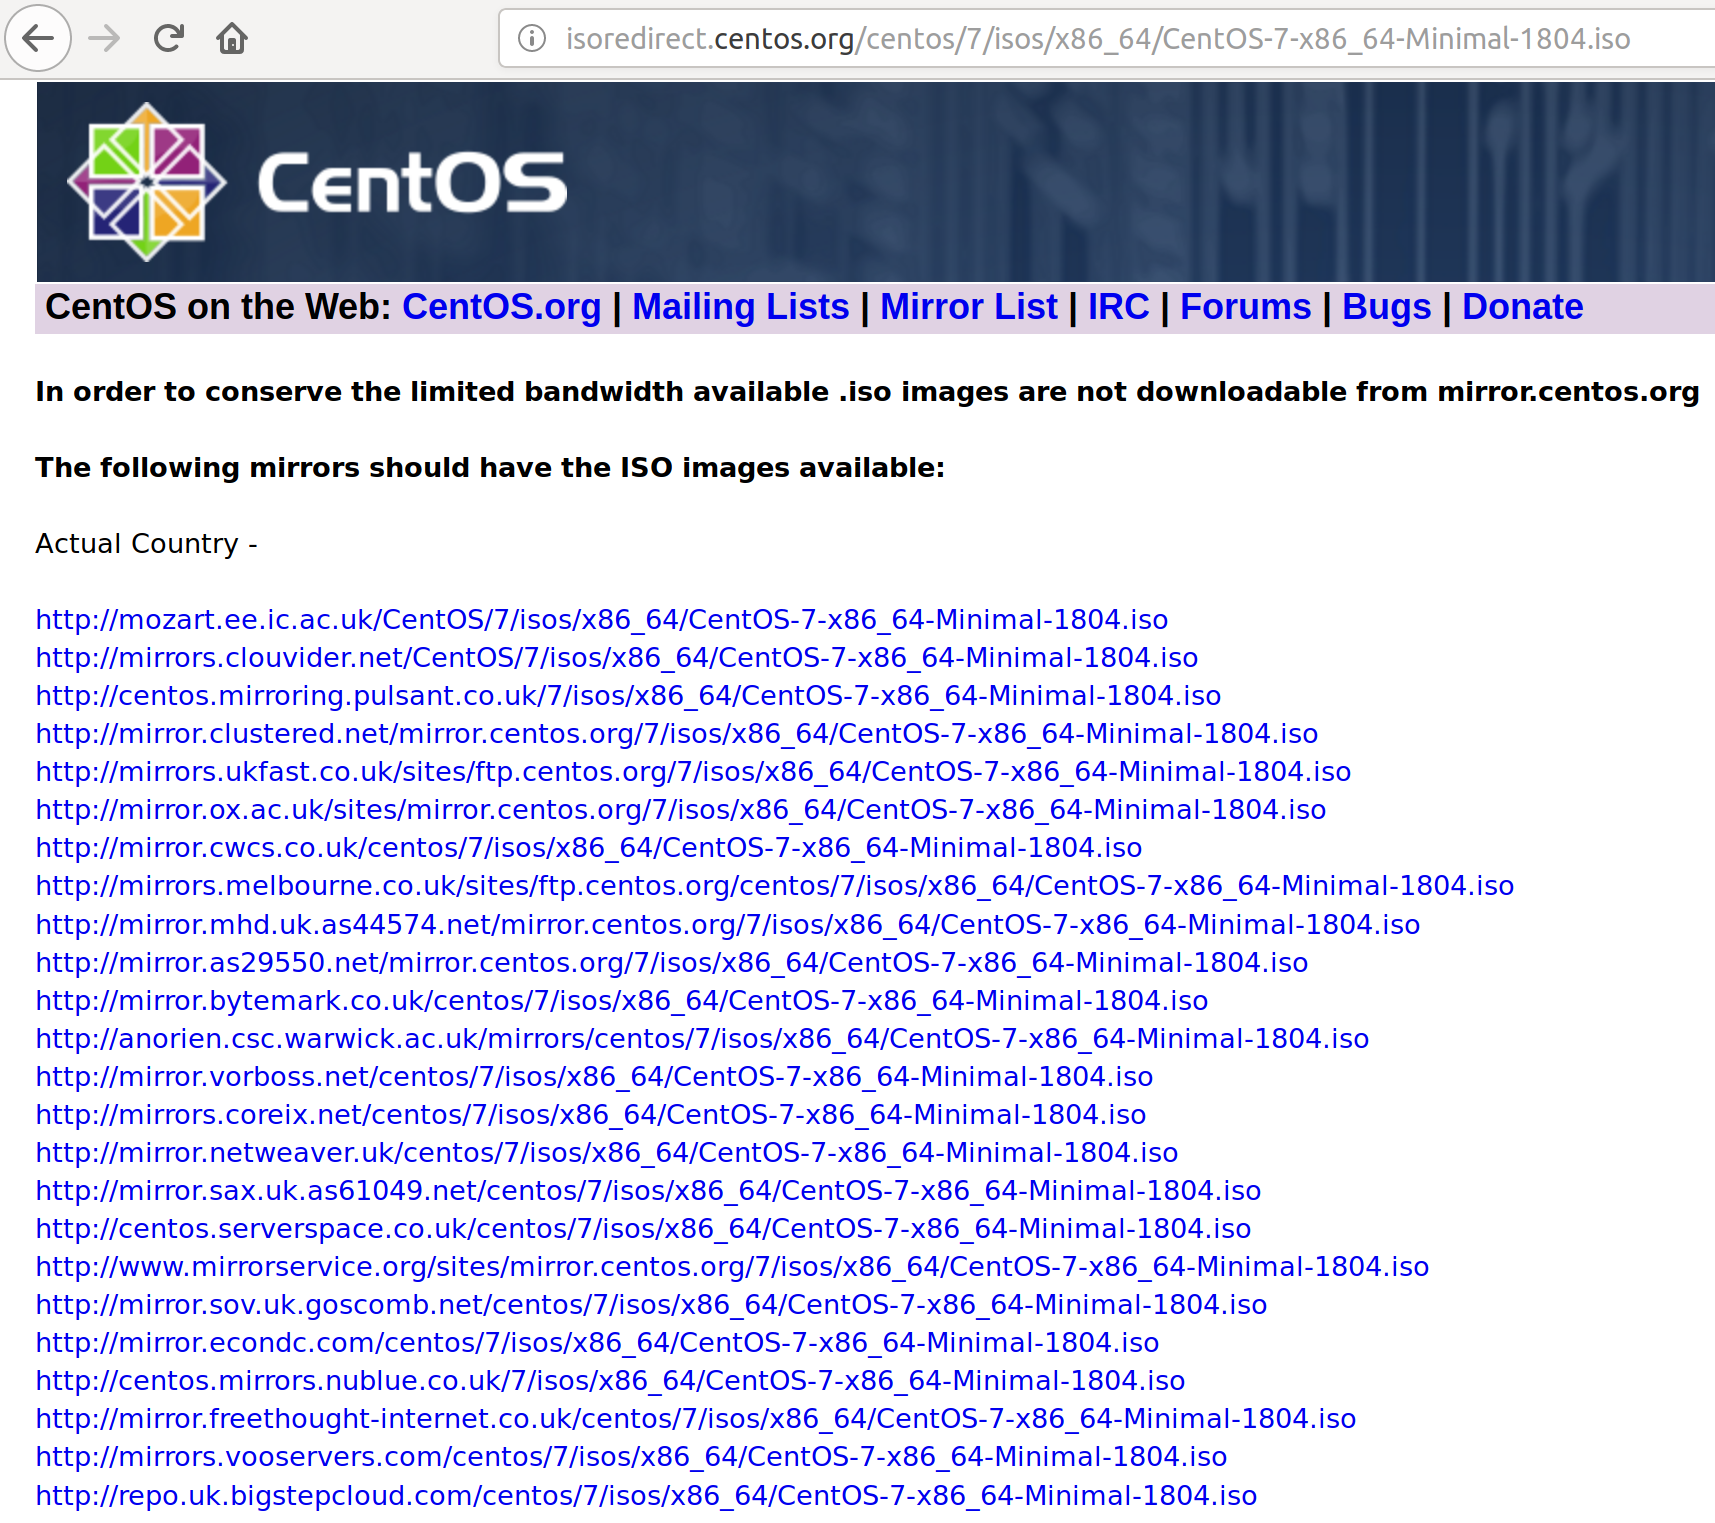
This is a bandwidth-saving measure on part of the CentOS Project by prompting the end user to download from any number of different hosts. They can spread the cost of bandwidth out to volunteers.
Choose a download location near to you, and wait for the download to complete.
Checking the checksum
Once downloaded (which may take a while, since even minimal is large), you will be faced with an ISO image.
On my Ubuntu installation, I can see it in my Downloads folder:
$ ls ~/Downloads/
CentOS-7-x86_64-Minimal-1804.iso
One way to confirm our installation media and ensure that we've downloaded exactly what we expect, is to compare the Sha256 sum of the downloaded file with a known-good value. This both proves that it's the download we expect it to be, and also checks that no corruption has occurred during the file download.
CentOS provides a release notes page that we can visit to find the Sha256 sum we're comparing: https://wiki.centos.org/Manuals/ReleaseNotes.
Click through to Release Notes for CentOS 7, which should bring you to the most recent version of the release notes.
On this page, we can scroll down to Verifying Downloaded Installation Images, which will list the current Sha256 sums for the download images.
In my case, I can see that the Sha256 value for the file I just downloaded is as follows:
714acc0aefb32b7d51b515e25546835e55a90da9fb00417fbee2d03a62801efd CentOS-7-x86_64-Minimal-1804.iso
With this in hand, I can go back to where I listed out the file in my Terminal, and run a basic command to check the Sha256 value of the downloaded image:
$ sha256sum CentOS-7-x86_64-Minimal-1804.iso
714acc0aefb32b7d51b515e25546835e55a90da9fb00417fbee2d03a62801efd  CentOS-7-x86_64-Minimal-1804.iso
Comparing the value from the CentOS website with the value from my downloaded image confirms that they are the same.
The media is what we expected!
Setting up our VM
Now that we have our media and VirtualBox is installed, it's time to run through manually provisioning (technical term) our machine and installing CentOS.
VirtualBox main window
Upon starting, you will be greeted with the VirtualBox main window. At the moment, we're only interested in the New button in the top left. You need to click the New button.
Next, you will be prompted to name your VM.
Call your first machine CentOS-1.
Notice how when you name your machine, the Type and Version automatically detects what you've typed, and reconfigures the selection as appropriate.
In this case, it gives us a Type of Linux, and a Version of Red Hat (64-bit). This is okay because of what we said before about CentOS and Red Hat Enterprise Linux being very close.
Hit Next.
Now, we have to configure the amount of memory to give our machine. If you're constrained by this, you can put it to a lower value than the default of 1024 MB (1 GB), but 1,024 MB is a reasonable place to start, and we can always adjust it later if needed.
Now, we'll be prompted to configure the hard disk for our virtual system.
Leave the default option of Create a virtual hard disk now selected, and click Create.
You'll be prompted to choose a type. Leave the default selected, that is, VDI (VirtualBox Disk Image).
You'll be given the option of provisioning the disk over time (Dynamically allocated) or all in one go (Fixed size). I tend to leave it as Dynamically allocated.
Next, you'll be prompted to choose a location and a size for the disk. I would advise leaving the disk in the default location, and for the moment the default size of 8 GB should be enough disk space to get started.
Hit Create.
If everything goes well, you will return to the main window, and a new VM should be listed on the left, in the Powered Off state.
CentOS installation
Now that we have our VM, it's time to install our OS on it.
Clicking Start on the top of the main VirtualBox window, with your VM selected, should prompt you to first select a startup disk.
I've navigated to my Downloads folder and chosen the downloaded image from earlier.
Pressing Start will boot the machine from our media.
You will be presented with the option screen within the VM, with Test this media & install CentOS 7 selected by default.
I usually hit the up arrow (within the VM window) to select only Install CentOS 7 and skip the media check, though you may wish to perform the test.
Pressing Enter will continue the installation.
You will be prompted to choose your language. I choose English, because I'm monolingual.
Once done, you will find yourself on the landing page of the most recent CentOS installer:
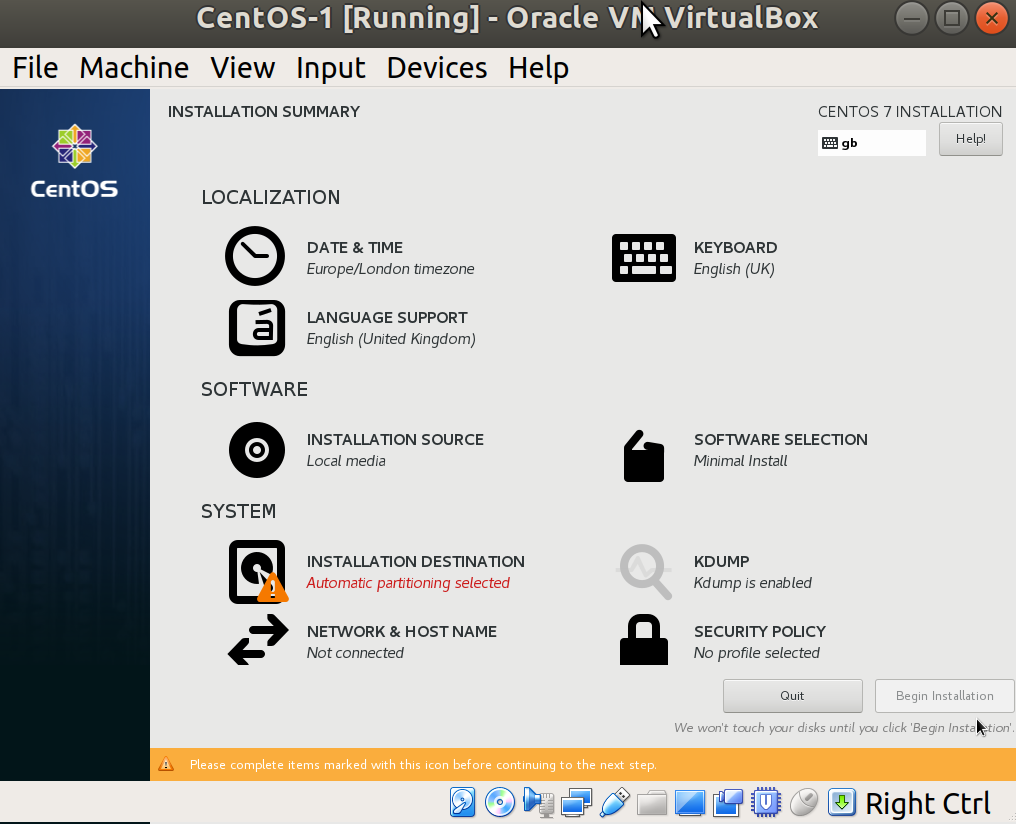
Because our date/time, keyboard, and language are all correct, we'll move on to the next stages, but feel free to correct any of these settings if they're wrong for you.
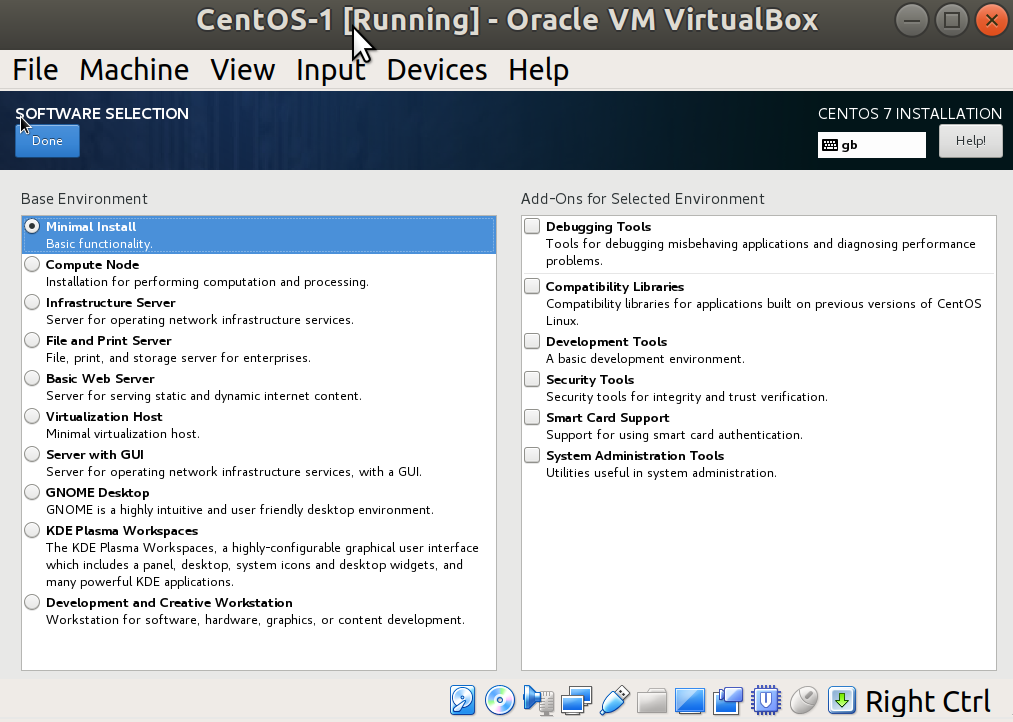
Notice that under INSTALLATION SOURCE we've got Local media selected, and under SOFTWARE SELECTION we've got Minimal Install. This is a product of us selecting the minimal image earlier on, and gives us a good chance to talk about installation over the internet.
First, we need to configure our network. Click on NETWORK & HOST NAME to do this.
You should have a single Ethernet device, provided as part of the default provisioning step when making our VM.
Toggle the ON/OFF toggle to the right of your device name, and check that the network values are populated in a similar way to mine:
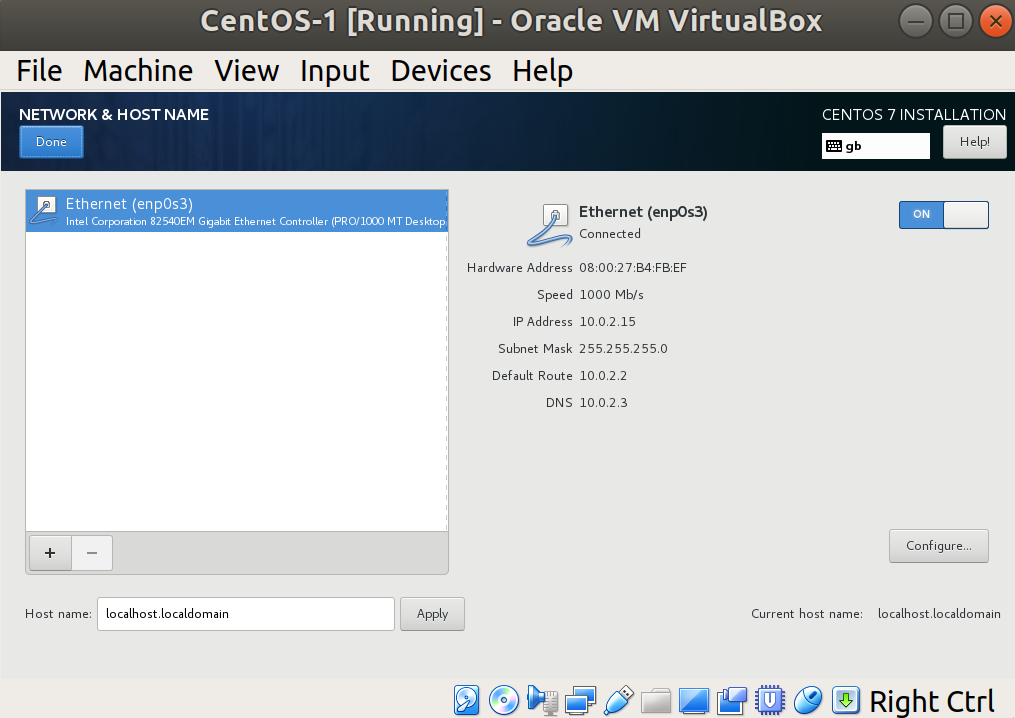
VirtualBox creates a NAT network by default, meaning that your VM doesn't sit on the exact same network as the host computer. Instead, the VM exists in a network by itself, but with a path to the outside world (via your host machine).
Press Done in the top left to complete our network setup (for now)!
Back on the main screen, click on INSTALLATION SOURCE:
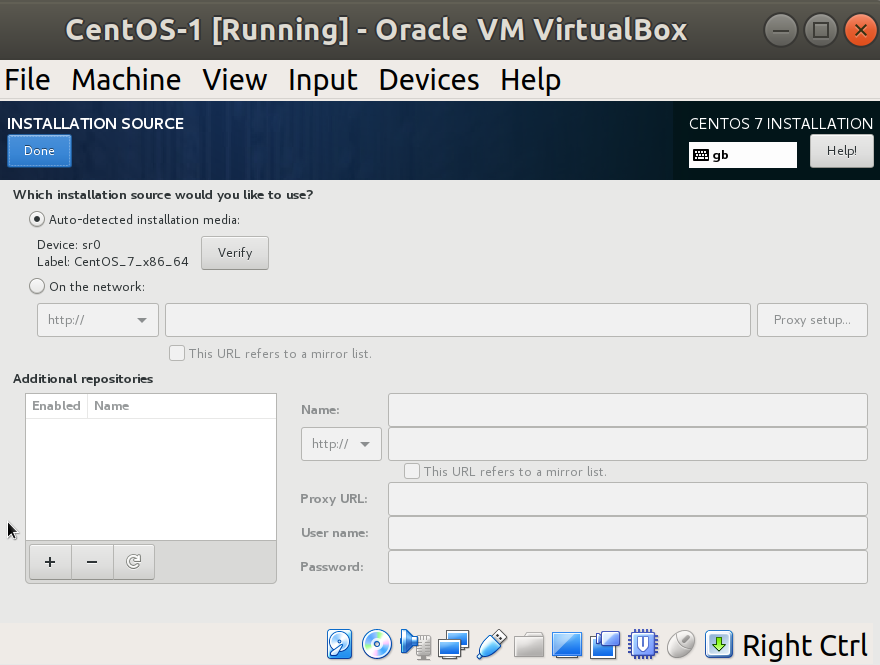
Within this screen, you can see that the auto-detected media is actually our disk image (sr0 being Linux's denotion of the disc drive).
Change the selected radio button to be On the network.
Populate the URL bar with the following:
mirror.centos.org/centos/7/os/x86_64/
You should end up with the following screenshot:
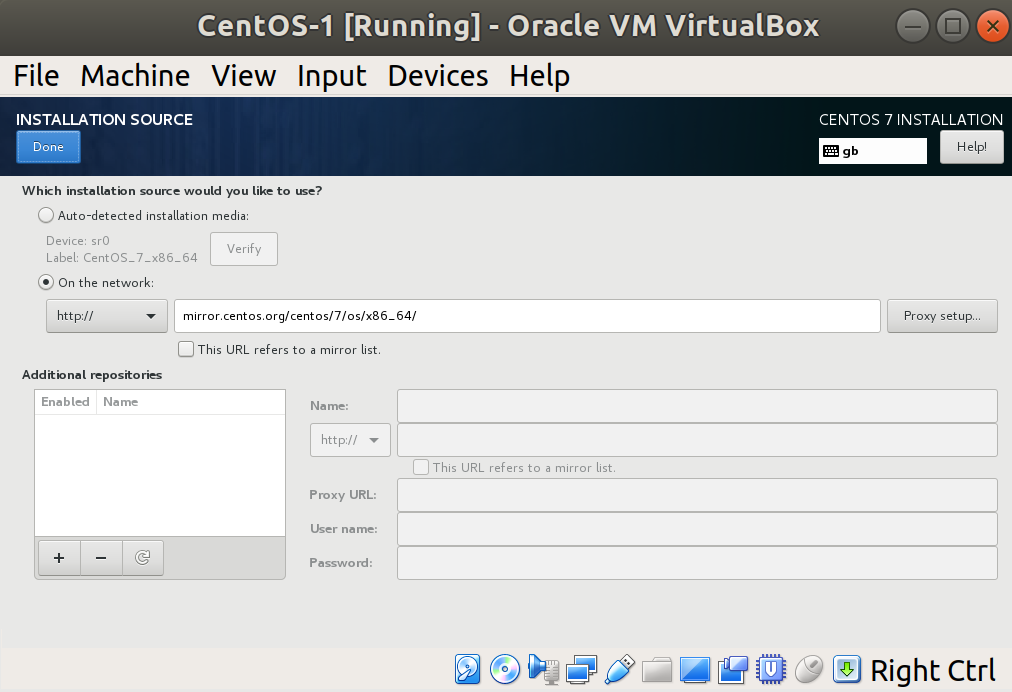
Press Done in the top left.
Once you're back on the main screen, it will be indicated that your software source has changed, and you need to verify this by entering the SOFTWARE SELECTION window. Proceed with this.
Have a read through the different options, but for now leave Minimal Install selected and click Done:
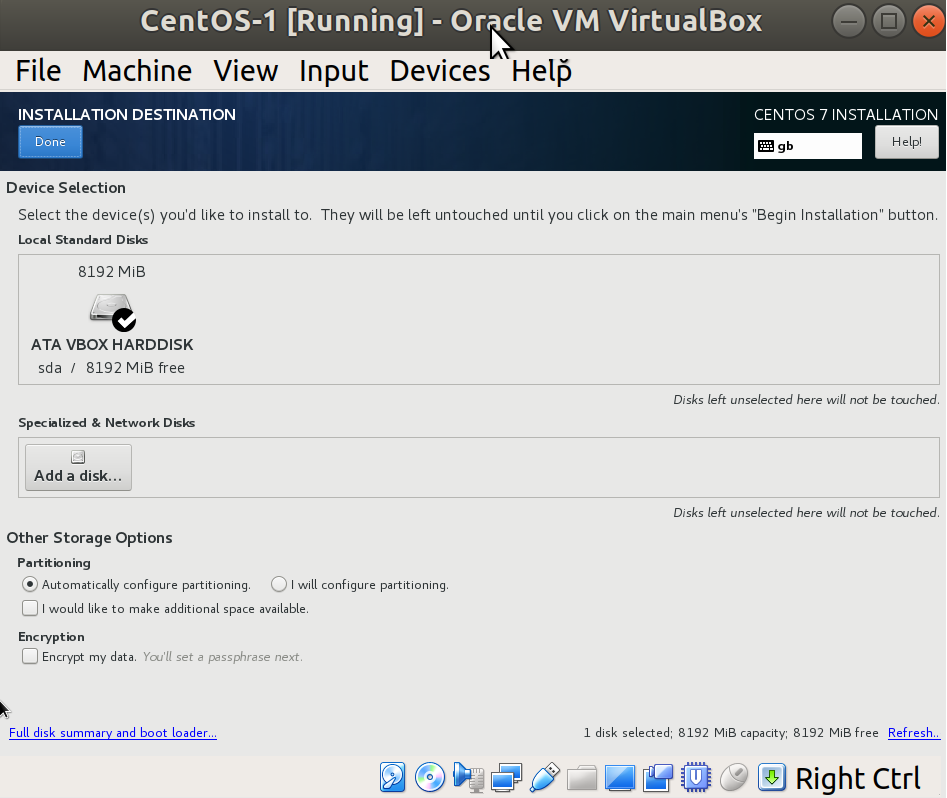
The last thing to do from the main screen is set our INSTALLATION DESTINATION. Click through to this screen.
Have a read of the options, but for now we're not going to bother with changing the default partition layout, or encrypting our disk. You should also see that the default selected disk is our 8 GB VirtualBox one.
Click Done (you shouldn't have had to make any changes, but the installer makes you enter this screen at the very least):
We've finally finished our (fairly basic) configuration. Hit the Begin Installation button at the bottom of the main screen.
You'll see the installation begin, and will be given the following screen while you wait:
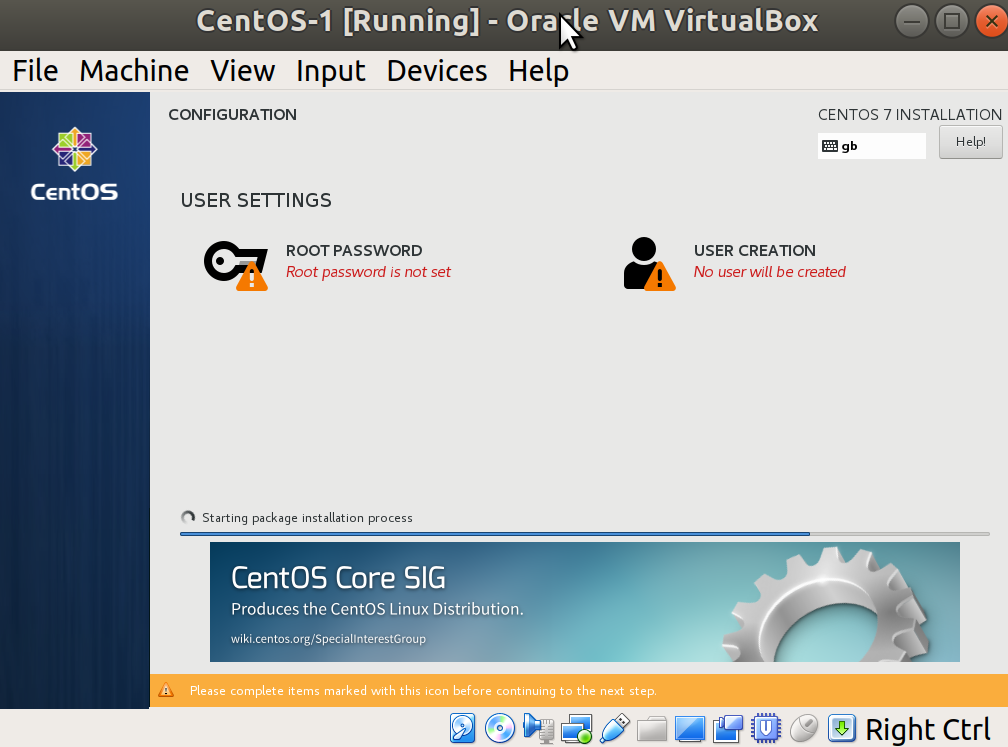
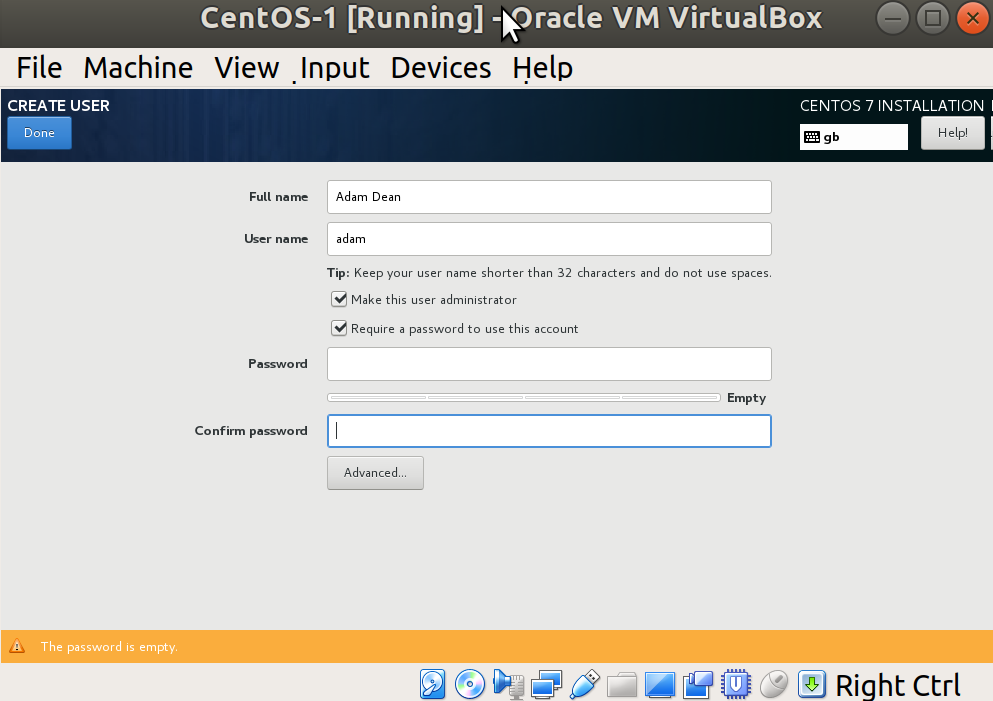
Click on the options at the top in turn, setting a root password and creating a user.
When making your user, flag them as an administrator too:
Clicking Done will take you back to the installation progress screen, where you may be prompted through the rest of the installation, and eventually get asked to reboot into your freshly installed system.
No sane person should ever have to produce that many screenshots.
Accessing and updating our VM
Now that we have our installed VM, we're going to log in and have a quick poke around.
Logging in from the VirtualBox window
Clicking into our VM, as we did during installation, will allow us to type at the login prompt:
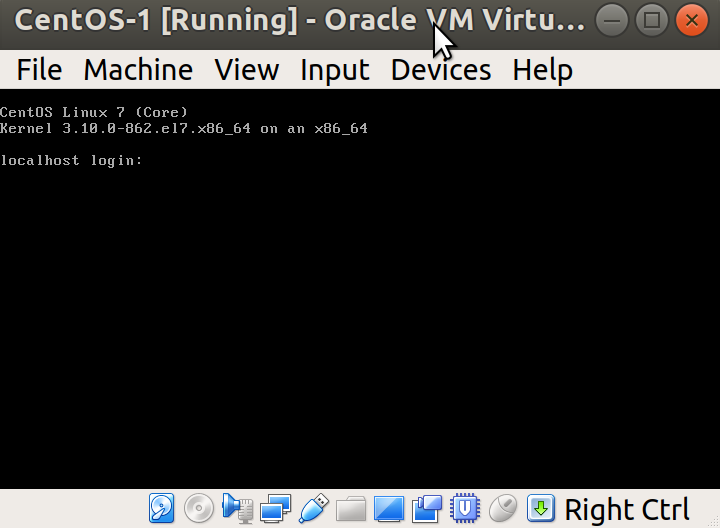
We're going to use the user we created at installation time, rather than root.
Note that you also get a bit of information on login attempts since your last login. In this case, I failed my first attempt at logging in, and it tells me this:
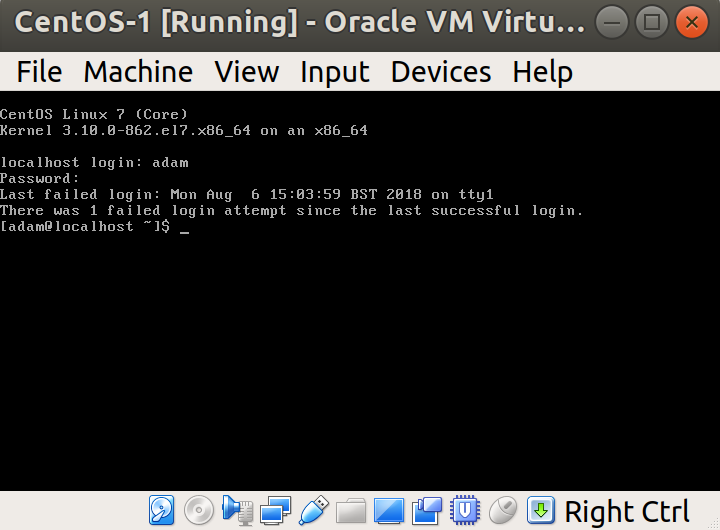
Congratulations – you've installed CentOS!
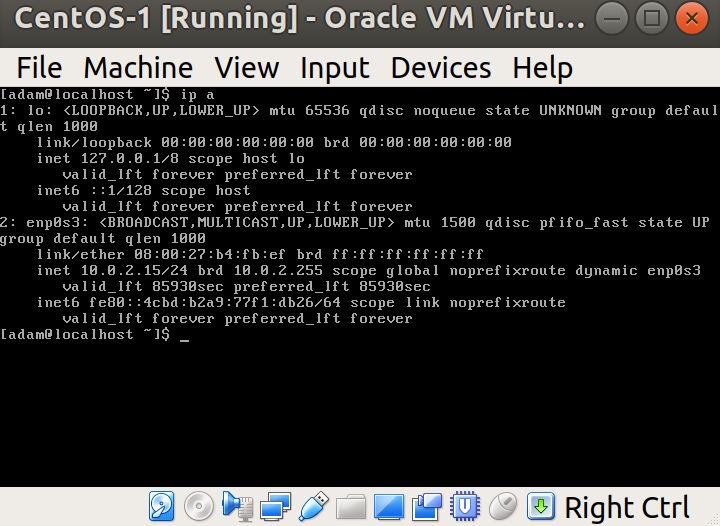
Before we go further, we're going to run a quick command to find the IP address of our machine:
$ ip a
This gives us a lot of network information, but crucially it gives us the inet address of our network interface, 10.0.2.15:
Logging in from the host Terminal
Because using the VirtualBox interface is somewhat cumbersome (making things such as copy and paste tricky), it makes sense that there's a more elegant way to connect and interact with our machine.
Secure Shell (SSH) is the tool we're going to use for this, as it provides a fast and secure way of connecting to remote machines.
Using our IP address from a moment ago, we're going to try and SSH to our VM, from our host (the machine you're running VirtualBox on:)
$ ssh adam@10.0.2.15
ssh: connect to host 10.0.2.15 port 22: Connection refused
Oh no! Something is off!
We haven't connected, and the connection was apparently refused!
Making sure sshd is running
First, we're going to make sure that the server component of sshd is running by logging onto our VM in VirtualBox and running the following:
$ sudo systemctl enable sshd
$ sudo systemctl start sshd
You should be prompted (at least once) for your user password that we set earlier.
What we're doing is enabling the sshd service to start when the server is booted with the first command, and starting it right now with the second (so that we don't have to reboot the VM).
Making sure that VirtualBox lets us through
Just starting sshd isn't enough to get us connecting to the VM from the host – we also have to set up some Port Forwarding for the VirtualBox NAT network.
From the main VirtualBox window, highlight your VM and click Settings at the top. Head to the Network section and click the arrow by Advanced to drop down a larger section. Click Port Forwarding:
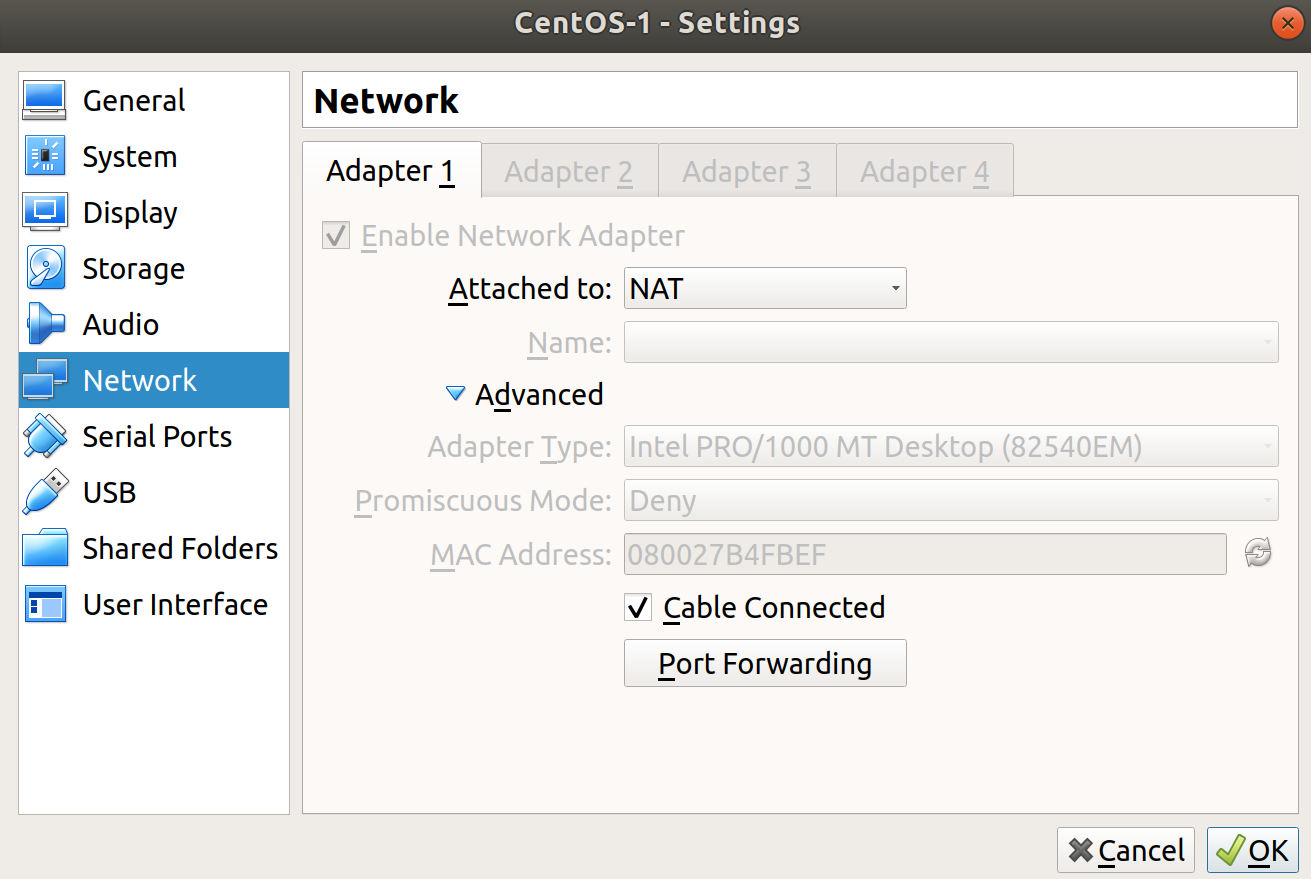
In the new window that's popped up, click to add a new rule on the right, and populate it with the settings from the following screenshot, substituting your Guest IP if it differs:
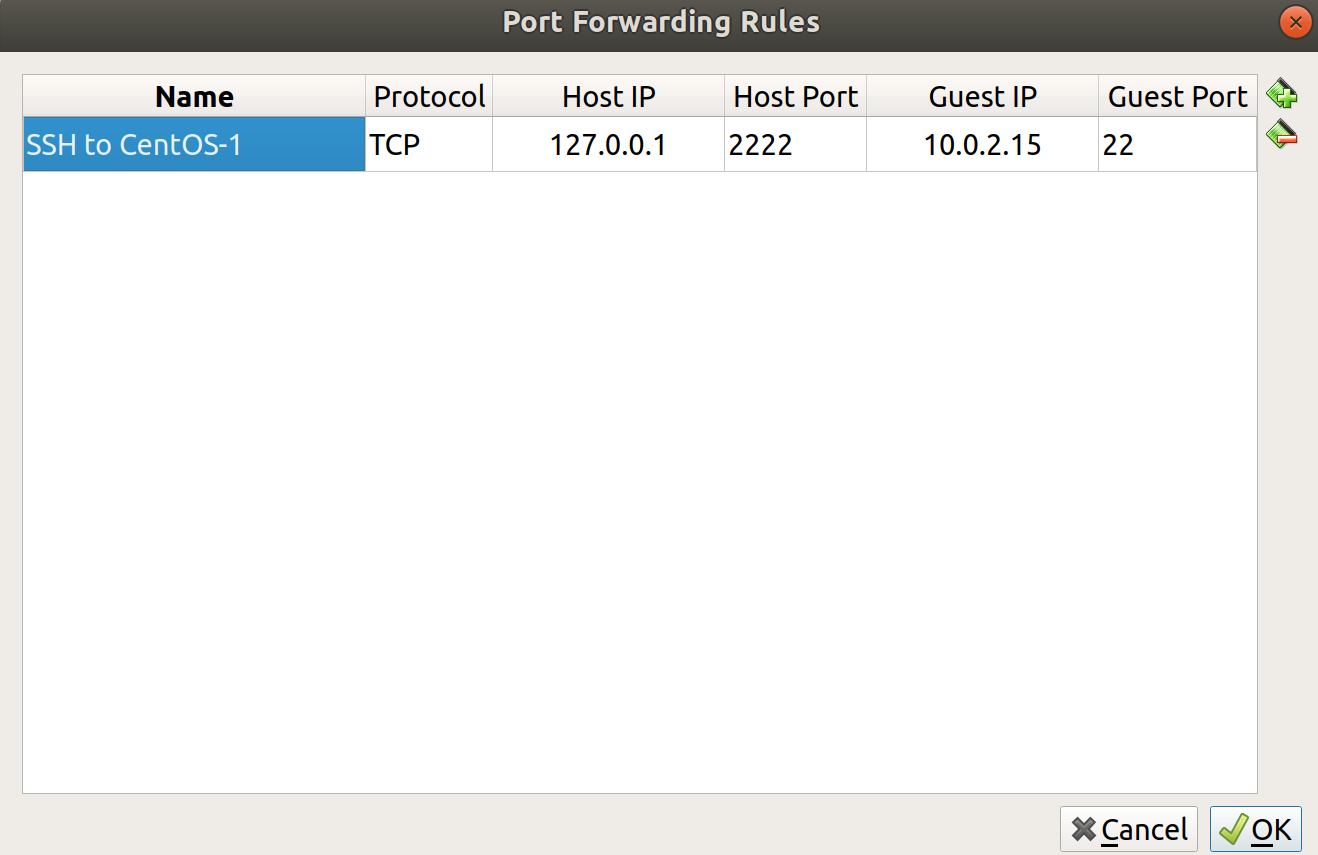
Notice that we're effectively mapping 127.0.0.1:2222 on our host to 10.0.2.15:22 on our guest. We've set it up so that any connection attempt made to the localhost address of our host machine, on port 2222, gets forwarded to the VM on port 22.
We can now try our SSH command again, tweaked for what we've just set up:
$ ssh adam@127.0.0.1 -p2222
The authenticity of host '[127.0.0.1]:2222 ([127.0.0.1]:2222)' can't be established.
ECDSA key fingerprint is SHA256:M2mQKN54oJg3B1lsjJGmbfF/G69MN/Jz/koKHSaWAuU.
Are you sure you want to continue connecting (yes/no)? yes
Warning: Permanently added '[127.0.0.1]:2222' (ECDSA) to the list of known hosts.
adam@127.0.0.1's password:
There are some things to break down about this command.
I've specified the username by using adam@ and I've told SSH to try connecting to the localhost address 127.0.0.1, along with the port we've chosen, that is, 2222.
We're presented with the fingerprint of the host, which we'll talk more about later, and which we accept.
We're then prompted to log in, using the password we set up in the VM, for our user:
Last login: Mon Aug  6 15:04:26 2018
[adam@localhost ~]$
Success!
We can now work on our VM as if it were a real server – just be mindful to make sure that you're on your VM when running any commands.
Updating our VM
Now that we've got access to our machine, we're going to run one command to make sure that we've got the latest version of all the installed software:
$ sudo yum update
When run, you may be presented with a long list of software to update. Typing Y for confirmation and hitting Enter will work through the upgrade of this software, as well as any dependent software that's needed. You may also be prompted to accept new or updated GPG keys.
As a rule of thumb, the only things that should require a full system reboot after being updated are the kernel and the init (initialization) system. This is a stark difference to Windows, where rebooting seems to be what the OS is designed to do, and actual work is just a by-product.
In my case, my kernel got updated. I'm able to confirm this by doing the following.
First, we list the installed versions of the kernel package:
$ yum info kernel
Loaded plugins: fastestmirror
Loading mirror speeds from cached hostfile
 * base: repo.uk.bigstepcloud.com
 * extras: mirror.sov.uk.goscomb.net
 * updates: mirrors.melbourne.co.uk
Installed Packages
Name        : kernel
Arch        : x86_64
Version     : 3.10.0
Release     : 862.el7
Size        : 62 M
Repo        : installed
From repo   : anaconda
Summary     : The Linux kernel
URL         : http://www.kernel.org/
Licence     : GPLv2
Description : The kernel package contains the Linux kernel (vmlinuz), the core of any
            : Linux operating system.  The kernel handles the basic functions
            : of the operating system: memory allocation, process allocation, device
            : input and output, etc.

Name        : kernel
Arch        : x86_64
Version     : 3.10.0
Release     : 862.9.1.el7
Size        : 62 M
Repo        : installed
From repo   : updates
Summary     : The Linux kernel
URL         : http://www.kernel.org/
Licence     : GPLv2
Description : The kernel package contains the Linux kernel (vmlinuz), the core of any
            : Linux operating system.  The kernel handles the basic functions
            : of the operating system: memory allocation, process allocation, device
            : input and output, etc.
Then, we check the version of the kernel currently in use, using uname:
$ uname -a
Linux localhost.localdomain 3.10.0-862.el7.x86_64 #1 SMP Fri Apr 20 16:44:24 UTC 2018 x86_64 x86_64 x86_64 GNU/Linux
We can see from this that we're running version 3.10.0-862.el7, but we have 3.10.0-862.9.1.el7 too.
Rebooting the system causes the newer kernel to be selected at boot time, and running uname again shows a different result:
$ uname -a
Linux localhost.localdomain 3.10.0-862.9.1.el7.x86_64 #1 SMP Mon Jul 16 16:29:36 UTC 2018 x86_64 x86_64 x86_64 GNU/Linux
Huzzah – we're running the newer kernel!
Understanding how VMs differ
Earlier, we started talking about VMs and what they are. We're now going to look at a couple of ways of working out if we're in a VM, from inside the machine itself.
I would generally do this if I'd got a new virtual private server (VPS) from a hosting provider, and wanted to know what software was being used to virtualize my new machine.
dmidecode
One of my favourite tools, dmidecode, can be used to dump a computer's desktop management interface (DMI) table. In practice, this means that it can be used to find out what kind of hardware you're running in a machine.
This command requires root access, so we'll be using sudo throughout these examples.
First, we're going to list the valid types we can pass to dmidecode:
$ dmidecode --type
dmidecode: option '--type' requires an argument
Type number or keyword expected
Valid type keywords are:
  bios
  system
  baseboard
  chassis
  processor
  memory
  cache
  connector
  slot
Starting at the top, we're going to use bios and see if it gives us anything useful:
$ sudo dmidecode --type bios
# dmidecode 3.0
Getting SMBIOS data from sysfs.
SMBIOS 2.5 present.

Handle 0x0000, DMI type 0, 20 bytes
BIOS Information
 Vendor: innotek GmbH
 Version: VirtualBox
 Release Date: 12/01/2006
 Address: 0xE0000
 Runtime Size: 128 kB
 ROM Size: 128 kB
 Characteristics:
 ISA is supported
 PCI is supported
 Boot from CD is supported
 Selectable boot is supported
 8042 keyboard services are supported (int 9h)
 CGA/mono video services are supported (int 10h)
 ACPI is supported
Instantly, we can see VirtualBox next to Version, which is a pretty strong hint that we're dealing with a VM.
Next, we will choose something else, system:
$ sudo dmidecode --type system
# dmidecode 3.0
Getting SMBIOS data from sysfs.
SMBIOS 2.5 present.

Handle 0x0001, DMI type 1, 27 bytes
System Information
    Manufacturer: innotek GmbH
    Product Name: VirtualBox
    Version: 1.2
    Serial Number: 0
    UUID: BDC643B8-8D4D-4288-BDA4-A72F606CD0EA
    Wake-up Type: Power Switch
    SKU Number: Not Specified
    Family: Virtual Machine
Again, the Product Name seen here is VirtualBox, and the Family is Virtual Machine, both of which are pretty damning pieces of evidence.
Lastly, we're going to look at the Chassis Information:
$ sudo dmidecode --type chassis
# dmidecode 3.0
Getting SMBIOS data from sysfs.
SMBIOS 2.5 present.

Handle 0x0003, DMI type 3, 13 bytes
Chassis Information
    Manufacturer: Oracle Corporation
    Type: Other
    Lock: Not Present
    Version: Not Specified
    Serial Number: Not Specified
    Asset Tag: Not Specified
    Boot-up State: Safe
    Power Supply State: Safe
    Thermal State: Safe
    Security Status: None
Oracle corporation is, again, a significant piece of information that leads us to believe we're in a virtualized environment.
If we don't want a lot of other information, we can fine-tune our search using dmidecode's -s option.
Running this option without an argument outputs a list of potential arguments we can use:
$ sudo dmidecode -s
dmidecode: option requires an argument -- 's'
String keyword expected
Valid string keywords are:
 bios-vendor
 bios-version
 bios-release-date
 system-manufacturer
 system-product-name
 system-version
 system-serial-number
 system-uuid
 baseboard-manufacturer
 baseboard-product-name
 baseboard-version
 baseboard-serial-number
 baseboard-asset-tag
 chassis-manufacturer
 chassis-type
 chassis-version
 chassis-serial-number
 chassis-asset-tag
 processor-family
 processor-manufacturer
 processor-version
 processor-frequency
Here, we can instantly see bios-version, and as we know from earlier, it should be VirtualBox:
$ sudo dmidecode -s bios-version
VirtualBox
These types of short-output commands are very useful for scripting, where succinctness is sometimes desirable.
lshw
Should dmidecode not be available, you can also make use of lshw, a command for listing hardware. Again, it makes use of the DMI table on a device.
Very quickly, we can use a format option of lshw to show the bus information of a system:
$ sudo lshw -businfo
Bus info Device Class Description
=====================================================
 system VirtualBox
 bus VirtualBox
 memory 128KiB BIOS
 memory 1GiB System memory
cpu@0 processor Intel(R) Core(TM) i7-7500U CPU @ 2.70GHz
pci@0000:00:00.0 bridge 440FX - 82441FX PMC [Natoma]
pci@0000:00:01.0 bridge 82371SB PIIX3 ISA [Natoma/Triton II]
pci@0000:00:01.1 scsi1 storage 82371AB/EB/MB PIIX4 IDE
scsi@1:0.0.0 /dev/cdrom disk CD-ROM
pci@0000:00:02.0 display VirtualBox Graphics Adapter
pci@0000:00:03.0 enp0s3 network 82540EM Gigabit Ethernet Controller
pci@0000:00:04.0 generic VirtualBox Guest Service
pci@0000:00:05.0 multimedia 82801AA AC'97 Audio Controller
pci@0000:00:06.0 bus KeyLargo/Intrepid USB
usb@1 usb1 bus OHCI PCI host controller
pci@0000:00:07.0 bridge 82371AB/EB/MB PIIX4 ACPI
pci@0000:00:0d.0 scsi2 storage 82801HM/HEM (ICH8M/ICH8M-E) SATA Controller [AHCI mode]
scsi@2:0.0.0 /dev/sda disk 8589MB VBOX HARDDISK
scsi@2:0.0.0,1 /dev/sda1 volume 1GiB Linux filesystem partition
scsi@2:0.0.0,2 /dev/sda2 volume 7167MiB Linux LVM Physical Volume partition
 input PnP device PNP0303
 input PnP device PNP0f03
This gives us information that instantly suggests a VM, such as the system, bus, and display entries.
We also have an easy-to-read breakdown of the classes available, meaning that we can query those directly, starting with disk in this example:
$ sudo lshw -c disk
  *-cdrom
       description: DVD reader
       product: CD-ROM
       vendor: VBOX
       physical id: 0.0.0
       bus info: scsi@1:0.0.0
       logical name: /dev/cdrom
       logical name: /dev/sr0
       version: 1.0
       capabilities: removable audio dvd
       configuration: ansiversion=5 status=nodisc
  *-disk
       description: ATA Disk
       product: VBOX HARDDISK
       vendor: VirtualBox
       physical id: 0.0.0
       bus info: scsi@2:0.0.0
       logical name: /dev/sda
       version: 1.0
       serial: VB5cbf266c-3015878d
       size: 8GiB (8589MB)
       capabilities: partitioned partitioned:dos
       configuration: ansiversion=5 logicalsectorsize=512 sectorsize=512 signature=000b6a88
Alternatively, if we think that's too much information, we could query the system class:
$ sudo lshw -c system
localhost.localdomain
 description: Computer
 product: VirtualBox
 vendor: innotek GmbH
 version: 1.2
 serial: 0
 width: 64 bits
 capabilities: smbios-2.5 dmi-2.5 vsyscall32
 configuration: family=Virtual Machine uuid=BDC643B8-8D4D-4288-BDA4-A72F606CD0EA
Quick sudo explanation
In the various commands that were given in the preceding recipe, we used sudo repeatedly. This was so that we didn't have to log in as the root user to perform various restricted actions.
Generally, if you attempt to run a command that you lack permissions to complete successfully, you'll be greeted with an error:
$ less /etc/sudoers
/etc/sudoers: Permission denied
Here, I tried to have a look at the /etc/sudoers file, which also happens to be the file that determines a user's sudo privileges.
Running this command with sudo is a different story. Instead, it opens the file for me, dropping me into the less pager.
Toward the bottom of this file, we find the following block:
## Allows people in group wheel to run all commands
%wheel  ALL=(ALL)       ALL
The wheel portion of this block is uncommented, and the text above that tells us what that means.
So, the obvious next question is, am I in the wheel group?
Thankfully, this is very easy to check – the file in question is always in the same place: /etc/group.
Here, we print the contents of the group file to our screen, and look specifically for wheel.
We see the following layout:
group_name:password:GID:user_list
We can see that the group_name is wheel, the password is a lower x, which means that shadow passwords are being used, the group ID is 10, and the only user in this group is myself:
$ sudo cat /etc/group | grep wheel
wheel:x:10:adam
We can even do this with a single word, that being the groups command, which prints the groups that your current user is a member of:
$ groups
adam wheel
Being granted the ability to run superuser commands with sudo isn't the immediate right of everyone on the system, and it's up to the individual company and administration team to decide how that power is distributed.
There are places where everyone in operations has the power of sudo, and places where one person has that power.
Using Vagrant to automatically provision VMs
Going through the tedium of installing a new VM every time you want to test something new, or create a sandbox to work in, can get old fast.
Because of this, various administrators and developers have come up with solutions that make provisioning a VM (or several) a breeze.
If we take a moment to think about the advantages of this approach, it's easy to highlight just a few benefits of automated VM provisioning:
- It eliminates the time it takes to manually type answers into a VM window.
- It allows for the automated running of software tests in a development environment.
- It allows for the sharing of text files that act as recipes for how to build a VM, rather than the shifting of large VM images from station to station. This is a form of Infrastructure as Code (IaC).
Kickstart
One method of automating the deployment of boxes are kickstart files, which are frequently used in large deployments to automatically answer the questions that the installer asks the user.
If you take a look in the /root/ folder of a CentOS VM, there's a good chance you'll find a file called anaconda-ks.cfg, which is effectively the kickstart file for the manual steps you took when installing the machine (anaconda being the name of the installer).
These files are tweaked, or written from scratch, and then hosted on a web server, on an installation network, ready to be picked up by an unconfigured machine.
Vagrant
Locally, kickstart files aren't really practical, and they're not quick to work with. We need something that can be set up quickly and easily, but which is also very powerful.
Enter Vagrant.
Developed by Hashicorp as an open source piece of software, Vagrant can be used for automatically provisioning VMs, and even whole development environments.
Typically, somewhere, you might find a Vagrantfile (the name of the core Vagrant... file...) is in a repository of some in-house application.
The developers working on the application pull down the repository to their local machine, and use the Vagrant configuration file to spin up a local development environment, which they can then use to test code changes or feature additions without utilizing expensive development environments.
On my Ubuntu host, I install Vagrant like so:
$ sudo apt install vagrant
There's quite a few dependencies, totalling around 200 MB of used disk space afterwards.
Ubuntu's packages are reasonably up to date, so we get a recent version:
$ vagrant --version
Vagrant 2.0.2
I'm quite particular about where I keep my files, so I'm going to create a dedicated folder called Vagrant in my home directory, which I'll use for working with my Vagrant VMs:
$ ls
 Desktop     Downloads   Pictures   snap        Videos
 Documents   Music       Public     Templates  'VirtualBox VMs'
$ mkdir Vagrant
$ cd Vagrant/
Next, we will initialize a new Vagrantfile. The following command will do this automatically:
$ vagrant init
$ ls
Vagrantfile
Have a look in the Vagrantfile, but don't make any changes yet. You'll see that a lot of the options are listed, but commented out by default. This is a good way of introducing you to what Vagrant is capable of.
Note that, by default, Vagrant will attempt to use a box called base, but will also prompt you to look at https://vagrantcloud.com/search for other boxes:
  # Every Vagrant development environment requires a box. You can search for
  # boxes at https://vagrantcloud.com/search.
  config.vm.box = "base"
Doing a search for CentOS on vagrantcloud reveals a nice default box we can use: https://app.vagrantup.com/centos/boxes/7.
It also lists the providers that the box can be provisioned under. VirtualBox is one of them, meaning it will work in our installation.
We need to change our Vagrantfile to point at this box. From the folder in which your Vagrantfile exists, run the following:
$ sed -i 's#config.vm.box = "base"#config.vm.box = "centos/7"#g' Vagrantfile
We've just used sed (a common tool for editing text on the command line, either in files or on standard out) with the -i option, to modify our Vagrantfile in-place. Opening the file now will show us that the base line has changed to point to centos/7 instead.
Now, we can provision our VM with another simple command:
$ vagrant up
Bringing machine 'default' up with 'virtualbox' provider...
==> default: Box 'centos/7' could not be found. Attempting to find and install...
    default: Box Provider: virtualbox
    default: Box Version: >= 0
==> default: Loading metadata for box 'centos/7'
    default: URL: https://vagrantcloud.com/centos/7
==> default: Adding box 'centos/7' (v1804.02) for provider: virtualbox
    default: Downloading: https://vagrantcloud.com/centos/boxes/7/versions/1804.02/providers/virtualbox.box
==> default: Successfully added box 'centos/7' (v1804.02) for 'virtualbox'!
<SNIP>
    default: No guest additions were detected on the base box for this VM! Guest
    default: additions are required for forwarded ports, shared folders, host only
    default: networking, and more. If SSH fails on this machine, please install
    default: the guest additions and repackage the box to continue.
    default:
    default: This is not an error message; everything may continue to work properly,
    default: in which case you may ignore this message.
==> default: Rsyncing folder: /home/adam/Vagrant/ => /vagrant
All being well, your VM image will start to download from vagrantcloud, and your box will spin itself up in VirtualBox.
We can even see our VM in the VirtualBox main window:
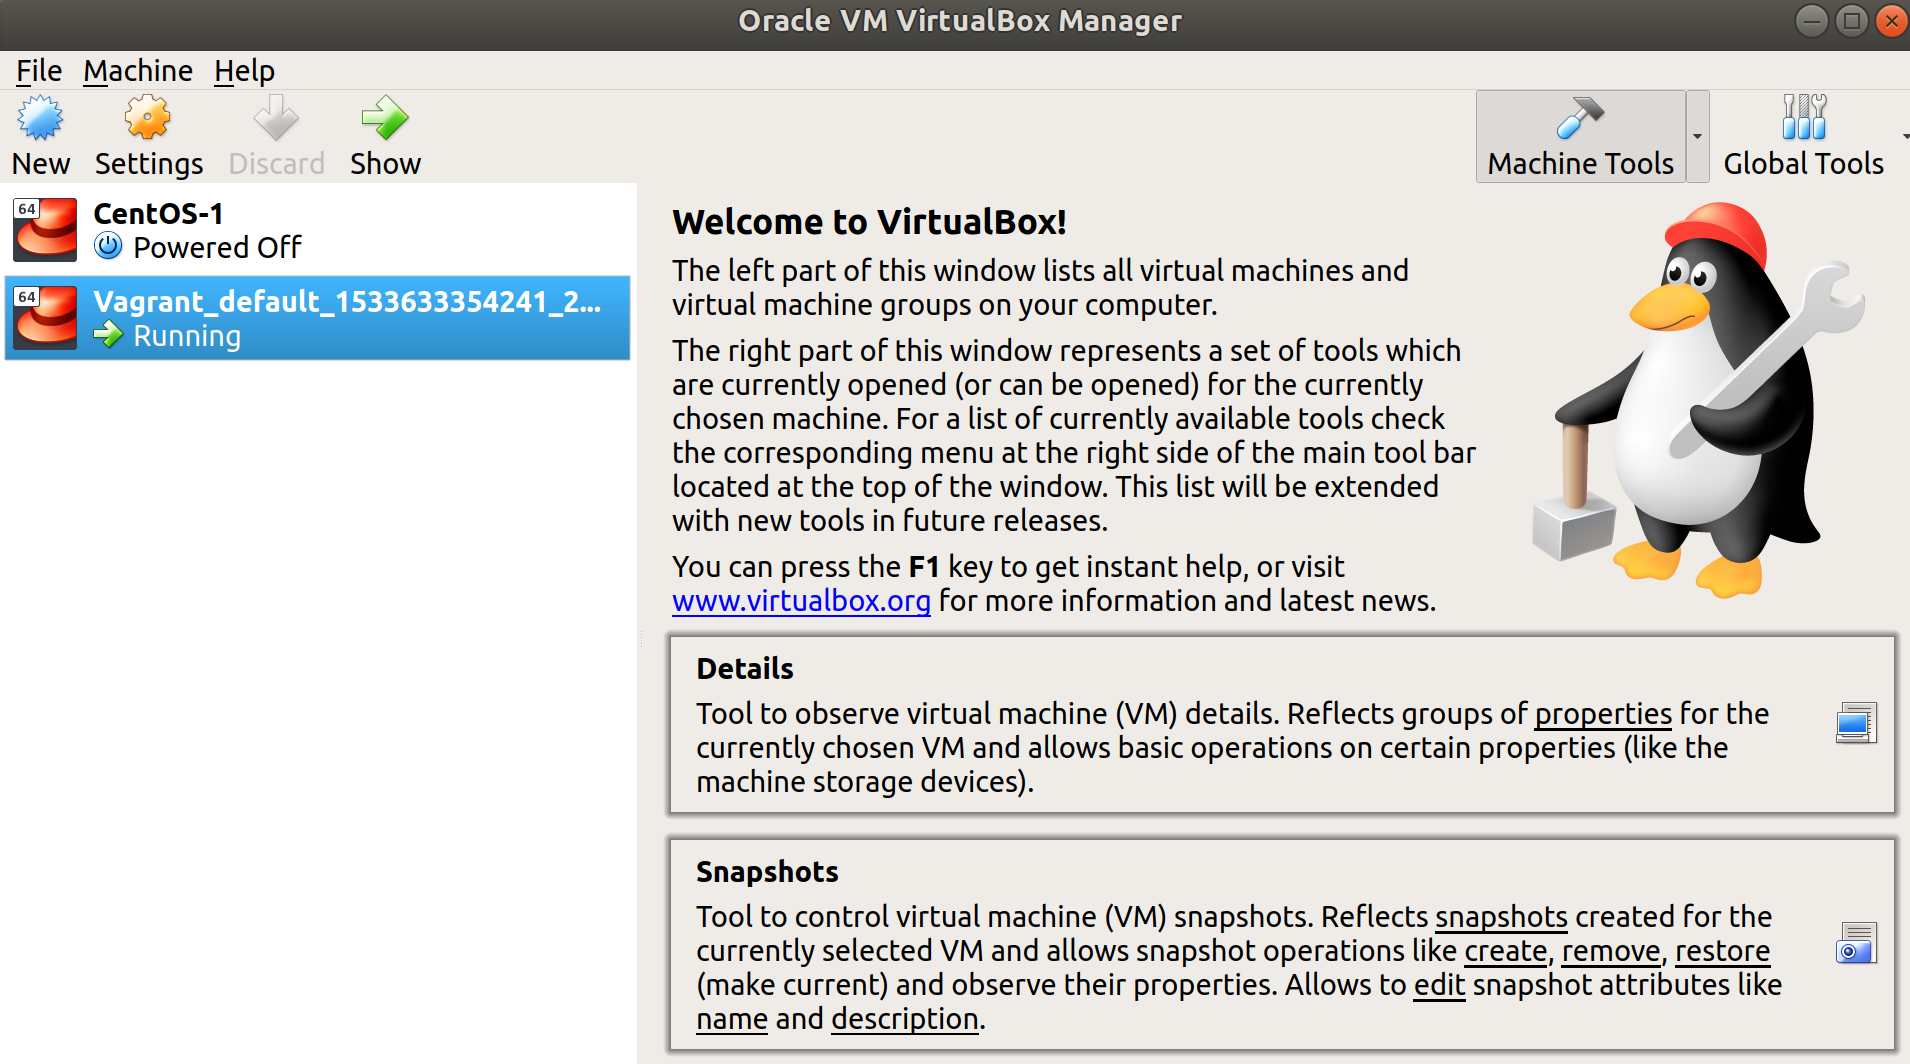
Taking a look under Settings | Network and Port Forwarding shows how Vagrant also automatically sets up access for the NAT's network, in a very similar way to the manual way we did.
We can also connect to our new VM using a built-in Vagrant shortcut:
$ vagrant ssh
Last login: Tue Aug  7 09:16:42 2018 from 10.0.2.2
[vagrant@localhost ~]$
This means that we've provisioned and connected to a VM in four commands, in summary:
$ vagrant init
$ sed -i 's#config.vm.box = "base"#config.vm.box = "centos/7"#g' Vagrantfile
$ vagrant up
$ vagrant ssh
[vagrant@localhost ~]$
We can also destroy any VMs we create from within the same folder that we ran against our Vagrantfile using one command:
$ vagrant destroy
Anecdote - try, try, and try again
You will find that in your career the concept of holy wars is dominant, and every new generation of technology has its apologists and opponents. This is not least seen in the distribution-wars, which has tribal factions staunchly defending their OS of choice. If you ever find yourself in the position of choosing which distribution to install for a company or project, take into consideration everything you've read here, and do your own reading around before blindly accepting one person's opinion as truth.
That's not to say you should become tribal yourself – I've installed all of the preceding distributions at one time or another, the first of which was Ubuntu.
Back in 2005, I learned about this thing called Linux.
Before then, I'd known Macs my entire life, as it was the brand my dad had decided upon. I'd also cobbled together a single Windows machine for the purpose of playing Diablo, though I can't say I ever enjoyed using the OS itself.
Everything changed when I spotted a computer magazine on holiday, and ended up flipping through the various pages until I landed on a piece about Linux, which captured my imagination immediately. Something different and quirky appealed to my rebellious attitude, and as a result I ended up burning this thing called Ubuntu to a CD (or several).
Back then, Canonical would freely send you Ubuntu CDs if you requested them, but I was impatient, and burning disks was quicker.
I made a backup of everything I cared about on my computer, and set about working my way through my first installation once I'd worked out exactly how to boot from a CD. By all accounts it went well, and though I had to nip to another computer occasionally (no smartphones, remember) to look up what certain options meant, I eventually had a shiny new desktop OS installed.
The trouble started around this time.
My wireless card didn't work, the graphics seemed sluggish, and I ran a single update before rebooting, which landed me not on a desktop, but at a command-line interface.
I had never seen a command-line interface before.
To this day, I have no idea how I ever managed to get a functional OS on that box, and I was forever fighting a program called NdisWrapper to get my wireless to work, or installing proprietary (though I didn't know the word at the time) graphics drivers, which would break as soon as you upgraded the kernel (though again, I had no idea that was what was happening at the time).
I somehow plodded along, soon getting bored of Ubuntu when I discovered different distributions, and spending the next few months with a different desktop every week. I distinctly remember running through Ubuntu, Debian, Fedora, OpenSUSE, and a very, very early attempt at installing Gentoo, which I gave up on after about five minutes.
I ended up on forums frequently, painstakingly copying errors into Google to try and find other people who'd had the issues I was experiencing, and often discovering a post where the poster had inconveniently announced they'd Fixed It! without actually providing the solution they'd used.
All of this, as irritating as it was to me at the time, was a learning experience, and I think my love of Linux and computing in general can be traced back to the first time I installed Ubuntu. Prior to that date, computers had been games machines and that was it.
Soon, I was using Linux Mint to bypass the school firewall, booting to a Live USB drive, and ignoring all the feeble attempts at blocking that the school IT department had enabled (for some reason, they believed Windows was the only OS in existence). I still don't quite know how this worked, but the point was that it did.
Between bouts of World of Warcraft, Linux was something I tinkered with for years, keeping up on the latest releases and installing other distributions to try ("distribution-hopping" frequently). I broke things, fixed them, got angry with Linux, got angry with computers in general, but on the whole, I slowly improved.
Fast forward a little while and generally bad school results meant I bailed out without finishing college, or going to university. I had very little in the way of qualifications, but still had something of an aptitude for computing. I found and went on a course that lasted a few months and resulted in a couple of noddy Microsoft certifications, but which ultimately meant that I had a sparse CV that I could start submitting to companies.
I was called by and went for an interview with a hosting provider based in Manchester, and met with the man who's now the CTO. The interview was weird, with us variously discussing taking computers apart, a bit of Linux, and a lot of Counter Strike, as it turned out he'd played a lot in years past. I left feeling nervous, but fairly amused at how it had gone.
Upon returning, after being called back in, I was fairly stunned to get offered the job of Data Center Engineer, which while not a Linux-focused position, was more than I could have hoped for given my level of education. It made me incredibly happy to be employable, and I'm forever grateful to that company and interviewer for giving me a chance.
The takeaway I'd like to present from this is that Linux is fairly great – it can give even the most academically illiterate of us a decent career, and it's so vibrant and forever evolving that there's always something new to learn. I've met some great people, and learned some fascinating things on my journey, a lot of which I hope to pass on in these pages.
I hope you find the rest of this book informative, whether you're a newcomer to Linux administration, or you're someone experienced that's just checking for tips and tricks you might not know.