


 Download code from GitHub
Windows Installer XML (WiX) is a free, open source XML markup that's used to author installation packages for Windows-based software. The underlying technology is called Windows Installer, which is the established standard for installing to any Windows operating system. Until recently, WiX was a Microsoft offering, but is now supported by the non-profit Outercurve Foundation. It is used by countless companies around the world. Microsoft uses it to deploy its own software including Microsoft Office and Visual Studio. In fact, Microsoft uses WiX for these products.
Windows Installer has many features, but how do you leverage them? How do you even know what they are? This book will help you by making you more familiar with the wide range of capabilities that are available. The good news is that WiX makes many of the arcane and difficult-to-understand aspects of the Windows Installer technology simple to use. This book will teach you the WiX syntax so that you can create a professional-grade installer that's right for you.
In this chapter, we will cover the following topics:
Getting WiX and using it with Visual Studio
Creating your first WiX installer
Examining an installer database with Orca
Logging an installation process
Adding a simple user interface
In this section, we'll dive right in and talk about what WiX is, where to get it, and why you'd want to use it when building an installation package for your software. We'll follow up with a quick description of the WiX tools and the new project types made available in Visual Studio.
Creating a Windows Installer, or MSI package, has always been a challenging task. The package is actually a relational database that describes how the various components of an application should be unpacked and copied to the end user's computer.
In the past you had two options:
You could try to author the database yourself—a path that requires a thorough knowledge of the Windows Installer API.
You could buy a commercial product such as InstallShield to do it for you. These software products will take care of the details, but you'll forever be dependent on them. There will always be parts of the process that are hidden from you.
WiX offers a route that exists somewhere in the middle. Abstracting away the low-level function calls while still allowing you to write much of the code by hand, WiX is a framework for building an installer in ways that mere mortals can grasp. Best of all, it's free. As an open source product, it has quickly garnered a wide user base and a dedicated community of developers. Much of this has to do not only with its price tag but also with its simplicity. It can be authored in a simple text editor (such as Notepad) and compiled with the tools provided by WiX. As it's a flavor of XML, it can be read by humans, edited without expensive software, and lends itself to being stored in source control where it can be easily merged and compared.
The examples in this first chapter will show how to create a simple installer with WiX using Visual Studio. However, later chapters will show how you can build your project from the command line using the compiler and linker from the WiX toolset. The WiX source code is available for download, so you can be assured that nothing about the process will be hidden if you truly need to know more about it.
It's fairly simple to copy files to an end user's computer. If that's all your product needs, then the Windows Installer technology might be overkill. However, there are many benefits to creating an installable package for your customers, some of which might be overlooked. The following is a list of features that you get when you author a Windows Installer package with WiX:
All of your executable files can be packaged into one convenient bundle, simplifying deployment
Your software is automatically registered with Programs and Features
Windows takes care of uninstalling all of the components that make up your product when the user chooses to do so
If files for your software are accidently removed, they can be replaced by right-clicking on the MSI file and selecting Repair
You can create different versions of your installer and detect which version has been installed
You can create patches to update only specific areas of your application
If something goes wrong while installing your software, the end user's computer can be rolled back to a previous state
You can create Wizard-style dialogs to guide the user through the installation
Many people today simply expect that your installer will have these features. Not having them could be seen as a real deficit. For example, what is a user supposed to do when they want to uninstall your product but can't find it in the Programs and Features list and there isn't an uninstall shortcut? They're likely to remove files in a haphazard manner and wonder why you didn't make things easy for them.
Maybe you've already figured that Windows Installer is the way to go, but why WiX? One of my favorite reasons is that it gives you greater control over how things work. You get a much finer level of control over the development process. Commercial software that does this for you also produces an MSI file but hides the details about how it was done. It's analogous to crafting a website. You get much more control when you write the HTML yourself as opposed to using a WYSIWYG software.
Even though WiX gives you more control, it doesn't make things overly complex. You'll find that making a simple installer is very straightforward. For more complicated projects, the parts can be split up into multiple XML source files to make it easier to work with. Going further, if your product is made up of multiple applications that will be installed together as a suite, you can compile the different chunks into libraries that can be merged together into a single MSI file. This allows each team to isolate and manage its part of the installation package.
WiX is a stable technology, having been first released to the public in 2004, so you don't have to worry about it disappearing. It's also had a steady progression of version releases. These are just some of the reasons why you might choose to use WiX.
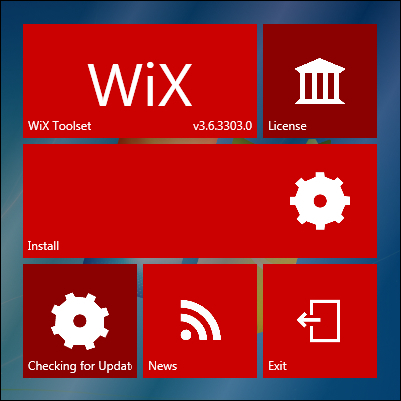
You can find the latest version of WiX at http://wixtoolset.org/, which has both stable releases and weekly builds. The current release is Version 3.6. Once you've downloaded the WiX installer package, double-click on it to launch it. It relies on having an Internet connection to download the .NET 4.0 platform, if it's not already installed.
If you want to install on a computer that isn't connected to the Internet, first download the installer on a computer that is and then open a command prompt and run the WiX executable with the following command wix36.exe /layout LayoutDirectory. The layout option takes the name of a target directory where the WiX files will be downloaded to. You can then take these files (which include a new installer) to the computer that doesn't have an Internet connection and use them there.
This installs all of the necessary files needed to build WiX projects. You'll also get the WiX SDK documentation and the settings for Visual Studio IntelliSense and project templates. Version 3.6 supports Visual Studio versions 2005 through 2012, although not the Express editions.
WiX comes with the tools outlined in the following table:
|
Tool |
What it does |
|---|---|
|
Compiles WiX source files ( | |
|
Links and binds | |
|
Creates WiX libraries ( | |
|
Decompiles an MSI file into WiX code | |
|
Creates a WiX source file that specifies components from various inputs | |
|
Inscribes an MSI with the digital signatures that its external CAB files are signed with | |
|
Converts a merge module ( | |
|
Generates a transform file used to apply changes to an in-progress installation or to create a patch file | |
|
Creates a DGML diagram from an MSI | |
|
Runs validation checks on an MSI or MSM file | |
|
Creates a patch file ( | |
|
Converts Version 2 WiX files to Version 3 | |
|
Validates WiX source files | |
|
Authors and runs unit tests on custom actions |
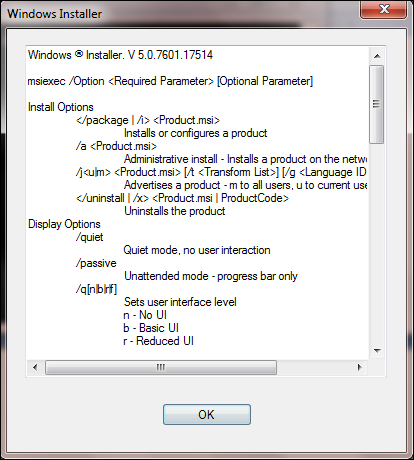
In order to use some of the functionality in WiX, you may need to download a more recent version of Windows Installer. You can check your current version by viewing the help file for msiexec.exe, which is the Windows Installer service. Open a Windows command prompt and then type msiexec /? to bring up a window, as shown in the following screenshot:
If you'd like to install a newer version of Windows Installer, you can get it from the Microsoft Download Center website. Go to:
http://www.microsoft.com/downloads/en/default.aspx
Search for Windows Installer. The current version for Windows XP, Vista, Server 2003, and Server 2008 is 4.5. Windows 7, Windows Server 2008 R2, and Windows 8 can support Version 5.0. Each new version is backwards compatible and includes the features from earlier editions.
The WiX toolset provides files that update Visual Studio to provide new WiX IntelliSense and project templates. Together these features, which are installed for you along with the other WiX tools, are called Votive. You must have Visual Studio 2005 or newer. Votive won't work on the Express versions. Refer to the WiX site for more information:
http://wix.sourceforge.net/votive.html
After you've installed WiX, you should see a new category of project types in Visual Studio labeled under the title Windows Installer XML, as shown in the following screenshot:
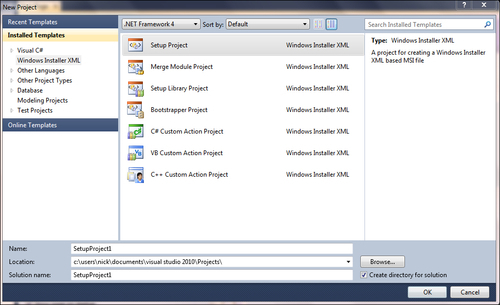
There are seven new project templates:
Setup Project: Creates a Windows Installer package from one or more WiX source files
Merge Module Project: Creates a merge module (MSM) file
Setup Library Project: Creates a .
wixliblibraryBootstrapper Project: Creates a prerequisite bootstrapper
C# Custom Action Project: Creates a .NET custom action in C#
C++ Custom Action Project: Creates an unmanaged C++ custom action
VB Custom Action Project: Creates a VB.NET custom action
Using these templates is certainly easier than creating the files on your own with a text editor. To start creating your own MSI installer, select the template Setup Project. This will create a new .wxs (WiX source file) for you to add XML markup to. Once we've added the necessary markup, you'll be able to build the solution by selecting Build Solution from the Build menu or by right-clicking on the project in the Solution Explorer and selecting Build. Visual Studio will take care of calling candle.exe and light.exe to compile and link your project files.
If you right-click on your WiX project in Solution Explorer and select Properties, you'll see several screens where you can tweak the build process. One thing you'll want to do is set the amount of information that you'd like to see when compiling and linking the project, and how non-critical messages are treated. Refer to the following screenshot:
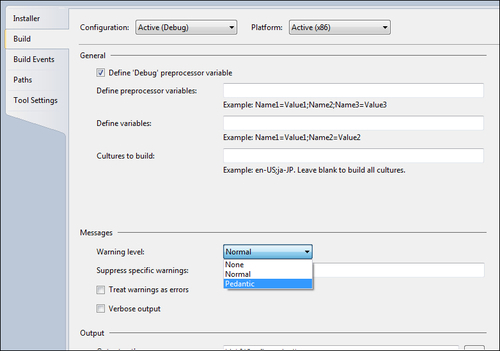
Here we're selecting the level of messages that we'd like to see. To see all warnings and messages, set Warning Level to Pedantic. You can also check the Verbose output checkbox to get even more information. Checking Treat warnings as errors will cause warning messages that normally would not stop the build to be treated as fatal errors.
You can also choose to suppress certain warnings. You'll need to know the specific warning message number though. If you get a build-time warning, you'll see the warning message, but not the number. One way to get it is to open the WiX source code (available at http://wix.codeplex.com/releases/view/93929) and view the messages.xml
file in the src\wix\Data folder. Search the file for the warning and from there you'll see its number. Note that you can suppress warnings but not errors.
Another feature of WiX is its ability to run validity checks on the MSI package. Windows Installer uses a suite of tests called Internal Consistency Evaluators (ICEs) for this. These checks ensure that the database as a whole makes sense and that the keys on each table join correctly. Through Votive, you can choose to suppress specific ICE tests. Use the Tools Setting page of the project's properties as shown in the following screenshot:
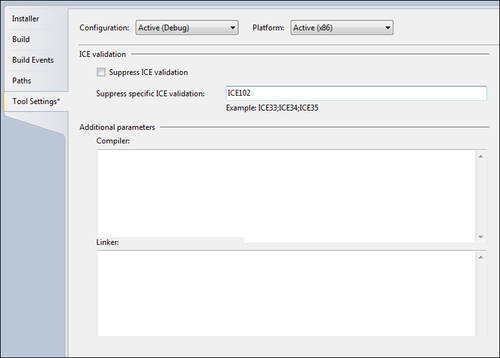
In this example, ICE test 102 is being suppressed. You can specify more than one test by separating them with semicolons. To find a full list of ICE tests, go to MSDN's ICE Reference web page at:
http://msdn.microsoft.com/en-us/library/aa369206%28VS.85%29.aspx
The Tool Settings screen also gives you the ability to add compiler or linker command-line flags. Simply add them to the textboxes at the bottom of the screen. We will discuss command-line arguments for Candle and Light later in the book.
In various places throughout WiX, you'll be asked to provide a GUID, which is a Globally Unique Identifier. This is so that when your product is installed on the end user's computer, references to it can be stored in the Windows Registry without the chance of having name conflicts. By using GUIDs, Windows Installer can be sure that every software application, and even every component of that software, has a unique identity on the system.
Each GUID that you create on your computer is guaranteed to be different from a GUID that someone else would make. Using this, even if two pieces of software, both called "Amazing Software", are installed on the same computer, Windows will be able to tell them apart.
Visual Studio 2010 provides a way to create a GUID. Go to Tools | Create GUID and copy a new GUID using Registry Format. WiX can accept a GUID with or without curly brackets around it, as 01234567-89AB-CDEF-0123-456789ABCDEF or {01234567-89AB-CDEF-0123-456789ABCDEF}. In this book, I'll display real GUIDs, but you should not re-use them as then your components will not be guaranteed to be unique.
To get started, download the WiX toolset. It can be found at:
Once you've downloaded and installed it, open Visual Studio and select New Project | Windows Installer XML | Setup Project. This will create a project with a single .wxs (WiX source) file. Visual Studio will usually call this file Product.wxs, but the name could be anything as long as it ends with .wxs.
Even the most minimal installer must have the following XML elements:
An XML declaration
A
Wixelement that serves as the root element in your XML documentA
Productelement that is a child to theWixelement, but all other elements are children to itA
PackageelementA
MediaorMediaTemplateelementAt least one
Directoryelement with at least one childComponentelement
Every WiX project begins with an XML declaration and a Wix element:
<?xml version="1.0" encoding="UTF-8"?>
<Wix xmlns="http://schemas.microsoft.com/wix/2006/wi">

</Wix>
Tip
Downloading the example code
You can download the example code files for all Packt books you have purchased from your account at http://www.packtpub.com. If you purchased this book elsewhere, you can visit http://www.packtpub.com/support and register to have the files e-mailed directly to you.
The xmlns, or XML namespace, just brings the core WiX elements into the local scope of your document. At the bottom of the file you'll have to close the Wix element, of course. Otherwise, it's not valid XML. The Wix element is the root element of the document. It comes first and last. All other elements will be nested inside of it.
Note
For the most part, knowing only the basic rules of writing a well-formed XML document will be enough to get you up and running using WiX. The major points are as follows, as recommended by the W3C:
The document must begin and end with the same root element
All elements must have a matching closing tag or be closed themselves
XML tags are case sensitive
Elements must be properly nested, with inner elements not overlapping outer elements
XML attributes should be quoted
At this point, you could also add the
RequiredVersion attribute to the Wix element. Given a WiX toolset version number, such as "3.6.3303.0", it won't let anyone compile the .wxs file unless they have that version or higher installed. If, on the other hand, you're the only one compiling your project, then it's no big deal.
<Wix ... >
  <Product Id="3E786878-358D-43AD-82D1-1435ADF9F6EA"
           Name="Awesome Software"
           Language="1033"
           Version="1.0.0.0"
           Manufacturer="Awesome Company"
           UpgradeCode="B414C827-8D81-4B4A-B3B6-338C06DE3A11">
  </Product>
</Wix>
This is where you define the characteristics of the software you're installing: its name, language, version, and manufacturer. The end user will be able to see these properties by right-clicking on your MSI file, selecting Properties, and viewing the Summary tab. Most of the time, these values will stay the same from one build of your project to the next. The exception is when you want to increment the software's version to indicate that it's an upgrade of a previous installation. In that case, you need to only change the Version attribute, and sometimes the Id attribute. We'll talk more about upgrading previous installations later on in the book.
The Product element's Id attribute represents the so-called
ProductCode of your software. It's always a unique number—a GUID—that Windows will use to uniquely identify your software (and tell if it's already installed on the computer). You can either hardcode it, like here, or just put an asterisk. That way, WiX will pick a new GUID for you each time you compile the project.
<Wix ... >
  <Product Id="*"
           Name="Awesome Software"
           Language="1033"
           Version="1.0.0.0"
           Manufacturer="Awesome Company"
           UpgradeCode="B414C827-8D81-4B4A-B3B6-338C06DE3A11">
  </Product>
</Wix>
The Name attribute defines the name of the software. In addition to being displayed in the MSI file's Properties page, it will also be shown in various places throughout the user interface of your installer—that is, once you've added a user interface, which we'll touch on at the end of this chapter.
The Language attribute is used to display error messages and progress information in the specified language to the user. It's a decimal language ID (LCID). A full list can be found on Microsoft's LCID page at:
http://msdn.microsoft.com/en-us/goglobal/bb964664.aspx
The previous example used "1033", which stands for "English-United States". If your installer uses characters not found in the ASCII character set, you'll also need to add a Codepage attribute set to the code page that contains those characters. Don't worry too much about this now. We'll cover languages and code pages later in the book when we talk about localization.
The
Version attribute is used to set the version number of your software. It can accept up to four numbers separated by periods. Typically, when you make a big enough change to the existing software, you'll increment the number. Companies often use the [MajorVersion].[MinorVersion].[Build].[Revision] format, but you're free to use any numbering system you like.
Note
During upgrade scenarios, the fourth digit in the Version attribute is ignored and won't make a difference when detecting previously installed software.
The Manufacturer attribute tells the user who this software is from and usually contains the name of your company. This is another bit of information that's available via the MSI file's Properties page.
The final attribute to consider is UpgradeCode. This should be set to a GUID and will identify your product across releases. It remains constant for a product line, even among different product versions. Think: Microsoft Office 2007 and Office 2010. Both would have the same UpgradeCode. Therefore, it should stay the same even when the ProductCode and Version change.
Windows will use this number in its efforts to keep track of all the software installed on the machine. WiX has the ability to search for previously installed versions of not only your own software, but also those created by others and it uses UpgradeCode to do it. Although, technically, this is an optional attribute, you should always supply it.
Once you've defined your Product element, the next step is to nest a Package element inside. An example is shown as follows:
<Wix ... >
  <Product ... >
    <Package InstallerVersion="301"
             Compressed="yes"
             InstallScope="perMachine"
             Manufacturer="Awesome Company"
             Description="Installs Awesome Software"
             Keywords="Practice,Installer,MSI"
             Comments="(c) 2012 Awesome Company" />
  </Product>
</Wix>
Of the attributes shown in this example, only Compressed is really required. By setting Compressed to yes, you're telling the installer to package all of the MSI's resources into CAB files. Later, you'll define these CAB files with Media elements or a MediaTemplate element.
Technically, an Id attribute is also required, but by omitting it you're letting WiX create one for you. You'd have to create a new one anyway since every time you change your software or the installer in any way, the package (the MSI file) has changed and so the package's ID must change. This really, in itself, emphasizes what the Package element is. Unlike the Product element, which describes the software that's in the installer, the Package element describes the installer itself. Once you've built it, you'll be able to right-click on the MSI and select Properties to see the attributes you've set here.
The
InstallerVersion attribute can be set to require a specific version of msiexec.exe (the Windows Installer service that installs the MSI when you double-click on it) to be installed on the end user's computer. If they have an older version, Windows Installer will display a dialog telling them that they need to upgrade. It will also prevent you from compiling the project unless you also have this version installed on your own computer. The value can be found by multiplying the major version by 100 and adding the minor version. So, for Version 4.5 of msiexec.exe, you'd set InstallerVersion to 405.
The
InstallScope attribute can be set to either perMachine or perUser. The former means that your software will be installed in the "All Users" context, meaning that all users will be able to access your application. As such, the person performing the install will need elevated privileges on a UAC enabled system such as Windows 7 to continue the installation. The latter means that it will be installed only for the current user. Behind the scenes this is setting a WiX property called ALLUSERS that we'll cover in more detail later when we discuss properties.
The rest of the attributes shown provide additional information for the MSI file's Properties window. Manufacturer is displayed in the Author text field, Description is shown as Subject, Keywords show up as Keywords, and Comments show as Comments. It's usually a good idea to provide at least some of this information, if just to help you distinguish one MSI package from another.
The files that you intend to install are compressed into CAB files and shipped along with the installer. You decide whether to embed them inside the MSI or provide them visibly alongside it. In WiX 3.6, a single MediaTemplate element handles all the details for you, intelligently splitting your files into the prescribed number of CAB files. Add it after the Package element, as shown in the following code snippet:
<Wix …>
  <Product … >
    <Package … />
    <MediaTemplate EmbedCab="yes" />
  </Product>
</Wix>
The
EmbedCab attribute is optional and sets whether the CAB files will be embedded inside the MSI, the default being to not embed them. Either way, WiX will create up to 999 CAB files, each holding a maximum of 200 MB of data. You can change that limit with the MaximumUncompressedMediaSize attribute, set to a size in megabytes. If a single file is bigger than the maximum, it will be placed into its own CAB file with enough space to accommodate it.
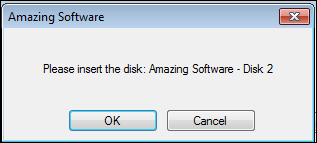
If you want to split your installation up into several physical disks—conjure up images of "Please insert disk 2"—you want to use the Media element instead.
The Media element is an older element that was replaced by MediaTemplate and if you use one you can't use the other. However, in some cases, the Media element is the only thing for the job. For each Media element that you add to your WiX markup, a new CAB file will be created.
<Wix ... >
  <Product ... >
    <Package ... />
    <Media Id="1"
           Cabinet="media1.cab"
           EmbedCab="yes" />
  </Product>
</Wix>
Each Media element gets a unique Id attribute to distinguish it in the MSI Media table. It must be a positive integer. If the files that you add to your installation package don't explicitly state which CAB file they wish to be packaged into, they'll default to using a Media element with an Id value of 1. Therefore, your first Media element should always use an Id value of 1.
The
Cabinet attribute sets the name of the CAB file. You won't actually see this unless you set EmbedCab to no, in which case the file will be shipped alongside the MSI. This is atypical, but might be done to split the installation files onto several disks.
If you do choose to split the installation up into several physical disks (or even virtual ISO images), you'll want to add the DiskPrompt and VolumeLabel attributes. In the following example, I've added two Media elements instead of one. I've also added a Property element above them, which defines a variable called DiskPrompt with a value of Amazing Software - [1].
<Property Id="DiskPrompt"
          Value="Amazing Software - [1]" />

<Media Id="1"
       Cabinet="media1.cab"
       EmbedCab="no"
       DiskPrompt="Disk 1"
       VolumeLabel="Disk1" />

<Media Id="2"
       Cabinet="media2.cab"
       EmbedCab="no"
       DiskPrompt="Disk 2"
       VolumeLabel="Disk2" />
The Property element will be used as the text in the message box the end user sees, prompting them to insert the next disk. The text in the DiskPrompt attribute is combined with the text in the property's value, switched with [1], to change the message for each subsequent disk. Make sure you give this property an Id value of DiskPrompt.
So that Windows will know when the correct disk is inserted, the VolumeLabel attribute must match the "Volume Label" of the actual disk, which you'll set with whichever CD or DVD burning program you use. Once you've built your project, include the MSI file and the first CAB file on the first disk. The second CAB file should then be written to a second disk.
Although we haven't described the File element yet, it's used to add a file to the installation package. To include one in a specific CAB file, add the DiskId attribute, set to the Id attribute of the corresponding Media element. The following example includes a text file called myFile.txt in the media2.cab file:
<File Id="fileTXT"
      Name="myFile.txt"
      Source="myFile.txt"
      KeyPath="yes"
      DiskId="2" />
We'll discuss the File element in more detail later on in the chapter. If you're only using one Media element, you won't need to specify the DiskId attribute on your File elements.
So, now we've defined the identity of the product, set up its package properties, and told the installer to create a CAB file to package up the things that we'll eventually install. Then, how do you decide where your product will get installed to on the end user's computer? How do we set the default install path, for example, to some folder under Program Files?
When you want to install to C:\Program Files, you can use a sort of shorthand. There are several directory properties provided by Windows Installer that will be translated to their true paths at install time. For example, ProgramFilesFolder usually translates to C:\Program Files. The following is a list of these built-in directory properties:
Tip
This list can also be found at:
http://msdn.microsoft.com/en-us/library/windows/desktop/aa370905(v=vs.85).aspx
The easiest way to add your own directories is to nest them inside one of the predefined ones. For example, to create a new directory called Install Practice inside the Program Files folder, you could add it as a child to ProgramFilesFolder. To define your directory structure in WiX, use Directory elements:
<Wix ... >
  <Product ... >
    <Package ... />
    <MediaTemplate ... />

    <Directory Id="TARGETDIR"
               Name="SourceDir">
      <Directory Id="ProgramFilesFolder">
        <Directory Id="MyProgramDir"
                   Name="Install Practice" />
      </Directory>
    </Directory>

  </Product>
</Wix>
One thing to know is that you must start your Directory elements hierarchy with a Directory element with an Id attribute of TARGETDIR and a Name value of SourceDir. This sets up the "root" directory of your installation. Therefore, be sure to always create it first and nest all other Directory elements inside.
By default, Windows Installer sets TARGETDIR to the local hard drive with the most free space—in most cases, the C: drive. However, you can set TARGETDIR to another drive letter during installation. You might, for example, set it with a VolumeSelectCombo user interface control. We'll talk about setting properties and UI controls later in the book.
A
Directory element always has an Id attribute that will serve as a primary key on the Directory table. If you're using a predefined name, such as ProgramFilesFolder, use that for Id. Otherwise, you can make one up yourself. The previous example creates a new directory called Install Practice, inside the Program Files folder. Id, MyProgramDir, is an arbitrary value.
When creating your own directory, you must provide the Name attribute. This sets the name of the new folder. Without it, the directory won't be created and any files that were meant to go inside it will instead be placed in the parent directory—in this case, Program Files. Note that you do not need to provide a Name attribute for predefined directories.
You can nest more subdirectories inside your folders by adding more Directory elements. The following is an example:
<Directory Id="TARGETDIR"
           Name="SourceDir">
  <Directory Id="ProgramFilesFolder">
    <Directory Id="MyProgramDir"
               Name="Install Practice">
      <Directory Id="MyFirstSubDir"
                 Name="Subdirectory 1">
        <Directory Id="MySecondSubDir"
                   Name="Subdirectory 2" />
      </Directory>
    </Directory>
  </Directory>
</Directory>
Here, a subdirectory called Subdirectory 1 is placed inside the Install Practice folder. A second subdirectory, called Subdirectory 2, is then placed inside Subdirectory 1, giving us two levels of nested directories under Install Practice.
Note
If you've been following along using the Visual Studio Setup Project template, you'll notice that it places its boilerplate Directory elements inside of a Fragment element. We will discuss Fragment in the next chapter.
Before jumping into how to add files to your new directories, we should cover the elements that define the files themselves. The next section covers how to create components, which are the containers for the files you want to install.
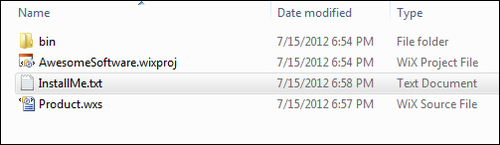
Once you've mapped out the directories that you want to target or create during the installation, the next step is to copy files into them. To really explain things, we'll need something to install. So let's create a simple text file and add it to our project's directory. We'll call it InstallMe.txt. For our purposes, it doesn't really matter what's in the text file. We just need something for testing.
Windows Installer expects every file to be wrapped up in a component before it's installed. It doesn't matter what type of file it is either. Each gets its own Component element.
Components, which always have a unique GUID, allow Windows to track every file that gets installed on the end user's computer. During an installation, this information is stored away in the registry. This lets Windows find every piece of your product during an uninstall so that your software can be completely removed. It also uses it to replace missing files during a repair, which you can trigger by right-clicking on an MSI file and selecting Repair.
Each Component element gets a unique GUID via its Guid attribute. To create a GUID in Visual Studio, go to Tools | Create GUID and copy a new GUID using the registry format. The component's Id attribute is up to you. It will serve as the primary key for the component in the MSI database, so each one must also be unique:
<Component Id="CMP_InstallMeTXT"
           Guid="E8A58B7B-F031-4548-9BDD-7A6796C8460D">

  <File Id="FILE_MyProgramDir_InstallMeTXT"
        Source="InstallMe.txt"
        KeyPath="yes" />
</Component>
In the preceding code snippet, I've created a new component called CMP_InstallMeTXT. I've started it with CMP_ to label it as a component, which is just a convention that I like to use. Although it isn't required, it helps to prefix components in this way so that it's always clear what sort of element it refers to.
The File element inside the component references the file that's going to be installed. Here, it's the InstallMe.txt file located in the current directory (which is the same directory as your WiX source file). You can specify a relative or absolute path with the Source attribute.
You should always mark a File element as the
KeyPath file and you should only ever include one File inside a component. A KeyPath file will be replaced if it's missing when the user triggers a repair (Windows Installer documentation calls this resiliency). Placing more than one File element inside a single Component element, at least in most cases, is not recommended. This is because only one file can be the KeyPath file, so the other files wouldn't be covered by a repair. You would really only ever place more than one File in a component if you didn't want the extra files to be resilient.
To add a component to a directory, you have several options. The first, which is the simplest, is to add your Component elements directly inside the target Directory element, as given in the following code snippet:
<Directory Id="TARGETDIR"
           Name="SourceDir">
  <Directory Id="ProgramFilesFolder">
    <Directory Id="MyProgramDir"
               Name="Install Practice">

      <Component Id="CMP_InstallMeTXT"
                 Guid="E8A58B7B-F031-4548-9BDD-7A6796C8460D">

        <File Id="FILE_MyProgramDir_InstallMeTXT"
              Source="InstallMe.txt"
              KeyPath="yes" />
      </Component>
    </Directory>
  </Directory>
</Directory>
In the previous code snippet, I've instructed the installer to copy the InstallMe.txt file to the %ProgramFiles%\Install Practice folder that we're creating on the end user's computer. Although this is the simplest solution, it isn't the cleanest. For one thing, if you're installing more than a handful of files, the XML file can begin to look tangled.
Another approach is to use a DirectoryRef element to reference your directories. This has the benefit of keeping the markup that defines your directories independent from the markup that adds files to those directories. The following is an example:
<Directory Id="TARGETDIR"
           Name="SourceDir">
  <Directory Id="ProgramFilesFolder">
    <Directory Id="MyProgramDir"
               Name="Install Practice" />
  </Directory>
</Directory>

<DirectoryRef Id="MyProgramDir">
  <Component ...>
    <File ... />
  </Component>
</DirectoryRef>
A third option is to group your components inside of a
ComponentGroup and use its Directory attribute to set the target directory. We will cover component groups in more detail in the next chapter, but the following snippet will give you an idea:
<ComponentGroup Id="ProductComponents"
                Directory="MyProgramDir">
  <Component ...>
    <File ... />
  </Component>
</ComponentGroup>As you've seen, the actual files inside components are declared with File elements. The File elements can represent everything from simple text files to complex DLLs and executables. Remember, you should only place one file into each component. The following example would add a file called SomeAssembly.dll to the installation package:
<Component ... >
  <File Id="FILE_MyProgramDir_SomeAssemblyDLL"
        Name="Some Assembly.dll"
        Source="SomeAssembly.dll"
        KeyPath="yes" />
</Component>
A File element should always get the Source attribute. Source defines the path to the file during compilation. I've listed a relative path here, but you could also specify an absolute path.
Id, Name, and KeyPath are optional. The Id attribute becomes the primary key for a row in the MSI database. It should be something unique, but you might consider starting it with FILE to make it clear that it refers to a File element. If not set, the Id value will match the filename. Name gives you a chance to change the name of the file once it's been copied to the end user's computer. By default, it will use the name in the Source attribute.
To mark a file as important (and that it should be replaced if it goes missing), set it as the KeyPath file for the component. Since you should only ever place one file inside a component, in almost all cases that file should be the KeyPath file. If not set, the first file in the component will be the KeyPath file automatically.
A few other optional but useful attributes for the File element include:
Hidden: Set toyesto have the file'sHiddenflag set. The file won't be visible unless the user sets the directory's options to show hidden files.ReadOnly: Set toyesto have the file'sRead-onlyflag set. The user will be able to read the file, but not modify it unless they change the file's properties.Vital: Set tonoto continue even if this file isn't installed successfully.
After you've defined your components and the directories that they'll be copied into, the next step is to define features. A feature is a group of components that the user can decide to install all at once. You'll often see these in an installation dialog as a list of modules, called a feature tree , where each is included or excluded from the installation. The following is an example of such a tree that has two features – Main Product and Optional Tools:
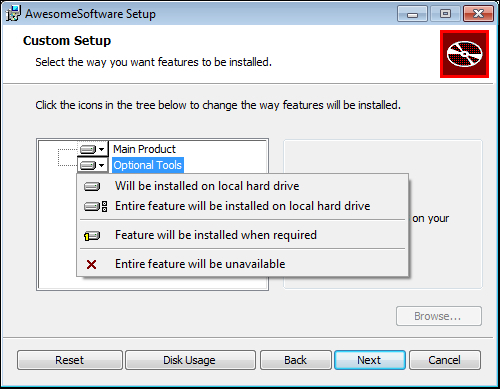
Every component must be included in a feature. Generally, you should group together components that rely on one another or that form a complete, self-sufficient unit. That way, if a feature is disabled, you won't have orphaned files (files that aren't being used) installed onto the computer. In many instances, if your product doesn't have any optional parts, you'll only want to create one feature.
If you've included a feature tree dialog (which we'll explain later in the book), such as the one shown, the user can simply click a feature to exclude it. However, even without this, they can select features from the command line. The following command only installs a feature called MainProduct:
msiexec /i myInstaller.msi ADDLOCAL=MainProduct
Here, we're using the msiexec program to launch an installer. The /i flag targets the MSI file to install. The ADDLOCAL property is set to the names of the features we want to include. If more than one, use commas to separate the names. To install all available features set ADDLOCAL=ALL, as shown:
msiexec /i myInstaller.msi ADDLOCAL=ALL
To create a new feature in your WiX file, add a Feature element inside the Product element. The following example installs three components under the feature MainProduct. Another feature called OptionalTools installs another component. Components are included in a feature with the ComponentRef element. The Id attribute of ComponentRef targets the Id attribute from the corresponding Component element:
<Feature Id="MainProduct"
         Title="Main Product"
         Level="1">
  <ComponentRef Id="CMP_MyAppEXE" />
  <ComponentRef Id="CMP_ReadMeTXT" />
  <ComponentRef Id="CMP_StartMenuShortcuts" />
</Feature>

<Feature Id="OptionalTools"
         Title="Optional Tools"
         Level="1">
  <ComponentRef Id="CMP_ToolsEXE" />
</Feature>
The Feature element's Id attribute uniquely identifies the feature and is what you'll reference when using the ADDLOCAL property on the command line. The Title attribute is used to set a user-friendly name that can be displayed on dialogs. Setting the Feature element's Level
attribute to 1 means that that feature will be included in the installation by default. The end user will still be able to remove it through the user interface or via the command line. If, on the other hand, Level is set to 0, that feature will be removed from the feature tree and the user won't be able to install it.
If you wanted to, you could create a more complex tree with features nested inside features. You could use this to create more categories for the elements in your product and give the user more options concerning what gets installed. You would want to make sure that all possible configurations function correctly. Windows Installer makes this somewhat manageable in that if a parent feature is excluded, its child features will be too. The following is an example of a more complex feature setup:
<Feature Id="MainProduct"
         Title="Main Product"
         Level="1">
  <ComponentRef Id="CMP_MyAppEXE" />
  <ComponentRef Id="CMP_StartMenuShortcuts" />

  <Feature Id="SubFeature1"
           Title="Documentation"
           Level="1">
    <ComponentRef Id="CMP_ReadMeTXT" />
  </Feature>
</Feature>

<Feature Id="OptionalTools"
         Title="Optional Tools"
         Level="1">
  <ComponentRef Id="CMP_ToolsEXE" />
</Feature>
In the preceding code snippet, I've moved the ReadMe.txt file used in the previous examples into its own feature called Documentation that's nested inside the MainProduct feature. Disabling its parent feature (MainProduct) will also disable it. However, you could enable MainProduct and disable Documentation.
You have the ability to prevent the user from excluding a particular feature. Just set the Absent attribute to disallow. You might do this for the main part of your product where excluding it wouldn't make sense.
You might also consider adding the
Description attribute, which can be set to a string that describes the feature. This could be displayed in your dialog alongside the feature tree, if you decide to use one. We'll cover feature trees and adding a user interface later in the book.
Having a working installer is good, but wouldn't it be nice to add some shortcuts to the Windows Start menu? First, add another Directory element that references the Start menu via the built-in ProgramMenuFolder property:
<Directory Id="TARGETDIR"
           Name="SourceDir">
  <Directory Id="ProgramFilesFolder">
    <Directory Id="MyProgramDir"
               Name="Awesome Software" />
  </Directory>
  <Directory Id="ProgramMenuFolder">
    <Directory Id="MyShortcutsDir"
               Name="Awesome Software" />
  </Directory>
</Directory>
In the previous code snippet we're adding a new folder to the Start menu called Awesome Software. Now, we can use a DirectoryRef element to reference our new shortcuts folder, as in the following code snippet:
<DirectoryRef Id="MyShortcutsDir">
  <Component Id="CMP_DocumentationShortcut"
             Guid="33741C82-30BF-41AF-8246-44A5DCFCF953">

    <Shortcut Id="DocumentationStartMenuShortcut"
              Name="Awesome Software Documentation"
              Description="Read Awesome Software Documentation"
              Target="[MyProgramDir]InstallMe.txt" />
  </Component>
</DirectoryRef>
Each Shortcut element has a unique identifier set with the Id attribute. The Name attribute defines the user-friendly name that gets displayed. Description is set to a string that describes the shortcut and will appear when the user moves their mouse over the shortcut link.
The
Target attribute defines the path on the end user's machine to the actual file being linked to. For that reason, you'll often want to use properties that update as they're changed, instead of hardcoded values. In the previous example, the main installation directory is referenced by placing the Id attribute of its corresponding Directory element in square brackets, which is then followed by the name of the file. Even if the path of MyProgramDir changes, it will still lead us to the InstallMe.txt file.
Two things that should accompany a shortcut are a RemoveFolder element and a RegistryValue element. RemoveFolder ensures that the new Start menu subdirectory will be removed during an uninstall. It uses an Id attribute to uniquely identify a row in the MSI RemoveFile table and an On attribute to specify when to remove the folder. You can set On to install, uninstall, or both. You can specify a Directory attribute as well to set to the Id attribute of a Directory element to remove. Without one, though, the element will remove the directory defined by the parent DirectoryRef or ComponentGroup element.
The RegistryValue element is needed simply because every component must have a KeyPath item. Shortcuts aren't allowed to be KeyPath items as they aren't technically files. By adding a RegistryValue, a new item is added to the registry and this is marked as KeyPath. The actual value itself serves no other purpose. We will cover writing to the registry in more detail later.
<DirectoryRef Id="MyShortcutsDir">
  <Component Id="CMP_DocumentationShortcut"
             Guid="33741C82-30BF-41AF-8246-44A5DCFCF953">

    <Shortcut Id="DocumentationStartMenuShortcut"
              Name="Awesome Software Documentation"
              Description="Read Awesome Software Documentation"
              Target="[MyProgramDir]InstallMe.txt" />

    <RemoveFolder Id="RemoveMyShortcutsDir"
                  On="uninstall" />

    <RegistryValue Root="HKCU"
                   Key="Software\Microsoft\AwesomeSoftware"
                   Name="installed"
                   Type="integer"
                   Value="1"
                   KeyPath="yes" />
  </Component>
</DirectoryRef>
There's actually another reason for using a
RegistryValue element as KeyPath. The shortcut we're creating is being installed to a directory specific to the current user. Windows Installer requires that you always use a registry value as the KeyPath item when doing this in order to simplify uninstalling the product when multiple users have installed it.
Another type of shortcut to add is one that uninstalls the product. For this, add a second Shortcut element to the same component. This shortcut will be different in that it will have its Target set to the msiexec.exe program, which is located in the System folder. The following example uses the predefined System64Folder directory name because it will automatically map to either the 64-bit or 32-bit System folder, depending on the end user's operating system.
By setting Target to the path of an executable, you're telling Windows to launch that program when the user clicks the shortcut. The msiexec program can remove software by using the /x argument followed by the ProductCode attribute of the product you want to uninstall. The
ProductCode attribute is the Id attribute specified in the Product element.
<DirectoryRef Id="ProgramMenuFolder">
  <Component Id="CMP_DocumentationShortcut"
             Guid="33741C82-30BF-41AF-8246-44A5DCFCF953">

    <Shortcut Id="DocumentationStartMenuShortcut"
              Name="Awesome Software Documentation"
              Description="Read Awesome Software Documentation"
              Target="[MyProgramDir]InstallMe.txt" />

    <Shortcut Id="UninstallShortcut"
              Name="Uninstall Awesome Software"
              Description=
              "Uninstalls Awesome Software and all of its components"
              Target="[System64Folder]msiexec.exe"
              Arguments="/x [ProductCode]" />

    <RemoveFolder Id="RemoveMyShortcutsDir"
                  On="uninstall" />

    <RegistryValue Root="HKCU"
                   Key="Software\Microsoft\AwesomeSoftware"
                   Name="installed"
                   Type="integer"
                   Value="1"
                   KeyPath="yes" />
  </Component>
</DirectoryRef>
Notice that we don't have to use the GUID from the Product element to get the ProductCode value. We can reference it using the built-in property called ProductCode surrounded by square brackets. If you'd like to add an icon to your shortcut, first add an Icon element as another child to the Product element. Then, reference that icon with the
Icon attribute on the Shortcut element, as shown in the following code snippet:
<Icon Id="icon.ico" SourceFile="myIcon.ico"/>
<DirectoryRef ... >
  <Component ... >
    <Shortcut Id="DocumentationStartMenuShortcut"
              Name="Awesome Software Documentation"
              Description="Read Awesome Software Documentation"
              Target="[MyProgramDir]InstallMe.txt"
              Icon="icon.ico" />

    <RemoveFolder ... />
    <RegistryValue ... />
  </Component>
</DirectoryRef>
Be sure to add the new component that contains the shortcuts to one of your features:
<Feature Id="ProductFeature"
         Title="Main Product"
         Level="1">
  <ComponentRef Id=" CMP_InstallMeTXT" />
  <ComponentRef Id="CMP_DocumentationShortcut" />
</Feature>Now that you've seen the different elements used to author an MSI package, the following is the entire .wxs file:
<?xml version="1.0" encoding="UTF-8"?>
<Wix xmlns="http://schemas.microsoft.com/wix/2006/wi">

  <Product Id="3E786878-358D-43AD-82D1-1435ADF9F6EA"
           Name="Awesome Software"
           Language="1033"
           Version="1.0.0.0"
           Manufacturer="Awesome Company"
           UpgradeCode="B414C827-8D81-4B4A-B3B6-338C06DE3A11">

    <Package InstallerVersion="301"
             Compressed="yes"
             InstallScope="perMachine"
             Manufacturer="Awesome Company"
             Description="Installs Awesome Software"
             Keywords="Practice,Installer,MSI"
             Comments="(c) 2012 Awesome Company" />

    <MediaTemplate EmbedCab="yes" />

    <!--Directory structure-->
    <Directory Id="TARGETDIR"
               Name="SourceDir">
      <Directory Id="ProgramFilesFolder">
        <Directory Id="MyProgramDir"
                   Name="Awesome Software" />
        <Directory Id="ProgramMenuFolder">
          <Directory Id="MyShortcutsDir"
                     Name="Awesome Software" />
        </Directory>
      </Directory>
    </Directory>

    <!--Components-->
    <DirectoryRef Id="MyProgramDir">
      <Component Id="CMP_InstallMeTXT"
                 Guid="E8A58B7B-F031-4548-9BDD-7A6796C8460D">
        <File Id="FILE_InstallMeTXT"
              Source="InstallMe.txt"
              KeyPath="yes" />
      </Component>
    </DirectoryRef>

    <!--Start Menu Shortcuts-->
    <DirectoryRef Id="MyShortcutsDir">
      <Component Id="CMP_DocumentationShortcut"
                 Guid="33741C82-30BF-41AF-8246-44A5DCFCF953">

        <Shortcut Id="DocumentationStartMenuShortcut"
                  Name="Awesome Software Documentation"
                  Description="Read Awesome Software Documentation"
                  Target="[MyProgramDir]InstallMe.txt" />

        <Shortcut Id="UninstallShortcut"
                  Name="Uninstall Awesome Software"
                  Description="Uninstalls Awesome Software"
                  Target="[System64Folder]msiexec.exe"
                  Arguments="/x [ProductCode]" />

        <RemoveFolder Id="RemoveMyShortcutsDir"
                      On="uninstall" />

        <RegistryValue Root="HKCU"
                       Key="Software\Microsoft\AwesomeSoftware"
                       Name="installed"
                       Type="integer"
                       Value="1"
                       KeyPath="yes" />
      </Component>
    </DirectoryRef>

    <!--Features-->
    <Feature Id="ProductFeature"
             Title="Main Product"
             Level="1">
      <ComponentRef Id="CMP_InstallMeTXT" />
      <ComponentRef Id="CMP_DocumentationShortcut" />
    </Feature>
  </Product>
</Wix>
Compile the project in Visual Studio and you should get a new MSI file:
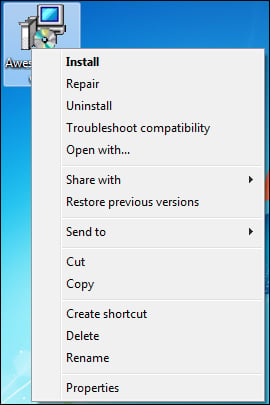
You can double-click on it or right-click and select Install to install the software. Doing so should create a subfolder for your program in the Start menu, as shown in the following screenshot:
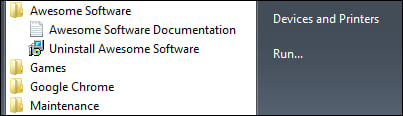
You should also find a new folder under Program Files:

To uninstall the software, you have several options:
Use the uninstall shortcut from the Start menu
Right-click on the MSI file and select Uninstall
Uninstall it from Programs and Features
From a command prompt, navigate to the directory where the MSI file is and use the following command:
msiexec /x AwesomeSoftware.msi
Although you'll eventually want to add your own dialogs to gather information from the user that's important for your own application, you may want to use one of WiX's built-in dialog sequences in the meantime. All of them are stored in an assembly called WixUIExtension.dll. You can add a reference to this file with Visual Studio's Add a Reference screen. The file exists in WiX's Program Files folder. You may have to navigate to C:\Program Files (x86)\WiX Toolset v3.6\bin.
Once you've added the new reference, add the following line to your WiX source file. It doesn't matter exactly where, as long as it's a child to the Product element:
<UIRef Id="WixUI_Minimal" />
This will insert the Minimal dialog set into your installation sequence. It shows a single dialog screen containing a license agreement and an Install button. Feel free to try any of the other dialog sets. Just replace WixUI_Minimal, with one of the other names in the UIRef element. WixUI_Advanced and WixUI_InstallDir require some further setup to really work properly. You can try out the following attributes:
We will explore these standard dialogs in more detail later and also explain how to create your own.
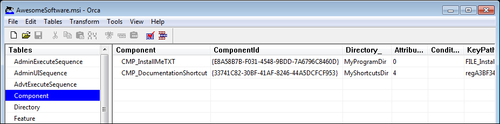
I mentioned before that an MSI file is really a sort of relational database. WiX does all the work of creating tables, inserting rows, and matching up keys in this database. However, as we progress through the rest of the book, I encourage you to explore how it looks behind the scenes. For example, we discussed the File and Component elements. Sure enough, there are two tables called File and Component in the MSI package that contain the definitions you've set with your XML markup. To get inside the installer, you'll need a tool called Orca.
Once you've compiled your project in Visual Studio, you'll have a working MSI package that can be installed by double-clicking on it. If you'd like to see the database inside, install the MSI viewer, Orca.exe. Orca is provided as part of the Windows SDK and despite the icon of a whale on the shortcut, it stands for One Really Cool App. You can find versions of the SDK at Microsoft's Windows Development Center website:
http://msdn.microsoft.com/en-us/windows/bb980924.aspx
After you've installed the SDK (specifically, the .NET tools that are included), you can find the installer for Orca—Orca.msi—in the Microsoft SDKs folder in Program Files. On my machine, it can be found in C:\Program Files\Microsoft SDKs\Windows\v7.0\Bin.
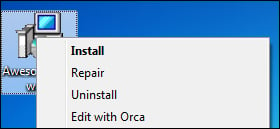
Install Orca and then right-click on your MSI file and select Edit with Orca, as shown in the following screenshot:
Orca lets you view the database structure of your installer. This can be a big help in troubleshooting problems or just to get a better idea about how different elements work together. The following is a screenshot of the
Component database:
If you wanted to, you could edit your MSI package directly with Orca. This is helpful when learning or trying out different concepts. You'll need to know exactly which tables and rows to modify. Sometimes, though, you'll be able to just change a single value and check its effect.
If you get into trouble with your installer, it may help to run it with logging turned on. To do so, install your package from a command prompt using msiexec with the arguments /l*v, and the name of a file to write the log to. For example, if you had an installer called myInstaller.msi, you could use this command to write a log during the installation to a file called myLog.txt:
msiexec /i myInstaller.msi /l*v myLog.txt
Every event that occurs during installation will be recorded here. It works for uninstalls too. Simply use the /x argument instead of /i. The log can be pretty helpful, but also very verbose. If your installer fails midway through, you might try searching the log for the text return value 3. This indicates that an action returned a status of failure. Often, you'll also see a specific MSI error code. You can find its meaning by searching for that number in the MSI SDK Documentation help file that comes with WiX.
Note
You can also turn on logging for all MSI packages by editing the HKEY_LOCAL_MACHINE\Software\Policies\Microsoft\Windows\Installer key in the Windows Registry. This should be used with care though so as not to use too much disk space. See http://support.microsoft.com/kb/223300 for more information.
If you have specific questions about WiX, you'll find additional resources at the following websites:
WiX users mailing list:
http://sourceforge.net/mailarchive/forum.php?forum_name=wix-users
Microsoft Windows Installer documentation:
http://msdn.microsoft.com/en-us/library/cc185688(VS.85).aspx
In this chapter, we discussed downloading the WiX toolset and its various features. Creating a simple MSI package is relatively easy. There are only a handful of XML elements needed to get started. As we explore more complex setups, you'll be introduced to elements that are more specialized.
Throughout the rest of this book, I'll make references to the structure of the MSI database. Orca is an excellent tool for seeing this structure yourself. Although this book focuses on WiX and not the underlying Windows Installer technology, it helps sometimes to see how the mechanics of it work. You may find it useful to consult Microsoft's MSI documentation too, which can be found online or in a help file provided by WiX, to get a deeper understanding of the properties and constructs we will discuss.


