


In this chapter, we will cover the following topics:
Working with a virtual environment
Creating a project file structure
Handling project dependencies with pip
Including external dependencies in your project
Defining relative paths in the settings
Setting up STATIC_URL dynamically for Subversion users
Setting up STATIC_URL dynamically for Git users
Creating and including local settings
Setting UTF-8 as the default encoding for MySQL configuration
Setting the Subversion ignore property
Creating a Git ignore file
Deleting Python-compiled files
Importing order in Python files
Defining overwritable app settings
In this chapter, I will show you good practices when starting a new project with Django 1.6 on Python 2.7. Some of the tricks introduced here are the best ways to deal with the project layout, settings, or configuration. However, for some of the tricks, you might find some alternatives online. So, feel free to evaluate and choose the best bits and pieces for yourself while digging deep into the Django world.
I am assuming that you are already familiar with the basics of Django, Subversion or Git version control, MySQL or PostgreSQL databases, and command-line usage. Also, I assume you are probably using a Unix-based operating system such as Mac OS X or Linux. It makes sense to develop with Django on Unix-based platforms because the websites will most likely be published on a Linux Server later, so you can establish routines that work the same while developing as while deploying. If you are working with Django locally on Windows, the routines are similar, but not always exactly the same.
It is very likely that you will develop multiple Django projects on your computer. Some modules, such as Python Image Library (or Pillow) and MySQLdb, can be installed once and shared for all projects. Other modules such as Django itself, third-party Python libraries, and Django apps will need to be kept isolated from each other. Virtualenv is a utility that separates all your Python projects into their own realms. In this recipe, we will show you how to use it.
Before getting into the usage example of virtual environments, let's install pip (the most convenient tool to install and manage Python packages), the shared Python modules Pillow and MySQLdb, and the virtualenv utility using the following commands:
$ sudo easy_install pip
$ sudo pip install Pillow
$ sudo pip install MySQL-python
$ sudo pip install virtualenv
Now, when you have your prerequisites installed, create a directory where all your Django projects will be stored, for example, virtualenvs under your home directory. Perform the following steps after creating the directory:
Go to the newly created directory and create a virtual environment that uses shared system site packages:
$ cd ~/virtualenvs
$ mkdir myproject_env
$ cd myproject_env
$ virtualenv --system-site-packages .
New python executable in ./bin/python
Installing setuptools.............done.
Installing pip...............done.
To use your newly created virtual environment, you need to execute the activation script within your current shell. This can be done with one of the following commands:
$ source bin/activate
$ . bin/activate
You will see that the prompt of the command-line tool gets a prefix of the project name, such as this:
(myproject_env)$To get out of the virtual environment, type the following command:
$ deactivate
When you create a virtual environment, specific directories (bin, build, include, and lib) are created to store a copy of the Python installation, and some shared Python paths are defined. When the virtual environment is activated, whatever you install with pip or easy_install will be put into and used by the site packages of the virtual environment, and not the global site-packages of your Python installation.
To install Django 1.6 to your virtual environment, type the following command:
(myproject_env)$ pip install Django==1.6
The Creating a project file structure recipe
The Deploying on Apache with mod_wsgi recipe in Chapter 10, Bells and Whistles
A consistent file structure for your projects makes you well organized and more productive. When you have the basic workflow defined, you can get into the business logic quicker and create awesome projects.
If you haven't done this yet, first create the virtualenvs directory where you will keep all your virtual environments (read about this in the Working with a virtual environment recipe), and which can be created under your home directory.
Then, create the directory for your project's environment, for example, myproject_env. Start the virtual environment inside it. This will create the bin, build, include, and lib directories there. I suggest adding the commands directory for local bash scripts related to the project, the db_backups directory for database dumps, and the project directory for your Django project. Also, install Django into your virtual environment.
Follow these steps to create a file structure for your project:
With the virtual environment activated, go to the
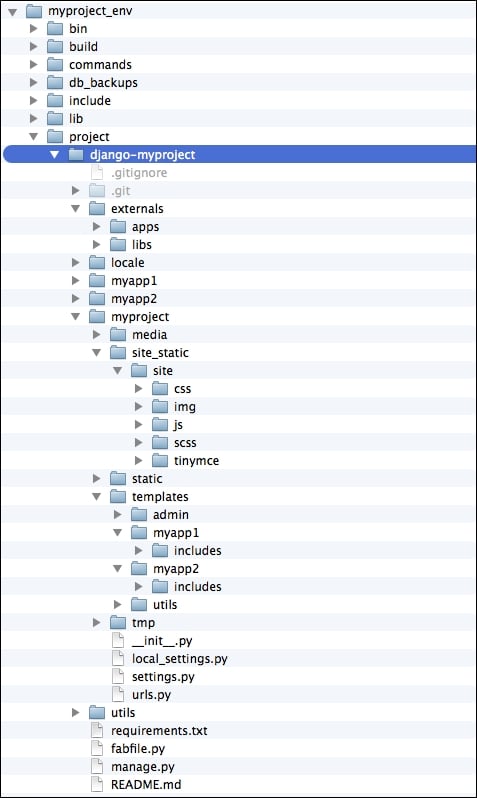
projectdirectory and start a new Django project, as follows:(myproject_env)$ django-admin.py startproject myprojectFor clearness, we will rename the newly created directory to
django-myproject. This is the directory that you should put under version control, so it will have.git,.svn, or similar directories inside.In the
django-myprojectdirectory, create aREADME.mdfile to describe your project to new developers. You can also putrequirements.txtwith the Django version, and you can include other external dependencies (read about this in the Handling project dependencies with pip recipe). Also, this directory will contain your project's Python package namedmyproject, Django apps (I recommend to have one app calledutilsfor different functionalities shared throughout the project), a locale directory for your project translations if it is multilingual, a Fabric deployment script namedfabfile.py, and theexternalsdirectory for external dependencies included in this project if you decide not to userequirements.txt.In your project's Python package,
myproject, create themediadirectory for project uploads, thesite_staticdirectory for project-specific static files, thestaticdirectory for collected static files, thetmpdirectory for the upload procedure, and thetemplatesdirectory for project templates. Also, themyprojectdirectory should contain your project settings,settings.pyandlocal_settings.py, as well as the URL configuration,urls.py.In your
site_staticdirectory, create thesitedirectory as a namespace for site-specific static files. Then, put the static files separated into directories inside it; for instance,scssfor Sass files (optional),cssfor generated minified cascading style sheets,imgfor styling images and logos,jsfor JavaScript, and lastly, any third-party module combining all types of files, for example, the rich text editortinymce. Besides thesitedirectory, thesite_staticdirectory might also contain overwritten static directories of third-party apps, for example,cmsoverwriting static files from Django CMS. To generate the CSS files out of Sass and to minify your JavaScript files, you can use the CodeKit or Prepros applications with a graphical user interface.Put your templates that are separated by apps into your
templatesdirectory. If a template file represents a page (for example,change_item.htmloritem_list.html), then put it directly in the app'stemplatedirectory. If the template is included in another template (for example,similar_items.html), put it into theincludessubdirectory. Also, yourtemplatesdirectory can contain one directory calledutilsfor globally reusable snippets such as pagination, language chooser, and others.
The whole file structure for a complete project inside a virtual environment will look like this:
The Handling project dependencies with pip recipe
The Including external dependencies in your project recipe
The Deploying on Apache with mod_wsgi recipe in Chapter 10, Bells and Whistles
The Creating and using the Fabric deployment script recipe in Chapter 10, Bells and Whistles
Pip is the most convenient tool to install and manage Python packages. Besides installing packages one by one, it is possible to define a list of packages you want to install and pass it to the tool so that it deals with the list automatically.
Before using this recipe, you need to have pip installed and a virtual environment activated. For more information on how to do this, read the Working with a virtual environment recipe.
Let's go to your Django project that you have under version control and create the requirements file with the following content:
#requirements.txt
Django==1.6
South==0.8.4
django-cms==2.4
Now, you can run the following command to install all required dependencies for your Django project:
(myproject_env)$ pip install -r requirements.txt
This command installs all your project dependencies into your virtual environment one after another.
When you have many dependencies in your project, it is good practice to stick to specific versions of the Python modules because you can then be sure that when you deploy your project or give it to a new developer, the integrity doesn't get broken and all the modules function without conflicts.
If you have already installed project requirements with pip manually one by one, you can generate the requirements.txt file using the following command:
(myproject_env)$ pip freeze > requirements.txt
If you need to install a Python library directly from a version control system or a local path, you can learn more about pip from the official documentation at http://pip.readthedocs.org/en/latest/reference/pip_install.html.
Sometimes, it is better to include external dependencies in your project. This ensures that whenever one developer upgrades third-party modules, all the other developers will receive the upgraded version within the next update from the version control system (Git, Subversion, or others).
Also, it is good to have external dependencies included in your project when the libraries are taken from unofficial sources (somewhere other than Python Package Index (PyPI)) or different version control systems.
Start with a virtual environment with a Django project in it.
Tip
Downloading the example code
You can download the example code fles for all Packt books you have purchased from your account at http://www.packtpub.com. If you purchased this book elsewhere, you can visit http://www.packtpub.com/support and register to have the fles e-mailed directly to you.
Execute the following steps one by one:
Create a directory named
externalsunder your Django project.Then, create the
libsandappsdirectories under it.The
libsdirectory is for Python modules that are required by your project, for example, requests, boto, twython, whoosh, and so on. Theappsdirectory is for third-party Django apps, for example, django-haystack, django-cms, django-south, django-storages, and so on.So, the directory structure should look like this:

The next step is to put the external libraries and apps under the Python path so that they are recognized as if they were installed. This can be done by adding the following code in the settings:
#settings.py
# -*- coding: UTF-8 -*-
import os
import sys

PROJECT_PATH = os.path.abspath(os.path.join(
    os.path.dirname(__file__), ".."))

EXTERNAL_LIBS_PATH = os.path.join(PROJECT_PATH, "externals", "libs")
EXTERNAL_APPS_PATH = os.path.join(PROJECT_PATH, "externals", "apps")
sys.path = ["", EXTERNAL_LIBS_PATH, EXTERNAL_APPS_PATH] + sys.path
A module is meant to be under the Python path if you can run Python and import the module. One of the ways to put a module under the Python path is to modify the sys.path variable before importing a module that is in an unusual location. The value of sys.path is a list of directories starting with an empty string for the current directory, followed by the directories in the virtual environment, and finally the globally shared directories of the Python installation. You can see the value of sys.path in the Python shell, as follows:
(myproject_env)$ python
>>> import sys
>>> sys.path
When trying to import a module, Python searches for the module in this list and returns the first result found.
So, at first, we define the PROJECT_PATH variable that is the absolute path to one level higher than the settings.py file. Then, we define the variables EXTERNAL_LIBS_PATH and EXTERNAL_APPS_PATH, which are relative to PROJECT_PATH. Lastly, we modify the sys.path property, adding new paths to the beginning of the list. Note that we also add an empty string as the first path to search, which means that the current directory of any module should always be checked first before checking other Python paths.
The Creating a project file structure recipe
The Handling project dependencies with pip recipe
The Defining relative paths in the settings recipe
The Using the Django shell recipe in Chapter 10, Bells and Whistles
Django requires you to define different filepaths in the settings, such as the root of your media, the root of your static files, the path to templates, the path to translation files, and so on. For each developer of your project, the paths might differ as the virtual environment can be set up anywhere, and the user might be working on Mac OS X, Linux, or Windows. Anyway, there is a way to define these paths relative to your Django project directory.
Modify your path-related settings accordingly, instead of hardcoding paths to your local directories:
#settings.py
# -*- coding: UTF-8 -*-
import os

PROJECT_PATH = os.path.abspath(os.path.join(os.path.dirname(__file__), ".."))

MEDIA_ROOT = os.path.join(PROJECT_PATH, "myproject", "media")

STATIC_ROOT = os.path.join(PROJECT_PATH, "myproject", "static")

STATICFILES_DIRS = (
    os.path.join(PROJECT_PATH, "myproject", "site_static"),
)

TEMPLATE_DIRS = (
    os.path.join(PROJECT_PATH, "myproject", "templates"),
)

LOCALE_PATHS = (
    os.path.join(PROJECT_PATH, "locale"),
)

FILE_UPLOAD_TEMP_DIR = os.path.join(PROJECT_PATH, "myproject", "tmp")At first, we define PROJECT_PATH, which is an absolute path to one level higher than the settings.py file. Then, we set all the paths relative to PROJECT_PATH using the os.path.join function.
If you set STATIC_URL to a static value, then each time you update a CSS file, a JavaScript file, or an image, you will need to clear the browser cache to see the changes. There is a trick to work around the clearing of the browser's cache. It is to have the revision number of the version control system shown in STATIC_URL. Whenever the code is updated, the visitor's browser will force the loading of all-new static files.
This recipe shows how to put a revision number into STATIC_URL for Subversion users.
Make sure that your project is under the Subversion version control and you have PROJECT_PATH defined in your settings, as shown in the Defining relative paths in the settings recipe.
Then, create the utils module in your Django project, and also create a file called misc.py there.
The procedure for putting the revision number into the STATIC_URL setting consists of the following two steps:
Insert the following content:
#utils/misc.py
# -*- coding: UTF-8 -*-
import subprocess

def get_media_svn_revision(absolute_path):
    repo_dir = absolute_path
    svn_revision = subprocess.Popen(
        'svn info | grep "Revision" | awk \'{print $2}\'',
        stdout=subprocess.PIPE, stderr=subprocess.PIPE,
        shell=True, cwd=repo_dir, universal_newlines=True)
    rev = svn_revision.communicate()[0].partition('\n')[0]
    return rev
Then, modify the
settings.pyfile and add these lines:#settings.py # ... somewhere after PROJECT_PATH definition ... from utils.misc import get_media_svn_revision STATIC_URL = "/static/%s/" % get_media_svn_revision(PROJECT_PATH)
The get_media_svn_revision function takes the absolute_path directory as a parameter and calls the svn info shell command in that directory to find out the current revision. We pass PROJECT_PATH to the function because we are sure it is under version control. Then, the revision is parsed, returned, and included in the STATIC_URL definition.
If you don't want to refresh the browser cache each time you change your CSS and JavaScript files, or while styling images, you need to set STATIC_URL dynamically with a varying path component. With the dynamically changing URL, whenever the code is updated, the visitor's browser will force the loading of all-new uncached static files. In this recipe, we will set a dynamic path for STATIC_URL when you use the Git version control system.
Make sure that your project is under the Git version control and you have PROJECT_PATH defined in your settings, as shown in the Defining relative paths in the settings recipe.
If you haven't done it yet, create the utils module in your Django project, and create a file called misc.py there.
The procedure for putting the Git timestamp into the STATIC_URL setting consists of the following two steps:
Add the following content to the
misc.pyfile placed atutils/:#utils/misc.py # -*- coding: UTF-8 -*- import subprocess from datetime import datetime def get_git_changeset(absolute_path): repo_dir = absolute_path git_show = subprocess.Popen( 'git show --pretty=format:%ct --quiet HEAD', stdout=subprocess.PIPE, stderr=subprocess.PIPE, shell=True, cwd=repo_dir, universal_newlines=True, ) timestamp = git_show.communicate()[0].partition('\n')[0] try: timestamp = datetime.utcfromtimestamp(int(timestamp)) except ValueError: return "" changeset = timestamp.strftime('%Y%m%d%H%M%S') return changesetThen, import the newly created
get_git_changesetfunction in the settings and use it for theSTATIC_URLpath:#settings.py # ... somewhere after PROJECT_PATH definition ... from utils.misc import get_git_changeset STATIC_URL = "/static/%s/" % get_git_changeset(PROJECT_PATH)
The
get_git_changeset function takes the absolute_path directory as a parameter and calls the git show shell command with the parameters to show the Unix timestamp of the HEAD revision in the directory. As in the previous recipe, we pass PROJECT_PATH to the function because we are sure it is under version control. The timestamp is parsed; converted to a string consisting of year, month, day, hour, minutes, and seconds; returned; and included in the definition of STATIC_URL.
You will need to have at least two different instances of your project: the development environment where you create new features and the public website environment in a hosted server. Additionally, there might be different development environments for other developers. Also, you might have a staging environment to test the project in a public-website-like situation.
Most of the settings for different environments will be shared and saved in version control. However, there will be some settings that are specific to the environment of the project instance, for example, database or e-mail settings. We will put them in the local_settings.py file.
Perform the following steps:
At the end of
settings.py, add a version oflocal_settings.pythat claims to be in the same directory, as follows:#settings.py # ... put this at the end of the file ... try: execfile(os.path.join(os.path.dirname(__file__), "local_settings.py")) except IOError: passCreate
local_settings.pyand put your environment-specific settings there, as follows:#local_settings.py DATABASES = { "default": { "ENGINE": "django.db.backends.mysql", "NAME": "myproject", "USER": "root", "PASSWORD": "root", } } EMAIL_BACKEND = "django.core.mail.backends.console.EmailBackend" INSTALLED_APPS += ( "debug_toolbar", )
As you can see, the local settings are not normally imported, but rather they are included and executed in the settings.py file itself. This allows you not only to create or overwrite the existing settings, but also to adjust the tuples or lists from the settings.py file; for example, we add debug_toolbar to INSTALLED_APPS here to be able to debug the SQL queries, template context variables, and so on.
The Creating a project file structure recipe
The Toggling Debug Toolbar recipe in Chapter 10, Bells and Whistles
MySQL is the most popular open source database. In this recipe, I will tell you how to set UTF-8 as the default encoding for it. Note that if you don't set this encoding in the database configuration, you might get into a situation where LATIN1 is used by default with your UTF-8-encoded data. This will lead to database errors whenever symbols such as "€" are used. Also, this recipe will save you from the difficulties of converting database data from LATIN1 to UTF-8, especially when you have some tables encoded in LATIN1 and others in UTF-8.
Make sure that the MySQL database management system and the MySQLdb Python module are installed and you are using the MySQL engine in your project's settings.
Open the MySQL configuration file (/etc/mysql/my.cnf) in your favorite editor, and ensure that the following settings are set in the sections [client], [mysql], and [mysqld]:
#/etc/mysql/my.cnf
[client]
default-character-set = utf8

[mysql]
default-character-set = utf8

[mysqld]
collation-server = utf8_unicode_ci
init-connect = 'SET NAMES utf8'
character-set-server = utf8
If any of the sections don't exist, create them in the file. Then, restart MySQL in your command-line tool, as follows:
/etc/init.d/mysql restart
If you are using Subversion for version control, you will need to keep most of the projects in the repository, but some files and directories should stay only locally and not be tracked.
Open your command-line tool and set your default editor as nano, vi, vim, or any other that you prefer, as follows:
$ export EDITOR=nano
Tip
If you don't have a preference, I recommend using nano, which is very intuitive and a simple text editor for the terminal.
Then, go to your project directory and type the following command:
$ svn propedit svn:ignore .
This will open a temporary file in the editor, where you need to put the following file and directory patterns for Subversion to ignore:
*.pyc
local_settings.py
static
media
tmp
Save the file and exit the editor. For every other Python package in your project, you will need to ignore the *.pyc files. Just go to a directory and type the following command:
$ svn propedit svn:ignore .
Then, put this in the temporary file, save it, and close the editor:
*.pyc
In Subversion, you need to define ignore properties for each directory of your project. Mainly, we don't want to track the Python-compiled files, for instance, *.pyc. We also want to ignore local_settings.py that is specific for each developer, static that replicates collected static files from different apps, media that contains uploaded files and will be changing together with the database, and tmp that is temporarily used for file uploads.
If you are using Git—the most popular distributed version control system—ignoring some files and folders from version control is much easier than with Subversion.
Using your favorite text editor, create a .gitignore file at the root of your Django project and put these files and directories there:
#.gitignore
*.pyc
/myproject/local_settings.py
/myproject/static/
/myproject/tmp/
/myproject/media/The .gitignore file specifies the paths that should intentionally be untracked by the Git version control system. The .gitignore file we created in this recipe will ignore the Python-compiled files, local settings, collected static files, temporary directory for uploads, and media directory with the uploaded files.
When you run your project for the first time, Python compiles all your *.py code to bytecode-compiled files, *.pyc, which are used later for execution.
Normally, when you change the *.py files, *.pyc are recompiled, but sometimes when switching branches or moving directories, you need to clean up the compiled files manually.
Use your favorite editor and edit, or create, a .bash_profile file in your home directory.
Add this alias at the end of .bash_profile:
#~/.bash_profile
alias delpyc="find . -name \"*.pyc\" -delete"
Now, to clean up the Python-compiled files, go to your project directory and type this command in the command line:
$ delpyc
When you create Python modules, it is good practice to stay consistent with the structure within the files. This makes it easier to read code for other developers and for yourself. This recipe will show you how to structure your imports.
Use the following structure in any Python file you create. Just after the first line that defines UTF-8 as the default Python file encoding, put imports categorized into sections:
# -*- coding: UTF-8 -*-
# System libraries
import os
import re
from datetime import datetime

# Third-party libraries
import boto
from PIL import Image

# Django modules
from django.db import models
from django.conf import settings

# Django apps
from cms.models import Page

# Current-app modules
import app_settings
We have five main categories for the imports, as follows:
System libraries for packages within the default installation of Python
Third-party libraries for additionally installed Python packages
Django modules for different modules from the Django framework
Django apps for third-party and local apps
Current-app modules for relative imports from the current app
When coding in Python and Django, use the official style guide for Python code, PEP 8. You can find it at http://legacy.python.org/dev/peps/pep-0008/.
This recipe will show you how to define settings for your app that can then be overwritten in your project's settings.py or local_settings.py file. This is especially useful for reusable apps.
Create your Django app either manually or by using this command:
(myproject_env)$ django-admin.py startapp myapp1
If you have just one or two settings, you can use the following pattern in your models.py file. If the settings are extensive, and you want to have them better organized, create an app_settings.py file in the app and put the settings in the following way:
#models.py or app_settings.py
# -*- coding: UTF-8 -*-
from django.conf import settings
from django.utils.translation import ugettext_lazy as _

SETTING1 = getattr(settings, "MYAPP1_SETTING1", u"default value")
MEANING_OF_LIFE = getattr(settings, "MYAPP1_MEANING_OF_LIFE", 42)
STATUS_CHOICES = getattr(settings, "MYAPP1_STATUS_CHOICES", (
    ('draft', _("Draft")),
    ('published', _("Published")),
    ('not_listed', _("Not Listed")),
))
Then, you can use the app settings in models.py in the following way:
#models.py
# -*- coding: UTF-8 -*-
from django.db import models
from django.utils.translation import ugettext_lazy as _

from app_settings import STATUS_CHOICES

class NewsArticle(models.Model):
    # ...
    status = models.CharField(_("Status"),
        max_length=20, choices=STATUS_CHOICES
    )
If you want to overwrite the STATUS_CHOICES setting for just one project, you simply open settings.py and add this:
#settings.py
# ...
from django.utils.translation import ugettext_lazy as _
MYAPP1_STATUS_CHOICES = (
    ("imported", _("Imported")),
    ("draft", _("Draft")),
    ("published", _("Published")),
    ("not_listed", _("Not Listed")),
    ("expired", _("Expired")),
)The Python function, getattr(object, attribute_name[, default_value]), tries to get the attribute_name attribute from object, and returns default_value if it is not found. In this case, different settings are tried to be taken from the Django project settings module, and if they are not found, the default values are assigned.

