


Chapter 2: Using the New iOS 14 Apps
In 2020, Apple introduced iOS 14, the latest operating system for the iPhone. Besides adding new features, iOS 14 also includeds a Translate and a Magnifier app. The Translate app lets you convert spoken or written words into another language, while the Magnifier app lets you turn your iPhone camera into a magnifying glass to help you read text that may be too small to read comfortably.
By learning how to use these new apps, as well as using the new features of iOS 14, you can get comfortable with using common user interface elements of iPhone apps. Since most apps work in similar ways, the more apps you use, the easier it will be to use your iPhone.
In the last chapter, you learned how to use common finger gestures to control different features of an iPhone. In this chapter, you'll learn the common elements of iOS by experimenting with the latest features of iOS 14:
- The Magnifier app
- The Translate app
- The App Library
Using the Magnifier app
Many people have a hard time reading text up close. This can be due to farsightedness or trying to read small print in low-lighting conditions. If you ever forget or misplace your reading glasses, you can use the Magnifier app on your iPhone, which appears as shown in Figure 2.1:
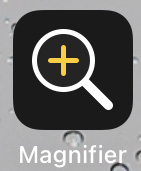
Figure 2.1 – The Magnifier app
To start the Magnifier app, you need to use two different gestures: swipe and tap. First, you'll need to use the swipe gestures to scroll through the different Home screens on your iPhone until you find the Magnifier app icon. Once you find the Magnifier app, you can start it by tapping the icon. Once the Magnifier user interface appears, you can point your iPhone camera at text or any item you want to see, as shown in Figure 2.2:
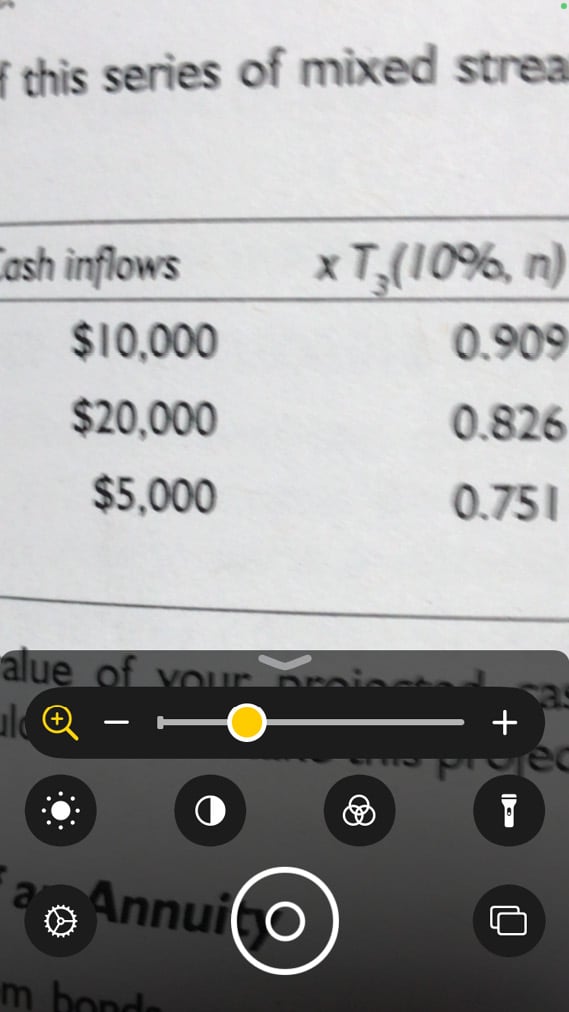
Figure 2.2 – Using the Magnifier app
The Magnifier app consists of buttons and sliders. Tapping an icon performs an action, while swiping the slider left or right lets you increase or decrease a value, such as brightness or magnification. Let's begin:
- To save space, only the zoom slider appears. If you want to display the brightness or contrast sliders, you'll need to tap the brightness or contrast icons, as shown in Figure 2.3:

Figure 2.3 – The zoom, brightness, and contrast icons
- When you tap the brightness or contrast icons, a slider appears so that you can adjust either the brightness or contrast. Swiping left and right on the slider changes that option, such as zoom, brightness, or contrast.
- When you no longer want to see the brightness or contrast sliders, tap the brightness or contrast icons again. (Note that the zoom slider always remains visible by default.)
- If you tap the color filter icon, a list of different color filter options appears, as shown in Figure 2.4:

Figure 2.4 – The color filter icon
- To illuminate an object, tap the flashlight icon, as shown in Figure 2.5. This flashlight icon toggles between turning the flash on or off to illuminate the area in front of your iPhone:

Figure 2.5 – The flashlight icon
- Most apps offer a way to customize the app, so to do that in the Magnifier app, tap the settings icon, as shown in Figure 2.6:

Figure 2.6 – The settings icon
- Tapping the settings icon displays the Customize Controls screen, which displays options in a list. Two common features of lists are that they allow you to delete items or move items.
- To delete items, you can tap the delete icon, which looks like a white dash inside a red circle.
- To move an item, you can swipe up or down on a three-line icon, often called a "hamburger menu" since it looks like the top and bottom of a bun with a patty inside, as shown in Figure 2.7:
Figure 2.7 – The Customize Controls screen
When you're done with the Customize Controls screen, tap the Done button in the upper-right corner of the screen. By experimenting with the Magnifier app, you can learn the basic gestures and user interface elements, which can help you use nearly any app in no time.
One unique feature of the Magnifier app is that it allows you to capture an image to view or share it with others. (However, note that when you capture a picture with the Magnifier app, that picture is not saved but stored temporarily.) This lets you capture pictures and view them later at your convenience. The two buttons for capturing and viewing images are shown in Figure 2.8:
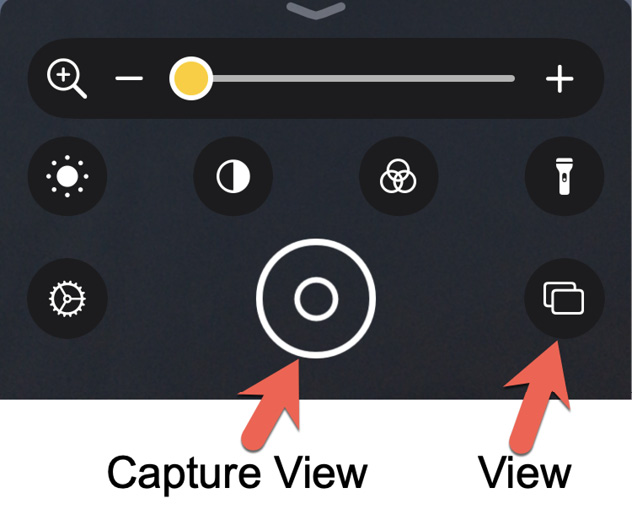
Figure 2.8 – The capture view and view buttons
Tapping the capture view button captures a picture of whatever you see through the iPhone camera. Once you've captured an image, you can view the captured image at your leisure without the need to hold your iPhone camera over a page anymore. The capture view button turns into a close button, so when you no longer want to view the static image you captured, click the close button, as shown in Figure 2.9:
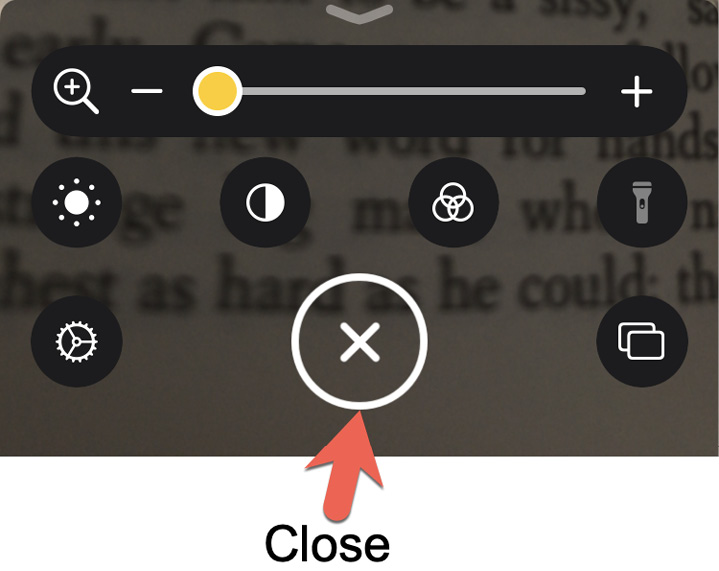
Figure 2.9 – The capture view button turns into a close button
Once you've captured an image, you can tap the close button to dismiss that image. However, if you capture an image and want to temporarily save it, tap the View button instead. This turns the capture view button into a + button to capture additional images, along with displaying the View button with the number of images temporarily stored, as shown in Figure 2.10:

Figure 2.10 – The buttons change slightly when capturing multiple images
If you tap the + button, you can capture additional images. If you tap the View button, you can view previously captured images. To dismiss a previously captured image, tap the End button in the upper-left corner.
The Magnifier app makes it easy to either view images while holding your iPhone or to capture images that you can review later so that you don't have to hold your iPhone over a page.
Like most apps, the Magnifier app makes icons and buttons easy to spot. To see how another app works, let's take a look at the new Translate app.
While some people may be multilingual, most people know their native language well but may not feel comfortable speaking another language fluently. That's why Apple included a new Translate app in iOS 14. The purpose of the Translate app is to let you either speak or type words in one language and see and hear a translation in another language.
Currently, the Translate app can translate to and from the following languages:
- Arabic
- Chinese (Mandarin)
- English (US and UK)
- French
- German
- Italian
- Japanese
- Korean
- Portuguese
- Russian
- Spanish
The Translate app appears as shown in Figure 2.11:
Figure 2.11 – The Translate app
The Translate app displays two different screens depending on whether you are holding your iPhone in portrait or landscape mode. Portrait mode is meant to let you either speak or type text to translate, as shown in Figure 2.12:
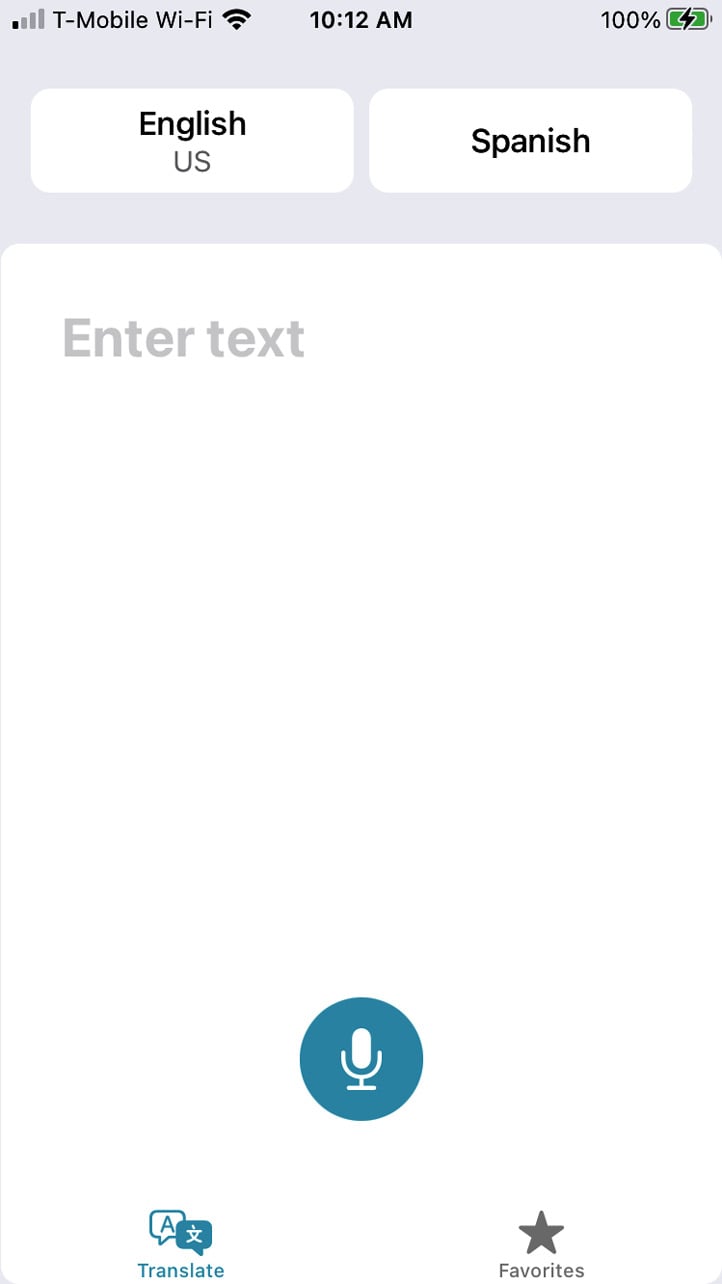
Figure 2.12 – The Translate app in portrait mode
Landscape mode can translate a conversation and let both people comfortably view the screen, as shown in Figure 2.13:
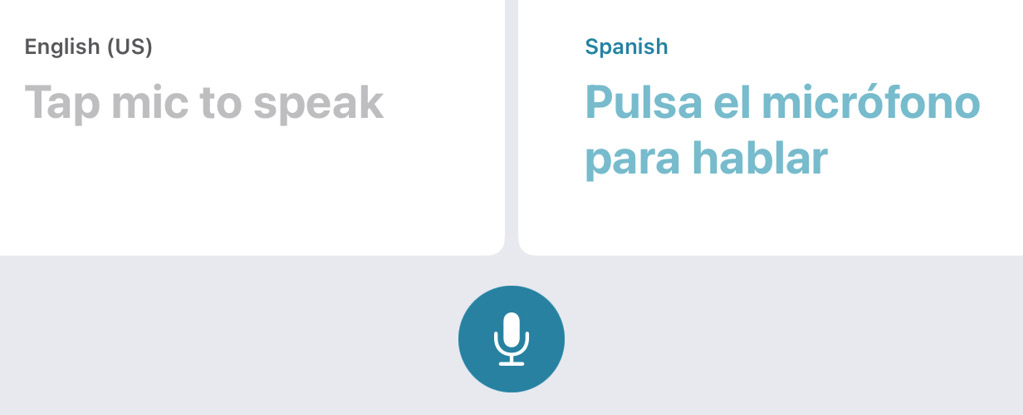
Figure 2.13 – The Translate app in landscape mode
To define which languages you want the Translate app to use, hold the Translate app in portrait mode. Then, tap the two language buttons at the top of the screen. When you tap a language button, a list of supported languages appears, as shown in Figure 2.14:
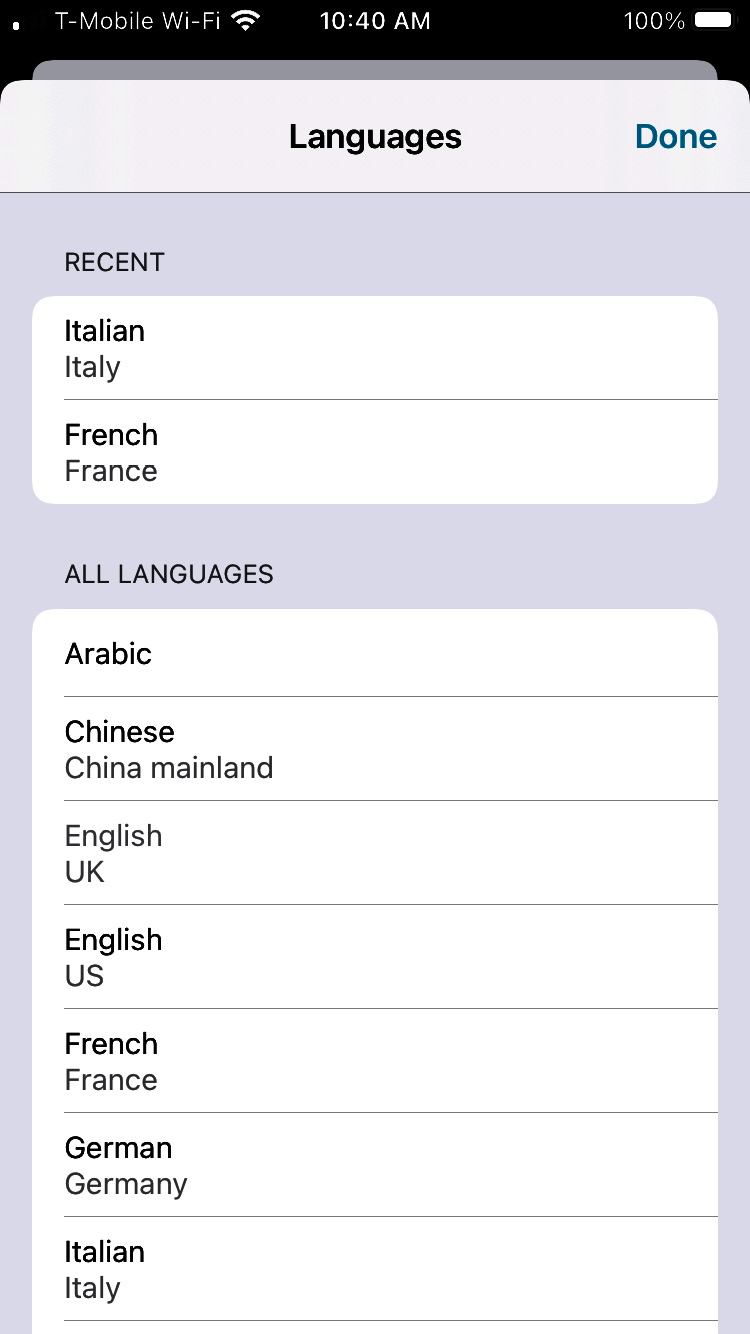
Figure 2.14 – Choosing a language in the Translate app
Tap a language to use, and then tap the Done button in the upper-right corner of the screen. By doing this for both the input and output languages, you can translate between multiple languages.
Once you've defined the two languages to use, you can now translate using either text or speech. To translate text:
- Tap the Enter text box to make the virtual keyboard appear.
- Type your text and tap the Go button in the bottom-right corner of the virtual keyboard.
- The Translate app displays your text, along with the translation in your chosen language, as shown in Figure 2.15:
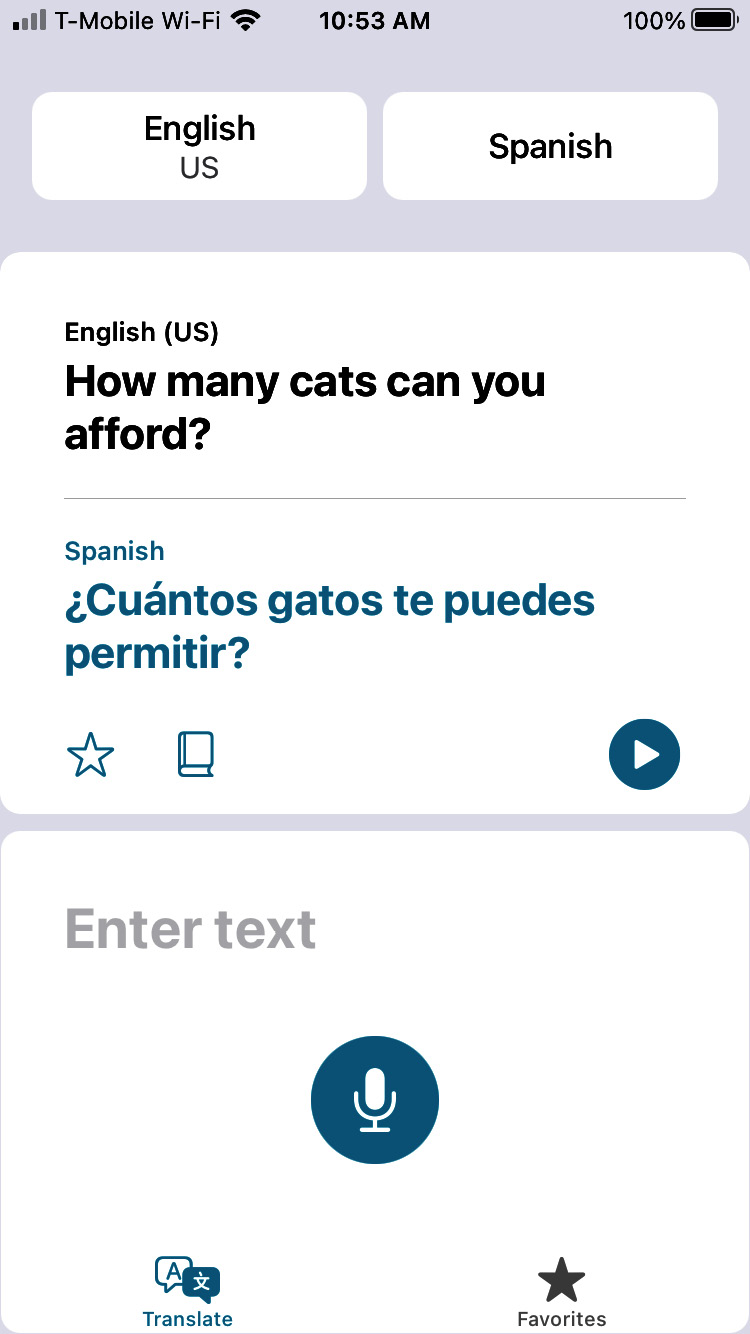
Figure 2.15 – Translating text
To translate speech, tap the microphone button. The Translate screen displays an audio image, along with text that says Listening…, as shown in Figure 2.16:

Figure 2.16 – Capturing audio input
Speak the words you want to be translated and then stop when you're done. After a few seconds, the Translate app will display the translated text as shown in Figure 2.15). The Clear button lets you delete all text inside a text field with one tap. Whether you entered text by typing or through speech, you'll see three icons (favorites, dictionary, and play) under the translated text, as shown in Figure 2.17:
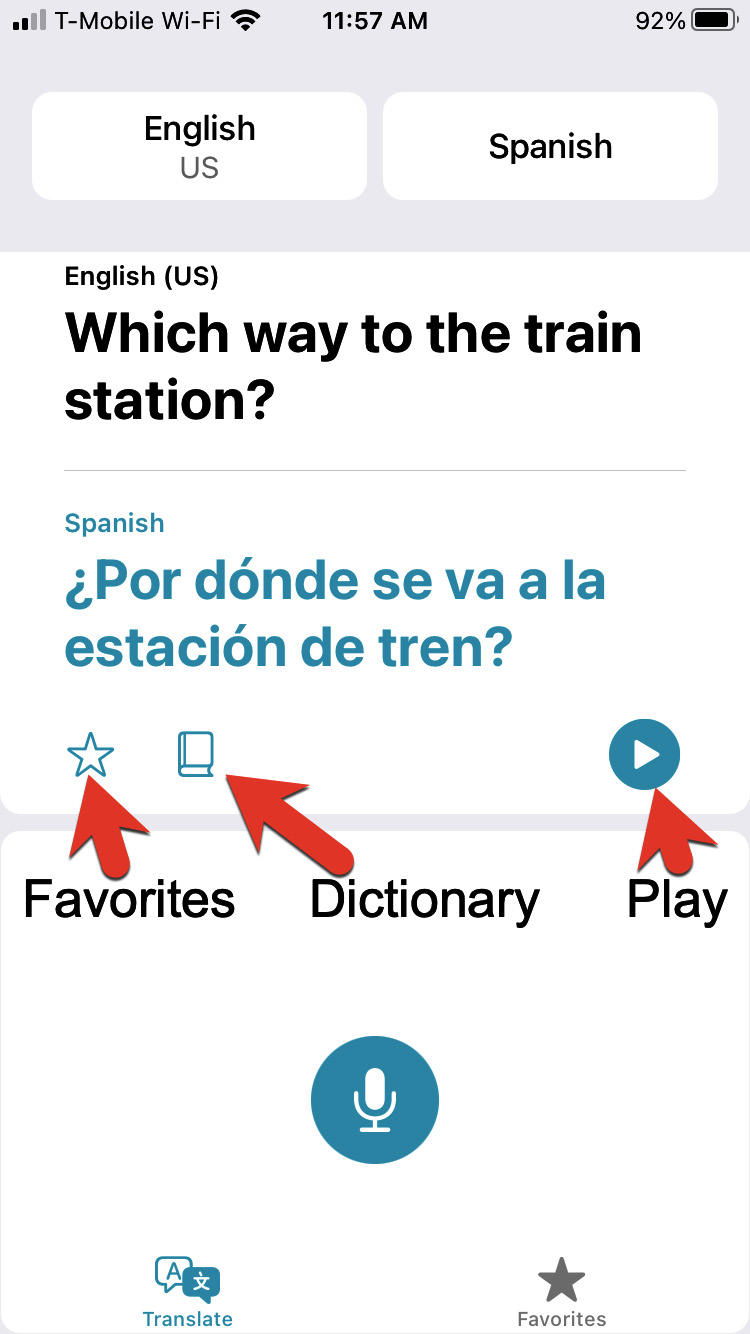
Figure 2.17 – The favorites, dictionary, and play icons
Tapping the Favorites icon stores the translated text in the Favorites category, which you can view at any time by tapping the Favorites icon in the bottom-right corner of the screen.
Tapping the dictionary icon displays the Dictionary pane. Now, you can tap on any word to view its dictionary definition, as shown in Figure 2.18:

Figure 2.18 – The Dictionary pane lets you identify the meaning of each translated word
When you no longer want to use the dictionary, tap the close icon (X) in the upper-right corner of the Dictionary pane.
Tapping the play icon lets you hear Siri speak the translated text out loud. This can be handy for hearing the correct pronunciation of a translated sentence or for playing the translated text to another person.
If you have stored any translations by tapping the Favorites icon, or if you want to view a list of your most recent translations, you can tap the Favorites icon in the bottom-right corner of the screen. This opens the Favorites list as shown in Figure 2.19:
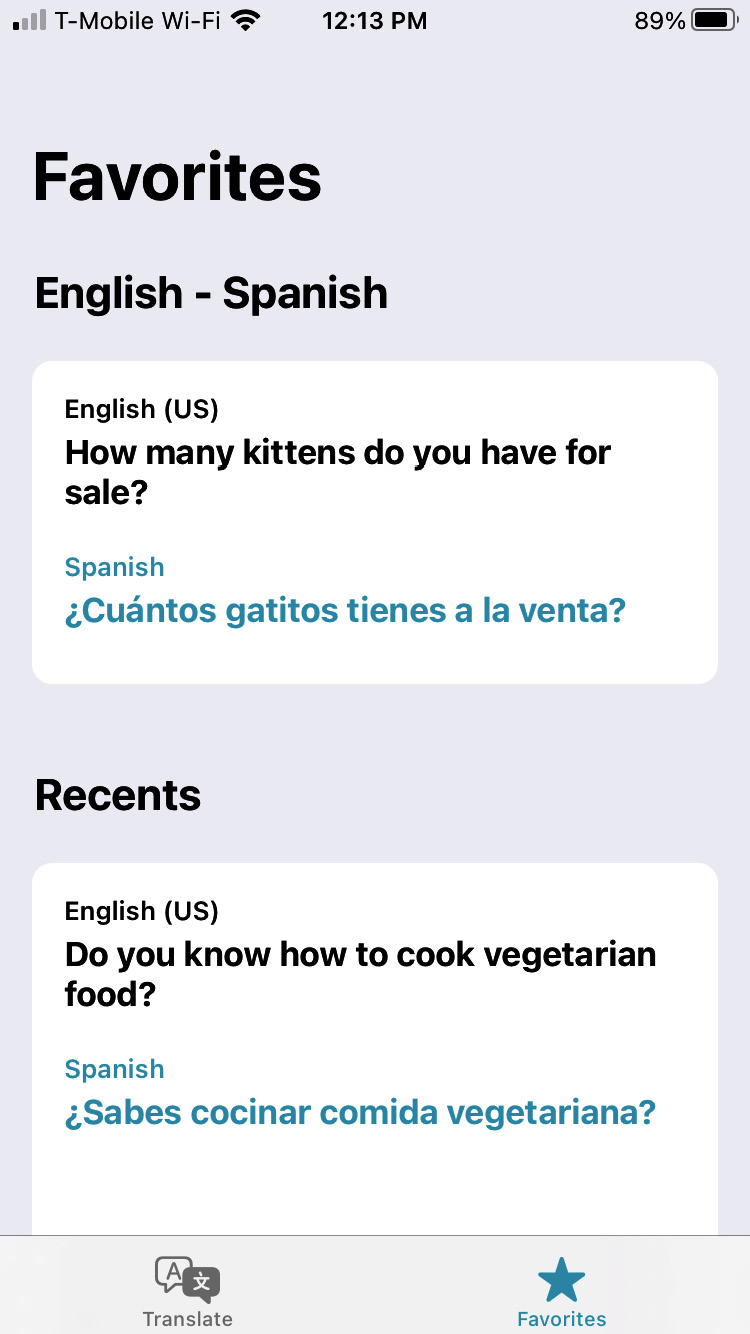
Figure 2.19 – The favorites icon displays all translations marked as favorites plus recent translations
To unmark a translation as a favorite, simply tap on the translation and tap the favorites icon to toggle it off and on.
Using the Translate app in portrait mode can be handy when you need translations for writing or reading. However, when you want to talk to someone who doesn't speak your language, it's easier to use the Translate app in landscape mode (see Figure 2.13):
- Hold your iPhone in portrait orientation, then start the Translate app, and tap the language that you speak (in the upper-left corner of the screen).
- Tap the language that the other person speaks (in the upper-right corner of the screen).
- Tilt your iPhone to landscape orientation. If necessary, tap the Translate button at the bottom of the screen. The screen splits in half to display your spoken words and the translation, as shown in Figure 2.20:

Figure 2.20 – Displaying text and its translation in landscape orientation
- Tap the button in the bottom-left corner that displays arrows pointing in opposite directions. This displays only your translated text to make it easy for someone to read it, as shown in Figure 2.21:

Figure 2.21 – Displaying only translated text
- Tap the button in the bottom-left corner of the screen (which contains two chat icons) to return back to viewing your original text and the translated text side by side.
As an alternative to showing the translated text to others, you can also tap the play button in the bottom-right corner so that Siri can speak the translated text out loud.
By using the Translate app, you can communicate with others who may not speak your language. This can help you both get your thoughts across with a minimal amount of frustration, thanks to the iPhone.
If you plan on using the Translate app often, you'll probably want to move it to a prominent location on your Home screen. For another way to find apps, consider using the App Library, another new feature in iOS 14.
Using the App Library
While you can move and group related app icons around the Home screen, most people don't do that because it's time-consuming. As a result, it's far more common to store apps all over the Home screen and then have a hard time finding exactly which app you want at any given time.
To reduce this problem, iOS 14 offers an App Library, which appears when you swipe left multiple times on the Home screen. The number of left swipes you need depends on the number of Home screens your iPhone has.
The purpose of the App Library is to organize all your apps automatically into related groups with descriptive purposes, such as Social, Utilities, Productivity & Finance, Travel, and Recently Added. In some cases, an app may appear in more than one category, such as the Translate app appearing in the Recently Added and Information & Reading groups, as shown in Figure 2.22:
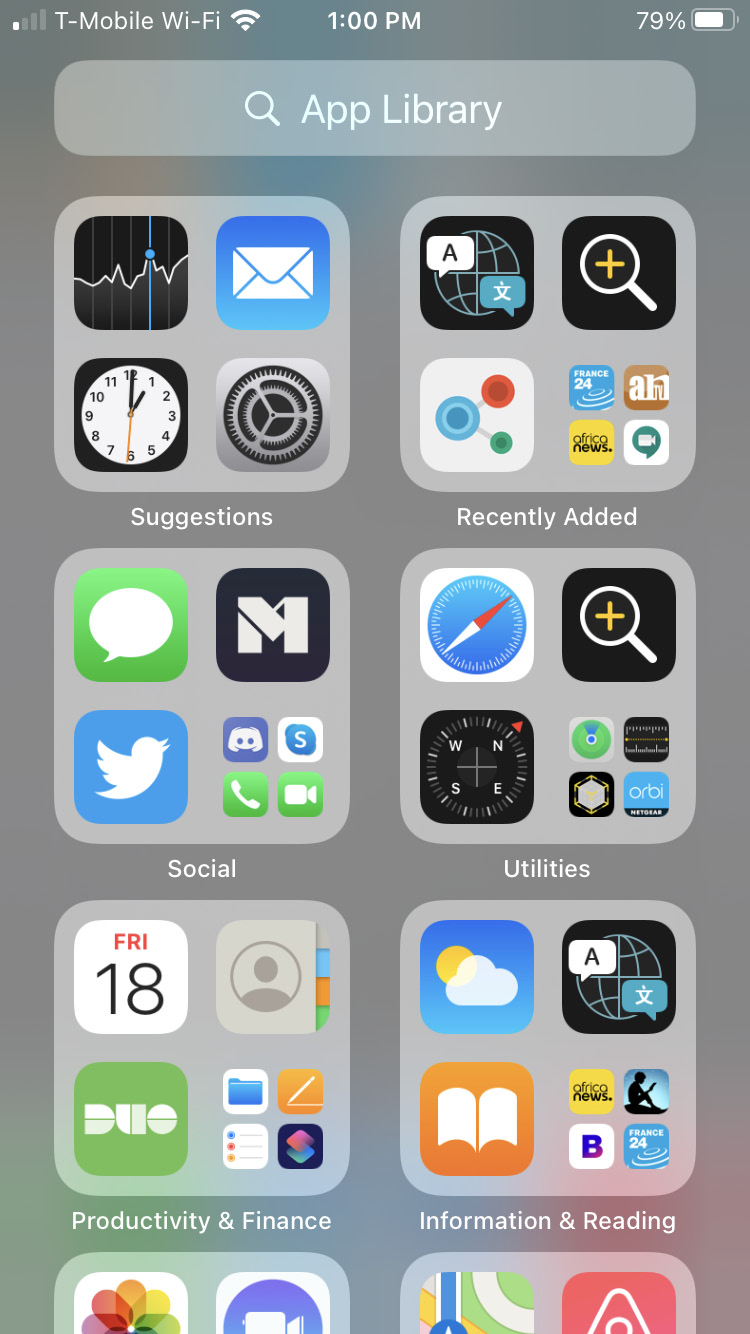
Figure 2.22 – The App Library
By scrolling through the list of App Library categories, you can find and tap on the app you want to use, such as the Translate or Magnifier apps. Since the App Library hides your least-used apps, you won't see all available apps in the App Library.
If you want an app that doesn't appear in the App Library, tap the App Library search field at the top of the screen to display an alphabetical list of all the installed apps on your iPhone, as shown in Figure 2.23:
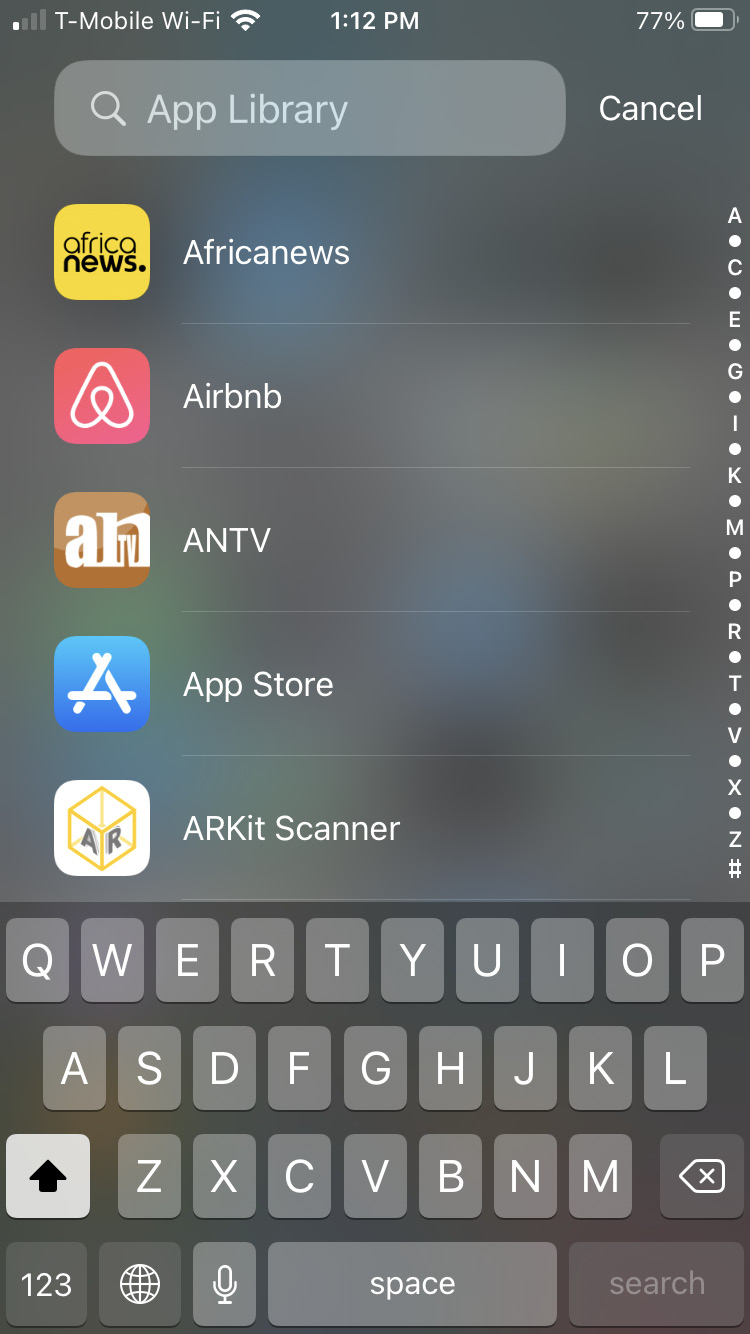
Figure 2.23 – Tapping the App Library search field displays an alphabetical listing of all the installed apps
You can scroll through this alphabetical list of apps and then tap the app name you want to use. As a faster alternative, you can tap on the index that appears on the right. Tapping on an index lets you jump to app names beginning with a certain letter, such as T or R.
You can also type all or part of an app name in the App Library search field. Each time you type another letter, the list of all matching apps narrows, as shown in Figure 2.24:
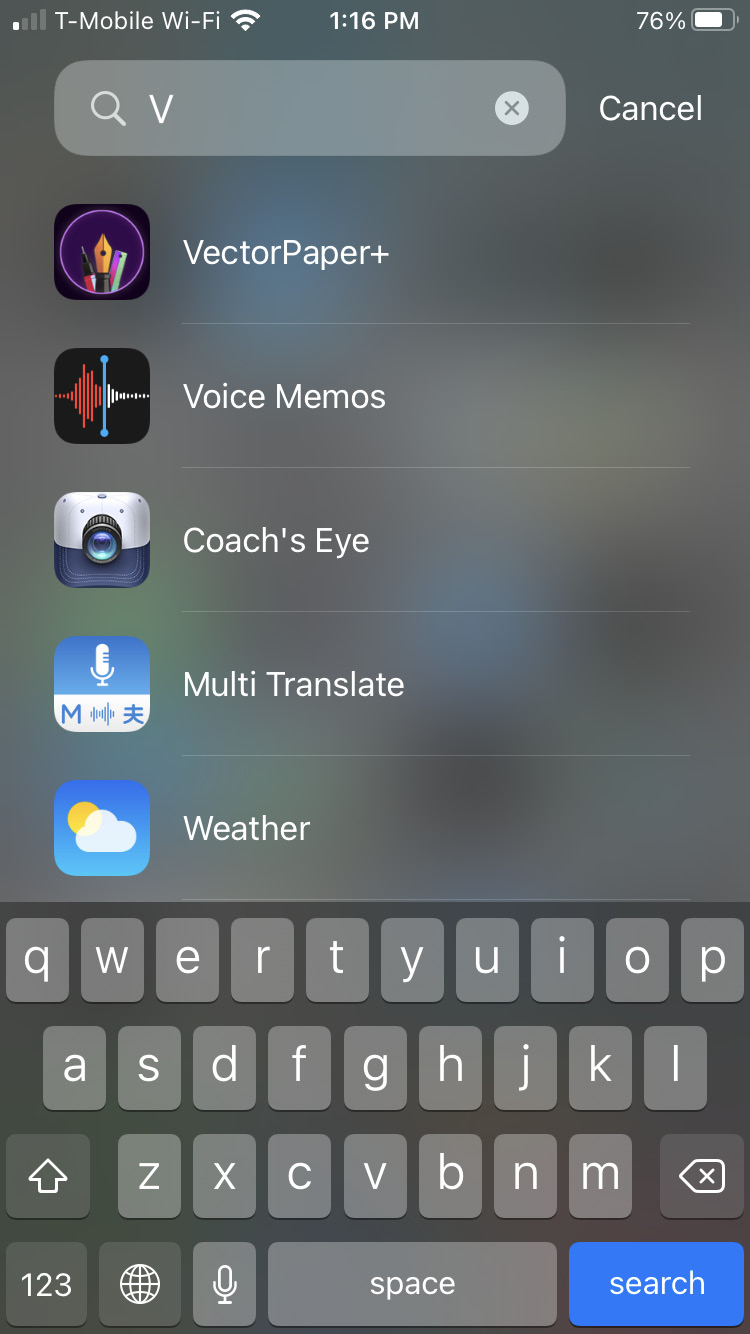
Figure 2.24 – Typing part of an app name helps the App Library display a limited number of apps
When you see the app you want to use, just tap on that app's icon. The App Library gives you both a visual and a textual way to find the app you want to use at any given time.
Summary
Three of the latest features in iOS 14 are the Magnifier app, the Translate app, and the App Library. The Magnifier app can replace reading glasses or magnifying glasses to help you read small print or examine items closely.
The Translate app can help you communicate with someone who may not speak your language. As long as both you and the other person speak and read one of the languages supported by the Translate app (such as German, French, Arabic, Russian, or English), you'll be able to chat and write to each other in the language you're most comfortable writing or speaking.
Finally, use the App Library to help you find an app you want to use. Over time, you gradually add apps faster than you remove them. The end result is that your Home screen winds up getting cluttered with lots of apps that you don't have the time to organize. That's when you can rely on the App Library to organize apps for you automatically or help you find an app by searching for it by name.
For many people, when they get an iPhone, their first task is to customize it by changing background images or choosing different ringtones, and that's what you'll learn how to do in the next chapter.


