


 Download code from GitHub
Chapter 2: Overview of Blender's Sculpting Workflows
This book is about art, so we're going to try not to get too technical about how sculpting works. However, digital sculpting is performed on a computer, and we will have the best experience with the software if we gain a basic understanding of what's going on under the hood. In this chapter, we will identify and explain how Blender's sculpting features work and demystify how each of the sculpting workflows should be used at each stage of the sculpting process.
The sculpting process can be broken up into four separate workflows: Basic Sculpting, Dynamic Topology (Dyntopo for short), Voxel Remeshing, and Multiresolution. Each of these workflows has upsides and downsides. We will learn how to use them at the correct stages of our sculpting projects so that we can maximize the upsides and minimize the downsides. If used appropriately, these workflows will give us artistic control, optimized performance, and final results of the highest quality.
By the end of this chapter, you'll have a good understanding of the components that 3D sculptures are made from and how the computer represents them to us in the 3D Viewport. Additionally, you'll understand how basic sculpting mode works and get a feel for several of the most common sculpting brushes. You'll understand how to use dynamic topology and voxel remeshing workflows to overcome the limitations of basic sculpting mode. Finally, you'll get a glimpse of the multiresolution workflow, which we will learn about, in more depth, in Chapter 5, Learning the Power of Subdivision and the Multiresolution Workflow.
The main topics in this chapter are as follows:
- Understanding the components of a 3D sculpture
- Pushing polys with the basic sculpting mode
- Discovering the limitations of the basic sculpting mode
- Creating dynamic topology with Dyntopo
- Practicing the basics of the Voxel Remesher
- Using the Voxel Remesher in a low-to-high detail workflow
- Exploring the most powerful sculpting mode – multiresolution
Technical requirements
For general requirements, please refer back to the Technical requirements section that was laid out in Chapter 1, Exploring Blender's User Interface for Sculpting.
In this chapter, we will be dealing with high-resolution models, so you will need at least 1GB of RAM available to open some of the example files. Example files for this book can be downloaded from the GitHub link at https://github.com/PacktPublishing/Sculpting-the-Blender-Way.
Understanding the components of a 3D sculpture
First, we're going to learn how 3D sculptures are represented by the computer. Traditional sculpting is often done with clay. Clay is an earthy blobby mess with no real structure; it's just out there waiting for us to play with it and make art! Digital sculpting in software such as Blender tries to capture the creativity and free-form nature of traditional sculpting. However, in digital sculpting, there is an underlying structure that we need to be aware of as artists. Although we like to think of our digital sculptures as clay, they are actually 3D models that are made up of small geometric shapes called polygons. The word polygon refers to a flat shape with multiple corners. Polygons are made up of three main components, as presented in the following diagram:

Figure 2.1 – The components of a polygon
The three main components of a polygon are as follows:
- Vertex (the plural form of the word is Vertices): These are the corners of a polygon; each vertex represents a single point in 3D space.
- Edge: This is a line that connects two vertices, edges make up the sides of a polygon.
- Face: This is the solid inner area of a polygon that forms the visible surface between three or more edges.
A vertex by itself is not a polygon; it has no dimension. An edge can be made between two vertices; however, an edge by itself is not a polygon either. We require at least three vertices and three edges in order to create a polygon. There are three types of polygons that we need to know about to make 3D art:
- The simplest polygons are Triangles (often abbreviated to Tris). Triangles have three vertices, three edges, and one face.
- The most common type of polygons are Quadrilaterals (often abbreviated to Quads). These have four vertices, four edges, and one face.
- Polygons with more than four vertices are known as n-gons. We do not usually use n-gons because they can cause issues with the surfaces of our 3D models.
Collectively, these simple geometric shapes are known as the geometry of the 3D model. When we interconnect all the little pieces of geometry together, they create a mesh. A mesh is the primary type of 3D model that we use when creating 3D models (that includes our sculptures).
We promised not to get too technical in this chapter, so that's plenty of information for now. Let's examine these components in the context of a 3D scene.
Getting ready
Launch Blender and start a new project with the sculpting preset by choosing File | New | Sculpting. We'll start this section by enabling a few viewport overlays that will show us the components of the model in the 3D Viewport.
How to do it…
First, let's enable our Statistics overlay so that Blender will display information about the model:
- Locate the Viewport Overlays pop-over menu in the upper-right corner of the 3D Viewport.
- Click on the little down arrow to open the pop-over menu..
- Check the box labeled Statistics.
Perfect! Now we have some additional information in the upper-left corner of the 3D Viewport, as shown in the following image::
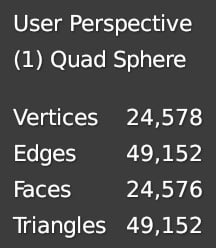
Figure 2.2 – The statistics overlay as seen in the upper-left corner of the 3D Viewport
Here, the name of our active object is displayed. In this example, the object is called Quad Sphere. The statistics for the geometry are displayed beneath the name. These statistics serve as a summary of the model, but we can do better than that. Let's turn on another overlay so that we can view the polygons:
- Open the Viewport Overlays pop-over menu again.
- Check the box labeled Wireframe.
- Use the slider next to the Wireframe checkbox to increase the value from
0.500to1.000so that the full wireframe will be displayed.
Now we can view the little quadrilaterals that the Quad Sphere's mesh is made out of. It should appear similar to the following diagram:
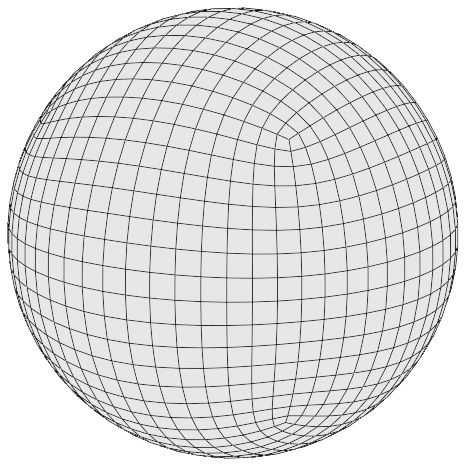
Figure 2.3 – The wireframe of the sphere (this diagram has been simplified for better visibility in this book)
This overlay is helpful when trying to understand how the geometry of the sculpture is arranged. Usually, we don't want to leave it turned on while we're sculpting because it can be a visual distraction. In this chapter, we'll be toggling this overlay on and off several times to help demonstrate what happens to the polygons as we sculpt. For now, we're done with this overlay. Toggle it back off so that we can move on and try out some sculpting tools!
How it works…
As you will have observed from the statistics, the Quad Sphere model has 24,578 vertices, 49,152 edges, and 24,576 faces. That's more information than we need. As a general rule, we only care about the number of polygons, which is referred to as the model's poly count. However, the poly count isn't always the most accurate representation of the complexity of our model. If we divide all of the quads and n-gons into their simplest forms, we will get the number of triangles in the model, which is known as the tri count. Blender includes the tri count for the model in the statistics overlay, so we can see that this model has 49,152 triangles.
That sounds like a lot, right? Wrong! This is actually a relatively low number of polygons when it comes to 3D sculptures. The childHead.blend example model that we explored in Chapter 1, Exploring Blender's User Interface for Sculpting, has 241,200 triangles, and even that is just scraping the surface of how many polygons Blender can handle.
So, why are there so many? Well, it's pretty simple. Triangles are always flat. We can't have a triangle with curved edges. So, we need to combine lots of triangles together to make the model look as though it's made out of clay with smooth round forms. When observed from afar, all of these tiny pieces of flat geometry should look smooth and round.
Some 3D modeling workflows are focused on arranging the geometry into specific patterns that give us good results without requiring many polygons. However, sculpting is designed around allowing us to create the shapes of the sculpture without having to focus on the geometry. To achieve this, the poly count is greatly increased – sometimes, into the millions. Once we have enough polygons, we can push them around with our sculpting tools to make any shape that we like.
Pushing polys with the basic sculpting mode
Your patience has paid off. It's finally time to try out some sculpting tools! In this section, we will discover how the basic Draw brush can be used to push the polygons of the model around to change the shape of the sculpture.
Getting ready
Let's pick up where we left off in the Understanding the components of a 3D sculpture section. We have a fresh file using the sculpting preset, and we have the Statistics overlay turned on.
Since we will be using tools, it would be helpful to expand the Toolbar on the left-hand side of the 3D Viewport so that we can view the names of the tools. Please refer back to the Expanding and collapsing the Toolbar and the Sidebar section of Chapter 1, Exploring Blender's User Interface for Sculpting.
Don't forget to use a graphics tablet as you follow along with the sculpting instructions. Please refer back to the Setting up your graphics tablet's stylus buttons section of Chapter 1, Exploring Blender's User Interface for Sculpting.
Important Note
If you do not have a graphics tablet, you can click with the left mouse button to use brushes instead of pressing down with the pen tip. Additionally, you can use the middle mouse button instead of the upper side button on the pen for navigation.
You might also experience inconsistencies with brush functionality because a mouse has no pressure sensitivity. If your brushes aren't working while using a mouse, check that the pen pressure for Radius and Strength are turned off in the Tool Settings menu.
How to do it…
As you can see in the upper-left corner of the 3D Viewport header, the sculpting preset has already set our Interaction Mode to Sculpt Mode, so we're ready to go! Now we can try out the Draw brush to begin sculpting:
- Locate the Draw brush at the top of the Toolbar.
- The active brush will be highlighted in blue. If the Draw brush is not already active, click on it to activate it.
- Hover your pen over your graphics tablet and align the pointer over the top of the Quad Sphere model.
- Press the tip of your pen onto your graphics tablet to begin drawing on the surface of the Quad Sphere.
Try drawing several brush strokes all over the surface of the model. It doesn't matter what you draw – we're just practicing. You can draw a smiley face, sign your name, or play a game of tic-tac-toe! Fill up the whole surface of the Quad Sphere, just as we've done in the following example:
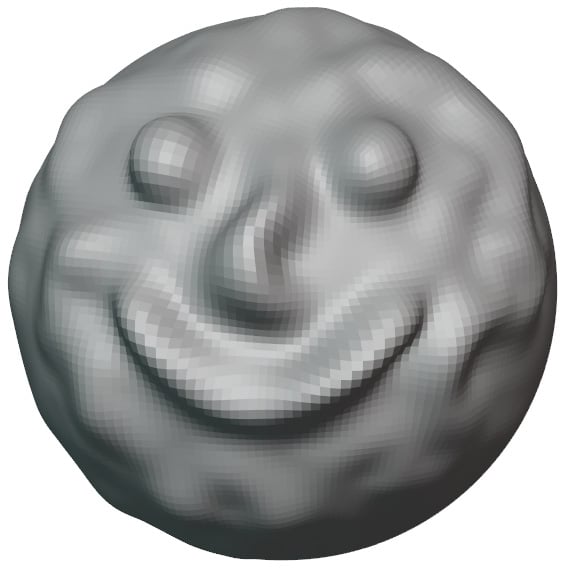
Figure 2.4 – The Quad Sphere after using the Draw brush
Eventually, we will run out of surface area to draw on, so we need to rotate the 3D Viewport around the sculpture so that we can sculpt the other areas of the Quad Sphere. Let's use the upper side button on our tablet pen to orbit around the model:
- Hover your pen over the 3D Viewport (do not press the tip of the pen down – keep it hovering slightly above the surface of the graphics tablet).
- Press and hold the upper side button on your pen (this button should be bound to the middle mouse button).
- While holding the upper side button, drag the pen to orbit around the model until you see an area of the Quad Sphere that you have not yet sculpted on.
- Let go of the upper side button of the pen to stop orbiting.
We will be doing this a lot, so practice this style of navigating until you're comfortable enough to move on. Don't forget that sculpting is a 3D process; we must keep orbiting around our object to sculpt details on all sides.
Additionally, it is important to zoom in and out while working on our sculptures. By default, the size of the Draw brush is relative to the view, so the effective size changes as we zoom in and out. If we zoom far away from our model, we can make very large brush strokes, and if we zoom very close to the surface of the model, we can draw finer details. Let's try this now:
- Hover your pen over the 3D Viewport (do not press the tip of the pen down – keep it hovering slightly above the surface of the graphics tablet).
- Press and hold the Ctrl key on your keyboard and the upper side button on your pen.
- While holding the Ctrl key and the upper side button, drag the pen downward to zoom out far away from the Quad Sphere.
- Let go of the Ctrl key and the upper side button of the pen to stop zooming.
- Use your pen to draw on the quad Quad Sphere.
Notice that because we are far away from the Quad Sphere, our brush strokes have a much larger impact on the sculpture. Next, let's try the opposite.
- While holding the Ctrl key and the upper side button, drag the pen upward to zoom in up close to the surface of the Quad Sphere.
- Let go of the Ctrl key and the upper side button of the pen to stop zooming.
- Use your pen to draw on the Quad Sphere again.
This time, we can make small details with each stroke of the brush.
It's very common to zoom out and increase the brush size while working on larger forms and, conversely, to zoom in and decrease the brush size while working on smaller details. However, zooming in and out isn't the most practical way to change the brush size. Quite often, we will want to change the brush size without changing our view.
Let's learn how to adjust the brush settings. Take a look at the Tool Settings section in the header of the 3D Viewport. Most of the settings we require are easily accessible from here:

Figure 2.5 – The Tool Settings section for the Draw brush
The size of the brush is determined by the Radius setting. By default, the radius of the Draw brush is set to 50 px. This radius unit is relative to the view, so 50 px means that the brush radius is 50 pixels on our screen. You can change the size of the brush by clicking and dragging the Radius slider.
This is simple enough, but we have a bit of a disadvantage to using this slider. We aren't able to easily view the size of the brush while we're adjusting it. Let's learn a hotkey for adjusting the brush radius instead:
- Hover your pen over the 3D Viewport before pressing the following hotkey.
- Press the F hotkey to begin changing the brush radius.
- Drag your pen to the left to decrease the radius, or drag your pen to the right to increase the radius.
- When you've got a brush radius you like, tap your pen down onto the graphics tablet.
Wasn't that easier than using the slider? Having this visual feedback while we adjust the brush size speeds up our workflow.
The next brush setting that we can adjust is the Strength setting. The strength determines how intense the brush effect will be. With a strength of 0.000, we will have no intensity at all, and the brush will do nothing. With a strength of 1.000, our brush will be at full intensity. Most brushes in Blender default to half strength, 0.500, which we can see in the Tool Settings at the top of the 3D Viewport.. So far, we've been using the Draw brush at half strength, so let's try turning it up to full:
- Click and drag the Strength slider to increase the intensity of the brush to
1.000. - Use your pen to draw on the Quad Sphere again.
Notice how we can raise the polygons twice as high now? Being able to adjust the strength is very useful, but we're not done yet. There is a pressure icon next to the Strength slider. By default, this button is turned on. But what does it do? While this feature is toggled on, we can control the intensity of our brush by varying the pressure on our pen tablet. Let's try it.
- If the pressure button isn't already highlighted blue, click on it to activate the strength pressure.
- Use your pen to draw on the Quad Sphere.
- While drawing, press your pen harder against your graphics tablet to increase the intensity of the brush.
Pen pressure can be modulated as much as you like during brush strokes. This gives us a lot of control over our brush strokes, and it is one of the main reasons we use graphics tablets for sculpting instead of a mouse. Just like adjusting the radius, we can also use a keyboard shortcut to adjust the brush strength.
- Hover your pen over the 3D Viewport before pressing the following keyboard shortcut.
- Press the Shift + F keyboard shortcut to begin changing the brush strength.
- Drag your pen to the left to decrease the strength, or drag your pen to the right to increase the strength.
- When you've got a brush strength that you like, tap your pen down onto the graphics tablet.
The Draw brush behaves in a pretty straightforward manner. As we draw, it raises the surface of the model upward, but it can also be used to press the surface inward if we reverse the direction of the brush. The Direction of the brush is represented by the little + and - buttons in the Tool Settings at the top of the 3D Viewport.. Currently, the direction is set to Add, as indicated by the blue highlight on the + button. Let's try changing it to Subtract.
- Locate the + and - buttons in the Tool Settings section of the 3D Viewport header.
- Click on the - button to change the brush direction to Subtract.
- Use your pen to draw on the surface of the Quad Sphere model.
Excellent! Now we can subtract from the model to create grooves in the surface. Once again, we have a hotkey that we can use instead of having to reach up to the Tool Settings.
- Hold the Ctrl key to temporarily invert the brush direction.
- While holding Ctrl, use your pen to draw on the surface of the Quad Sphere model.
- Let go of the Ctrl key to return to the original brush direction.
Very good. Since the Ctrl key makes switching direction very accessible, we should switch the Draw brush direction back to its default direction to avoid confusion. Switch the direction to Add by clicking on the + button in Tool Settings.
There are, of course, other brush settings, but we'll save those for later.
How it works…
Customizing our brush settings gives us a lot of control over how each brush feels. A large radius will allow us to make very large changes to the sculpture, while a small radius is helpful for smaller details. We tend to change brush radius very often while sculpting, so you should get used to using the F hotkey.
Strength is also important for getting our brush to behave exactly the way we want. When combined with pressure, the strength setting works as an upper bound to how intense the brush stroke will be. If strength is set to 1.000, then we will get full intensity while pressing firmly on the tablet. If it is set to 0.500, then we will max out at half intensity while pressing firmly on the tablet. Since we are using a graphics tablet with pressure sensitivity, we can usually keep the strength around 0.800 and press firmly or less firmly to get the intensity we like. Feel free to adjust the strength whenever you need to; just don't set it to 0.000 because no strength means that the brush will have no effect at all.
The direction of the brush gives us quick access to move the surface inward and outward with a single toggle. This gives each brush dual functionality and opens up a lot of possibilities. Some of the advanced brushes don't have a direction, but they can still be toggled to a secondary function while we hold the Ctrl key.
There's more…
Everything we did in this section utilized the basic sculpting mode. In this mode, the brushes push around the geometry to modify the shape of the model. If you read the information in the statistics overlay, you'll notice that the tri count of the Quad Sphere stayed exactly the same while we used the Draw brush. That's because basic Sculpt Mode can only modify the polygons that we already have; it does not create or remove polygons.
The basic Sculpt Mode is useful for all types of modeling. We can temporarily hop into basic sculpting mode and push the polygons around, then hop back out of the Sculpt Mode once we've made the changes we like. However, for the purposes of this book, the basic sculpting mode runs into limitations very quickly. So, what happens when we need more polygons? For that, we require a more advanced sculpting mode, which we will learn about in the next section.
Discovering the limitations of the basic sculpting mode
So far, we've only made changes to the surface details of the Quad Sphere using the Draw brush. These changes are pretty cool, but the whole thing still just looks like a sphere with some details on it because the major forms haven't changed. We can think of the major forms of a model as large building blocks. If you squint and look at any object, you can roughly block it out into its major forms: cubes, spheres, cylinders, the head, the neck, appendages, protrusions, horns, the nose, eyeballs, and more.
The Draw brush is not well suited to making new major forms, so we will require a new kind of brush – one that pushes the polygons around in a very different way. In this section, we will try out the Snake Hook brush to begin creating new major forms on our sculpture.
Getting ready
In this section, we can either start with a new sculpting project or pick up where we left off in the Pushing polys with the basic sculpting mode section. If you start a new file, make sure that you turn on the statistics overlay so that you can see the tri count.
How to do it…
Let's try using the Snake Hook brush to create new major forms on our Quad Sphere:
- Locate the Snake Hook brush from the Toolbar.
- Click to activate the Snake Hook brush.
- Increase the brush Radius setting to around
250 px. - Hover your pen over your graphics tablet and align the pointer over part of the Quad Sphere model.
- Press the tip of your pen onto your graphics tablet to begin using the Snake Hook brush.
- Draw in an outward direction from the Quad Sphere to pull a piece of the sphere outward.
The Snake Hook brush is much better at moving around large areas of the sculpture than the Draw brush. Your results should appear similar to the following diagram:
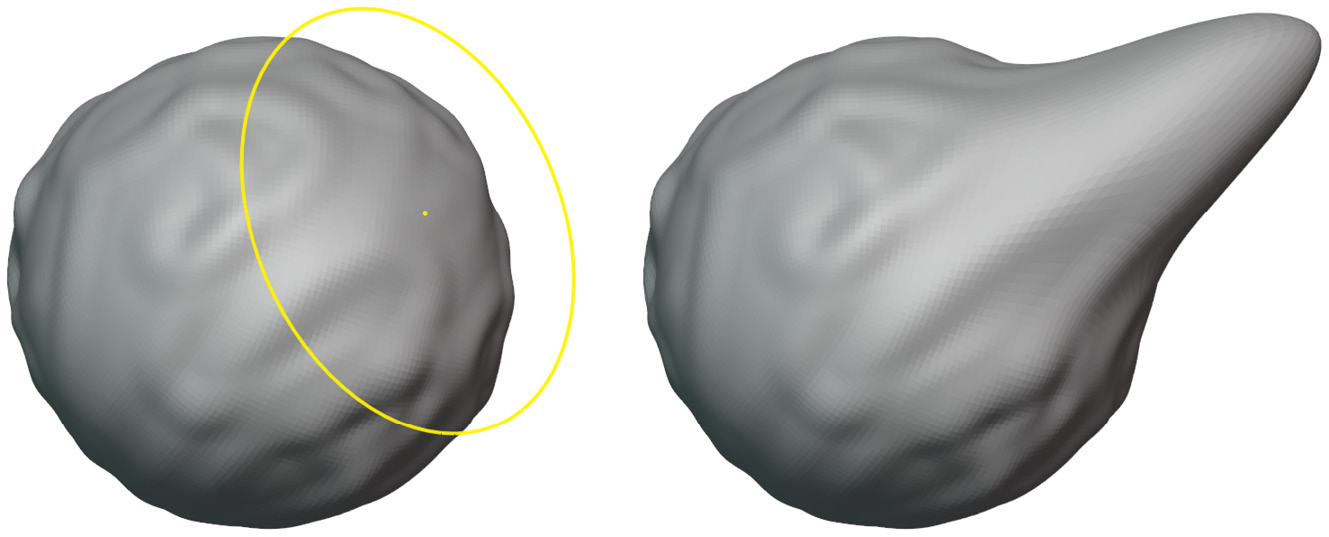
Figure 2.6 – The Snake Hook brush used to pull out a new segment of the Quad Sphere
Pretty cool! But we're starting to run into a problem. As we discovered in the Pushing polys with the basic sculpting mode section, the basic Sculpt Mode can only push around polygons that already exist in the model. The polygons of our Quad Sphere are getting a bit stretched out. To better visualize how stretched out these polygons have become, let's turn on the wireframe overlay:
- Open the Viewport Overlays pop-over menu.
- Check the box labeled Wireframe.
- Use the slider next to the wireframe checkbox to set the wireframe value to
1.000.
The polygons of the Quad Sphere will now be visible. They should appear similar to the following diagram:
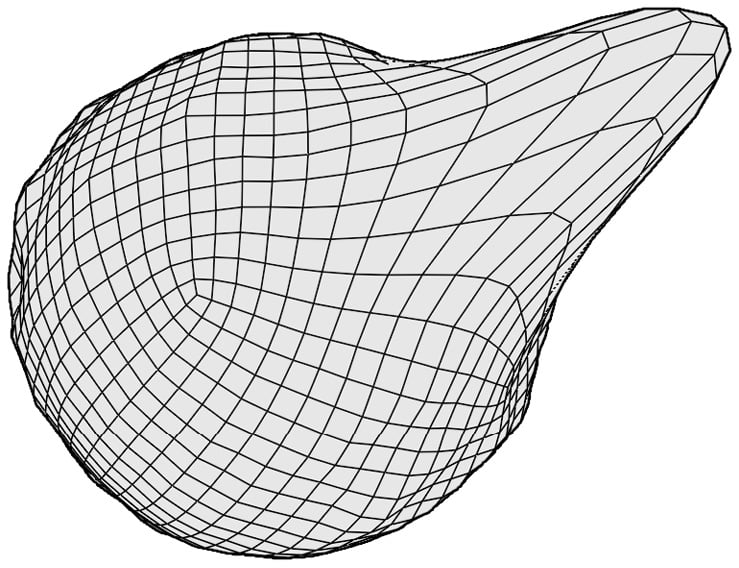
Figure 2.7 – The wireframe after using the Snake Hook brush (this diagram has been simplified for better visibility in this book)
Notice how the protrusion we created has led to large, stretched-out polygons? The further we pull these polygons away from the Quad Sphere, the more stretched out they will become.
So, let's examine what happens if we try taking this even further. Let's make a curvy shape using the Snake Hook brush:
- Use the Snake Hook brush to extend the protrusion further.
- As you draw, try making a curvy, swoopy S-shaped pattern.
You've probably noticed the problem by now. Our polygons have become so stretched out that they can't represent this shape properly, as you can see in the following diagram:
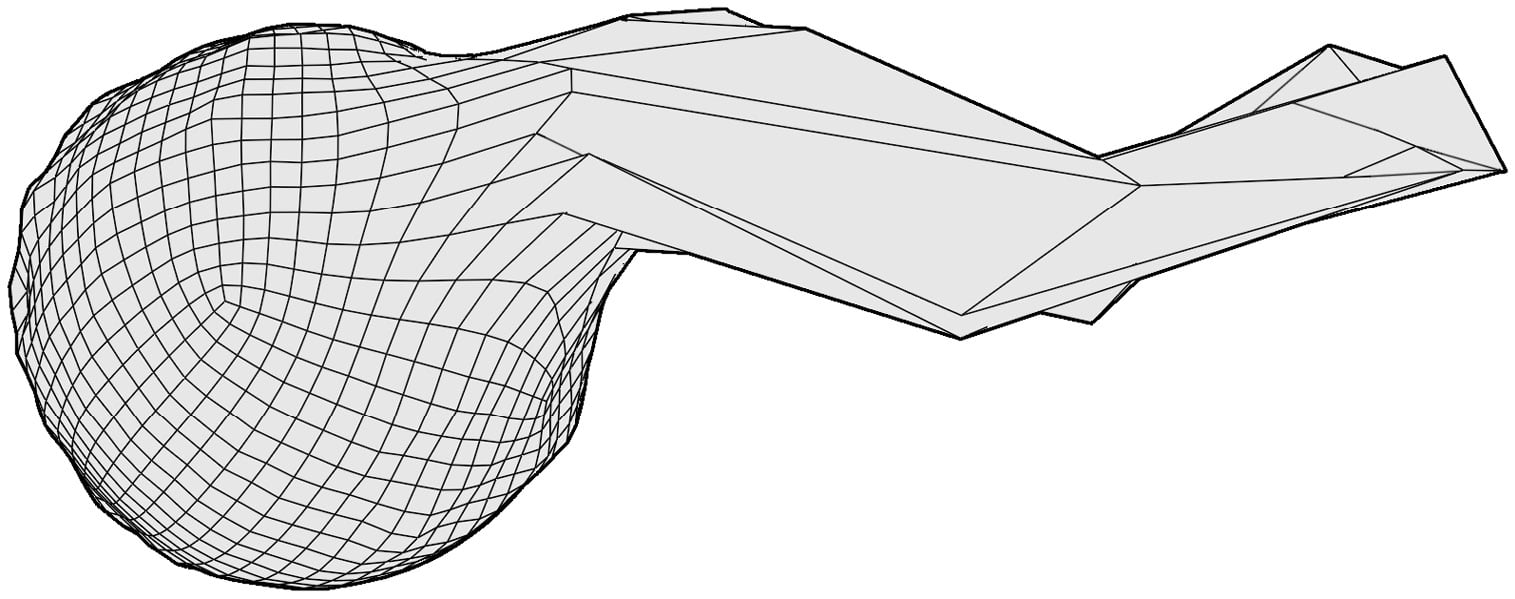
Figure 2.8 – The wireframe after making a curvy segment with the Snake Hook brush (this diagram has been simplified for better visibility in this book)
Oh, no! We ruined it. The Snake Hook brush did not play nicely with the polygons of our Quad Sphere. This is a major limitation of the basic sculpting mode. If we try to add new major forms to our models, we will end up with ruined, stretched-out geometry.
Stretched-out geometry such as this will always produce bad results in our finished sculptures. If you start to observe this happening to your sculptures, it means we are pushing the polygons too far. We need to do something else if we are going to overcome this limitation of the basic sculpting mode.
Creating dynamic topology with Dyntopo
As we discovered in the Discovering the limitations of the basic sculpting mode section, the basic sculpting mode doesn't work very well for introducing new major forms in our sculptures. But that's no good. How can we make beautiful art if we're stuck with a boring sphere? To solve this problem, we will have to learn a little bit about topology.
Topology is a term we use to describe how all the geometry of a mesh is interconnected. This Quad Sphere is made up of quadrilaterals that form a clean and simple set of grid patterns. The grid patterns in the Quad Sphere are arranged nicely to create a smooth sphere shape. One way to think about this is to say that the topology for this mesh wants to be a sphere. Of course, topology is not a living thing and can't truly want anything, but it can still be helpful for us to think of it in this way. The problem we ran into in our previous example is that the topology doesn't want to have a protrusion coming out of it – it's trying to stay a sphere.
So, if we want to introduce a new major form to this mesh, we need some way of adjusting the topology so that it will support the new major form we are trying to add.
One easy-to-use solution that we can try is called Dynamic Topology (Dyntopo). Dyntopo is a feature that will dynamically update our sculpture's topology to fit the new shapes that we sculpt into the model. Dyntopo comes with its own set of limitations; however, before we concern ourselves with that, let's play around with it and have some fun.
Getting ready
We ruined our Quad Sphere in the Discovering the limitations of the basic sculpting mode section, so let's start over with a new sculpting project from the sculpting preset by choosing File | New | Sculpting. Turn on the statistics overlay again so that we can observe what happens to our topology as we work.
How to do it…
We're going to try out the Snake Hook brush again. However, this time, we will first enable the Dyntopo feature:
- Locate the Dyntopo options in the upper-right corner of the 3D Viewport header.
- Click the checkbox to activate dynamic topology.
- Click on the Dyntopo option next to the checkbox to open the pop-over menu.
- Change the Detail Size setting to
8.00 px.
You can view the Dyntopo settings in the following screenshot:
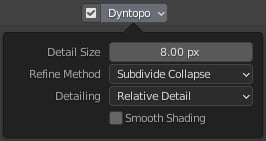
Figure 2.9 – The Dyntopo pop-over menu
Now, let's try the Snake Hook brush again with this new sculpting mode enabled:
- Click on the Snake Hook brush in the Toolbar to activate it.
- Set the Radius setting of the brush to
250 px. - Use the Snake Hook brush to pull a piece of the quad sphere outward.
- As you draw, try making a curvy, swoopy S-shaped pattern.
That's looking much better than our previous attempt. Your result should appear similar to the following diagram:
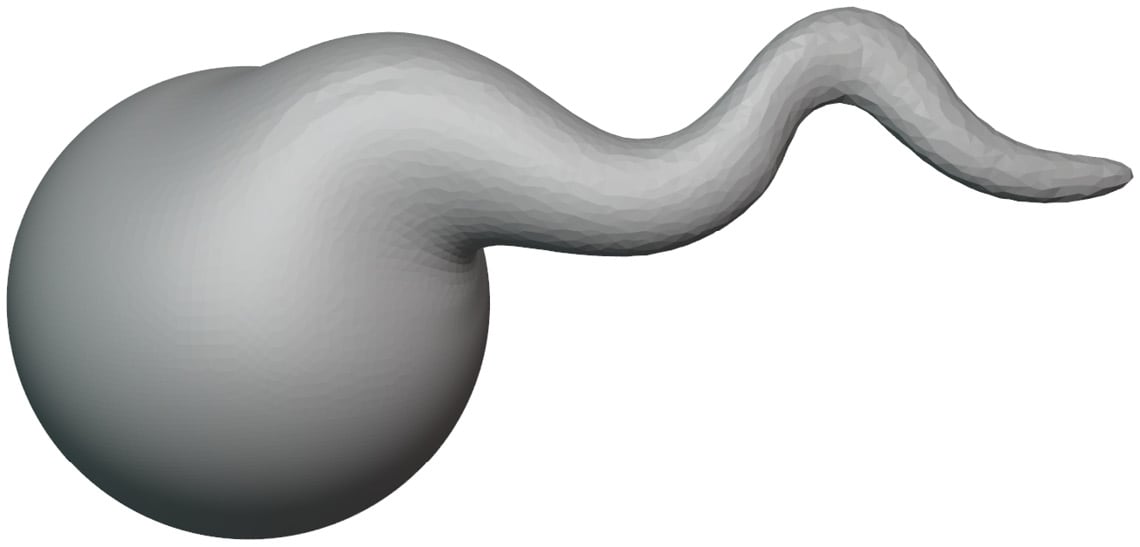
Figure 2.10 – The curvy segment we created with the Snake Hook brush and Dyntopo
Because we are using the Dyntopo feature, the topology of the Quad Sphere was altered when we used the Snake Hook brush. Let's turn on our statistics and wireframe overlays so that we can find out what happened:
- Open the Viewport Overlays pop-over menu.
- Check the box labeled Statistics.
- Check the box labeled Wireframe.
- Use the slider next to the Wireframe checkbox to set the wireframe value to
1.000.
Your sculpture should appear similar to the following diagram:
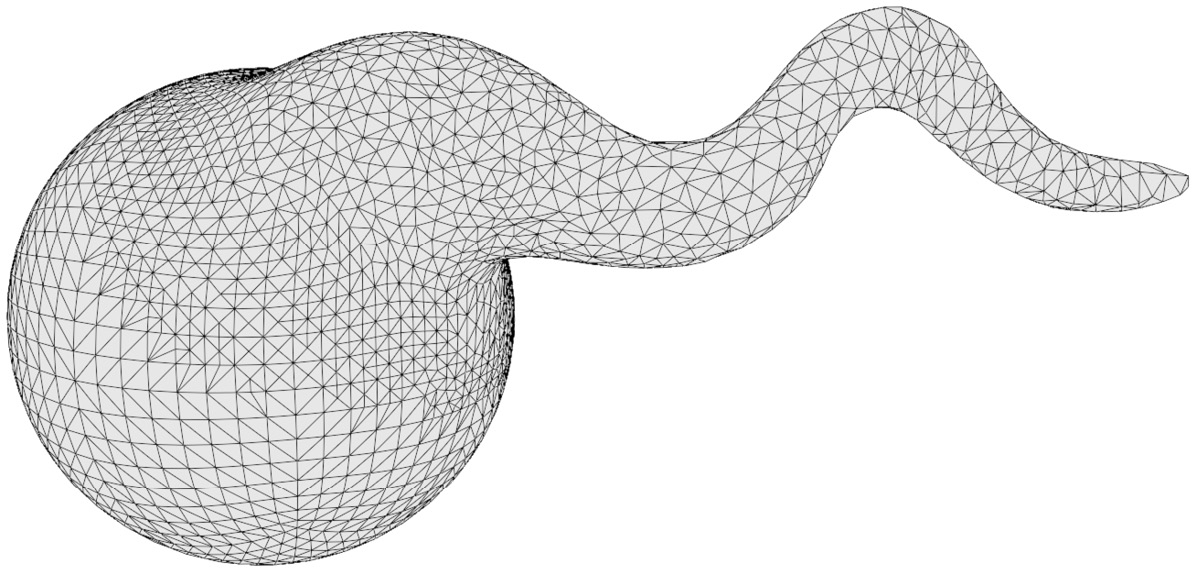
Figure 2.11 – The wireframe after making a curvy segment with the Snake Hook brush and Dyntopo (this diagram has been simplified for better visibility in this book)
Isn't that interesting? Dyntopo has created new polygons to support the curvy protrusion that we just made. Go ahead and have some fun with this sculpting mode before moving on.
How it works…
Dyntopo is able to detect when our polygons are becoming too stretched out. When the edges of the polygons exceed the detail size we specified in the pop-over menu, new polygons are created to support the new shape. The technical term for this is tessellation.
Check the statistics: how many triangles did you end up with? In our example, we got 48,302. That's actually fewer than our original tri count of 49,152 because Dyntopo didn't just add polygons that we needed for our curvy shape, it also removed polygons that were no longer needed. This is because Dyntopo is using a Refine Method setting called Subdivide Collapse. These settings can be customized further to get exactly the effect you're looking for.
Take note of the fact that the arrangement of our topology is more important than the exact number of polygons. Greater or fewer polygons don't inherently mean we can create new major forms. We must support our new shapes with topology that wants to be the shape we are trying to make.
There's more…
This book would have been incomplete if we hadn't covered the Dyntopo feature, but admittedly, this feature has fallen out of favor in the Blender community because it has many downsides:
- Sometimes, the surfaces can fracture into scattered triangles that create holes and other issues with the surface of the mesh.
- It has the poorest performance of all the sculpting workflows and our computers will often slow down while performing highly detailed work.
- We cannot join separate pieces of geometry together.
- If we aren't careful, we can accidentally remove details from our sculptures that are too small for our current detail size.
- The tessellation creates lumpy surfaces that don't look very pleasing in a final model.
- The density of the polygons varies throughout the model. Areas of high detail have tiny polygons, while areas of low detail have very large polygons. This uneven polygon density can make it difficult to sculpt details into the model's surface.
For these reasons, we do not recommend that you utilize the Dyntopo feature for most of your sculpting workflows. It's fun while we're getting started, and it works well with the Snake Hook brush, but the flaws of this feature become very apparent when we get into high detail work.
Don't worry, though. Next, we will learn about an alternative feature that we can use to adjust the mesh of our sculptures while we work.
See also
Much of the information presented throughout this chapter is directly informed by the lead developer behind Blender's sculpting features: Pablo Dobarro. If you would like to view his original presentation on these sculpting workflows, please check out The new sculpting workflow in Blender - Pablo Dobarro, which is available on the official Blender YouTube channel at https://www.youtube.com/watch?v=lxkyA4Xslzs.
This presentation is a few years old and is presented from a highly technical standpoint. However, if you would like to view the techy inner workings of the software, there's no better resource than this.
Practicing the basics of the Voxel Remesher
We've learned about the importance of topology in relation to the shape of our sculptures. We understand that we can only push polygons around a short distance before they become too stretched out to properly represent the shape we are trying to make. In the Creating dynamic topology with Dyntopo section, we discovered one solution to this problem, but it was riddled with little issues that would make our workflow very difficult later down the line.
In this section, we will explore a better alternative for adjusting the topology while we sculpt. Blender has several methods for analyzing a mesh to determine which polygons are necessary to support any given shape. After analyzing the shape of a model, Blender can replace the original polygons with a completely new set of polygons to create a new mesh that better fits the shape we are trying to represent. This process is known as Remeshing.
There are several types of remeshing, but for sculpting, we require a really fast method. Luckily, we have an almost instantaneous type of remeshing called Voxel Remeshing. Voxels are three-dimensional volume elements, which is a nerdy way of saying: voxels are little cubes.
If we analyze a sphere, we can visualize its volume as being filled with little cubes. This tends to make our objects look extremely blocky, so we can follow it up by smoothing out all of the corners of the voxels, which will give us a nice new mesh. You can see a visualization of this process in the following diagram:
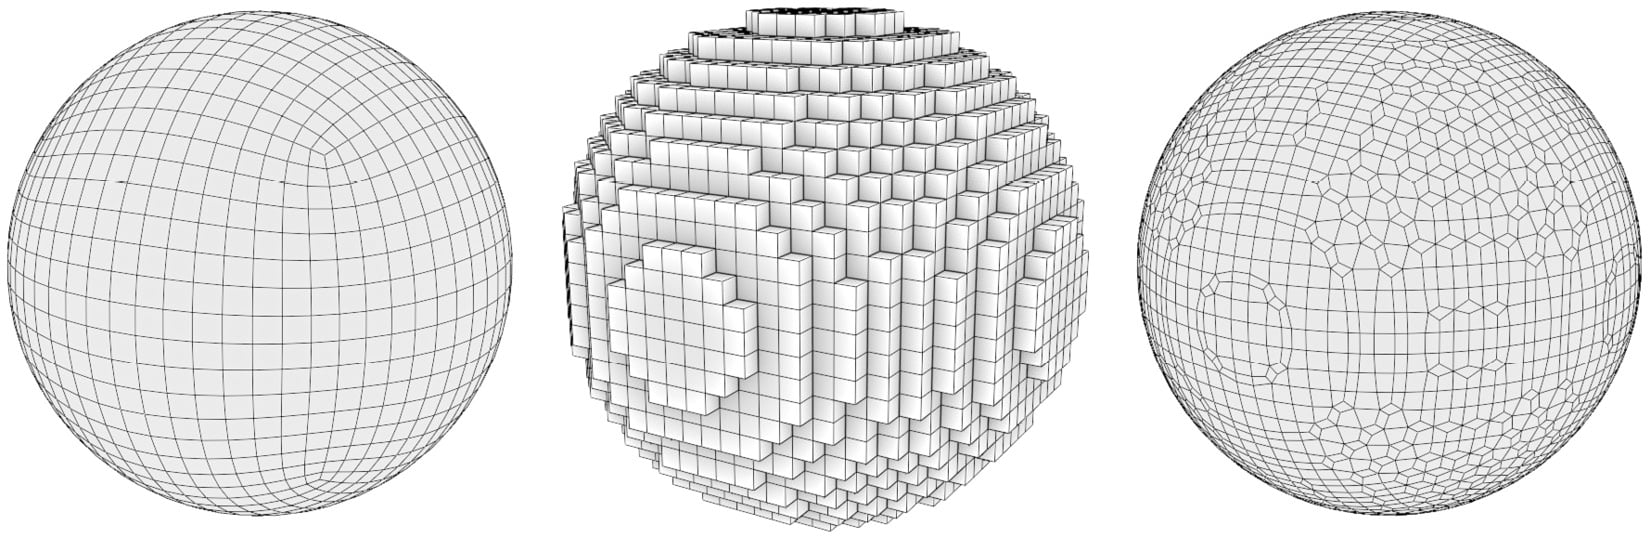
Figure 2.12 – The original Quad Sphere on the left-hand side, converted into voxels in the middle, and smoothed out into a new sphere-shaped mesh on the right-hand side
This process works for any shape. It's also extremely fast, so we can voxel remesh our sculpture as often as we need to. Let's try it out.
Getting ready
The Voxel Remesher utility will work with any object, but working with a sphere is boring, so let's try it with an example file. Download the devilishlyHandsomeGuy.blend example file from the GitHub repository at https://github.com/PacktPublishing/Sculpting-the-Blender-Way/blob/main/Chapter02/devilishlyHandsomeGuy.blend.
Once you've downloaded the example file, open it in Blender by either double-clicking on the file or dragging the file into the Blender window and choosing Open. Inside this file, you'll find a sculpture of a devilishly handsome guy, which you can see in the following diagram:
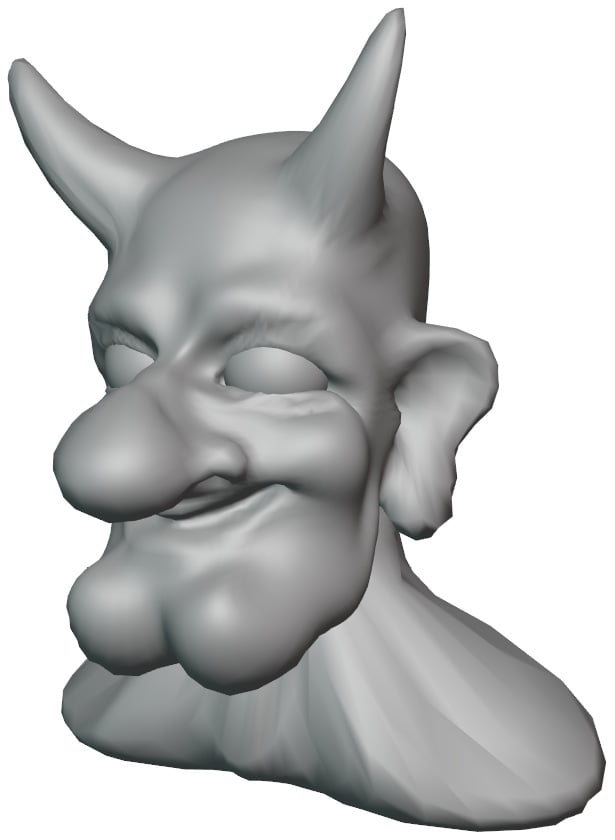
Figure 2.13 – The devilishly handsome guy
This character has been sculpted out of a basic Quad Sphere. The topology of this model is being stretched too far apart, which is causing issues. Notice how the shading around the neck, the base of the horns, and the ears have become blocky and distorted? This is a clear sign that the polygons have been stretched too far.
It's not just a shading issue; we don't have enough polygons in these areas to keep sculpting new details on this character. So, let's practice using the Voxel Remesher on this character to create new polygons and solve these issues.
How to do it…
Start by turning on the wireframe overlay so that we can see what the topology of the model looks like before and after we remesh it. As we can observe in the following diagram, the topology of this devilishly handsome guy has been stretched:
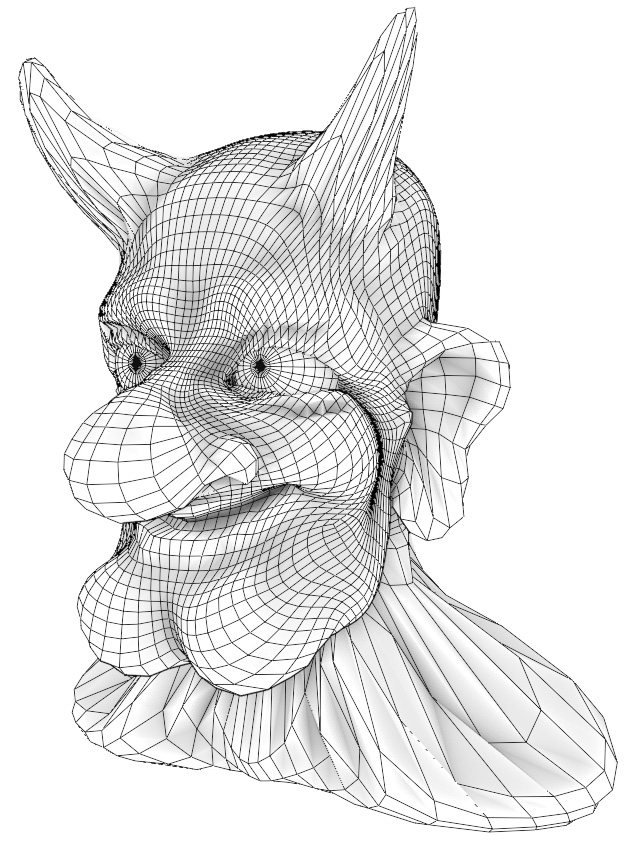
Figure 2.14 – The devilishly handsome guy before remeshing (this diagram has been simplified for better visibility in this book)
Take a look at the nose, horns, neck, shoulders, ears, and chin. These areas have all been stretched way too far. This character will greatly benefit from some extra polygons. Let's fix this now:
- Locate the Remesh options in the upper-right corner of the 3D Viewport header.
- Click on Remesh to open the pop-over menu.
Here, we can view the settings for the Voxel Remesher:

Figure 2.15 – The Remesh pop-over menu
To get a good result, we must choose a voxel size that can capture the details of the sculpture. If our voxel size is too high, we will lose details. If our voxel size is too low, we will have too many polygons and our sculpture will be difficult to work with. Luckily, we don't have to guess which size to use; we can use the eyedropper tool to pick a size from the model.
- Click on the eyedropper icon next to the Voxel Size setting.
- Use the eyedropper to click on an area of the model that isn't stretched too thin; the character's forehead is a good choice.
- Open the Remesh pop-over menu again.
You'll notice that the Voxel Size setting has been updated to match the size of the polygons on the character's forehead, which is
0.087872 min our example. (Don't worry about getting this number exactly right; it just has to be close.) Now, we can run the Voxel Remesher to generate new polygons. - Click on the Remesh button at the bottom of the pop-over menu.
You can view how our example turned out in the following diagram:
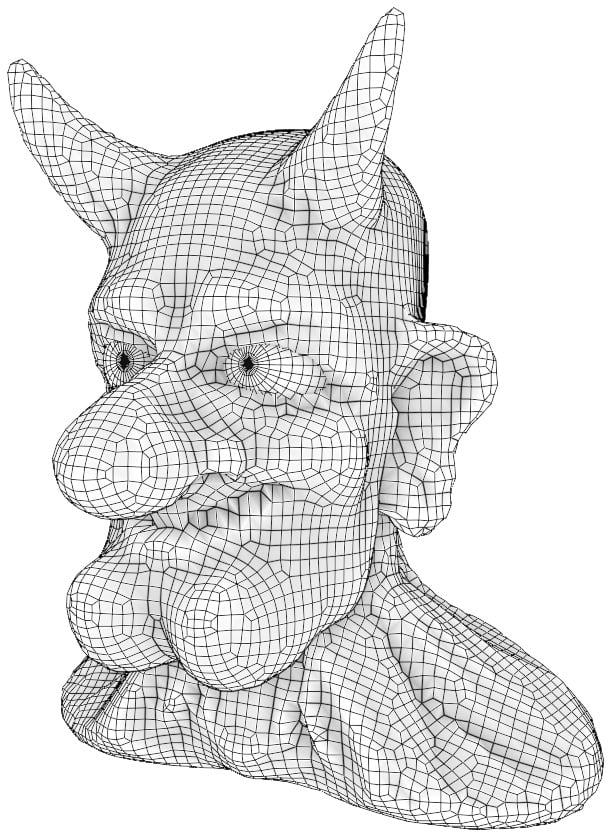
Figure 2.16 – The devilishly handsome guy after remeshing (this diagram has been simplified for better visibility in this book)
Excellent! The character has a fresh set of polygons for us to work with!
How it works…
The Voxel Remesher is the preferred method for many artists in the Blender community since it avoids many of the downsides from Dyntopo, but it still allows us to update the topology of the model to fit the shape while we work. The only real downside of the Voxel Remesher is that we have to manually run the remesher to update the geometry. This makes the Snake Hook brush slightly harder to use. Other than that, this method is better for an optimized workflow.
This character might look a little blocky now, but that's actually a good thing. When working with the Voxel Remesher, we are meant to start sculpting the major forms that have a low level of detail. As we make changes to the major forms, we can run the Voxel Remesher over and over again each time our polygons become stretched out.
Unfortunately, some of the details in this character didn't turn out very well. The mouth ended up pretty blocky because the voxel size we used wasn't small enough to represent that shape. Also, the neck has become somewhat distorted. This is because the original polygons in the neck were stretched so far that the Voxel Remesher couldn't really make sense of them. Problems such as this can easily be smoothed out, but this character really should have been remeshed earlier in the sculpting process to avoid these issues.
In the next section, we will gain additional practice with using the Voxel Remesher at the correct time and with the right detail size to avoid these issues.
Using the Voxel Remesher in a low-to-high detail workflow
Sculpting is an artistic process. In a lot of ways, it is similar to drawing. When we are trying to draw a character, we don't start with the finer details such as the nostrils, the anatomy of the ear, the individual hairs of the eyebrows, or anything like that. First, we block out the major forms, then work our way to finer and finer details. It's the same with sculpting.
The Voxel Remesher is meant to be used in this same way. Typically, we start with the voxel size set very large so that we are working with just a few polygons while we block out a shape. Then, when we don't have enough polygons to represent the forms we are trying to create, we reduce the voxel size and run the remesher again.
In this section, we will practice this workflow and learn a few hotkeys that can help us.
Getting ready
We're going to start this section from scratch. Launch Blender and create a new project with the sculpting preset. Once the new project has been created, we can practice with the Voxel Remesher workflow.
How to do it…
This time, we're not going to use the eyedropper to sample a voxel size from the model. Instead, we can set the voxel size by using a keyboard shortcut:
- Hover your pen over the 3D Viewport before pressing the following keyboard shortcut.
- Press the Shift + R keyboard shortcut to begin changing the voxel size.
A visualization of the voxel size will appear over the model, as you can see in the following screenshot:

Figure 2.17 – The voxel size can be visualized using this grid pattern
- Drag your pen to the left to increase the voxel size to around
0.2500. - Tap your pen down onto the graphics tablet to confirm the new voxel size.
Perfect! Increasing the voxel size also increases the size of the polygons that will be generated when we run the Voxel Remesher. This also means we will have fewer polygons, which, in this case, is a good thing. Having fewer polygons will make the sculpture easier to work with while we block out the largest of our major forms.
Important Note
Be careful with this setting – if you set the voxel size too low, it will take a very long time for your computer to calculate the new mesh. Usually, we don't need to go any lower than 0.01 m. If you try to use the Voxel Remesher with a setting that is much lower than this, you could crash Blender and lose your sculpture.
We also have a keyboard shortcut to run the Voxel Remesher. Let's use it now:
- Hover your pen over the 3D Viewport before pressing the following keyboard shortcut.
- Press the Ctrl + R keyboard shortcut to run the Voxel Remesher.
The sphere will be remeshed to have very few and very large polygons, as you can see in the following screenshot:
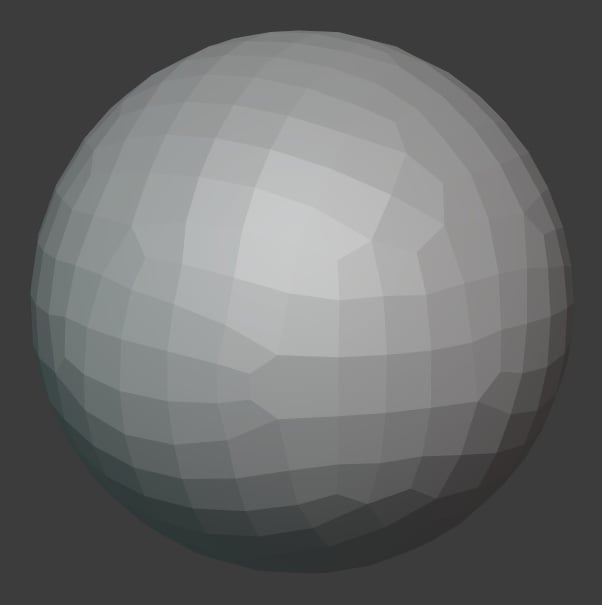
Figure 2.18 – The Quad Sphere after running the Voxel Remesher at a voxel size of 0.2500
Reducing the poly count is helpful at this stage because we can stay focused on the appropriate level of detail. Let's try pulling out a protrusion using the Snake Hook brush:
- Click on the Snake Hook brush from the Toolbar to activate it.
- Set the Radius setting of the brush to
250 px. - Use the Snake Hook brush to pull a piece of the sphere outward. Be careful not to create an overly curvy shape that the polygons can't properly support.
When working with the Voxel Remesher, we have to make our changes in small increments; we make a change with our brushes, then we run the remesher again. Now that we have a protrusion coming out of the sphere, we need to remesh the polygons so that they support the new form.
- Press Ctrl + R to run the Voxel Remesher again.
Notice that new polygons have been created to support the protrusion, but the rest of the sphere stayed the same. That's a good thing! If you can't see the difference, you can turn on the wireframe overlay to view the before and after, as we've done in the following diagram:
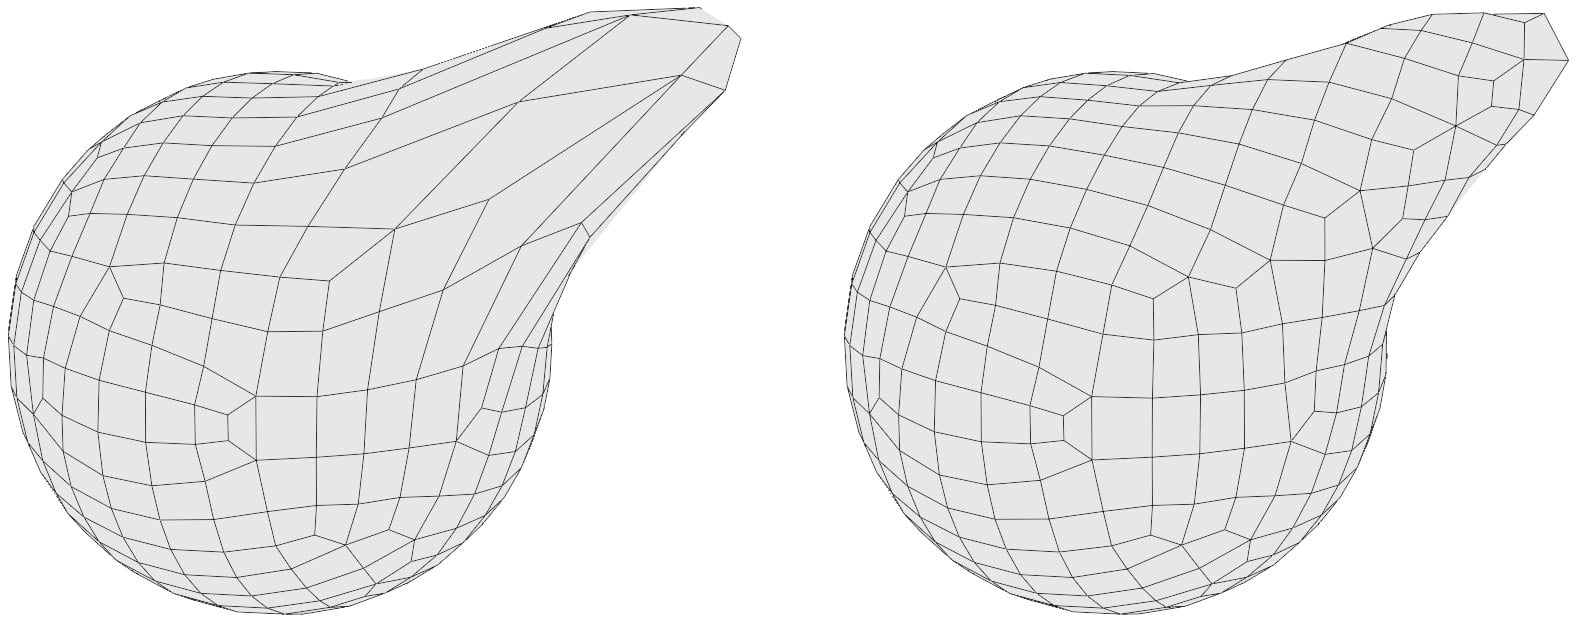
Figure 2.19 – The wireframe of the sphere before and after voxel remeshing a second time (this diagram has been simplified for better visibility in this book)
You might be wondering whether it's excessive to use the Voxel Remesher in this way. Not at all! This is how it's meant to be used. We can run the remesher as many times as we need to. Any time we begin to work on a new form and the polygons become stretched out, it's time to run the remesher again. You might run the Voxel Remesher 10, 50, 100, or even 1,000 times during a sculpting session; that's why we have the keyboard shortcuts.
Go ahead and practice this before moving on. Once we have all of the largest forms settled in, we need to use a smaller voxel size so that we can work on the smaller details:
- Use the Shift + R keyboard shortcut to begin changing the voxel size.
- Drag your pen to the right to decrease the voxel size to around
0.1000. - Tap your pen down onto the graphics tablet to confirm the new voxel size.
- Press Ctrl + R to run the Voxel Remesher again.
Perfect! Now we can add more details at this new voxel size. We should avoid decreasing the voxel size too much too quickly. If we go too quickly, we will end up with jagged artifacts on the surface of our mesh. If you recall back to our example in the Practicing the basics of the Voxel Remesher section, this is what happened to the character's neck. If we end up with some of these jagged edges, we will have to find a way to smooth them out later. So, it's easier if we simply don't introduce these issues in the first place.
We will get plenty more practice with the Voxel Remesher throughout this book, as it will be the main method we use while creating all of the major forms of our sculptures.
How it works…
Working from low detail to high detail is the best way to achieve good results in our sculptures. Another way to think about voxel size is in terms of resolution. Resolution describes the amount of detail we can achieve based on the current size and density of the polygons.
This is the same concept in raster graphics and digital images. An image with few pixels has a low resolution and can only support a very low level of detail. An image with millions of pixels has a high resolution and can support a very high level of detail. An example of this can be seen in the following diagram:
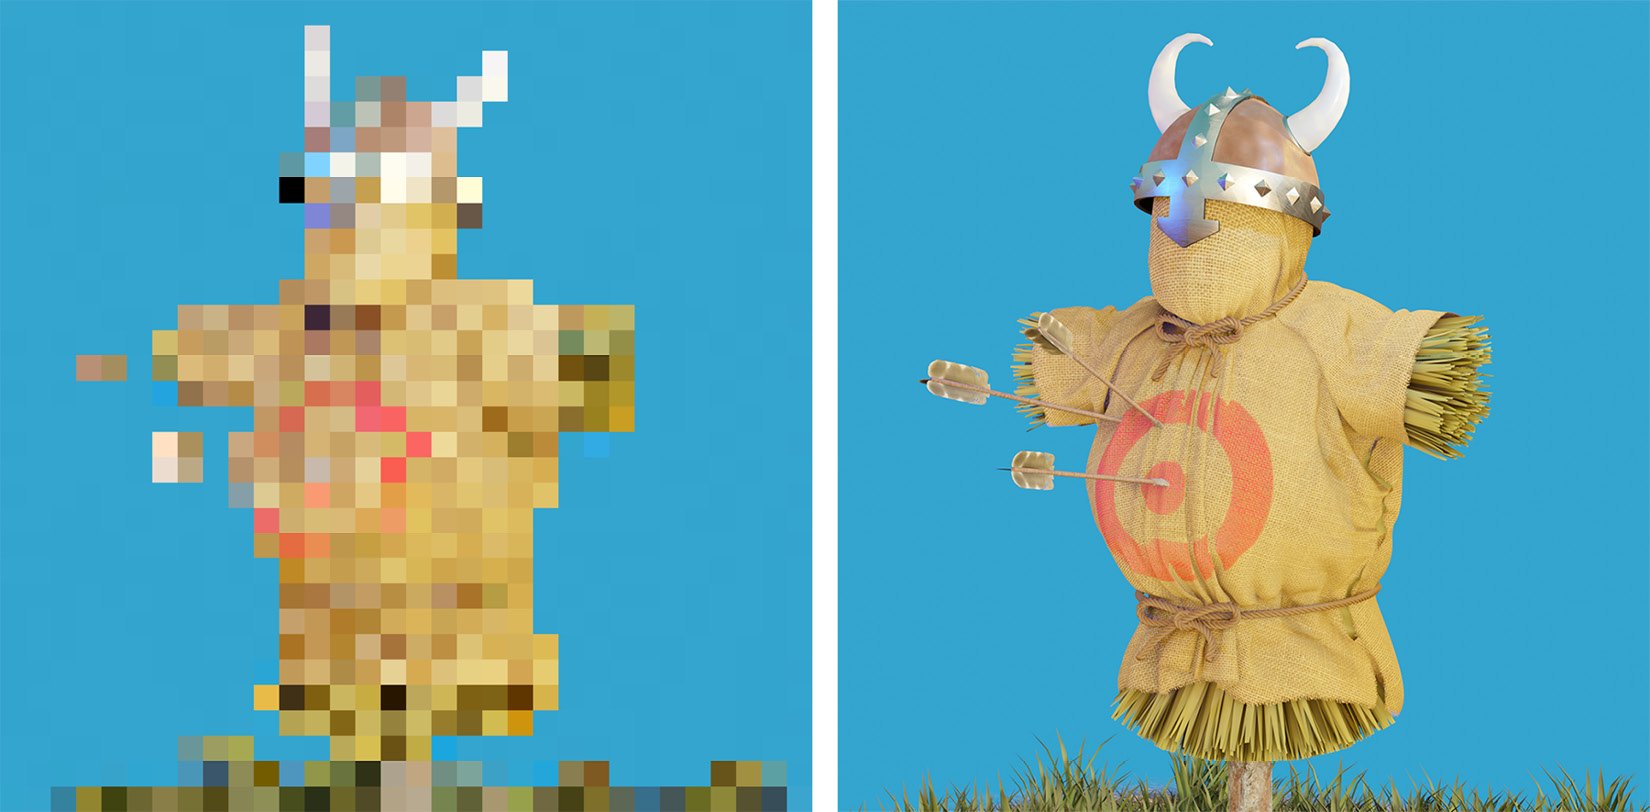
Figure 2.20 – A low-resolution image with 32 x 32 pixels on the left-hand side versus a high-resolution image with 1024 x 1024 pixels on the right-hand side
Resolution in an image and resolution in a 3D sculpture work very similarly. However, we have an advantage in 3D sculptures: we can increase the resolution by decreasing the voxel size, then running the Voxel Remesher.
This method will serve us well in the early stages of our sculpting workflow. However, we will eventually get to a point where the Voxel Remesher causes problems. Sometimes, we need to be able to work with extremely high-frequency details such as skin pores, fingernails, scars, scales, or other fine textures. Attempting to use the Voxel Remesher for these details becomes problematic for performance and workflow reasons.
To get around this, we need to learn about the final sculpting workflow – multiresolution.
Exploring the most powerful sculpting mode – multiresolution
The previous techniques in this chapter focused on the early stages of sculpting. Dyntopo and the Voxel Remesher are both focused on adding new polygons to support new major forms to our sculptures. But what do we do when we're done adding new major forms? Eventually, we'll want to start adding details to our sculptures, and for that, we require a very high resolution. If we want to get down to the highest frequency details such as skin pores, we're going to need hundreds of thousands, if not millions, of polygons.
However, increasing our resolution with something like the Voxel Remesher tends to make our work unwieldy. Often, our computers will slow down while working with anything over a few hundred thousand polygons. The Voxel Remesher is not designed for that.
Instead, what we need is a way to keep our model at a low resolution, but somehow also store a high-resolution version of the model that we can sculpt details onto. Luckily, we have a feature that does exactly that: it's called multiresolution.
For the sake of completeness in this chapter, we'll take a quick look at how multiresolution works. However, this is a very deep subject, so we won't go into much depth until Chapter 5, Learning the Power of Subdivision and the Multiresolution Workflow.
Getting ready
To demonstrate the power of the multiresolution workflow, we need a finished sculpture as an example.
Download the multiResolutionHand.blend example file from the GitHub repository at https://github.com/PacktPublishing/Sculpting-the-Blender-Way/blob/main/Chapter02/multiResolutionHand.blend.
Once you've downloaded the example file, open it in Blender by either double-clicking on the file or dragging the file into the Blender window and choosing Open. Inside this file, you'll find a sculpture of a hand, which you can view in the following diagram:

Figure 2.21 – The hand model as it appears in the .blend file
This hand is looking a little anticlimactic, isn't it? Where are all the high-resolution details? Good question. If you lower your expectations, all art can be beautiful! Just kidding! This is the low-resolution version of the hand sculpture. If you take a look at the information in the statistics overlay, you can see that this hand has 2,794 triangles. Most multiresolution sculptures start with a low tri count such as this before adding in the higher resolution.
Let's find out how we can activate the high-resolution details of this hand sculpture.
How to do it…
To activate the high-resolution details of this sculpture, we need to turn our attention to the Properties editor. Currently, the Properties editor is displaying the modifiers for the active object. In this case, the hand has a Multires modifier, as you can see in the following screenshot:
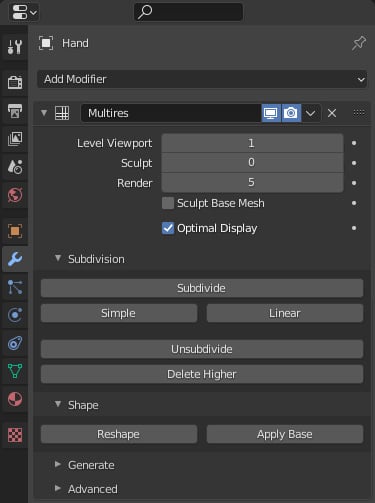
Figure 2.22 – The Multires modifier attached to the hand object
This modifier helps our computers to stay running fast by allowing us to preview the sculpture at different resolutions. Since we are in Sculpt Mode, the modifier is using the setting for the Sculpt resolution level, which can be found between the Level Viewport and Render resolution levels at the top of the modifier.
Right now, the Sculpt resolution is set to 0, which means that none of the extra details are being displayed. Let's increase it and see what happens:
- Hover your mouse or pen over the right-hand side edge of the Sculpt level number field.
- Two arrow indicators will appear along the left-hand and right-hand edges of the field. Clicking on these arrows acts as a quick shortcut to increase or decrease the number in the field.
- Click or tap your pen on the right arrow indicator, >, to increase the Sculpt resolution to
1:
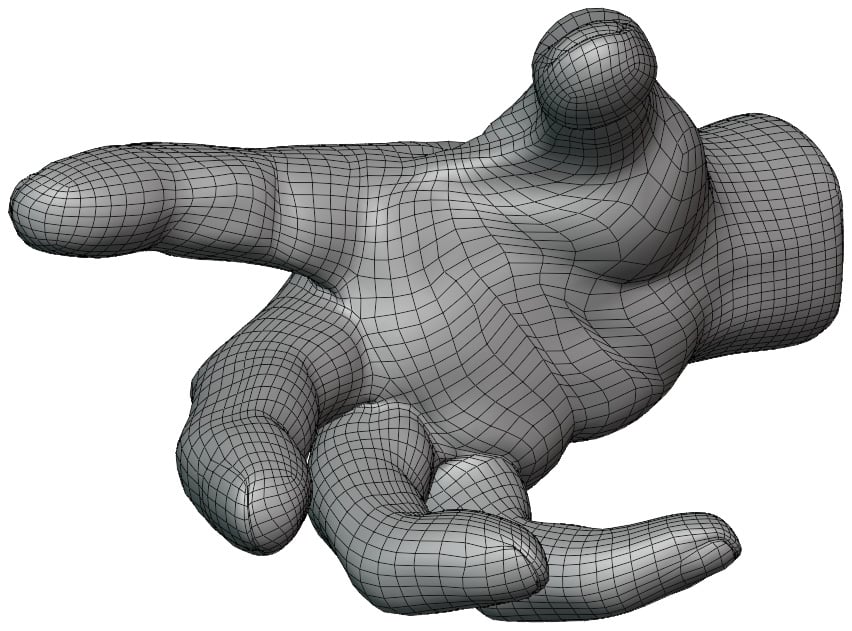
Figure 2.23 – The hand model after increasing the resolution to 1
Neat! If we check the statistics, we'll see that the hand now has 11,176 triangles. That's a pretty big jump from the previous resolution. In fact, it's exactly four times as many triangles as we had before. Each level or resolution quadruples the number of triangles in the sculpture, so the poly count is going to skyrocket by the time we're done.
From this point forward, the wireframe is just a visual distraction. Let's turn it off and increase the resolution again:
- Use the Viewport Overlays popover menu to turn off the Wireframe setting.
- Increase the Sculpt resolution level in the Multires modifier to
2.Notice that the details of the hand are starting to appear; the fingernails are starting to come in and a few of the creases in the palm are showing up as well.
- Increase the Sculpt resolution level in the Multires modifier to
3.
Depending on how powerful your computer is, this might be as high as we can go. However, this sculpture has extra details that can only be viewed if we go all the way up to level 5. If your computer can handle it, take it all the way up, and examine the details of the hand.
You can view the highest resolution in the following diagram:
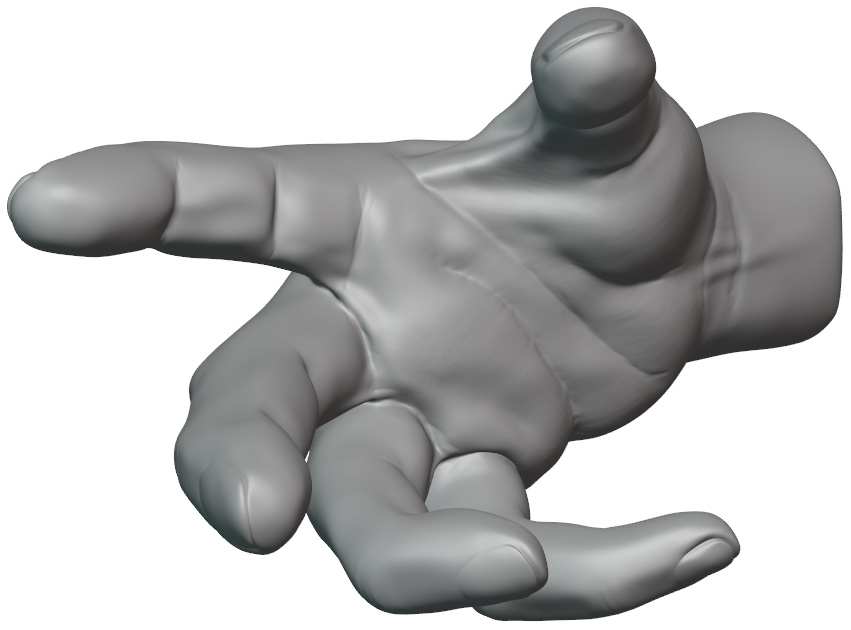
Figure 2.24 – The hand model after increasing the resolution to 5
Pretty cool! Feel free to orbit around the model and observe the details of the high-resolution hand.
How it works…
The Multiresolution modifier has allowed us to store all of this high-resolution detail in an optimized way. Additionally, we have access to a performance-saving feature called Fast Navigate. This feature is on by default; however, it can be toggled under the Options pop-over menu in the upper-right corner of the header of the 3D Viewport. The fast navigate feature will display the highest resolution of the sculpture while we are looking at the model and sculpting it, and it will toggle down to a lower resolution while we orbit around the sculpture so that our computers can stay running fast while we navigate around the scene.
Multiresolution is the gold standard of sculpting workflows. The other workflows, Dyntopo and voxel remeshing, are intended to be used before this stage in the sculpting process, with the ultimate goal of preparing a mesh for multiresolution.
Note that we do not go back to the Voxel Remesher or Dyntopo once we begin using multiresolution. We begin multiresolution once all of our major forms are in place. To prepare for multiresolution, we need to arrange our topology in a particular fashion that is well optimized for the multiresolution workflow. A mesh that has been prepared for multiresolution is called a Base Mesh. We will learn how to create a base mesh in Chapter 4, How to Make a Base Mesh for a 3D Sculpture.
There's more…
Here's a quick summary of the workflows that we discussed in this chapter:
- Basic sculpting mode: This is useful for pushing polygons around, but we run into limitations pretty quickly when we need to add major forms or add high-resolution details.
- Dyntopo: This is a way to quickly add polygons while sculpting. It is particularly helpful when paired with the Snake Hook brush. Dyntopo has fallen out of favor and is no longer considered the best way to sculpt by most sculptors.
- Voxel Remesher: This allows us to quickly block out major forms and remesh the sculpture to support any new shapes that we create. It is useful for the early stages of our model as we work our way from low detail to high detail.
- Multiresolution: This is the golden standard of sculpting. The goal is to get to this point so that we can add high-frequency details and work with millions of polygons in an optimized way.
If you're coming from the popular sculpting software of ZBrush, you might already be familiar with the features discussed in this chapter but under different names. For reference, here is a list of the equivalent features between ZBrush and Blender:
- ZBrush's Sculptris Pro feature is equivalent to Blender's Dyntopo.
- ZBrush's Dynamesh feature is equivalent to Blender's Voxel Remesher.
- ZBrush's Subdivision Levels feature is equivalent to Blender's multiresolution.
Now we have a solid foundation for our technical sculpting knowledge. Understanding these workflows is important for us to be able to make informed decisions for our artistic sculpting processes. Now that we understand how Blender does things under the hood, we'll have a much easier time creating sculptures!