


 Download code from GitHub
The Model View Controller (MVC) design pattern was very popular in the eighties in the software industry. This pattern helped so many engineers and companies to build better software for a while and is still useful nowadays with the rise of Node.js and some Node frameworks as Express.js (more information about Express.js and its API can be found at http://expressjs.com/).
Note
As the Express.js website says, it is "Fast, unopinionated, minimalist web framework for Node.js."
Express.js is the most popular Node framework and many companies across the globe have adopted it. So in our first application, let's see how to apply the MVC pattern to create an application using only JavaScript at the backend.
In this chapter, we will cover these topics:
Installing the Node and Express framework
MVC design pattern
Dealing with Yeoman generator
How to use Express generator
How to deal with Express template engine
User authentication
MongoDB connection with Mongoose Schema
First off, we need to install the most up-to-date Node.js version. At the time of writing this book, Node.js's latest update is v6.3.0. You can go to the Node.js website at https://nodejs.org/en/ and choose your platform. For this book, we are using Mac OS X, but the examples can be followed on any platform.
To check the Node and Node Package Manager (NPM) version, open your terminal/shell and type these:
node -vnpm -v
The book uses Node version 6.3.0 and NPM version 3.10.3
Throughout this book, we will use some tools that accelerate our development process. One of them is called Yeoman (more information can be found at http://yeoman.io/), a powerful web application generator.
Now let's install the generator. Open your terminal/shell and type the following code:
npm install -g yo
For our first application, let's use the official Express generator. The generator helps us in creating the initial code of our application and we can modify it to fit into our application.
Simply type the following command in your terminal or shell:
npm install -g express
Note that the -g flag means installing globally on your machine so that you can use it on any project.
Express is a powerful micro framework for Node.js; with it, it's possible to build web applications with ease.
The project that will start now will be a fully server-side application. We will not use any interface framework such as AngularJS, Ember.js, and others; let's just concentrate on the express framework.
The purpose of this application is to use all the express resources and middleware to create an application following the MVC design pattern.
Middleware is basically functions that are activated by the routing layer of express. The name refers to when a route is activated until its return (from start to end). Middleware is in the middle as the name suggests. It is important to remember that the functions are executed in the order in which they were added.
In the code examples, we will be using middleware including cookie-parser, body-parser, and many others.
Note
You can download the code used in this book directly from the book page present at Packt Publishing Website and you can also download this chapter and all others directly from GitHub at:
Each application is given the name of the relevant chapter, so let's dive into our code now.
First off, create a new folder called chapter-01 on your machine. From now on, we will call this folder the root project folder. Before we move on and execute the command to start our project, we will see a few lines about the flags that we use with the express command.
The command we use is express --ejs --css sass -git, where:
expressis the default command used to create an application--ejsmeans to use the embedded JavaScript template engine, instead of Jade (default)--css sassmeans use SASS instead of plain CSS (default)--git: means to add a.gitignorefile to the project
As I'm using git for version control, it will be useful to use the express option to add a .gitignore file to my application. But I'll skip all git commands in the book.
To check all the options available from the express framework, you can type this into your terminal/shell:
express -h
And the framework gives us all the commands available to start a project:
Usage: express [options] [dir]
  Options:
    -h, --help          output usage information
    -V, --version       output the version number
    -e, --ejs           add ejs engine support (defaults to jade)
        --hbs           add handlebars engine support
    -H, --hogan         add hogan.js engine support
    -c, --css <engine>  add stylesheet <engine> support
                   (less|stylus|compass|sass) (defaults to plain css)
        --git           add .gitignore
    -f, --force         force on non-empty directory
Now, open your terminal/shell and type the following command:
express --ejs --css sass -git
The output in the terminal/shell will be as follows:
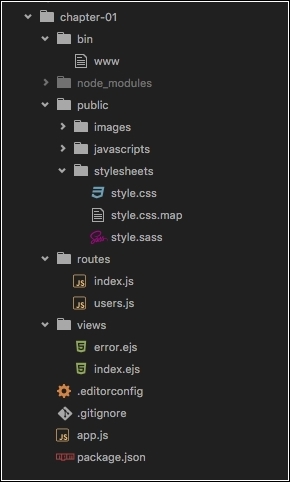
 create :
   create : ./package.json
   create : ./app.js
   create : ./.gitignore
   create : ./public
   create : ./public/javascripts
   create : ./public/images
   create : ./public/stylesheets
   create : ./public/stylesheets/style.sass
   create : ./routes
   create : ./routes/index.js
   create : ./routes/users.js
   create : ./views
   create : ./views/index.ejs
   create : ./views/error.ejs
   create : ./bin
   create : ./bin/www
   install dependencies:
     $ cd . && npm install
   run the app:
     $ DEBUG=chapter-01:* npm start
As you can see in the following screenshot, the generator is very flexible and only creates the minimum necessary structure to start a project:
However, we will make some changes before we proceed.
Open package.json in the root project folder and add the following highlighted lines of code:
{
    "name": "chapter-01",
    "description": "Build a Twitter Like app using the MVC design pattern",
    "license": "MIT",
    "author": {
        "name": "Fernando Monteiro",
        "url": "https://github.com/newaeonweb/node-6-blueprints"
    },
    "repository": {
        "type": "git",
        "url": "https://github.com/newaeonweb/node-6-blueprints.git"
    },
    "keywords": [
        "MVC",
        "Express Application",
        "Expressjs"
    ],
    "version": "0.0.1",
    "private": true,
    "scripts": {
        "start": "node ./bin/www"
    },
    "dependencies": {
        "body-parser": "~1.13.2",
        "cookie-parser": "~1.3.5",
        "debug": "~2.2.0",
        "ejs": "~2.3.3",
        "express": "~4.13.1",
        "morgan": "~1.6.1",
        "node-sass-middleware": "0.8.0",
        "serve-favicon": "~2.3.0"
    }
}
Even though it is not a high-priority alteration, it is considered a good practice to add this information to your project.
Now we are ready to run the project; let's install the necessary dependencies that are already listed in the package.json file.
On the terminal/shell, type the following command:
npm install
At the end, we are ready to go!
To run the project and see the application in the browser, type the following command in your terminal/shell:
DEBUG=chapter-01:* npm start
The output in your terminal/shell will be as follows:
chapter-01:server Listening on port 3000 +0ms
You can run just npm start, but you won't see the previous output with the port name; later in this chapter, we will fix it.
Now, just check out http://localhost:3000. You'll see the welcome message from express.
Let's make some changes to the structure of directories in our application and prepare it to follow the Model-View-Controller design pattern.
I will list the necessary steps for this refactoring:
Inside the
rootproject folder:Create a new folder called
server
Inside the
serverfolder:Create a new folder called
configCreate a new folder called
routesCreate a new folder called
views.
Do not worry about the
configfolder at this point; we will insert its contents later.Now we need to move the
error.jsandindex.jsfiles from thechapter-01/viewsfolder to thechapter-01/server/viewsfolder.Move the
index.jsanduser.jsfiles from thechapter-01/routesfolder to thechapter-01/server/routesfolder.A very simple change here, but during the development process, it will be very useful to better organize all the files of our application.
We still need to change the path to this folder in the main application file, app.js. Open the app.js file from the project root folder and change the following highlighted lines:
...
var routes = require('./server/routes/index');
var users = require('./server/routes/users');

var app = express();

// view engine setup
app.set('views', path.join(__dirname, 'server/views'));
app.set('view engine', 'ejs');
...
Before we proceed, let's change the welcome message from the routes/index.js file to the following highlighted code:
/* GET home page. */
router.get('/', function(req, res, next) {
    res.render('index', { title: 'Express from server folder' });
});
To run the project and see the application in your browser, follow these steps:
Type the following command in your terminal/shell:
DEBUG=chapter-01:* npm startOpen your browser at
http://localhost:3000.The output in your browser will be as follows:

Application home screen
Now we can delete the folders and files from:
chapter-01/routes:index.jsuser.js
chapter-01/views:error.jsindex.js
As mentioned earlier, we will change the default initialization process of our application. To do this task, we will edit the app.js file and add a few lines of code:
Open
app.jsand add the following code after theapp.use('/users', users);function:// catch 404 and forward to error handler app.use(function(req, res, next) { var err = new Error('Not Found'); err.status = 404; next(err); });It's a simple
middlewareto intercept 404 errors.Now add the following code after the
module.exports = app;function:app.set('port', process.env.PORT || 3000); var server = app.listen(app.get('port'), function() { console.log('Express server listening on port ' + serer.address().port); });Open the
package.jsfile at the root project folder and change the following code:... "scripts": { "start": "node app.js" }, ...The
package.jsonfile is a file of extreme importance in Node.js applications. It is possible to store all kinds of information for the project, such as dependencies, project description, authors, version, and many more.Furthermore, it is possible to set up scripts to minify, concatenate, test, build and deploy an application easily. We'll see more on how to create scripts in Chapter 9, Building a Frontend Process with Node.js and NPM.
Let's test the result; open your terminal/shell and type the following command:
npm startWe will see the same output on the console:
      > node app.js


Express server listening on port 3000!
Now we will make a major change to the structure of directories in the views folder: we will add an important Embedded JavaScript (EJS) resource for the creation of reusable files in our templates.
They are known as partial files and will be included in our application using the <% = include %> tag.
Tip
You can find more information about EJS on the official project page at: http://ejs.co/
Inside the views folder, we will create two more folders, called partials and pages:
The
pagesfolder will be as follows at this point:Now let's move the files that were in the
viewsfolder to thepagesfolder.Create a
pagesfolder inside theviewsfolder.Create a
partialsfolder inside theviewsfolder.server/pages/index.ejserror.ejspartials/
Now we need to create the files that will be included in all templates. Note that we have just two templates:
index.jsanderror.js.Create a file called
stylesheet.ejsand add the following code:<!-- CSS Files --> <link rel='stylesheet' href='https://cdnjs.cloudflare.com/ ajax/libs/twitter-bootstrap/4.0.0-alpha/css/bootstrap.min.css'> <link rel='stylesheet' href='/stylesheets/style.css' />We are using a Content Delivery Network (CDN) for CSS and JS files.
Create a file called
javascript.ejsand add the following code to it:<!-- JS Scripts --> <script src='https://cdnjs.cloudflare.com/ajax/libs /jquery/2.2.1/jquery.min.js'></script> <script src='https://cdnjs.cloudflare.com/ajax/libs/ twitter-bootstrap/4.0.0-alpha/js/bootstrap.min.js'></script> </body> </html>Then create a file called
header.ejsand add the following code:<!-- Fixed navbar --> <div class="pos-f-t"> <div class="collapse" id="navbar-header"> <div class="container bg-inverse p-a-1"> <h3>Collapsed content</h3> <p>Toggle able via the navbar brand.</p> </div> </div> <nav class="navbar navbar-light navbar-static-top"> <div class="container"> <button class="navbar-toggler hidden-sm-up" type= "button"data-toggle="collapse" data-target= "#exCollapsingNavbar2"> Menu </button> <div class="collapse navbar-toggleable-xs" id="exCollapsingNavbar2"> <a class="navbar-brand" href="/">MVC App</a> <ul class="nav navbar-nav navbar-right"> <li class="nav-item"> <a class="nav-link" href="/login"> Sign in </a> </li> <li class="nav-item"> <a class="nav-link" href="/signup"> Sign up </a> </li> <li class="nav-item"> <a class="nav-link" href="/profile"> Profile</a> </li> <li class="nav-item"> <a class="nav-link" href="/comments"> Comments</a> </li> </ul> </div> </div> </nav> </div> <!-- Fixed navbar -->Create a file called
footer.ejsand add this code:<footer class="footer"> <div class="container"> <span>© 2016. Node-Express-MVC-App</span> </div> </footer>Let's adjust the path for the view templates in our
app.jsfile; add the following lines of code:// view engine setup app.set('views', path.join(__dirname, 'server/views/pages')); app.set('view engine', 'ejs');Now we will replace the code in
pages/index.ejswith the following code:<!DOCTYPE html> <html> <head> <title><%= title %></title> <% include ../partials/stylesheet %> </head> <body> <% include ../partials/header %> <div class="container"> <div class="page-header m-t-1"> <h1><%= title %></h1> </div> <p class="lead">Welcome to <%= title %></p> </div> <% include ../partials/footer %> <% include ../partials/javascript %> </body> </html>Let's do the same for the error view file at
pages/error.ejs:<!DOCTYPE html> <html> <head> <title>Wohp's Error</title> <% include ../partials/stylesheet %> </head> <body> <% include ../partials/header %> <div class="container"> <div class="page-header m-t-1"> <h1>Sorry: <%= message %></h1> <h2><%= error.status %></h2> <pre><%= error.stack %></pre> </div> </div> <% include ../partials/footer %> <% include ../partials/javascript %> </body> </html>
We currently have the following structure in our server folder:
server/pages/index.ejserror.ejspartials/footer.ejsheader.ejsjavascript.ejsstylesheet.ejs2
Now we have a solid basis to move forward with the project. At this time, we will add some template files for login, sign-up, and profile screens.
The expected result for these pages will be as shown in the following screenshot:

Login screen

Sign-up screen
Profile screen
Now let's create the login template. Create a new file called
login.ejsin theviewsfolder and place the following code:<!DOCTYPE html> <html> <head> <title><%= title %></title> <% include ../partials/stylesheet %> </head> <body> <% include ../partials/header %> <div class="container"> <% if (message.length > 0) { %> <div class="alert alert-warning alert-dismissible fade in" role="alert"> <button type="button" class="close" data-dismiss= "alert" aria-label="Close"> <span aria-hidden="true">×</span> </button> <strong>Ohps!</strong> <%= message %>. </div> <% } %> <form class="form-signin" action="/login" method="post"> <h2 class="form-signin-heading">Welcome sign in</h2> <label for="inputEmail" class="sr-only">Email address</label> <input type="email" id="email" name="email" class="form- control" placeholder="Email address" required=""> <label for="inputPassword" class="sr-only">Password</label> <input type="password" id="password" name="password" class="form-control" placeholder="Password" required=""> <button class="btn btn-lg btn-primary btn-block" type="submit">Sign in</button> <br> <p>Don't have an account? <a href="/signup">Signup</a> ,it's free.</p> </form> </div> <% include ../partials/footer %> <% include ../partials/javascript %> </body> </html>Add the login route to
routes/index.jsafter the index route:/* GET login page. */ router.get('/login', function(req, res, next) { res.render('login', { title: 'Login Page', message: req.flash('loginMessage') }); });Let's add the
signuptemplate to theviews/pagesfolder.Create a new file in
views/pagesand save assignup.ejs; then add the following code:<!DOCTYPE html> <html> <head> <title><%= title %></title> <% include ../partials/stylesheet %> </head> <body> <% include ../partials/header %> <div class="container"> <% if (message.length > 0) { %> <div class="alert alert-warning" role="alert"> <strong>Warning!</strong> <%= message %>. </div> <% } %> <form class="form-signin" action="/signup" method="post"> <h2 class="form-signin-heading">Please signup</h2> <label for="inputName" class="sr-only">Name address</label> <input type="text" id="name" name="name" class="form-control" placeholder="Name" required=""> <label for="inputEmail" class="sr-only">Email address</label> <input type="email" id="email" name="email" class= "form-control" placeholder="Email address" required=""> <label for="inputPassword" class="sr-only">Password</label> <input type="password" id="password" name="password" class="form-control" placeholder="Password" required=""> <button class="btn btn-lg btn-primary btn-block" type="submit">Sign in</button> <br> <p>Don't have an account? <a href="/signup">Signup</a> ,it's free.</p> </form> </div> <% include ../partials/footer %> <% include ../partials/javascript %> </body> </html>Now we need to add the route for the sign-up view. Open
routes/index.jsand add the following code right afterlogin route:/* GET Signup */ router.get('/signup', function(req, res) { res.render('signup', { title: 'Signup Page', message:req.flash('signupMessage') }); });Next, we will add the template to the
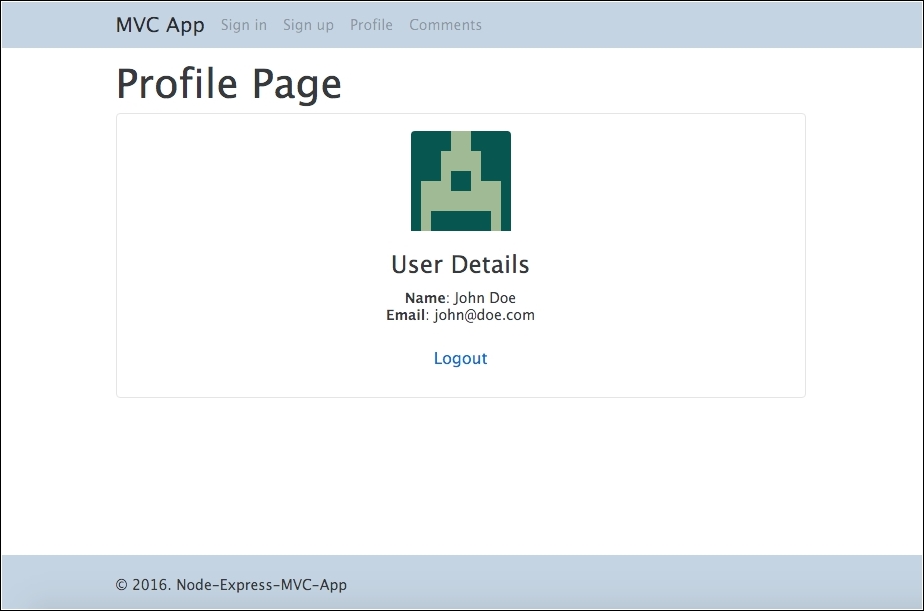
profilepage and the route to this page. Create a file calledprofile.ejsinside theview/pagesfolder and add this code:<!DOCTYPE html> <html> <head> <title><%= title %></title> <% include ../partials/stylesheet %> </head> <body> <% include ../partials/header %> <div class="container"> <h1><%= title %></h1> <div class="datails"> <div class="card text-xs-center"> <br> <img class="card-img-top" src="<%= avatar %>" alt="Card image cap"> <div class="card-block"> <h4 class="card-title">User Details</h4> <p class="card-text"> <strong>Name</strong>: <%= user.local.name %><br> <strong>Email</strong>: <%= user.local.email %> </p> <a href="/logout" class="btn btn-default">Logout</a> </div> </div> </div> </div> <% include ../partials/footer %> <% include ../partials/javascript %> </body> </html>Now we need to add the route for the profile view; open
routes/index.jsand add the following code right after thesignuproute:/* GET Profile page. */ router.get('/profile', function(req, res, next) { res.render('profile', { title: 'Profile Page', user : req.user, avatar: gravatar.url(req.user.email , {s: '100', r: 'x', d: 'retro'}, true) }); });
As you can see in the previous sections, we used some middleware to display messages and the user icon using the gravatar. In this section, we will see how to install some very important modules for our application.
Since we created templates for the signin, signup, and profile pages, we will need to store the users with login and password.
These are the middleware that we will use for this task, with the definition for each one:
|
Component |
Description |
More details |
|
|
User-friendly messages | |
|
|
Drive to connect with MongoDB | |
|
|
Store user sessions in the DB | |
|
|
Show a random user picture | |
|
|
Authentication middleware | |
|
|
Local user/password authentication |
Open your terminal/shell and type:
npm install connect-flash connect-mongo express-session gravatar
passport passport-local -save
Note
As we can see, we will use MongoDB to store user data; you can find more information about MongoDB at https://www.mongodb.org/, and the installation process at https://docs.mongodb.org/manual/installation/ . We assume that you already have MongoDB installed on your machine and it is running.
At this time, we have to do a major restructuring of the app.js file to include the new middleware that we will use.
We will show you step by step how to include each middleware and at the end, we will see the complete file:
Open
app.jsand add the following lines beforevar app = express():// ODM With Mongoose var mongoose = require('mongoose'); // Modules to store session var session = require('express-session'); var MongoStore = require('connect-mongo')(session); // Import Passport and Warning flash modules var passport = require('passport'); var flash = require('connect-flash');This is a simple import process.
Add the following lines after
app.set('view engine', 'ejs'):// Database configuration var config = require('./server/config/config.js'); // connect to our database mongoose.connect(config.url); // Check if MongoDB is running mongoose.connection.on('error', function() { console.error('MongoDB Connection Error. Make sure MongoDB is running.'); }); // Passport configuration require('./server/config/passport')(passport);Note that we are using a
config.jsfile in the first line; later we will create this file.Add the following lines after
app.use(express.static(path.join(__dirname, 'public'))):// required for passport // secret for session app.use(session({ secret: 'sometextgohere', saveUninitialized: true, resave: true, //store session on MongoDB using express-session + connect mongo store: new MongoStore({ url: config.url, collection : 'sessions' }) })); // Init passport authentication app.use(passport.initialize()); // persistent login sessions app.use(passport.session()); // flash messages app.use(flash());
As mentioned earlier, let's create a config file:
Inside
server/config, create a file calledconfig.jsand place the following code in it:// Database URL module.exports = { // Connect with MongoDB on local machine 'url' : 'mongodb://localhost/mvc-app' };Create a new file on
server/configand name itpassport.js. Add the following content:// load passport module var LocalStrategy = require('passport-local').Strategy; // load up the user model var User = require('../models/users'); module.exports = function(passport) { // passport init setup // serialize the user for the session passport.serializeUser(function(user, done) { done(null, user.id); }); // deserialize the user passport.deserializeUser(function(id, done) { User.findById(id, function(err, user) { done(err, user); }); }); // using local strategy passport.use('local-login', new LocalStrategy({ // change default username and password, to email //and password usernameField : 'email', passwordField : 'password', passReqToCallback : true }, function(req, email, password, done) { if (email) // format to lower-case email = email.toLowerCase(); // process asynchronous process.nextTick(function() { User.findOne({ 'local.email' : email }, function(err, user) { // if errors if (err) return done(err); // check errors and bring the messages if (!user) return done(null, false, req.flash('loginMessage', 'No user found.')); if (!user.validPassword(password)) return done(null, false, req.flash('loginMessage', 'Wohh! Wrong password.')); // everything ok, get user else return done(null, user); }); }); })); // Signup local strategy passport.use('local-signup', new LocalStrategy({ // change default username and password, to email and // password usernameField : 'email', passwordField : 'password', passReqToCallback : true }, function(req, email, password, done) { if (email) // format to lower-case email = email.toLowerCase(); // asynchronous process.nextTick(function() { // if the user is not already logged in: if (!req.user) { User.findOne({ 'local.email' : email }, function(err,user) { // if errors if (err) return done(err); // check email if (user) { return done(null, false, req.flash('signupMessage', 'Wohh! the email is already taken.')); } else { // create the user var newUser = new User(); // Get user name from req.body newUser.local.name = req.body.name; newUser.local.email = email; newUser.local.password = newUser.generateHash(password); // save data newUser.save(function(err) { if (err) throw err; return done(null, newUser); }); } }); } else { return done(null, req.user); } }); })); };Note that in the fourth line, we are importing a file called
models; we will create this file using Mongoose.
Create a models folder inside server/ and add the following code:
// Import Mongoose and password Encrypt
var mongoose = require('mongoose');
var bcrypt = require('bcrypt-nodejs');
// define the schema for User model
var userSchema = mongoose.Schema({
// Using local for Local Strategy Passport
local: {
name: String,
email: String,
password: String,
}
});
// Encrypt Password
userSchema.methods.generateHash = function(password) {
return bcrypt.hashSync(password, bcrypt.genSaltSync(8), null);
};
// Verify if password is valid
userSchema.methods.validPassword = function(password) {
return bcrypt.compareSync(password, this.local.password);
};
// create the model for users and expose it to our app
module.exports = mongoose.model('User', userSchema);
At this point, we have enough code to configure secure access to our application. However, we still need to add a few more lines to the login and sign-up forms to make them work properly:
Open
server/routes/index.jsand add the following lines after thelogin GETroute:/* POST login */ router.post('/login', passport.authenticate('local-login', { //Success go to Profile Page / Fail go to login page successRedirect : '/profile', failureRedirect : '/login', failureFlash : true }));Add these lines after the
signup GETroute:/* POST Signup */ router.post('/signup', passport.authenticate('local-signup', { //Success go to Profile Page / Fail go to Signup page successRedirect : '/profile', failureRedirect : '/signup', failureFlash : true }));Now let's add a simple function to check whether the user is logged in; at the end of
server/routes/index.js, add the following code:/* check if user is logged in */ function isLoggedIn(req, res, next) { if (req.isAuthenticated()) return next(); res.redirect('/login'); }Let's add a simple route to a logout function and add the following code after the
isLoggedIn()function:/* GET Logout Page */ router.get('/logout', function(req, res) { req.logout(); res.redirect('/'); });The last change is to add
isloggedin()as a second parameter to the profile route. Add the following highlighted code:/* GET Profile page. */ router.get('/profile', isLoggedIn, function(req, res, next) { res.render('profile', { title: 'Profile Page', user : req.user, avatar: gravatar.url(req.user.email , {s: '100', r: 'x', d:'retro'}, true) }); });
The final index.js file will look like this:
var express = require('express');
var router = express.Router();
var passport = require('passport');
// get gravatar icon from email
var gravatar = require('gravatar');
/* GET home page. */
router.get('/', function(req, res, next) {
res.render('index', { title: 'Express from server folder' });
});
      /* GET login page. */
      router.get('/login', function(req, res, next) {
          res.render('login', { title: 'Login Page', message:
           req.flash('loginMessage') });
       });
      /* POST login */
      router.post('/login', passport.authenticate('local-login', {
          //Success go to Profile Page / Fail go to login page
          successRedirect : '/profile',
          failureRedirect : '/login',
          failureFlash : true
      }));
/* GET Signup */
router.get('/signup', function(req, res) {
res.render('signup', { title: 'Signup Page', message: req.flash('signupMessage') });
});
      /* POST Signup */
      router.post('/signup', passport.authenticate('local-signup', {
          //Success go to Profile Page / Fail go to Signup page
          successRedirect : '/profile',
          failureRedirect : '/signup',
          failureFlash : true
      }));
/* GET Profile page. */
router.get('/profile', isLoggedIn, function(req, res, next) {
res.render('profile', { title: 'Profile Page', user : req.user, avatar: gravatar.url(req.user.email , {s: '100', r: 'x', d: 'retro'}, true) });
});
      /* check if user is logged in */
      function isLoggedIn(req, res, next) {
          if (req.isAuthenticated())
              return next();
          res.redirect('/login');
      }
      /* GET Logout Page */
      router.get('/logout', function(req, res) {
          req.logout();
          res.redirect('/');
      });
module.exports = router;
We have almost everything set to finalize the application, but we still need to create a page for comments.
Instead of using the routes folder to create the route and functions of the comments file, we will use another format and create the controllers folder, where we can separate the route and the controller function, thus having a better modularization:
Create a folder called
controllers.Create a file called
comments.jsand add the following code:// get gravatar icon from email var gravatar = require('gravatar'); // get Comments model var Comments = require('../models/comments'); // List Comments exports.list = function(req, res) { // List all comments and sort by Date Comments.find().sort('-created').populate('user', 'local.email').exec(function(error, comments) { if (error) { return res.send(400, { message: error }); } // Render result res.render('comments', { title: 'Comments Page', comments: comments, gravatar: gravatar.url(comments.email, {s: '80', r: 'x', d: 'retro'}, true) }); }); }; // Create Comments exports.create = function(req, res) { // create a new instance of the Comments model with request body var comments = new Comments(req.body); // Set current user (id) comments.user = req.user; // save the data received comments.save(function(error) { if (error) { return res.send(400, { message: error }); } // Redirect to comments res.redirect('/comments'); }); }; // Comments authorization middleware exports.hasAuthorization = function(req, res, next) { if (req.isAuthenticated()) return next(); res.redirect('/login'); };Let's import the controllers on the
app.jsfile; add the following lines aftervar users = require('./server/routes/users'):// Import comments controller var comments = require('./server/controllers/comments');Now add the comments route after
app.use('/users', users):// Setup routes for comments app.get('/comments', comments.hasAuthorization, comments.list); app.post('/comments', comments.hasAuthorization, comments.create);Create a file called
comments.ejsatserver/pagesand add the following lines:<!DOCTYPE html> <html> <head> <title><%= title %></title> <% include ../partials/stylesheet %> </head> <body> <% include ../partials/header %> <div class="container"> <div class="row"> <div class="col-lg-6"> <h4 class="text-muted">Comments</h4> </div> <div class="col-lg-6"> <button type="button" class="btn btn-secondary pull-right" data-toggle="modal" data-target="#createPost"> Create Comment </button> </div> </div> <!-- Modal --> <div class="modal fade" id="createPost" tabindex="-1" role="dialog" aria-labelledby="myModalLabel" aria-hidden="true"> <div class="modal-dialog" role="document"> <div class="modal-content"> <form action="/comments" method="post"> <div class="modal-header"> <button type="button" class="close" data-dismiss="modal" aria-label="Close"> <span aria-hidden="true">×</span> </button> <h4 class="modal-title" id="myModalLabel"> Create Comment</h4> </div> <div class="modal-body"> <fieldset class="form-group"> <label for="inputitle">Title</label> <input type="text" id="inputitle" name="title" class="form-control" placeholder= "Comment Title" required=""> </fieldset> <fieldset class="form-group"> <label for="inputContent">Content</label> <textarea id="inputContent" name="content" rows="8" cols="40" class="form-control" placeholder="Comment Description" required=""> </textarea> </fieldset> </div> <div class="modal-footer"> <button type="button" class="btn btn-secondary" data-dismiss="modal">Close</button> <button type="submit" class="btn btn-primary"> Save changes</button> </div> </form> </div> </div> </div> <hr> <div class="lead"> <div class="list-group"> <% comments.forEach(function(comments){ %> <a href="#" class="list-group-item"> <img src="<%= gravatar %>" alt="" style="float: left; margin-right: 10px"> <div class="comments"> <h4 class="list-group-item-heading"> <%= comments.title %></h4> <p class="list-group-item-text"> <%= comments.content %></p> <small class="text-muted">By: <%= comments.user.local.email %> </small> </div> </a> <% }); %> </div> </div> </div> <% include ../partials/footer %> <% include ../partials/javascript %> </body> </html>Note that we are using a simple Modal component from Twitter-bootstrap for the addition of comments, as shown in the following screenshot:

Model for the create comments screen
The last step is to create a model for the comments; let's create a file named
comments.jsatserver/models/and add the following code:// load the things we need var mongoose = require('mongoose'); var Schema = mongoose.Schema; var commentSchema = mongoose.Schema({ created: { type: Date, default: Date.now }, title: { type: String, default: '', trim: true, required: 'Title cannot be blank' }, content: { type: String, default: '', trim: true }, user: { type: Schema.ObjectId, ref: 'User' } }); module.exports = mongoose.model('Comments', commentSchema);
Now it's time to test whether everything is working properly:
Open terminal/shell at the root project folder and type the following command:
npm startCheck your browser at:
http://localhost:3000.Go to
http://localhost:3000/signupand create a user calledJohn Doewith the e-mail ID asjohn@doe.comand password as123456.Go to
http://localhost:3000/comments, click on the create comment button and add the following content:Title: Sample Title Comments: Lorem ipsum dolor sit amet, consectetur adipiscing elit, sed do eiusmod tempor incididunt ut labore et dolore magna aliqua. Ut enim ad minim veniam, quis nostrud exercitation ullamco laboris nisi ut aliquip ex ea commodo consequat. Duis aute irure dolor in reprehenderit in voluptate velit esse cillum dolore eu fugiat nulla pariatur. Excepteur sint occaecat cupidatat non proident, sunt in culpa qui officia deserunt mollit anim id est laborum.The following screenshot illustrates the final result:

Comments screen
Now let's check the flash-connect messages. Go to http://localhost:3000/login and try to log in as a user; we will use martin@tech.com with password 123.
The following screenshot illustrates the result:

Error message on the login screen
Now we try to sign up with an already registered user. Go to http://localhost:3000/signup and place the following content:
name: John Doe
email: john@doe.com
password: 123456
This screenshot illustrates the result:

Error message on signup screen
In this chapter, we discussed how to create MVC applications using Node.js and the express framework, with an application fully on the server side-something very similar to applications created with the Rails or Django framework.
We also built safe routes and a very robust authentication with session control, storage of session cookies, and encrypted passwords.
We used MongoDB to store the data of users and comments.
In the next chapter, we will see how to use another database system with express and Node.js.