


Introduction to pfSense
his book aims to provide you with in-depth knowledge of a very widely used technology, pfSense. This will provide you with some real-world scenarios and use cases, which you will be able to leverage immediately in your own projects. The introductory modules will help you to understand what pfSense is, its features, the key services it provides, and how you can install it. After the introductory modules, we will deep dive into each of its exciting features. You'll learn about the installation, configuration, and use of pfSense. This education will enable you to do everything from setting up firewalls, load balancing, and failover settings, to integrating with other software such as OpenVPN and Squid proxy server.
In this book, we will give you the information you need in order to work with this amazing piece of software.
In this chapter, you will be introduced to pfSense. You will gain an understanding of what pfSense is, its key features, and its advantages. You will also view demonstrations on the installation of pfSense on a virtual platform on VMware, as well as some other configurations. Let's get started.
What is pfSense?
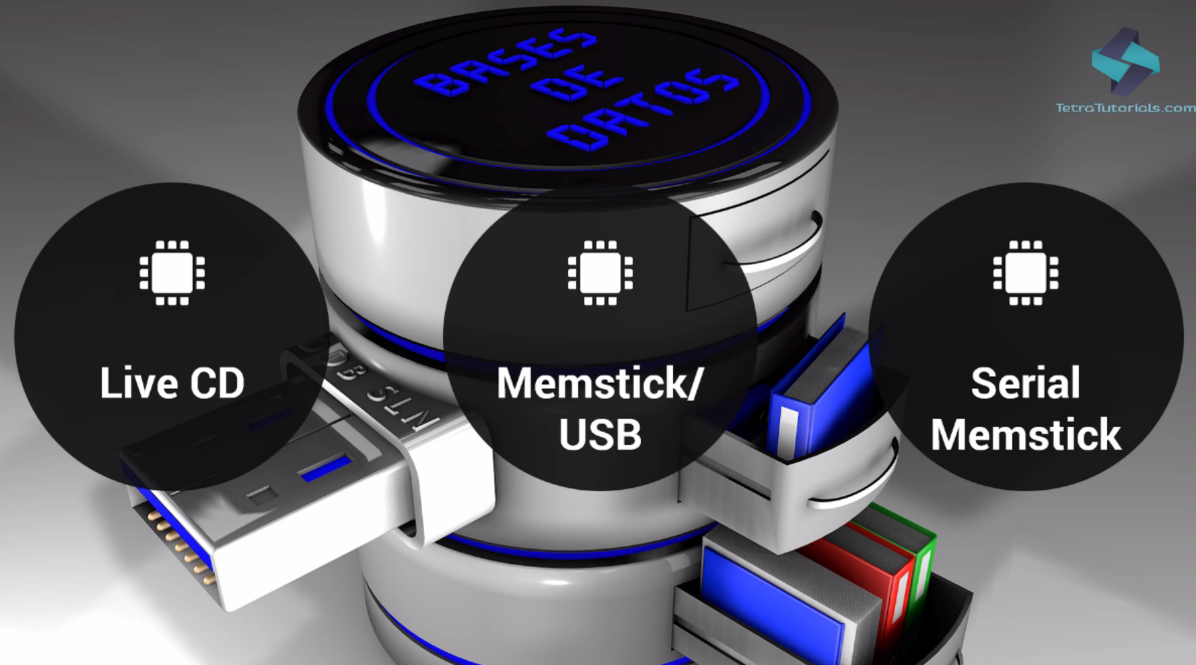
pfSense is a free, customized distribution of FreeBSD. FreeBSD itself is an operating system for a variety of platforms, which focuses on features, speed, and stability. It's derived from BSD, the version of UNIX developed at the University of California, Berkeley. It is developed and maintained by a large community. You can use pfSense to turn a computer into a fully-featured router and firewall. This software was first developed in 2004 as an offshoot of the popular m0n0wall project. The main difference between pfSense and m0n0wall is that pfSense is designed for personal computers and servers instead of embedded devices. This allows pfSense to offer more flexibility and features. pfSense is a very flexible and powerful tool that you can easily adapt to numerous applications, from a home router to a firewall, for a large corporate network. pfSense is easy to install and maintain. It has a very useful web-based user interface. pfSense also has many features that are usually only found in expensive commercial routers. You can use the following three types of install media to install pfSense:
- Optical disk image: That could be an ISO image, a CD, or a DVD disc. This is an easy and familiar choice. Use this option if the target hardware has an optical drive. This is especially useful if the BIOS will not boot from USB.
- Memstick: This option is similar to the CD or DVD, but runs the installation from a USB thumb drive. It's often faster than a CD or DVD. This is very useful with new devices, as many of them don't have integrated optical drives, making this the current best recommendation.
- Serial memstick: This option is similar to the memstick image, but runs using the serial console rather than VGA for newer embedded systems.
The following is the graphical representation of the installation media:
pfSense is a very impressive software. The following are some of its key features:
- pfSense is very robust and it supports a number of great features. This allows you to have a single device that performs all the functions you need at the edge of your network. The downside of this is that all your functions work from a single machine, so it's a single point of failure.
- To offset this, pfSense also supports high availability, which means that you can group several devices together.
- One of the most significant benefits is that pfSense is free. You can simply download the software from the website. Although virtualization is supported, you will, of course, need to spend on the hardware that you are going to install the software on. However, all things considered, it is more cost-effective than other solutions.
- pfSense can be installed on any hardware, which makes it highly flexible and very scalable.
- pfSense is also highly extensible. It has an energetic and dedicated community behind it. They have built and contributed tons of useful add-ons to the pfSense platform. Most of these add-ons are also completely free.
Benefits of pfSense
The first benefit is that pfSense is feature-rich, robust, and very flexible software. Besides the essential firewall features, it has tons of additional features for network routing, remote connectivity, diagnostics, and reporting, along with many more. What's more, it is an extensible platform. You do not have to settle for the functionality provided out of the box with pfSense. You're free to write your own plugins and add-ons. Many members of the community have done just that. You will go over some of its key extensions later in this book.
With all the enterprise-grade features and security pfSense provides, it is incredible that it is a free and open source product. This is possibly its biggest benefit. You can download it from the pfSense website at https://www.pfsense.org/download/, and install it by yourself. For large implementations and complex configurations, you do have the option to purchase license support from professionals, but that is completely optional.
pfSense is very versatile and flexible. If you are a professional working out of a home-based office, you can use pfSense to protect your network. But if you are a large company running a global infrastructure, you can still use pfSense to protect various parts of your work. pfSense can run on a 10-year-old PC with limited resources, and it can also run on large multicore servers. This makes it quite scalable. You can easily expand the resources on your pfSense infrastructure in the event that your network needs an increase. And due to these benefits, and many other features which pfSense brings to the table, individuals, network administrators, security enthusiasts, and companies across the world are embracing pfSense. These are just some of the most recognizable names who have adopted pfSense as a core part of their network infrastructure. Needless to say, with organizations such as Google, the US Department of Homeland Security, Shopify, and NASA putting their faith in pfSense, this free open source firewall solution is here to stay.
Use cases
Let's take a look at some use cases where pfSense can prove to be instrumental.
LAN or WAN router
pfSense can act as a LAN or WAN router. LAN, as you know, is basically a group of computers and associated devices that share a common communication line or wireless link to a server. A LAN usually consists of devices connected within a closed area, such as an office or a commercial establishment. A WAN is a geographically distributed private telecommunications network that interconnects multiple LANs. For example, in an organization, a WAN might connect multiple branch offices. A router is used to connect a LAN to a WAN.
Wireless hotspot or captive portal
pfSense can work as a wireless hotspot. The pfSense appliance has significantly more functionality and configurability than a typical SOHO security appliance. It is also slightly more involved to set up. pfSense offers some great features, such as being able to host a Wi-Fi network for guests outside of the main firewall, even using a different public IP to NAT behind.
VPN router
You can also configure pfSense as a VPN router. A VPN is used to add security and privacy to private and public networks, such as Wi-Fi hotspots and the internet. VPNs are most often used by corporations to protect sensitive data.
Firewall
You can configure pfSense as a firewall to put rules and other security settings over the private network. A firewall is a network security system that uses rules to control incoming and outgoing network traffic. It acts as a barrier between a trusted and untrusted network. A firewall controls access to the resources of a network through a positive control model. This means that the only traffic allowed onto the network is defined in the firewall policy. All other traffic is denied.
DHCP or DNS server
pfSense can act as a DNS server or DHCP server. DHCP is a communications protocol that network administrators use to centrally manage and automate the network configuration of devices attaching to an IP network. It removes the need to manually configure IP addresses and automatically assigns an IP address to a device, even when moving to different locations. DHCP is supported for both IPv4 and IPv6, that is, the Internet Protocol version. With the use of DHCP and domain name resolution all on the firewall, it makes life easier for configuring the network traffic precisely the way you need it.
Multi-WAN router support for failover or load balancer
This support for multiple WAN connections enables pfSense to load balance or failover traffic from a LAN to multiple internet connections. With load balancing, traffic from the LAN is shared out on a connection-based, round-robin basis across the available WANs. With failover, traffic will go out to the highest-priority WAN, until it goes down. Then, the next one is used. pfSense monitors each WAN connection using either the gateway IP or an alternate monitor IP address, and if the monitor fails, it will remove that WAN from use. This also reduces latency to users. Load balancing can be implemented with hardware, software, or a combination of both.
Port forwarding or Network Address Translation
You can also use pfSense to forward ports or Network Address Translation (NAT). NAT is the process where a network device, usually a firewall, assigns a public address to a computer or group of computers inside a private network. The main use of NAT is to limit the number of public IP addresses an organization or company must use for both economy and security purposes. NAT helps improve security and decrease the number of IP addresses an organization needs. NAT gateways sit between the two networks—the inside network and the outside network. Systems on the inside network are typically assigned IP addresses that cannot be routed to external networks.
pfSense features
Let's discuss the pfSense features through a use-case diagram:
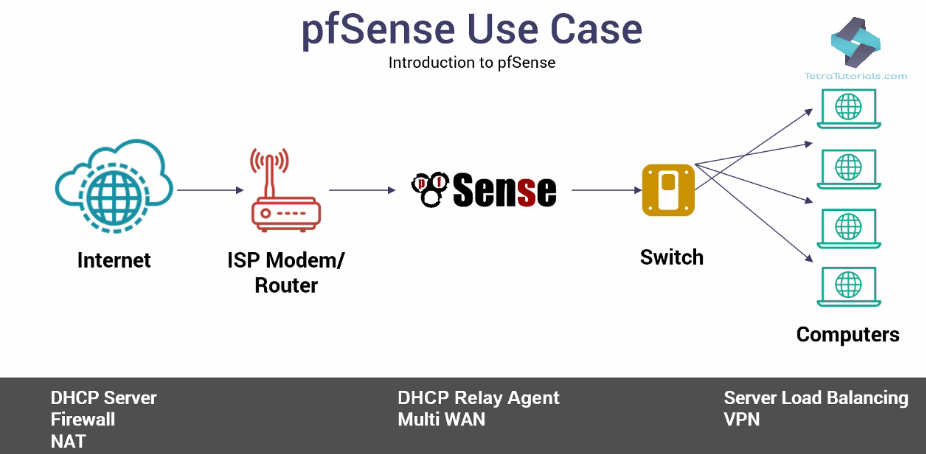
The preceding diagram gives you an idea of how pfSense plays a vital role in the network. The ISP Modem/Router connects pfSense to the internet. The Switch connects pfSense to various desktops.
In this scenario, pfSense acts as a DHCP Server, Firewall, and NAT device. It can play these roles distinctly or all at the same time simultaneously.
Let's explore some other standard features of pfSense:
- The DHCP Relay Agent feature serves the DHCP service for all clients.
- The Firewall feature filters requests and responses by source and destination IPs, and source and destination ports. It also limits simultaneous connections on a per rules basis.
- NAT port forwards include range and use of multiple public IPs and one-to-one NAT for individual IP or multiple subnets.
- The Multi WAN functionality enables the use of multiple internet connections, with load balancing, failover, and usage distribution. With this, you can achieve redundancy across multiple ISP connections, and not only that, you can distribute the traffic from your internal network to the internet to numerous links in a load-balanced fashion.
As a VPN server, pfSense offers two options for VPN connectivity:
- IPsec allows connectivity with any device supporting standard IPsec. This is most commonly used for site-to-site connectivity to other pfSense installations, and almost all other firewall solutions like Cisco, Juniper, and so on. It can also be used for mobile client connectivity.
- The second is OpenVPN. OpenVPN is a flexible, powerful SSL VPN solution supporting a wide range of client operating systems. Let's assume that the computers are in different sites. You can use IPsec VPN to connect them both together.
Now that you're familiar with pfSense, let's go ahead with installation and configuration of pfSense. But before we start with that, let's review the minimum hardware requirements for installing and running pfSense.
Prerequisites for installation
For some of the topics in this book, you may need to take some more initial steps, such as signing up for services and launching a virtual machine.
In this book, we have used the latest stable version of pfSense, which is 2.4.3. pfSense is an open source software and occasionally releases new versions or patches. So, in order to review the latest requirements, you should always refer to the latest documentation. So, let's review it now.
Navigate to the pfSense site's requirements page at https://www.pfsense.org/products/. This page lists some ready-made appliances, which are tried and tested by the pfSense community. If you want to avoid the hassle of building your server and trying out all the components, then it is recommended that you purchase one of the appliances. But, of course, if you are like a tinkerer or a geek, then you can opt for the option of building your server.
Let's review the hardware requirements for building your own server:
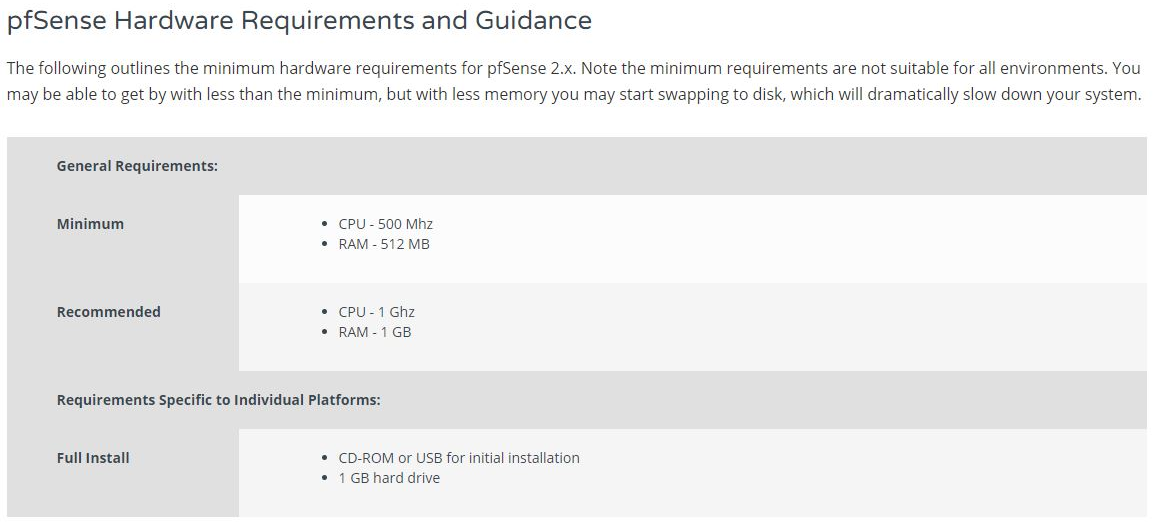
As you can see, the minimum requirements, as of the latest version, are very modest. pfSense can run on a PC with 500 Mhz CPU and 512 MB of RAM. Do you know of any sophisticated software that is capable of running on these low specs? Anyway, the recommended requirements are a bit higher than these. But still, 1 Ghz CPU and 1 GB of RAM is still very modest by modern standards. Here are some additional details for specific components of the system. You can check the compatibility of your network interface cards here as well:

This is very important because pfSense is a firewall and its primary function is securing your network. Besides that, there is also a link to the compatibility list for FreeBSD:

As mentioned earlier, pfSense is based on FreeBSD. So, it'll make sense to check the compatibility of your hardware with the FreeBSD compatibility list as well.
Now that you know all about pfSense and its features, let's install pfSense on a virtual machine.
Installing pfSense on a virtual machine
First and foremost, you need to download the installer files for pfSense.
- To download pfSense, navigate to https://www.pfsense.org/download/:
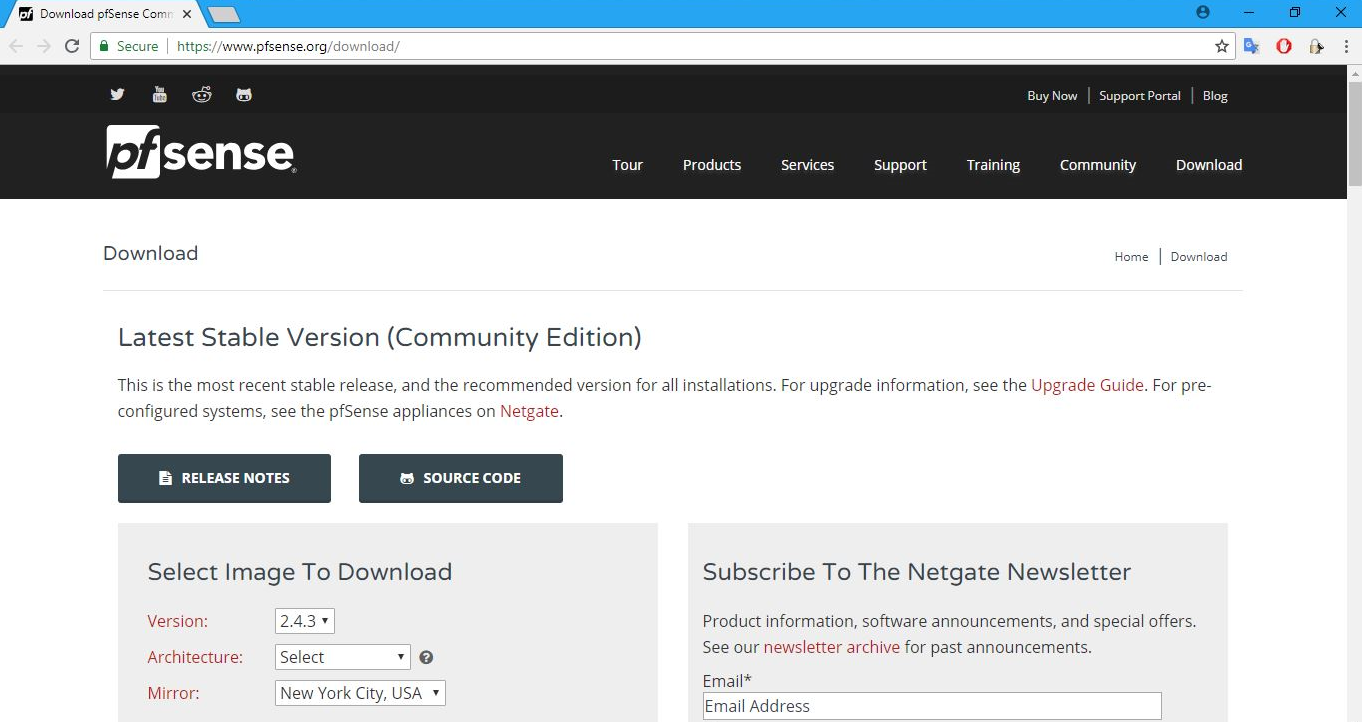
pfSense supports multiple platforms and flavors. It also has various editions and versions available. For the best results, always use the stable version. And, of course, unless you intend to purchase the supported version, opt for the free Community Edition. That is exactly what we'll do here as well.
- From the Version drop-down list choose 2.4.3, which is the stable version we are using. The Architecture specifies the target CPU architecture you intend to use. Select the option depending on your computer. If your system has a 64-bit capable Intel or AMD CPU, use the 64-bit version. The 32-bit version should only be used with 32-bit CPUs. In this case, we will pick AMD64(64-bit). pfSense also supports multiple types of Installer options:
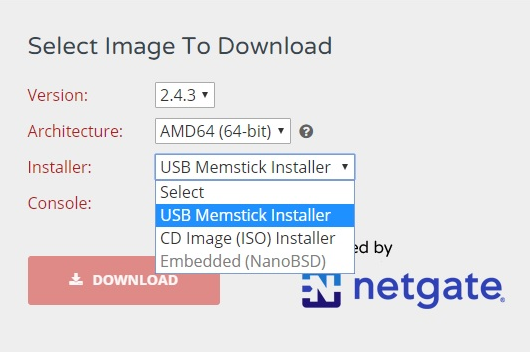
You can download the Installer as a USB Memstick Installer, ISO CD image, or as an Embedded (NanoBSD) image. The USB memory stick image is meant to be written to the hard disk of your target system. Installing pfSense on the hard drive is the preferred method of running pfSense software. In this case, the entire hard drive is overwritten. Note that dual booting with another OS is not supported. The CD Image (ISO) Installer is used to create a CD or DVD version that's used to install on virtual machines or systems with a CD or DVD drive. The Embedded version of pfSense is meant to be written to system hard disk before use, and it is specifically tailored for use with any hardware using flash memory, mostly compact flash, rather than the system's hard drive. As you may be aware, flash memory can only handle a limited number of writes, so the embedded version runs read-only from flash with read/write file systems as RAM disks. The NanoBSD platform has two OS slices and a config slice. One OS slice is used to boot from, the other is used for upgrades. The config slice is where the configuration resides. There are two variations of the NanoBSD platform, namely, the default version, which uses a serial console, and another that supports using a VGA console. Each of these variations also come sized for different sizes of storage media. For this instance, in the Installer drop-down list, select CD Image (ISO) Installer.
- In the Mirror dropdown, select the nearest location to you, and then click on the DOWNLOAD button. Mirror sites are useful when the original site generates too much traffic for a single server to support. Mirror sites also increase the speed with which files or websites can be accessed. Users can download files more quickly from a server that is geographically closer to them.
- After selecting these options, let's click on the DOWNLOAD button to get the required installer files. After the download is complete, once you go to the download folder, you will be able to locate the pfSense installer file. As you will see, the installer file is in a zipped compressed format. You can unarchive this file using any usual compression utility such as WinZip, or WinRAR on Windows, and other similar programs on other platforms.
- Once the ISO file has been extracted, you can burn the ISO to a CD, which will be a bootable CD, and use it to then install the software on your PC, that is, if you are using a physical hardware device. Alternatively, you can use the ISO file to create a virtual machine. You can also run pfSense in live CD mode, where you can just run the pfSense software from the CD without installing anything on your system's hard drive. The benefit here is that you can test drive pfSense without changing any configuration on your system. However the drawback is that you will lose all your configuration once your system restarts. So, for now, we will stick with permanent installation of pfSense on a virtual machine.
Let's go ahead and launch a new virtual machine for pfSense.
Launching the virtual machine
We will use VirtualBox for hosting the virtual machine, but you are free to use any other virtualization platform, such as VMware Workstation and Hyper-V:
- After launching VirtualBox, we have to create a new virtual machine for pfSense by clicking on the Machines menu and then New:
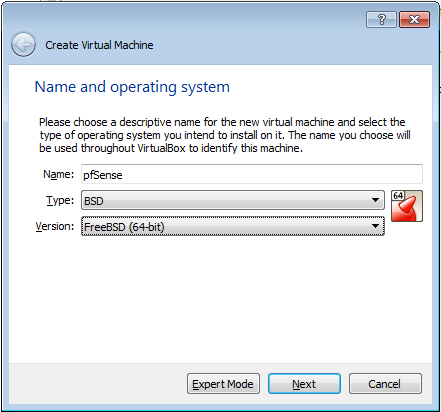
- The Create Virtual Machine wizard will launch, which will walk you through the process of creating and launching a new virtual machine. The creation is rather straightforward, with default choices.
- Enter the desired Name of the VM, select BSD from the Type drop-down menu, and select FreeBSD(64-bit) from the Version drop-down menu.
- Select the desired RAM for your VM. The recommended size is 512 MB but it will run smoothly at 256 MB if you are running low on RAM.
- Also further into the steps you can select the size of the virtual hard disk. We recommend at least 4 GB in size but the minimum requirement is 1 GB if you are running low on disk space. The click Create.
This will successfully create a virtual machine for you. Now, we are left with configuring and completing the installation.
Configuring VM and completing the installation
The VM is now created, but you still have some network configuration to do. pfSense is all about networking and security. And, so far, you have not allocated any network interface cards to this virtual machine. So, let's go ahead and proceed with the network configuration. After that, you need to finish the installation for pfSense.
Typically, pfSense isolates the network traffic for internal and external networks using different network interface cards. Consider a scenario where you have one network device that is connected directly to the internet, and the second network device is connected to the internal network. That is precisely how most pfSense installations are configured.
- From the Settings menu in VirtualBox, go to Network settings. Currently only one network adapter will be enabled, Adapter 1, which will be the WAN network.
- Now, we will add one more internal network adapter by clicking on Adapter 2 and enabling it by checking the Enable Network Adapter check box:
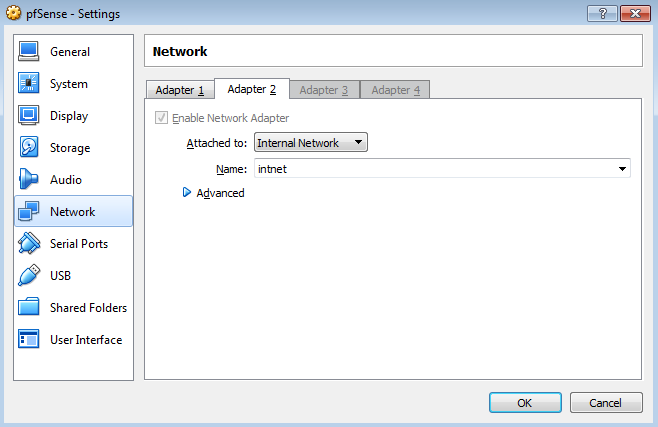
- From the Attached to drop-down menu, select Internal Network. Within the context of VirtualBox, an Internal Network segment is a private network that is shared by other virtual machines. This LAN segment can be useful for multi-tier testing, network performance analysis, and situations where virtual machine isolation is important. After taking care of the internal network adapter, let's also mount the ISO image for pfSense software.
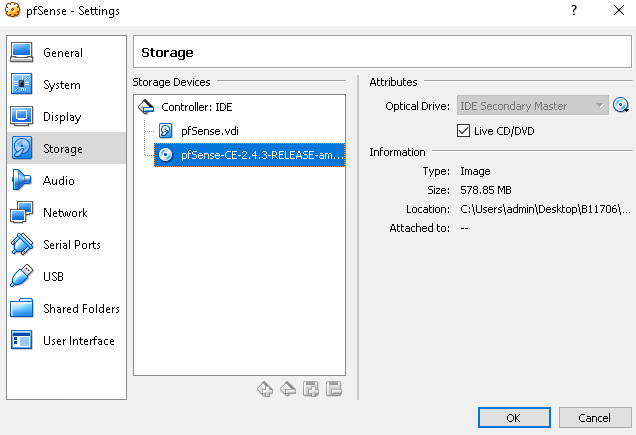
- Go to the Storage settings from the Settings menu and select the Live CD/DVD check box.
- Mount the pfSense ISO image to the CD-ROM by clicking on the Optical Drive drop-down menu:
- Click the OK button, which will save the settings. Now that the virtual machine has been configured properly, we can start the VM.
Now, VirtualBox will launch this virtual machine. And since you have already mounted the bootable CD ISO image, it will boot into pfSense installer.
- In the home screen of pfSense installer, you are given a few choices on how you want to install pfSense. The first and default option is Boot Multi User. This will continue the FreeBSD boot process. So, just proceed with the default options and press Enter to boot into the FreeBSD installer. The kernel will start to load and display the boot output. After a minute, a text prompt will appear to install or enter recovery mode.
- Press I to launch the installer. The installer will start now and it will give us the opportunity to change the display and other system settings.
- Let's accept all the default settings:

Then, it offers the choice of a Quick/Easy Install, Custom Install, and several other options. Select Quick/Easy Install and press Enter. This easy install will take care of a lot of things such as disk partitions. Select OK and the installer will begin. pfSense will be installed on the first available disk in the system. It will take a few minutes to copy all of the files to the target disk, so allow it some time to finish. When the files have finished being copied, the installer will prompt to select either the Embedded kernel or Standard Kernel; select Standard Kernel:
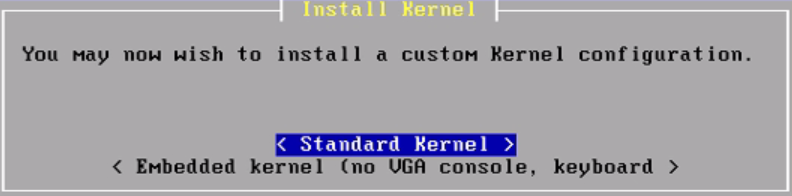
Basically, this setting controls whether you get a VGA terminal or a serial-based console. If this were an embedded device with no video card, then we would have picked the Embedded kernel option. The installation continues.
- Once the installation is complete, pfSense needs to reboot. So, press Enter to reboot. While rebooting, make sure you unmount the CD so that the virtual machine boots from its hard drive and not from the CD-ROM again.
- Click on the Remove Disk from Virtual Drive from where we mounted the ISO image earlier. You can ignore any warning dialog which may pop up.
- Now, let's get back to the virtual machine. The machine has rebooted, and this is the boot screen for pfSense:
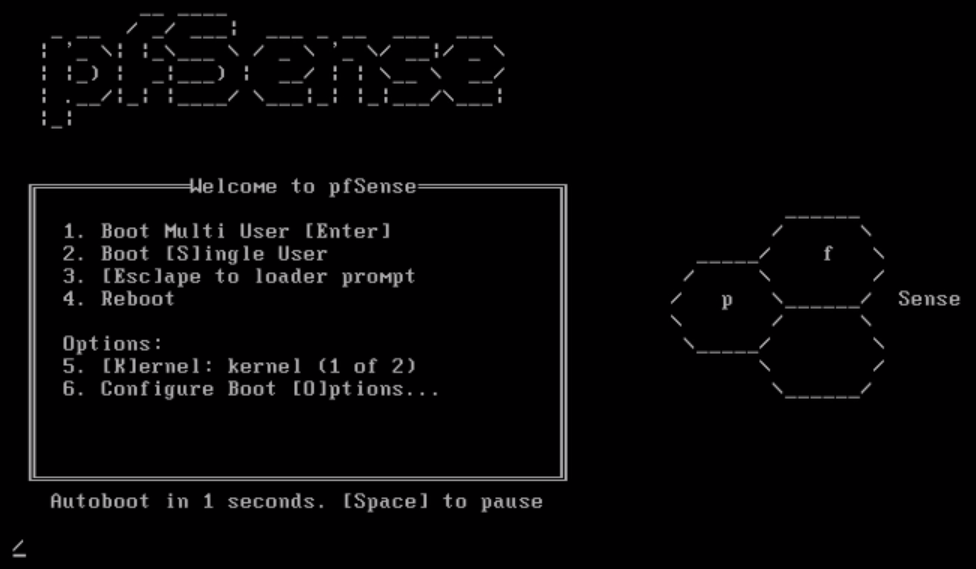
- Let's press F1 to continue booting pfSense. Note that this time, it is booting from pfSense, which has been installed on the hard drive of this system. Once the installation part is complete, we will get a screen like the following:
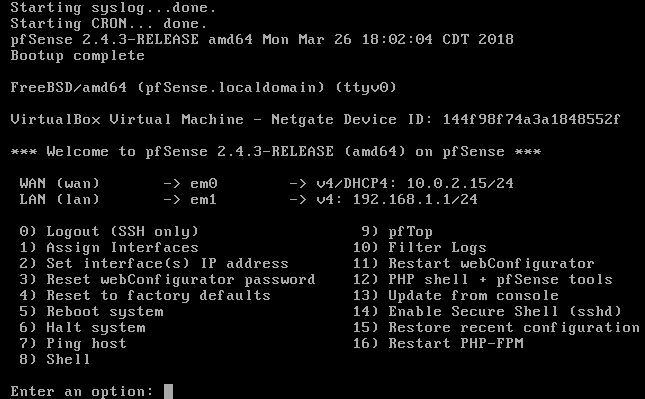
Here, you can see that one of the IP addresses and networking interfaces has been assigned to WAN's network connection. This is the em0 network interface. em1 has been assigned to the internal LAN network. The WAN network interface has been assigned a dynamic IP address. This is typical for general-purpose-based internet connections such as cable, ADSL, or fiber optic ISP connections. You may also be allocated a fixed IP from your ISP. These settings can easily be changed within the pfSense admin console, or right here on the admin console.
- If you want to change the IP address, you can change it by selecting the second option: Set interface(s) IP address, to whatever you need to change it to. We will visit these shortly. The DHCP IP address assigned to the WAN connection is 10.0.2.15/24, while the LAN, or em1, has taken the network address 192.168.1.1/24. The LAN interface will become the internet gateway for all the devices within the internal LAN network.
Once the installation is complete, you need to configure pfSense. So, let's do that now.
Configuring pfSense
This next phase of configuration will be done through a web-based administration portal provided by pfSense. You can use this rich web interface to configure all your network components, firewall rules, VPN settings, and so on. The LAN network interface's IP address exposes this web-based administration console. So, in this case, you will navigate to the IP address 192.168.1.1 in order to access the administration portal for pfSense.
As the client machine, we have set up another virtual machine which is running Windows Server 2012 R2. Let's head over to the Windows Server.
Before we attempt to navigate to the pfSense web-based configuration portal from this client machine, let's make sure that this Windows Server virtual machine is on the same network as the pfSense server:
- Let's access network settings for this Windows system. Right-click on the Windows Home icon and select Network Connections. This Windows machine only has one network adapter called Ethernet0.
- Right-click on Ethernet0 and select Properties. Now, double-click on Internet Protocol Version 4 (TCP/IPv4). Change the IP address to 192.168.1.2, the gateway IP address to 192.168.1.1, and the DNS server to 192.168.1.1:
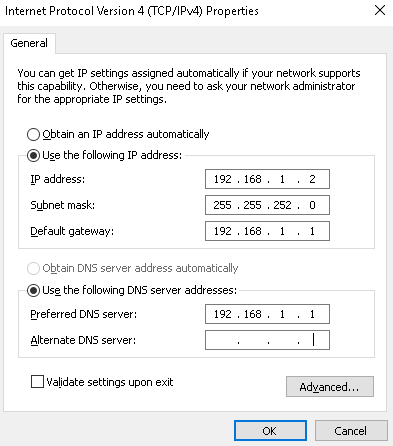
Here, we are trying to accomplish a few things with this configuration.
First, you need to make sure that the Windows client machine is on the same subnet as the pfSense server. Second, you want to make sure that this client machine is using pfSense as its default gateway and DNS server.
- After configuring the IP settings, click on OK. Now, we can proceed with the next phase of configuration.
- Right-click on the Windows Home icon and select Run. Run the cmd command to open the Command Prompt.
- Let's try to ping the pfSense server. Execute the ping command as follows:
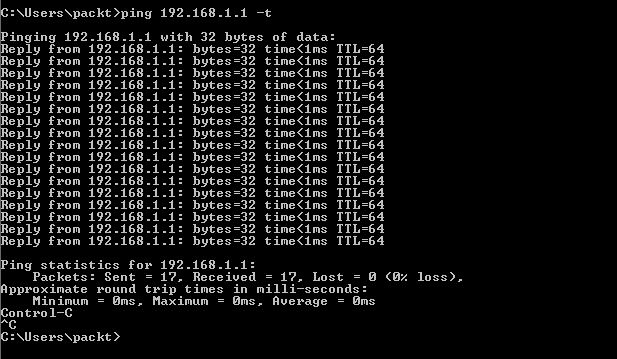
Here, 192.168.1.1 is the IP address of the pfSense server. The -t option pings the specified host until it is asked to stop. Since we're getting replies, it confirms that the connection is working absolutely fine.
- Press Ctrl + C to stop the ping command.
- Execute exit to close the command window.
Now that the connectivity has been established, it is time for us to get familiar with the configuration portal for pfSense.
- Launch your favorite browser and navigate to the pfSense server's IP address 192.168.1.1. By default, pfSense exposes the configuration portal over an HTTPS endpoint. It uses a self-signed SSL certificate for this purpose. Your browser may complain about the security certificate. You can safely ignore it and proceed. An SSL-enabled connection is more secure, even with this self-signed certificate, as long as you are familiar with the source of the certificate.
What we will be looking at once the page loads will be the login page for the pfSense server. The default username and password is admin and pfsense, respectively. Note that it is all in lowercase.
- Enter the credentials and click on SIGN IN:
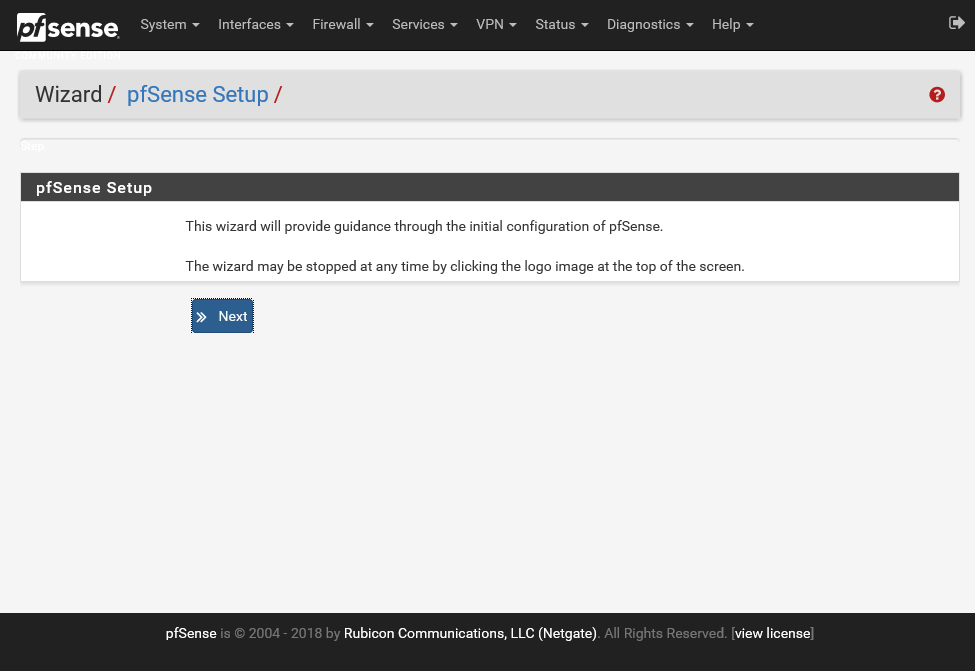
You have successfully installed pfSense server in a virtual platform. Now, you can connect to it over the network via this client system. After the login, pfSense brings you to a helpful Wizard, which will guide you through the rest of the configuration and setup. This wizard is not mandatory. You can skip it at any time and choose to configure your pfSense server manually.
- Let's go ahead with the wizard for now and perform the initial configuration. Keep clicking on Next until you get to the General Information tab:
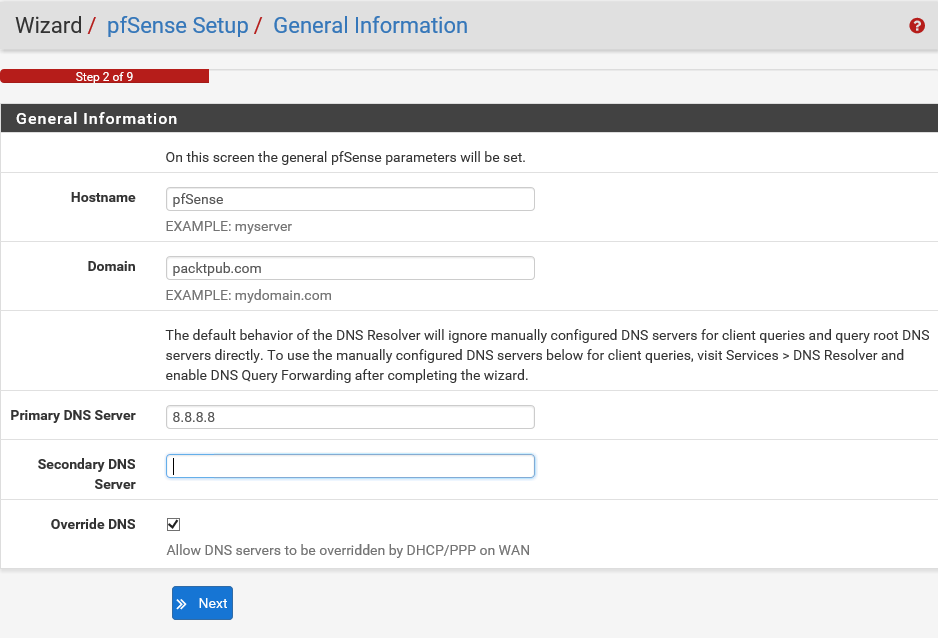
On this screen, you need to enter some general information about your pfSense server.
- Let's accept the default value for the Hostname, which is pfSense.
- Next is the Domain name in which pfSense is used, together with the Hostname. This will form the Fully Qualified Domain Name (FQDN) of the firewall.
- Let's input packtpub.com as the Domain name.
- Next, you are given an opportunity to configure DNS servers for pfSense server. If known, these DNS servers will be used for pfSense itself, as well as for the DHCP clients if the DNS forwarder is off, and for PPTPVPN clients. These may be left blank if you're using a dynamic WAN connection that provides DNS servers, such as PPTP or DHCP. They may also be left blank if the DNS resolved is used in non-forwarding mode. Let's use the Google global DNS server 8.8.8.8. This last option allows you to override the DNS settings. If a dynamic WAN is present, unchecking this box will make the system use only the servers specified manually and not the ones provided by the ISP. This is especially useful when using open DNS servers for access control or Google Public DNS to work around flaky ISP DNS servers. For now, let's accept the default value for this setting and click on Next.
- For a lot of networking use cases, it is very important that pfSense server has the correct time. To ensure that pfSense server always has the correct time, it can synchronize the system clock with an NTP server. As you may know, Network Time Protocol, or NTP, is a networking protocol for clock synchronization between computer systems over packet-switched, variable latency data networks:
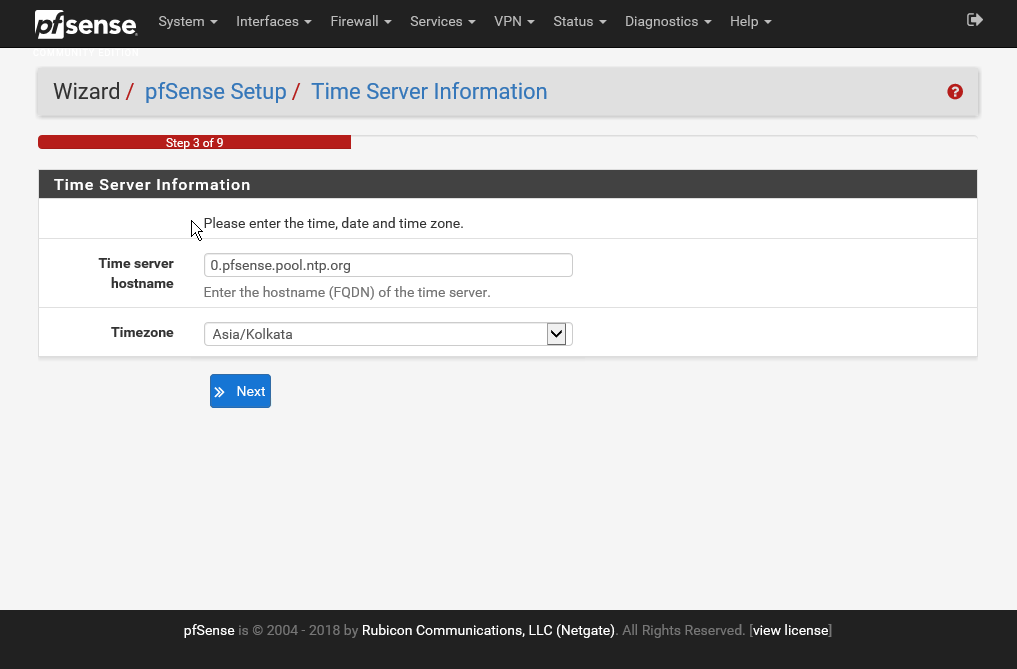
Here, pfSense has provided a default NTP server. Let's accept that and also set the Timezone. You need to select the time zone as per your location. In this case, we have selected Asia/Kolkata. Then, you can click on Next.
- You now need to Configure WAN Interface. Within the context of pfSense, WAN interface is the connection from your ISP or upstream connections, which allow you to connect to the internet:
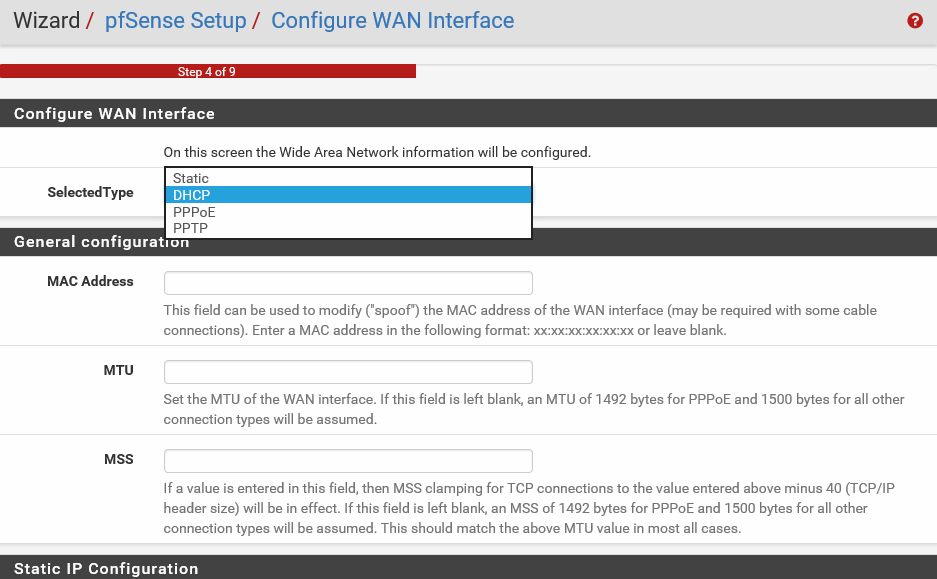
- The SelectedType DHCP means that the network interface will get its IP address from a DHCP server. With most small, home office, or even corporate ISPs, they use the DHCP method. You can choose to make it static if your ISP has provided you with a public IP address. If you select Static, then you must enter the networking details for your setup, like the public IP Address, Subnet Mask, and Upstream Gateway. pfSense also has support for PPPoE and PPTP connections. These are for specialized use cases, and we will not discuss them in this book. In this example, let's accept the default value of DHCP. You will notice that the setup wizard is smart enough to understand that for DHCP setup. You do not need to fill all the fields in the Static IP Configuration section. So, the fields shown in the preceding screenshot are disabled if your SelectedType is DHCP.
- If you scroll down, you can see that all the default values are good, so you can go ahead and accept them. You can then click on Next.
- Now, you need to Configure LAN interface:
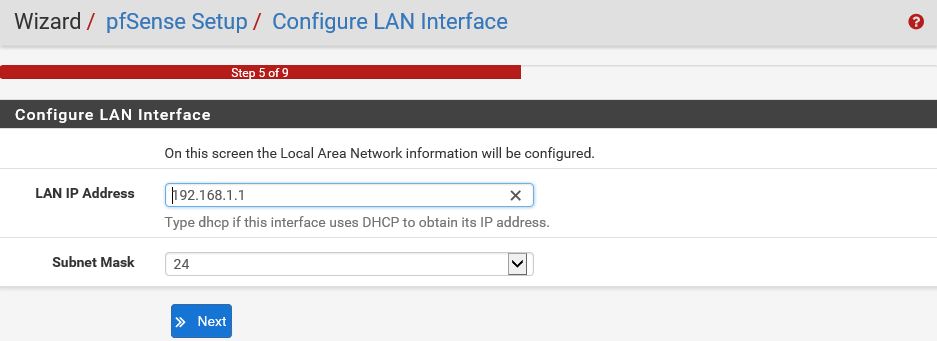
This is the configuration for your internal network. So, you must make sure that these settings are compatible with the rest of your internal network.
pfSense is generally at the periphery of your network boundary, so all your networking equipment such as switches and servers will need to be ready to route their external traffic via this pfSense server. Anyway, these default values of the LAN IP Address 192.168.1.1 and the Subnet Mask of 24 were already set up by us during the installation phase. So, let's accept them and click on Next.
- Now, you need to Set Admin WebGUI Password. WebGUI stands for Web-based Graphical User Interface. If you remember, the default admin password that you used to log in to this web console was pfsense. You now have an option to change it here for better security.
- Let's change the password to a more secure one and then click on Next:
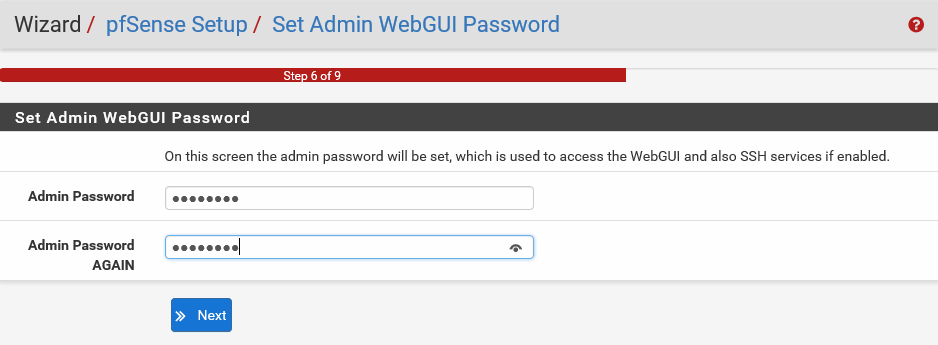
Make sure that you remember the password so that you can log in to the system again. And that's it. The wizard has finished.
Mind you, pfSense has worked really hard to make the initial configuration as easy and as painless as possible. But don't let this simplicity fool you. There is a plethora of settings you can tweak in pfSense to make it behave exactly the way you want. We'll go over these settings in the upcoming sections.
pfSense has now been configured through the WebGUI.
- Click on Reload to save all of the configuration settings:
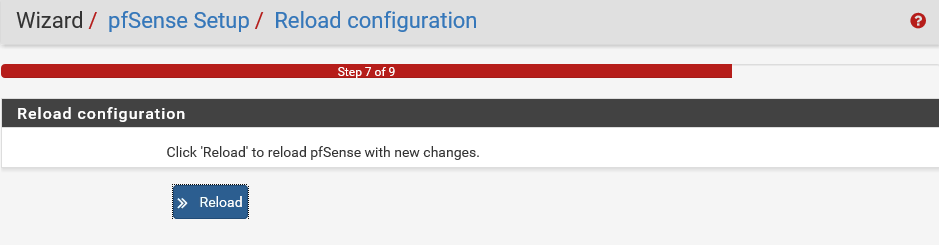
pfSense will save the configuration and reload itself:
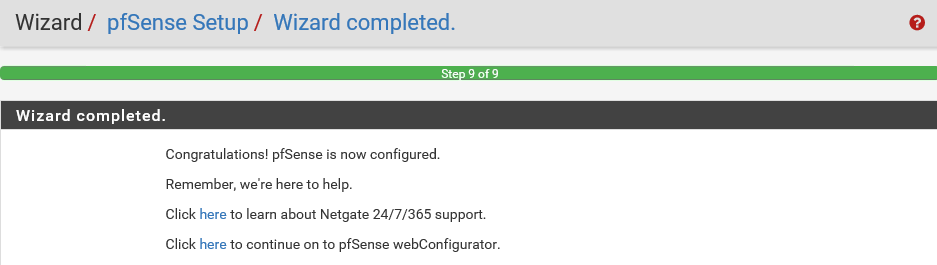
Great! The configuration is now complete and changes have been saved.
- Click on the second link to navigate to the main pfSense webConfigurator dashboard:
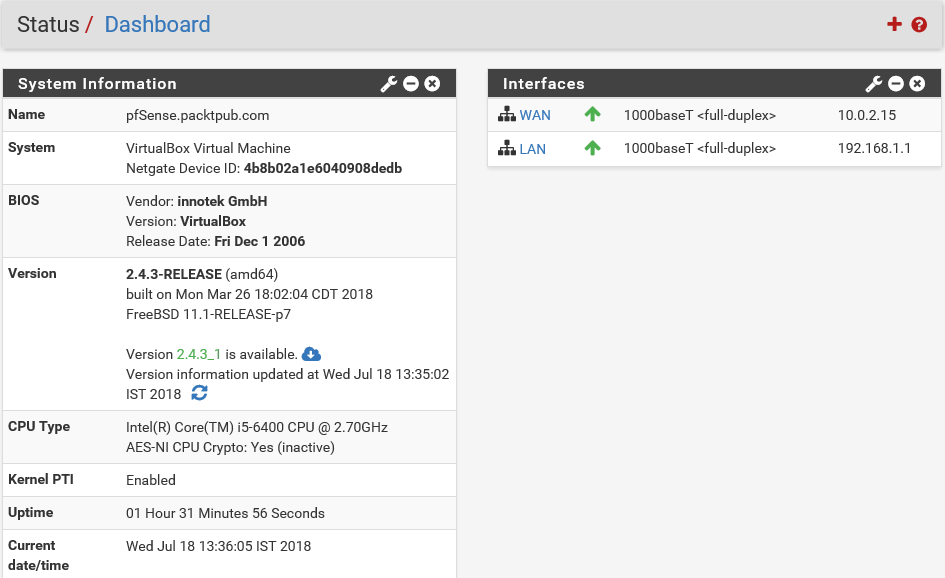
This is the main Dashboard for this pfSense server, where you can see an overview of the pfSense system. The domain Name is pfSense.packtpub.com. pfSense's Version is 2.4.3-RELEASE(amd64). Uptime is how long this pfSense server has been up. pfSense is so stable and robust, and we have seen it run for months and even years without any downtime.
On the right-hand side, you can see that all the network interfaces are also listed along with the names and current status. As you can see, we have two interfaces. One is attached to a WAN connection and the second one is attached to a LAN connection. Both of them are in an up state, indicated by the green up arrow. A whole bunch of vital information about this pfSense server is available right on the central dashboard of pfSense. If you're wondering how this pfSense WebGUI console is related to the pfSense server you installed, let's have a quick peek at the server.
You'll notice that it has detected that the admin account has logged in to the WebGUI from the IP address 192.168.1.2:

pfSense WebGUI walkthrough
You just saw the main dashboard of the pfSense WebGUI interface, but that is just us scratching the surface. Now, let's walk through the pfSense WebGUI interface and check out what else it has to offer.
Okay, now, back in the pfSense WebGUI dashboard, let's explore this:
- Click on System and then on Advanced:
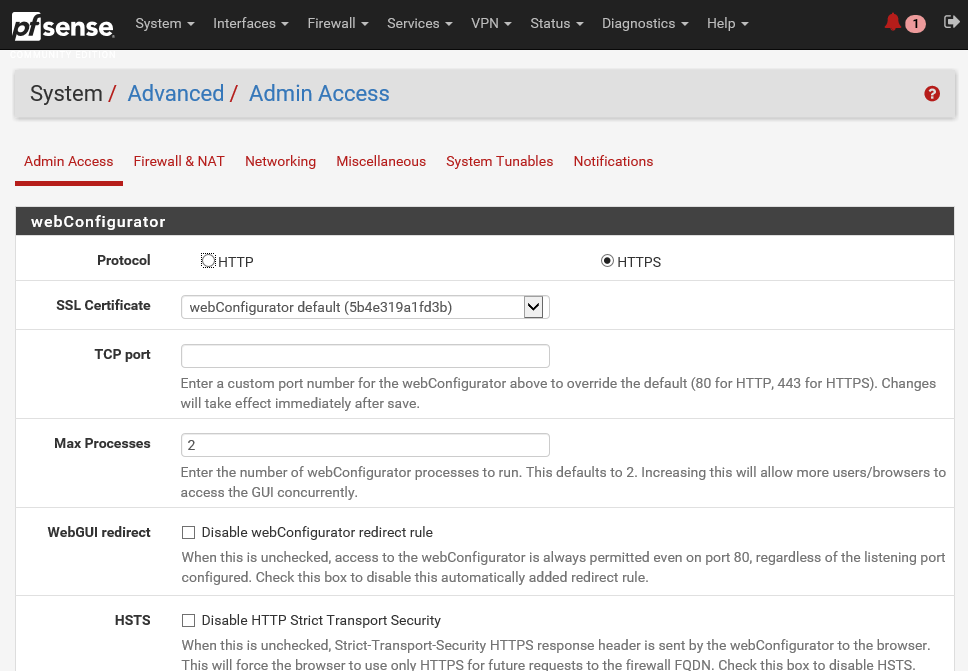
There are multiple tabs here with different information:
- The Admin Access tab contains settings for the WebGUI such as the Protocol (HTTP or HTTPS) and port, security settings for management, SSH daemon settings, serial console settings, and console options
- Firewall & NAT contains settings that tweak the behavior of the firewall, such as fragmentation, optimization algorithms, and state table settings
- Networking contains settings for IPv6 and various network interface settings, such as hardware, checksums, device polling, and ARP message suppression
- Miscellaneous contains settings that do not fit into the other categories
- System Tunables contains an interface to manage various FreeBSD system values that tweak different system behavior
- Notifications control how the system will notify administrators when an alert happens
The advanced settings available here do not normally need adjusting on a typical setup. These here are for additional tweaking or for those who need the functionality given. We do not need to change anything here, so let's move on.
- Click on System again and then on Cert. Manager:
pfSense includes a central certificate manager under System and Cert. Manager. This central certificate management takes the place of several other locations inside pfSense, which you can use to acquire certificates we entered directly into their configurations, such as for HTTPS SSL access to the WebGUI, OpenVPNPKI certificate management, and IPsec certificate management. Each set of certificates is bound to a certificate authority. These are managed from the Certificate Authority tab. Certificates are managed on the Certificates tab. Certificate Revocation Lists (CRLs) control which certificates are valid for a given CA. If a certificate is compromised in some way or is invalidated, it can be added to a CRL and that CRL may be selected for use by an OpenVPN server. Then, the OpenVPN client using that certificate will no longer be allowed to connect. Certificate revocation lists are managed from the Certificate Revocation tab.
- Click on System and then on General Setup:
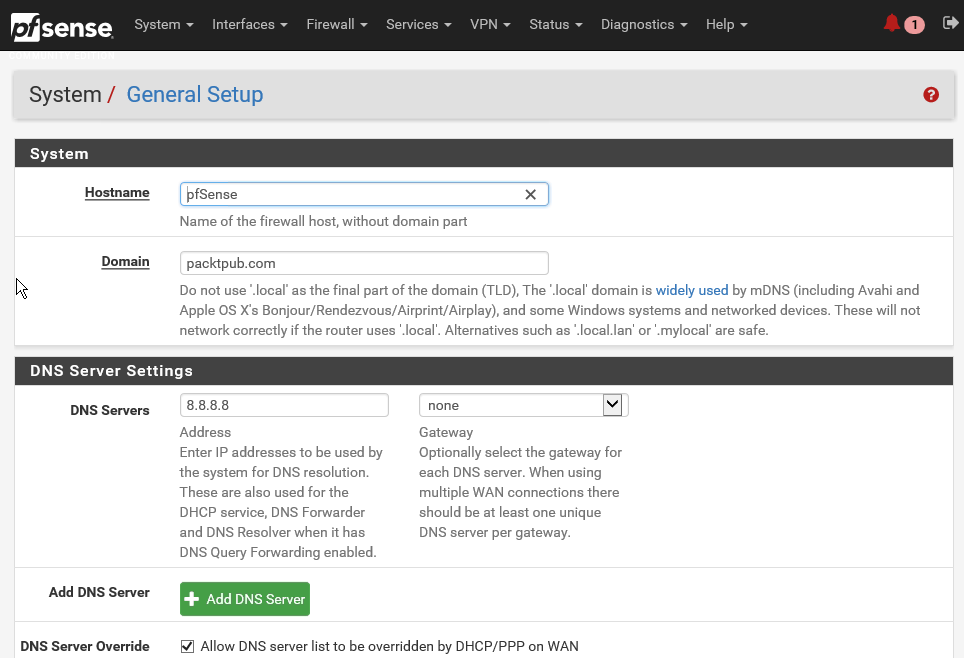
- You can scroll down and look at all the general setup settings available. These are more or less the same settings which you set while going through the configuration wizard.
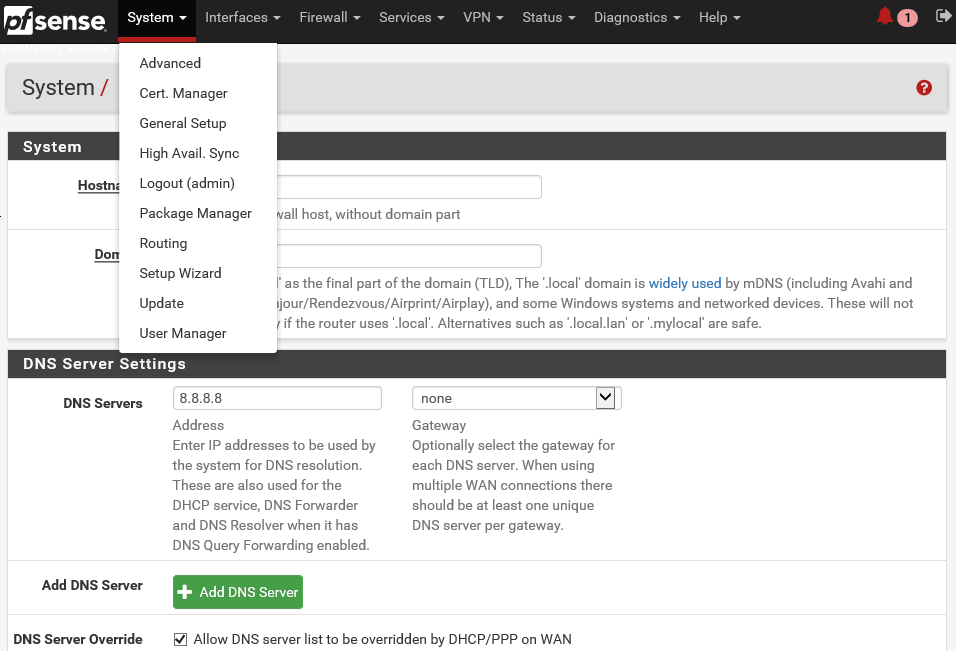
Similarly, the following are the other options available under the System menu:
- High Avail. Sync: High Avail. Sync which can enable you to deploy multiple instances of pfSense and configure them in a high availability mode. You can also log out of your active session from the WebGUI.
- Package Manager: Package Manager used to install and maintain packages on a pfSense firewall.
- Routing: Routing enables you to set up gateways and gateway groups. A gateway is a system through which pfSense can reach the internet or another network. So, if multiple LANs are in use, or if there are multiple paths to the internet via different gateways, the associated gateways must be defined. Gateways must also be assigned for networks that are reachable via static routes.
- Setup Wizard: The Setup Wizard will enable you to reset your configurations for your pfSense server.
- Update: This menu will allow you to update your pfSense server with the latest version of the software.
- User Manager: Let's click on it and explore further. In pfSense, user management has been centralized under this option.
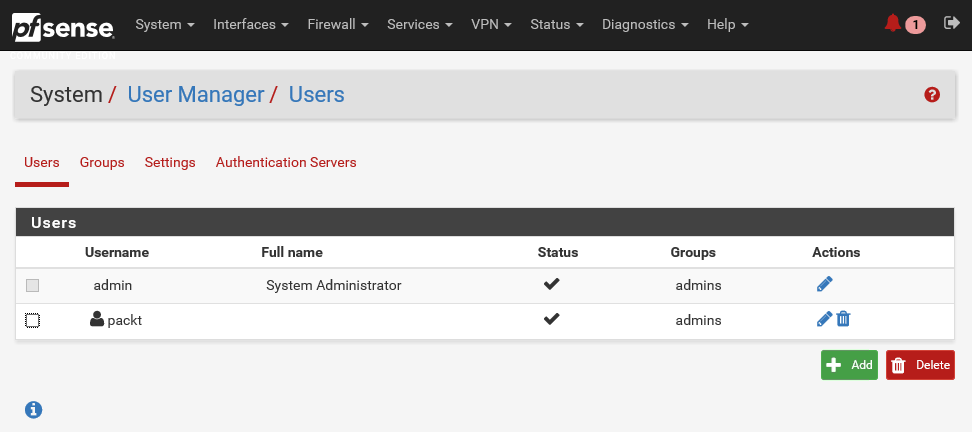
This takes the place of the individual user management and access to server settings that used to be available under various subsystems. Users are managed at the list view on the Users tab. The admin user cannot be deleted, and its username cannot be changed. You can see this admin account in the following screenshot. The standard practice is to create at least one other user. So, let's do that.
- Click on the Add button to add another user:
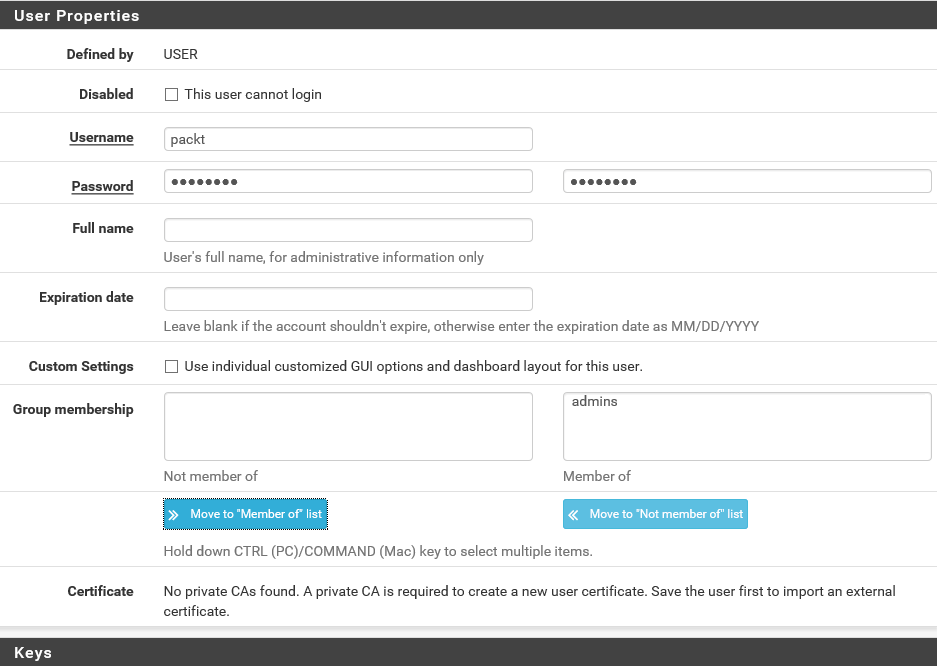
- Enter a Username and Password. Let's call this new user packt. Repeat the password to confirm.
- The next setting is Group membership. pfSense has this notion of role-based security. Users can be a member of groups or roles, which can have different access rights. By default, there are two groups, namely all users and admins. Members of the admins group have full access to the WebGUI. For now, let's assign admins group to this new user. For production environments, of course, you should consider setting up different groups with more fine-grained permissions. Click on the Move to Member of list button and then on the Save button.
You've now created a new pfSense user:
The question that comes to mind naturally is, why create a user account when you already have an admin account? Well, the answer is simple, for security purposes!
The admin account has far-reaching privileges to change the entire configuration of the pfSense server. Using an admin account makes you vulnerable to attacks. If this account is compromised in any way, then any malicious hacker can make changes to pfSense, whereas, if you are using a regular user account and a weakly privileged account is compromised in any way, you wouldn't have much to worry about. And since admin is a public account in pfSense, anyone can try a brute force dictionary attack to crack the password and gain access to your pfSense server. For that reason, the best practice is to disable the default admin account and set up other accounts for managing your pfSense server. This is called security by obscurity.
- All you need to do is select the edit icon for the admin user and select the This user cannot login checkbox:
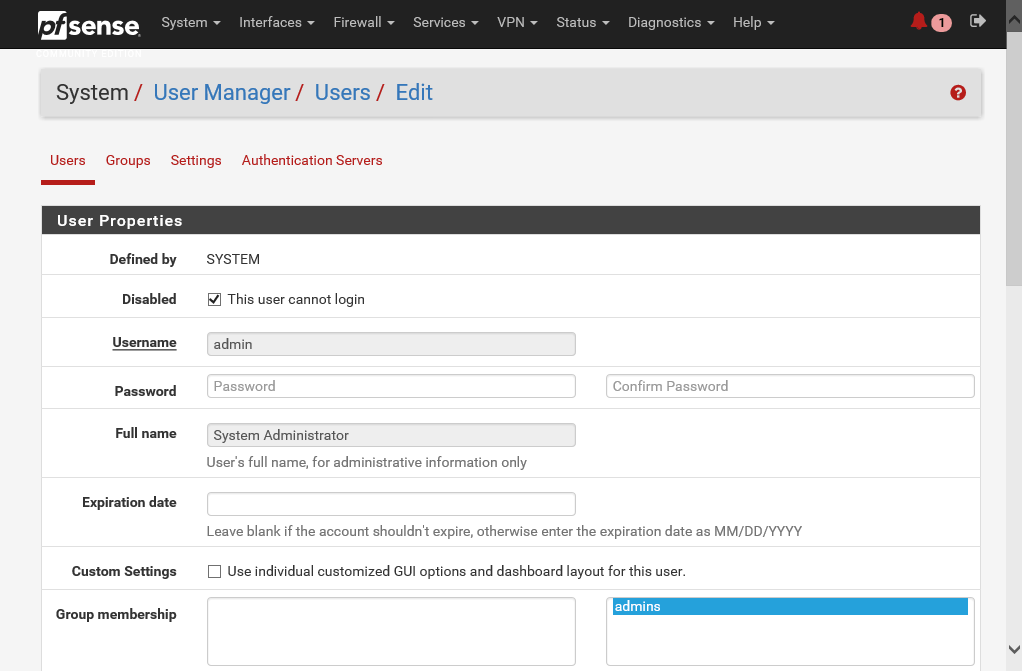
- Save the settings and log out from the account.
When you try to log in again, you will see that you do not have access to log in. So with that, effectively, you have reduced the attack surface area for hackers to try and guess the password and log in to your pfSense server. Now, let's try to log in using the new packt user account.
You can see that it works. Every time you log in to the console, pfSense automatically runs a query for an updated version of the software. If it finds an updated version, it will inform you right here.
You can just click on this version link to upgrade your pfSense server. It's easy as pie. It is recommended that you keep your pfSense software up to date, unless there is a very good reason to defer the upgrades.
- To confirm that the admin has been disabled, go to the System drop-down menu option and select User Manager:
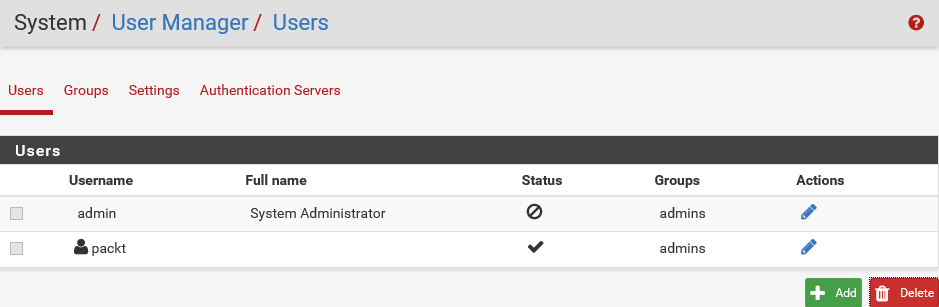
As you can see, here, admin is disabled. Instead of admin, we are using the user account packt for security purposes.
- Let's move on to the Interfaces drop-down. There are two interfaces: LAN and WAN. Select WAN and scroll down to review all the settings configured for this interface. As you can see, pfSense gives you a lot of power to tweak the settings on each interface. Let's take a quick peek at the second interface, which is the LAN interface:
You will see information such as IP Address and Subnet mask.
- The next tab is Firewall. Click on it. You can configure NAT, Traffic Shaper, Virtual IPs, and so forth from here.
- From the Services tab, you can select all the services provided by pfSense, such as DHCP Server, DHCP Relay, DNS Resolver, and Dynamic DNS.
- Under the VPN menu, you can configure the various types of support VPN connectivity options. You have IPsec, OpenVPN, and L2TP. If you click on the Status tab, you can see a lot of other information about various services running on the pfSense server. This applies for the Diagnostics, Gold, and Help tabs.
This was a high-level overview of the pfSense WebGUI configuration console. We will visit many of these options and settings in the upcoming demos but this quick overview should give you an idea of how flexible and feature-rich pfSense really is.
Configuring pfSense as a DHCP server
Now that you are familiar with the pfSense interface, let's see how to configure the various pfSense services, starting with the DHCP server:
- Let's open the WebGUI administration console for the pfSense server. Now, click on the Services menu located on the top toolbar and then click on the DHCP Server.
The DHCP Server in pfSense will hand out addresses to DHCP clients, and automatically configure them for network access.
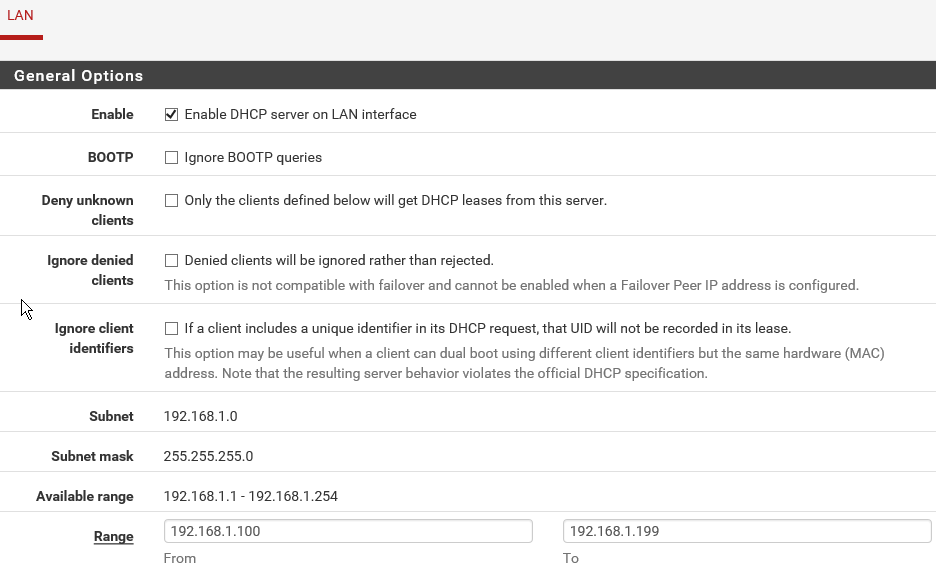
By default, the DHCP server is enabled on the LAN interface. In case you can see that the DHCP server is not enabled in your instance of pfSense, you can check the box to enable it, as shown in the previous screenshot.
Using the Deny unknown clients option, DHCP access can be prevented for any client which is not included in the list at the bottom of the page. Similarly, static ARP may also be enabled to further restrict access, so that only the clients who are listed can talk to the pfSense router. There are other options such as Subnet and Subnet mask. These will be assigned to the clients when they get a unique dynamic IP address from the DHCP server. Currently, the Subnet is set to 192.168.1.0 and the Subnet mask is set to 255.255.255.0. By default, the DHCP server automatically sets the DHCP address range. The DHCP address range is the range of IP addresses that the DHCP server can assign to network devices. IP addresses outside of the DHCP address range are reserved for statically addressed computers. You can see the available range of IP addresses, which is 192.168.1.1 to 192.168.1.254. So, that is 255 IP addresses that you can have in your internal network. In most cases, this is more than enough; however, if you have more devices in a larger network, you can change the Subnet mask to get a larger range.
- You can also configure the actual range to be different than the entire available IP address range. That way, you can exclude some IP addresses from the dynamic pool, and use them for static IP allocations:
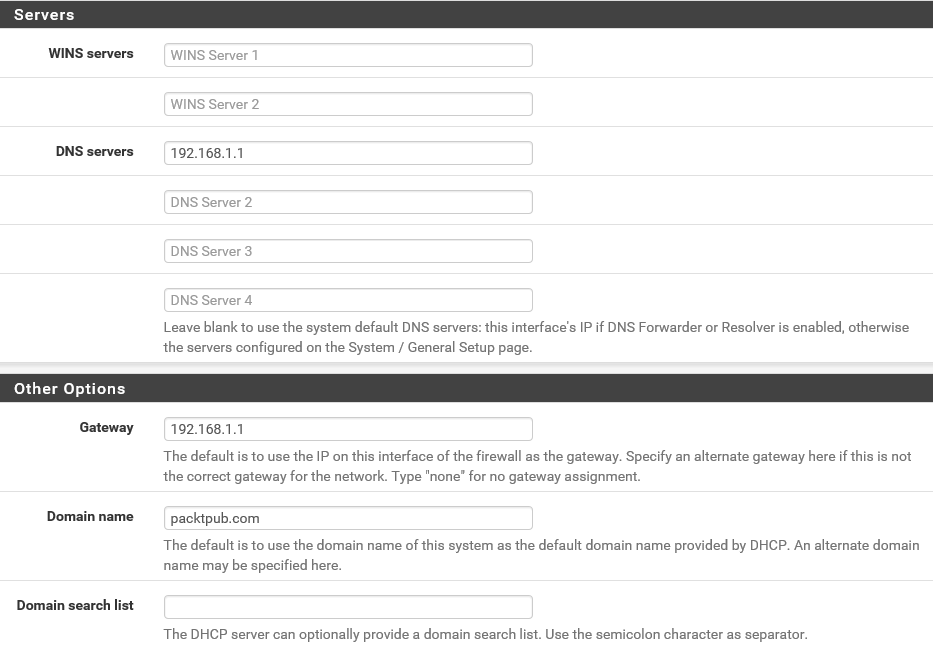
You can also set some more options. DHCP servers can be configured to provide optional data that fully configures TCP/IP on a client. Some of the most common DHCP option types configured and distributed by the DHCP server during leases include the default gateway, router, and DNS parameters. Even though pfSense is smart enough to assign the correct values based on the usual configuration, you can specify specific options here. For instance, let's set the first DNS server field to 192.168.1.1, which is basically pointing the DNS to this pfSense server.
- In the Gateway field, let's also enter 192.168.1.1, which once again will assign this pfSense server as the default gateway to the DHCP clients. In the Domain name field, enter packtpub.com. Then, click on Save. Here, you will get the confirmation message.
The DHCP server is now configured. Great!
Now, let's play around with the networking settings for this Windows Server client system and observe what effect these pfSense DHCP changes had on the clients:
- Open the Network and Sharing Center in the Windows 2012 Server client.
- Click on the Change adapter settings link.
- Double-click on Ethernet0 and then click on Properties. Here, double-click on IPv4 settings. Originally, we'd assigned the static IP address of 192.168.1.2 to the server. Along with that, we also specified the other settings for the DNS and Default gateway explicitly, but now, we can get these settings from the DHCP server.
- Select the Obtain an IP address automatically option and also select the Obtain DNS server address automatically option:
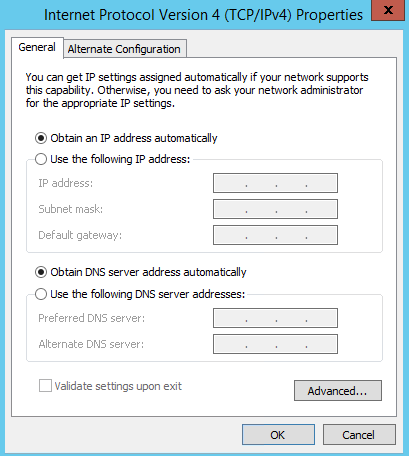
Since the DHCP server has been configured to pass on all these options directly to the clients, we do not need to specify them here individually for any device on the network. That is the true benefit of a DHCP server.
- Click on OK and close the windows.
- Now, let's check the IP address of the client machine. It should receive a new IP address from the DHCP server. Open the Command Prompt and execute the following command:
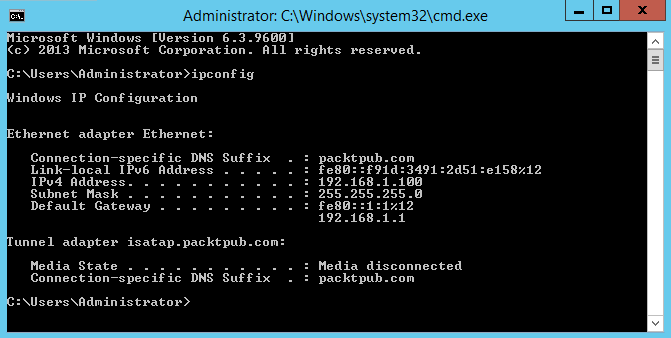
As you can see, the new IP address assigned to this system is 192.168.1.100.
The rest of the settings have also been assigned correctly to this client machine. This is exactly what we expected. So, excellent! You have now finished configuring the DHCP server.
Next, let's add another client to the same LAN network. Here, we have another virtual machine running Windows 7:
- Let's open Network Connections. This system belongs to the same network, but, as you can see, the LAN network adapter is disabled. Let's enable it.
- Right-click on the icon and select Enable. This adapter has already been set up to get a dynamic IP address for the DHCP server. This adapter is connected and it should have received a new IP address. Let's check it.
- So, open the Command Prompt and execute the ipconfig command again:

The IP address is 192.168.1.101 and all other networking settings are also as per expectations. If you check the range from the web browser, the IP address is within the specified range for this DHCP server.
- Now, let's check how you can control the DHCP server. For that, click on Status on the top toolbar and then on Services. Here, you can see all the services running on this pfSense system:
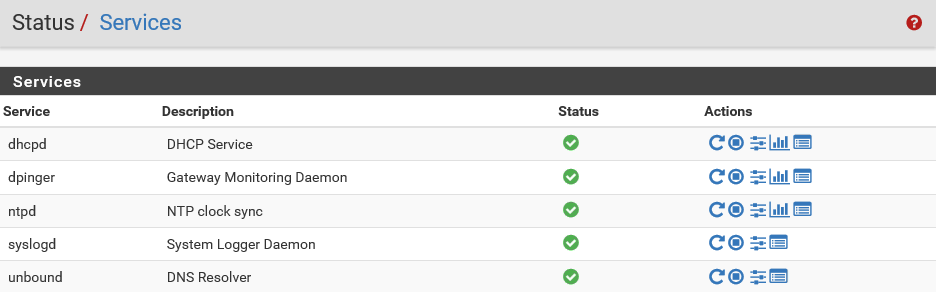
The first one is DHCP. You can see that the DHCP service is currently running.
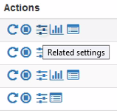
- Let's stop the service from the actions panel. Click on the Stop icon:
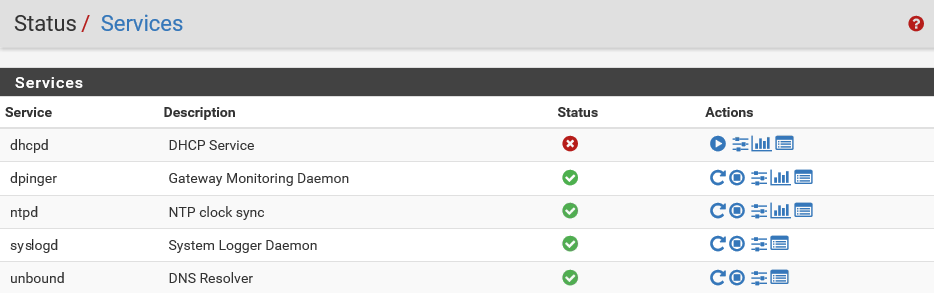
The DHCP service has been stopped. There are other options in the panel such as Related settings and Related status.
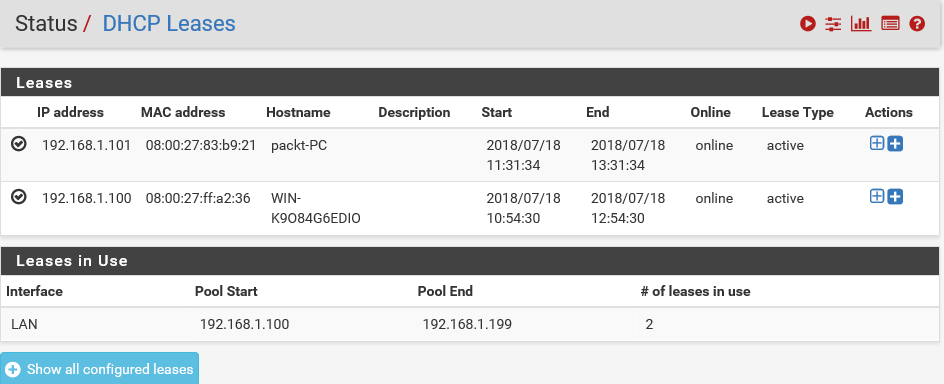
- If you click on status, you can see that the DHCP Pool range is between IP addresses 192.168.1.100 and 192.168.1.199:
- Let's go back and restart the DHCP server. The service is now running. Now, go to the client system and try to renew the IP address.
- Right-click on the LAN connection and select Disable and then again click Enable to enable it. This will reset the adapter and also force it to renew its IP address. Okay, now, the adapter has changed the state and it is trying to identify its network.
- Once it's done identifying, let's switch to the Command Prompt and execute ipconfig again:
You can see that the system has the same IP address. Note that since we reset the adapter, this new IP address was fetched again from the DHCP server. The IP address now matches. The Services section shows that the DHCP server is running.
- From the actions panel, click on Related settings:
This will lead you to the same DHCP server settings page you visited earlier. You can modify many settings here such as Default lease time, Dynamic DNS, and NTP, TFTP, LDAP, and Network Booting.
- Let's go back to the Status page. Click on Status and then on DHCP Leases. Here, you can see the IP address lease assigned to the Windows 7 client system:
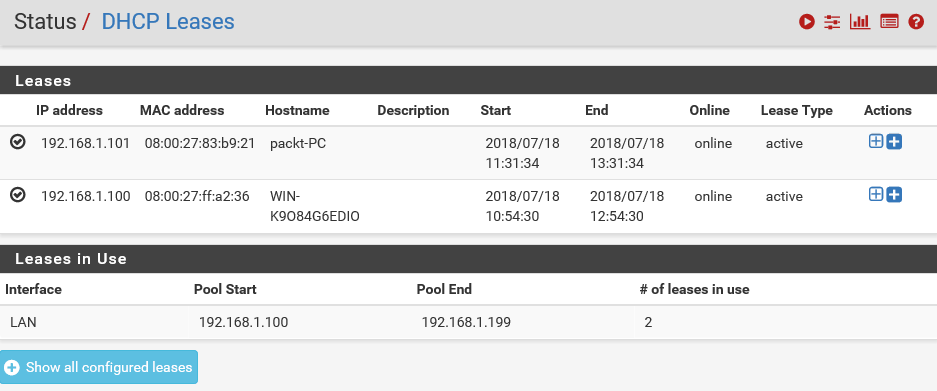
The MAC address for that system is also listed here. You can always verify this information.
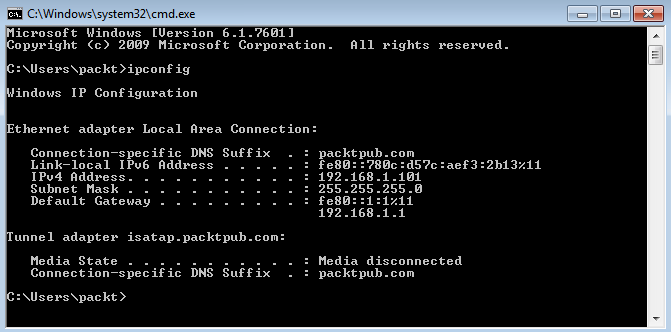
- Let's get back to the Command Prompt and execute the ipconfig command. This will list all the details about the networking setup on the system:
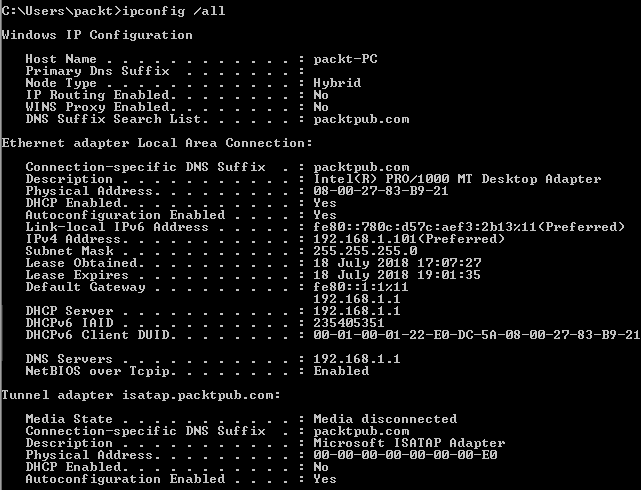
All the details of the IP and MAC addresses are listed here. A MAC address is given to a network adapter when it is manufactured. It is hardwired or hard-coded onto your computer's network interface card and it's unique to it. Let's take a note of this MAC address. It starts with 80 and ends with 21. These are all hexadecimal numbers. Now, let's compare that MAC address to the one listed on the IP address Lease Status page and verify it. This MAC address is the same as the client machine. The Host Name is packt-PC.
- You can verify this by going to Start, right-clicking on Computer, and selecting Properties:
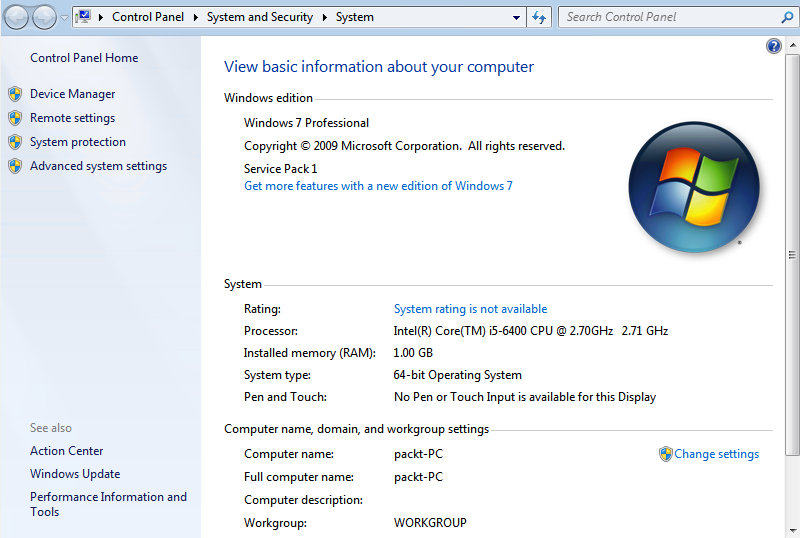
As you can see here, the Computer name is also packt-PC.
In the previous DHCP Lease tab, you can also see the Start time and the End time. This is the start and end date of the IP address lease.
When this lease expires, the DHCP server is responsible for assigning a new IP address from the available pool to the clients. You have many other features available here.
- You can click on this Log icon at the top right corner, where you can view all the log entries:
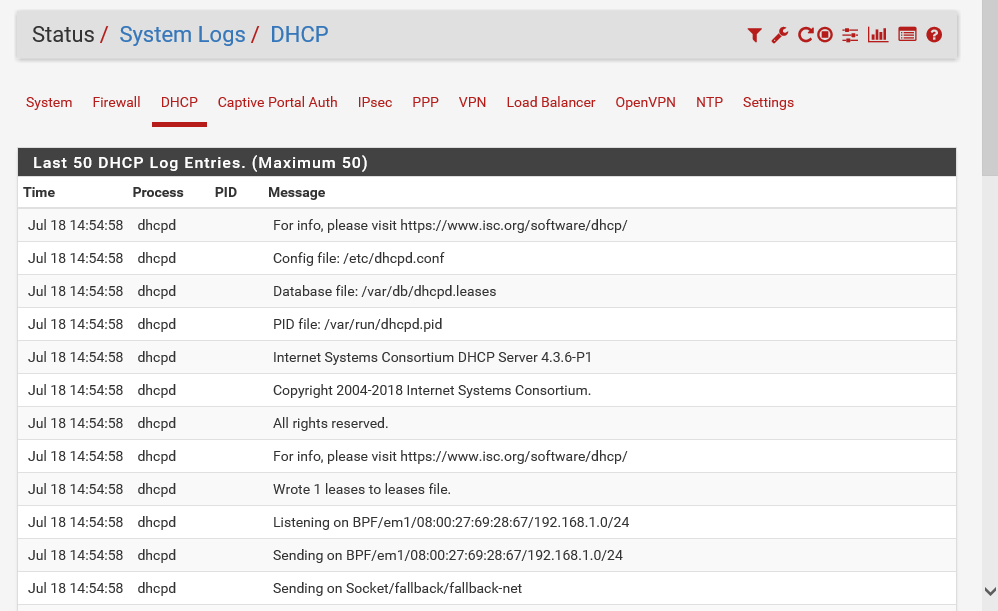
The preceding screenshot shows detailed log entries for the DHCP server. You can see the inner workings of the DHCP server from here.
Here, the client machine discovered the DHCP server:

The DHCP server offers a lease to the client. Finally, the selected DHCP server acknowledges the client DHCP request for the IP address by sending a DHCPACK packet:

This time, the server also forwards any optional configuration parameters. Upon receipt of the DHCPACK, the client can participate in the TCP/IP network, and complete its system startup.
So, we just saw a very detailed walkthrough of setting up a DHCP server on pfSense.
Summary
Let's recap some of the key points that we covered in this chapter. You learned all about what pfSense is, its key features, advantages, and why it's such a great tool. Next, you went through a series of demonstrations that gave you a practical insight into installing pfSense on your network infrastructure. Next, you learned how to configure pfSense and got a walkthrough of the pfSense WebGUI and all the tasks you can perform. Finally, you learned about configuring pfSense as a DHCP server.
In the next chapter, you will learn about the firewall features of pfSense.