


In this chapter, we will cover the following recipes:
- Applying basic settings to General Setup
- Identifying and assigning interfaces
- Configuring a WAN interface
- Configuring a LAN interface
- Configuring optional interfaces
- Enabling SSH access
- Generating authorized RSA keys
- Configuring SSH RSA authentication
- Accessing the SSH
- Configuring VLANs
- Assigning interfaces from the console
- Configuring a WAN interface from the console
- Configuring a LAN interface from the console
- Configuring optional interfaces from the console
- Configuring VLANs from the console
pfSense is open source software that can be used to turn a computer into a firewall/router. Its origins can be traced to the FreeBSD packet-filtering program known as PF, which has been part of FreeBSD since 2001. As PF is a command-line utility, work soon began on developing software that would provide a graphical frontend to PF. The m0n0wall project, which provides an easy-to-use, web-based interface for PF, was thus started. The first release of m0n0wall took place in 2003. pfSense began as a fork of the m0n0wall project.
Version 1.0 of pfSense was released on October 4, 2006, and version 2.0 was released on September 17, 2011. A key point in the development of pfSense took place with the release of Version 2.3 on April 12, 2016. This version phased out support for legacy technologies such as Point to Point Tunneling Protocol (PPTP), Wireless Encryption Protocol (WEP), and Single DES, and also provided a face-lift for the web GUI. Version 2.4, released on October 12, 2017, continues this trend of phasing out support for legacy technologies while also adding features. Support for 32 bit x86 architectures has been deprecated, while support for Netgate Advanced RISC Machines (ARM) devices has been added. A new pfSense installer (based on FreeBSD’s bsdinstall) has been incorporated into pfSense, and there is support for the ZFS filesystem, as well as the Unified Extensible Firmware Interface (UEFI). pfSense now supports multiple languages; the web GUI has been translated into 13 different languages.
This chapter will cover the basic configuration steps common to virtually all deployments. Once you have completed the recipes in this chapter, you will have a fully functional router/firewall. By following the recipes in subsequent chapters, you can enhance that functionality by adding specific firewall rules, enabling traffic shaping, adding load balancing and multi-WAN capabilities, and much more.
This recipe describes how to configure core pfSense settings from the web GUI.
All that is required for this recipe is a fresh install of pfSense and access to the web GUI.
- In the web GUI, navigate to
System | General Setup. - In the first section of the page (
System), enter aHostname. This name can be used to access the firewall instead of the IP address:

In the next field, enter the
Domain:

The next field is
DNS Servers. By default, pfSense will act as the primary DNS server; however, you can specify alternate DNS servers here. TheAdd DNS Serverbutton causes an additional edit box to appear, into which you can enter another DNS server; you can add as many alternate DNS servers as is necessary:

Check the
Allow DNSserver list to be overridden by DHCP/PPP on WANcheckbox (it should be checked by default). This ensures that any DNS requests that cannot be processed internally will be passed on to the external DNS servers, asspecified by your ISP:

In the Localization section, specify a
Timezoneand leaveTimeserversat the default value of 0.pfsense.pool.ntp.org. Specify the appropriate Language (the default is English):

In the webConfigurator section, I’d recommend the default Theme of pfSense. You can set Top Navigation to either Scrolls with page (appropriate for all screen sizes) or Fixed (designed for large screens only). You may also set the number of Dashboard Columns (the default is 2):

This recipe describes how to identify interfaces on a network configuration and how to assign them in pfSense.
You need to identify the MAC addresses for each Ethernet port on your pfSense system before attempting to assign them.
- Navigate to
Interfaces | Interface Assignments. - Assign a WAN interface, first by selecting the correct MAC address from the drop-down list for the WAN interface:
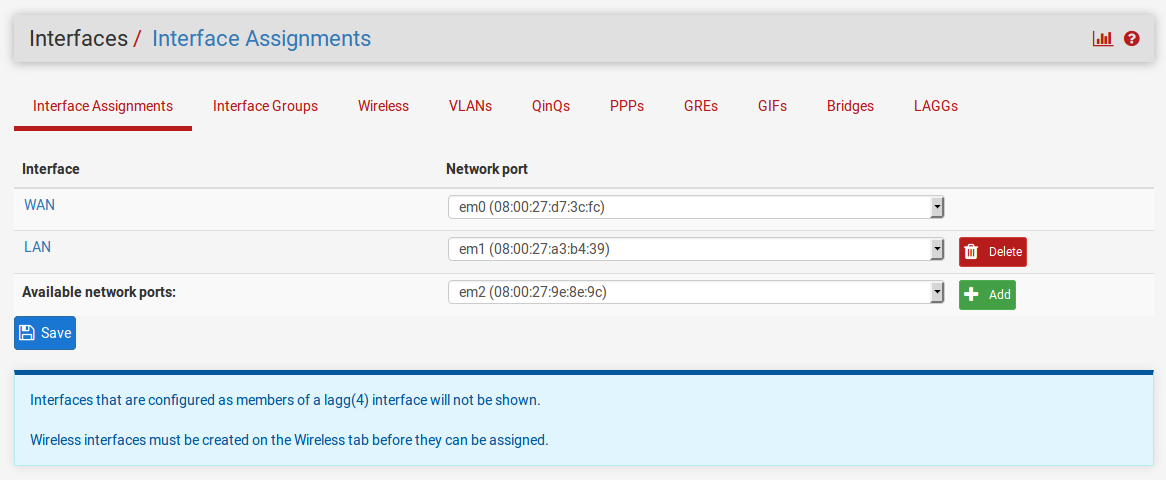
- Repeat this process for the LAN interface, selecting the correct MAC address from the drop-down list for the LAN interface. If necessary, add the LAN interface to the list by following this process:
- Click on the
Addbutton in theAvailable network portscolumn. - Click on the name of the newly created interface in the Interfaces column (it should be
OPT1). - When the configuration page for the interface loads, change
DescriptiontoLAN. - Click on the
Savebutton at the bottom of the page. - Navigate back to
Interfaces|Interface Assignments.
- Click on the
- If you want to add optional interfaces, you can do so by repeating step 3 and substituting the name of the optional interface (for example,
DMZ) for LAN. - When you are done assigning interfaces, click on the Save button.
This recipe describes how to configure the Wide Area Network (WAN) interface, which provides access to external networks on our pfSense system.
The WAN interface is your connection to external networks (in most cases, the public internet). You will need a properly configured WAN interface and an internet connection. In this example, we will connect to the internet via an Internet Service Provider (ISP) and a cable modem.
- Navigate to
Interfaces|WAN. - Check the
Enable Interfacecheckbox (it should be checked by default):
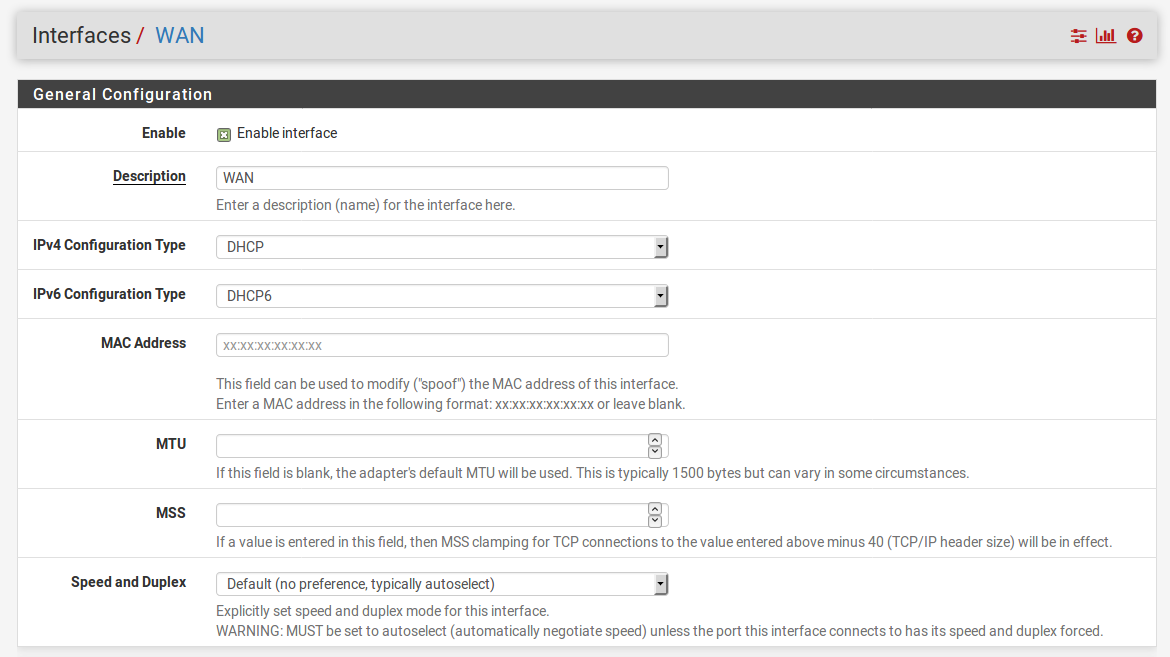
- Choose anIPv4 Configuration Type(usually DHCP).
- Choose an IPv6 Configuration Type, or leave it set to None.
- Leave MAC Address blank. Manually entering a MAC address here is known as MAC address spoofing. You can enter a MAC address here if you want to force your ISP to hand you a different IP address, or a different set of DNS servers. Be warned, however, that the MAC address entered must have a valid manufacturer’s prefix or it won’t work.
- Leave MTU, MSS, Hostname, and Alias IP address blank.
- Check the Block private networks and loopback addresses checkbox (it should be checked by default). This will block RFC 1918 private addresses from being sent out over the public internet.
- Check the Block bogon networks checkbox (it should be checked by default). This will block packets from IP addresses not yet assigned by IANA from being sent or received:

Click on the
Savebutton when done.
We must first establish a connection to the internet before we can configure pfSense to allow other networks to access it. The example we provided is a typical WAN configuration for a Small Office/Home Office (SOHO) environment. By setting up the WAN interface as the only interface with direct access to the internet, we are securing the network behind the firewall and establishing complete control over our networks. All networks behind the firewall must now abide by the rules we create.
Now that we have configured the WAN interface, we can connect the cable modem to the WAN port on pfSense and check the status of the WAN port by navigating to Status | Interfaces.
This recipe describes how to configure the Local Area Network (LAN) internal interface of our pfSense firewall.
The LAN interface is the interface to the internal network through which our nodes will be able to securely connect to other internal nodes and to the internet. An assigned LAN interface is required.
- Navigate to
Interfaces | LAN. - Check the
Enable Interfacecheckbox:

- Choose anIPv4 Configuration Type(usuallyStatic IPv4).
- Choose an IPv6 Configuration Type (or leave it set to None).
- Enter an IPv4 Address in the appropriate field, and the correct CIDR in the adjacent drop-down box. Leave IPv4 Upstream gateway set to None.
- If you enabled IPv6 by setting the IPv6 Configuration Type, enter an IPv4 Address in the appropriate field and the correct CIDR in the adjacent drop-down box.
- Leave Block private networks and Block bogon networks unchecked (they should be unchecked by default).
- When you are done making changes, click on the Save button. When the page reloads, click on the Apply Changes button.
You have just defined your first internal network. If you have been following these recipes in order, you now have met the minimal requirements for a fully functional network. You can now either continue adding networks, or start configuring the rules to regulate traffic between the networks.
You can now connect a switch to the LAN port of your pfSense system, and connect nodes to the LAN network.
This recipe describes how to configure optional interfaces (for example, a DMZ network) to pfSense.
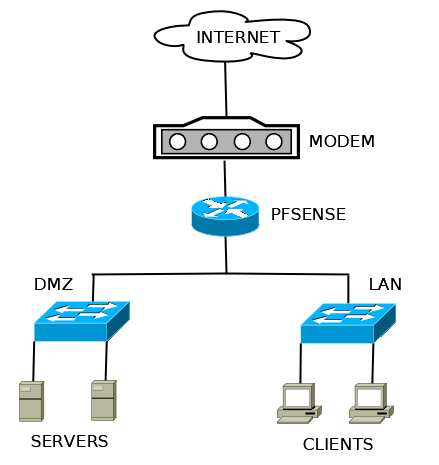
The optional network you will create in this network will be a DMZ, which is short for the DeMilitarized Zone. The idea of a DMZ is to have a network where some traffic is allowed to pass and some traffic is not. Typically, traffic in the DMZ is allowed to pass to and from the internet but not to other internal networks. Traffic is allowed to pass from internal networks to the DMZ. Thus, the flow of traffic looks like this:
Internet <<>> DMZ << Internal networks
Unsafe internet traffic, for example, is allowed to enter a web server in the DMZ. LAN traffic is allowed to enter the DMZ as well, for example, if someone on the LAN wants to access the web server as well. However, the key lies in the fact that no DMZ traffic is allowed to access the internal networks.
To configure a DMZ, you will need at least one spare interface, and you will have to have added it using the procedure outlined in theIdentifying and assigning interfacesrecipe. We will assume that you have added at least one such interface (named OPT1).
- Navigate to
Interfaces|OPT1. - Check the
Enable Interfacecheckbox:

- Set
Descriptionto DMZ. - Set
IPv4 Configuration TypetoStatic IPv4. - Enter an
IPv4 Addressand the CIDR. In our case, we will use192.168.2.1and select 24 from the CIDR dropdown list. - Leave
IPv4 Upstream gatewayset to None. - Leave the
Block private networksandBlock bogon networkscheckboxes unchecked (they should be unchecked by default). - When you are done making changes, click on the
Savebutton. When the page reloads, click on theApply Changesbutton.
Your DMZ network will now allow external (WAN) access. Your LAN network will now be able to access the DMZ, but the DMZ will not be able to access the LAN.
You can now attach a switch to your DMZ port to allow you to attach multiple nodes to your DMZ network. If you have been following the recipes in this chapter in order, your network will now look like this:
This recipe describes how to enable the Secure Shell service in pfSense, thus making remote console login possible.
SSH is a networking protocol that allows encrypted communication between two nodes. Enabling SSH will allow you to gain access to the pfSense console remotely, as if you were at the console.
- Navigate to
System|Advanced. - In the Secure Shell section of the page, check the
Enable Secure Shellcheckbox:

- With the current settings, you will be prompted for a username and password when logging into the console remotely. But by changing theSSHd Key Onlysetting toPublic Key Only, you can set it so that only logins with a public key will be allowed. See the next recipe for details on how to generate an RSA public key.
- Leave SSH port set to the default, port 22.
- When you are done, click on the
Savebutton.
Enabling Secure Shell in pfSense turns on pfSense’s internal SSH server, which causes pfSense to listen for login attempts on the SSH port (in this case, port 22).
This recipe describes how to create an authorized RSA key so the user can log in to the pfSense console without using a password.
Linux and macOS users will need the ssh-keygen utility (installed by default in most cases). Windows users will need the puttygen utility.
For Linux/macOS users:
- In a Terminal window, type
ssh-keygenand pressEnter - Enter the name of the file in which to save the public key (or just accept the default value)
- Enter a passphrase for the new key (not necessary, but recommended)
- Enter the passphrase a second time for confirmation
- The program will now generate an RSA public key and save it to the file
For Windows users:
- Start the
puttygenutility. - In the
Actionssection, click on theGeneratebutton to generate a public/private key pair:
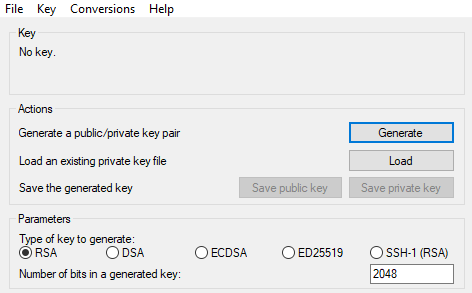
- Move your mouse over the top section of the puttygen dialog box to generate random activity, as per puttygen's instructions.
- Enter a passphrase (not necessary, but recommended).
- Click on the
Saveprivate key button and specify a filename for the private key (for example,MyPrivateKey.ppk). - Highlight the public key that was created in the textbox and save it to a file (for example,
MyPublicKey.txt). Do not use theSave public keybutton because it adds potentially incompatible text to the file.
RSA has become a standard for securing client/server connections. A client generates a public/private key pair—a private key file and a public key file, and a possible passphrase for additional security. Any server can then request the client’s public key and add it to their system; that client can then authenticate without typing in a password.
This recipe describes how to configure pfSense to use an RSA key rather than a username/password combination for authentication.
Make sure you have enabled SSH access and generated an RSA key (if you completed the last two recipes, you have).
- Navigate to
System|Advanced. - Make sure
SSHd Key Onlyis set toPublic Key Only:

- Navigate to
System|User Manager. Click on theUserstab (it should be selected by default). - Click on the
Editicon (the pencil) for the admin account. - In the
Keyssection, paste the client's public RSA key (that can be the RSA key you created in the previous recipe). When pasted, the key should appear as a single line. Make sure your text editor does not insert any line feeds, or authentication may fail:

- When done, click on the Save button.
When you connect using an SSH client, instead of asking for a username and password, the SSH server will now use your public RSA key to send a challenge to you. The challenge can only be read if you have the matching private RSA key.
This recipe describes how to access the console from any Linux, macOS, or Windows computer.
The SSH server must be enabled and configured on your pfSense box. You must have an SSH client on your computer.An SSH client is installed by default on Linux and macOS. If you are using Windows, you need to install an SSH client such asPuTTY.
In Linux or macOS, follow these steps:
- Launch a Terminal window and type the following:
sshadmin@192.168.1.1. - If you are using the default configuration, you will be prompted for a password.
- If you are using RSA key authentication, the client will directly connect to the server, or you may be asked for a passphrase. If asked for a passphrase, use the one you created when creating the RSA key.
- If you configured SSH to use a different port, you can specify it using the
-poption; for example,ssh -p 12345 admin@192.168.1.1.
In Windows, follow these steps:
Launch PuTTY and, on the initial screen, enter the hostname or IP address of pfSense:
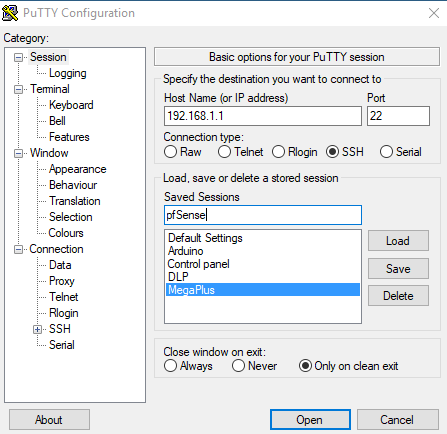
- Specify an alternate port if necessary.
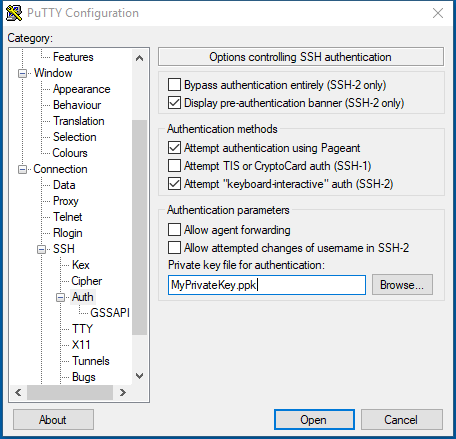
- If you are using RSA key authentication, navigate to
Connection|SSH|Auth|Private keyfile for authentication:
SSH allows access to the pfSense console from any computer or device that has an SSH client installed on it.
This recipe describes how to set up a Virtual LAN (VLAN) from the pfSense web GUI.For example, we could set up a VLAN for developers.
In order to complete this recipe, you must have at least one unassigned interface to use as the parent interface.
- Navigate to
Interfaces|Assignments, and click on the VLANs tab. - Click on the
Addbutton. - Choose a
Parent Interfacefrom the drop-down menu; this should be a currently unassigned interface:

- Enter a VLAN Tag from
2to4094(1is reserved as the default VLAN tag and should not be used). - Enter aVLAN Prioritylevel from
0to7(or just leave it at the default value of0). - Enter a brief
Description. - When you are done, click on the
Savebutton. - Click on the
Interface Assignmentstab. - In the
Available network portscolumn, select the newly created VLAN in the drop-down box, and click on theAddbutton:

- To configure the VLAN, click on the interface name in the
Interfacecolumn. - On the Interfaces configuration page, check the
Enable Interfacecheckbox. - Change the
Descriptionto an appropriate one for the VLAN (for example, DEV). - Set theIPv4 Configuration Typeto an appropriate value (usuallyStatic IPv4).
- Set theIPv6 Configuration Type, or leave it set toNone.
- If you set theIPv4 Configuration TypetoStatic IPv4, you must enter theIPv4 Addressand CIDR for the new VLAN. Use a subnet that has not yet been used (for example,
192.168.10.1/24).
- Leave the IPv4 Upstream gatewayset to None.
- If you set theIPv6 Configuration TypetoStatic IPv6, you must enter theIPv6 Addressand CIDR for the new VLAN.
- Leave theIPv6 Upstream gatewayset to none.
- Leave theBlock private networksandBlock bogon networkscheckboxes unchecked.
- When you are done making changes, click on the
Savebutton, and then, when the page reloads, click on theApply Changesbutton.
Up to now, we have contemplated networks that correspond to a single network interface. Sometimes, however, we want to decouple logical network groupings from physical interfaces. We may want to have more than one network on a single interface—or, less commonly, have a network span multiple interfaces. We can accomplish this with virtual LANs, or VLANs. By attaching a special header to an Ethernet frame, known as an 802.1Q tag, we can have VLANs. Since the VLAN tag is an integer from 1 to 4094, it would seem that we are limited to 4094 VLANs (or 4093, since we are not supposed to use 1 as a tag), but by using QinQ tagging, we can nest VLAN tags, making it possible to have a much greater number of VLANs on our private network (in fact, a much greater number of VLANs than we would probably ever need).
Note
In step 5 of this recipe, we referenced the VLAN priority level. This is a feature added to pfSense with version 2.3 that allows you to define a class of service for your VLAN. It is a 3 bit field from 0 to 7. Somewhat counter-intuitively, 1 is the lowest priority level (background), while 7 is the highest, and 0 is best effort treatment, which is one step above the lowest priority level.
In order to utilize VLANs on your network, you need one or more managed switches. These are switches that recognize 802.1Q tags placed in the Ethernet frame by pfSense, and which will forward the frames to the correct port. Managed switches are never plug and play, they always involve some configuration, so consult your switch’s documentation for details on how to configure it.
This recipe describes how to assign interfaces using the console menu.
- On the console menu, press1and pressEnter.
- The first option will be for setting up VLANs. Since we don’t want to set up VLANs now, pressnandEnter:

- You will be prompted to enter the WAN interface name. Here, you must enter the device name for the interface that will be the WAN interface (for example,
eth0,eth1,em0,em1, and so on). Enter the appropriate device name and pressEnter. - You will be prompted to enter the LAN interface name, or nothing if finished. You only need to assign the WAN interface (in which case you will be able to log into pfSense using the WAN IP address). However, if you want to assign an interface to LAN, enter the device name and pressEnter. Otherwise, just pressEnter.
- If there are more than two network interfaces, you can assign optional interfaces at the console. To do so, enter the device name and press Enter. Otherwise, just pressEnter.
- The interface assignments will be listed, and you will be asked whether you want to proceed. PressingnandEnterwill result in no changes being made, while pressingyandEnterwill commit the changes.
- If you pressedyandEnter, the changes will be written and the settings will be reloaded. You will then be returned to the console menu.
This recipe describes how to configure the WAN interface from the Console menu.
In order to complete this recipe, the WAN interface must have previously been assigned to one of the available network interfaces.
- On the console menu, type
2 - pfSense will prompt you for the number of the interface you want to configure. For the WAN interface, this will be
1, so type1and pressEnter.
- pfSense will ask you if you want to configure the IPv4 WAN address through DHCP. In most cases, you will want to typey, because the WAN interface address will be assigned by your ISP via DHCP. Typeyand press Enter.If you entern, pfSense will prompt you for a WAN IPv4 address, and then the subnet bit count:

- pfSense will ask you whether you want to configure the IPv6 WAN address through DHCP6. You can type
yif your ISP supports IPv6 addressing, or typen, in which case IPv6 addressing for the WAN interface will be disabled. - pfSense will ask you whether you want to revert to HTTP for the
webConfiguratorprotocol. Unless you have a reason for not using HTTPS for the web GUI, typenand pressEnter. - The configuration process is now complete. The settings will be saved and pfSense will reload them.
This recipe describes how to configure the WAN interface via the console instead of through the web GUI. Note that the options are much more limited than they are in the web GUI. For example, you only have the option to configure an IPv4 address via DHCP or use a static address. None of the other options, such as PPP or PPPoE are available. Also, with IPv6, the only option is DHCP6. If you require more options that are available here, use the web GUI.
This recipe describes how to configure theLAN interface from the Console menu.
In order to complete this recipe, theLAN interface must have previously been assigned to one of the available network interfaces.
- On the console menu, type
2and pressEnter. - pfSense will prompt you for the number of the interface you want to configure. For theLAN interface, this will be
2, so type2and pressEnter. - pfSense will prompt you for the new LAN IPv4 address. Enter the new address and pressEnter:

- pfSense will prompt you for the subnet bit count (the CIDR). Enter the bit count and pressEnter.
- pfSense will prompt you for the new LAN IPv4 upstream gateway address. You don’t need to specify an upstream gateway, so just pressEnter.
- pfSense will prompt you for the new LAN IPv6 address. If you want to specify an IPv6 address, type it here; otherwise, just pressEnter.
- If you entered an IPv6 address, pfSense will prompt you for the subnet bit count (CIDR). Enter the bit count and pressEnter.
- If you entered an IPv6 address,pfSense will prompt you for the new LAN IPv6upstream gateway address. You don’t need to specify an upstream gateway, so just pressEnter.
- pfSense will ask whether you want to enable the DHCP server on LAN. If you enter
y, you will then be prompted for the start and end addresses of the IPv4 client address range. You can enteryand type the start and end addresses, or just enternand set up DHCP later on (recommended). - If you entered an IPv6 address,pfSense will ask if you want to enable the DHCP6server on LAN. If you enter
y, you will then be prompted for the start and end addresses of the IPv6client address range. You can enteryand type the start and end addresses, or just enternand set up DHCP6later on (recommended). - pfSense will ask you whether you want to revert to HTTP for the webConfigurator protocol. Unless you have a reason for not using HTTPS for the web GUI, type
nand pressEnter. - The configuration process is now complete. The settings will be saved and pfSense will reload them.
This recipe described how to set up a LAN interface’s IP address using the console instead of the web GUI. Note that this option also allows you to set up the DHCP (or DHCP6) server, although it does not provide as many options as the web GUI. As with configuring a WAN interface, you may find it necessary to do the configuration via the web GUI, as the console only provides limited options.
This recipe describes how to configure optionalinterfaces from the console menu.
In order to complete this recipe,at least one optional interfacemust have previously been assigned to one of the available network interfaces.
- On the console menu, type
2and pressEnter. - pfSense will prompt you for the number of the interface you want to configure.Type the appropriate number and pressEnter.
- pfSense will prompt you for the new LAN IPv4 address. Enter the new address and press Enter.
- pfSense will prompt you for the subnet bit count (the CIDR). Enter the bit count and pressEnter.
- pfSense will prompt you for the new LAN IPv4 upstream gateway address. You don’t need to specify an upstream gateway, so just pressEnter.
- pfSense will prompt you for the new LAN IPv6 address. If you want to specify an IPv6 address, type it here; otherwise, just pressEnter.
- If you entered an IPv6 address, pfSense will prompt you for the subnet bit count (CIDR). Enter the bit count and pressEnter.
- If you entered an IPv6 address,pfSense will prompt you for the new LAN IPv6upstream gateway address. You don’t need to specify an upstream gateway, so just pressEnter.
- pfSense will ask whether you want to enable the DHCP server on LAN. If you enter
y, you will then be prompted for the start and end addresses of the IPv4 client address range. You can enteryand type the start and end addresses, or just enternand set up DHCP later on (recommended).
- If you entered an IPv6 address,pfSense will ask whether you want to enable the DHCP6server on LAN. If you enter
y, you will then be prompted for the start and end addresses of the IPv6client address range. You can enteryand type the start and end addresses, or just enternand set up DHCP6later on (recommended). - pfSense will ask you if you want to revert to HTTP for the
webConfiguratorprotocol. Unless you have a reason for not using HTTPS for the web GUI, typenand pressEnter. - The configuration process is now complete. The settings will be saved and pfSense will reload them.Repeat the process for as many optional interfaces as you wish to configure.
This recipe describes how to add a VLAN from the console menu.
In order to complete this recipe,there must be at least one interface that was not previously assigned.
- From the console menu, type
1and pressEnter. - pfSense will ask if VLANs should be created now. Typeyand pressEnter.
- pfSense will next warn you that if you proceed, all existing VLANs will be cleared. Type
yand pressEnter:

- pfSense will list all the VLAN-capable interfaces. Although, technically, you can make a previously-assigned interface into the parent interface of a VLAN, it is not recommended. Type the name of one of the unassigned interfaces (for example,
eth0,eth1,em0, orem1) and pressEnter. - pfSense will next prompt you for the VLAN tag. Type the VLAN tag and pressEnter.
- Repeat steps 4 and 5 for as many VLANs as you wish to create.When you are done, pressEnter.
- pfSense will prompt you for the name of the WAN interface; type in the name and pressEnter.
- pfSense will prompt you for the name of the LAN interface; type in the name and press Enter.
- pfSense will prompt you for the name of the Optional 1 interface. You can create a VLAN by using the name of the VLAN interface(s) assigned in steps 4 and 5. The name of the interface will have two numbers separated by a period. The first number will be the device number of the interface; the second number (after the period) will be the VLAN tag. Thus if the device name is
em, andem2is the parent interface of a VLAN tagof3, the interface name will beem2.3. Type the interface name and pressEnter. - When you are done assigning interfaces, pressEnter.
- pfSense will ask you whether you want to proceed. Type
yand pressEnter. Take note of the name of the newly created VLAN (for example, OPT1). - You now have assigned a VLAN, but the VLAN doesn’t have an IP address. To set the VLAN’s IP address, type
2and press Enter. - Find the newly created VLAN in the list of interfaces and type the appropriate number and pressEnter.
- pfSense will prompt you for the VLAN’s IPv4 address. Type in the address and pressEnter.
- pfSense will prompt you for the subnet bit count (CIDR) of the address. Type in the bit count and pressEnter.
- pfSense will prompt you for theIPv4upstream gateway address. Since you don't need one, pressEnter.
- PfSense will prompt you for the VLAN’s IPv6 address. You can type in an IPv6 address or just pressEnter.
- If you entered an IPv6 address, pfSense will prompt you for the subnet bit count (CIDR). Enter the bit count and pressEnter.If you didn’t enter an IPv6 address, skip to step 20.
- If you entered an IPv6 address,pfSense will prompt you for theIPv6upstream gateway address. Since you don't need one, pressEnter.
- pfSense will ask you whether you want to enable the DHCP server on the VLAN. Type
yif you want to enable the DHCP server, and then type the range of available addresses. Otherwise, typenand pressEnter. - If you entered an IPv6 address pfSense will ask you whether you want to enable the DHCP6 server on the VLAN. Type
yif you want to enable the DHCP6 server, and then type the range of available addresses. Otherwise, typenand pressEnter. - pfSense will ask you whether you want to revert to HTTP for the webConfigurator protocol. Unless you have a reason for not using HTTPS for the web GUI, type
nand pressEnter. - pfSense will save the changes, and reload them. VLAN configuration is now complete.
This recipe describeshow to set up VLANs from the console. The process is somewhat cumbersome, but if you need to create a VLAN and don't have access to the web GUI, it can be done.