Have you ever had to create 200 virtual machines in a short period of time, change a setting on all of your hosts, or make an advanced report for your boss to show how full the hard disks of your virtual machines are? If you have, you know that performing these tasks using the vSphere web client will take a lot of time. This is where automation can make your job easier. VMware PowerCLI is a powerful tool that can perform these tasks and much more. And the best thing is that it is free!
VMware PowerCLI is a command-line interface (CLI) distributed as a collection of Microsoft PowerShell modules and snap-ins. Microsoft PowerShell is Microsoft's command shell and scripting language, designed with the systems administrator in mind. Microsoft PowerShell is available on every Microsoft Windows server or workstation since Windows Server 2008 R2 and Windows 7. VMware PowerCLI is an extension to Microsoft PowerShell. This means that all of the features of PowerShell can be used in PowerCLI. You can use PowerCLI to automate your vSphere hosts, virtual machines, virtual networks, storage, clusters, vCenter Servers, and more.
In this chapter, you will learn:
Downloading and installing PowerCLI
Participating in the VMware Customer Improvement Program
Modifying the PowerShell execution policy
Creating a PowerShell profile
Connecting and disconnecting servers
Using the credential store
Retrieving a list of all of your virtual machines
Retrieving a list of all of your hosts
In this section, you will learn how to download and install PowerCLI 6.5 Release 1. First, we will list the requirements for PowerCLI 6.5 Release 1. After downloading PowerCLI from the VMware website, we will install PowerCLI on your system.
You can install VMware PowerCLI 6.5 Release 1, the version used for writing this book, on the following 64-bit operating systems:
Windows Server 2012 R2
Windows Server 2008 R2 Service Pack 1
Windows 10
Windows 8.1
Windows 7 Service Pack 1
VMware PowerCLI 6.5 Release 1 is compatible with the following PowerShell versions:
Microsoft PowerShell 3.0
Microsoft PowerShell 4.0
Microsoft PowerShell 5.0
Microsoft PowerShell 5.1
If you want to work with VMware PowerCLI 6.5 Release 1, make sure that the following software is present on your system:
Microsoft PowerShell 3.0, 4.0, 5.0, or 5.1
NET Framework 4.5, 4.5.x, 4.6, or 4.6.x
Before you can install PowerCLI, you have to download the PowerCLI installer from the VMware website. You will need a My VMware account to do this.
Perform the following steps to download PowerCLI:
Visit http://www.vmware.com/go/powercli . On this page, you will find a Resources section.

Click on the Download button to download PowerCLI.
You have to log in with a My VMware account. If you don't have a My VMware account, you can register for free.

After you log in, you will be taken to the VMware PowerCLI download page. Click on the Download Now button to start downloading PowerCLI.
Perform the following steps to install PowerCLI:
Run the PowerCLI installer that you just downloaded.
Click Yes in the User Account Control window to accept the Do you want to allow this app to make changes to your device? option.
If the PowerShell execution policy on your computer is not set to RemoteSigned, you will get a warning that tells you It is recommended that you set the execution policy to "RemoteSigned" in order to be able to execute scripts. After the installation of PowerCLI, I will show you how to set the execution policy. Click on Continue to continue to the installation of PowerCLI.

Click on Next > in the Welcome to the InstallShield Wizard for VMware PowerCLI window.

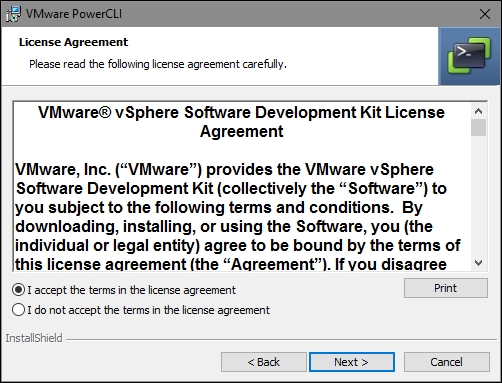
Select I accept the terms in the license agreement and click on Next >.
If you are not using vCloud Air, VMware vCloud Director, vSphere Update Manager, vRealize Operations Manager, or Horizon View, you can click on the little arrow to the left of a feature and select This feature will not be available. I recommend installing all of the features, to be able to run the scripts in all of the chapters in this book. If you want, you can change the installation directory by clicking on Change.... Click on Next >.

Click on Install to begin the installation.

Click on Finish to exit the installation wizard.

After installing PowerCLI, you will have a VMware PowerCLI icon on your desktop. If you installed PowerCLI on a 64-bit computer, you will also have a VMware PowerCLI (32-Bit) icon. Some PowerCLI commands only work in the 32-bit version of PowerCLI. So keep both versions.
When you start PowerCLI for the first time, you will get the following screen:
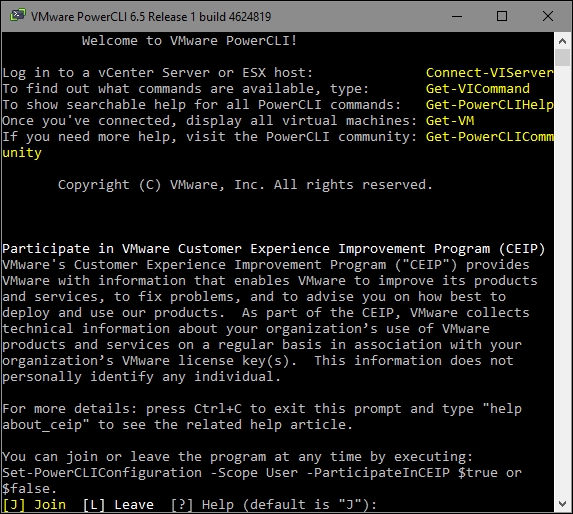
You are asked to participate in the VMware Customer Improvement Program (CEIP). Type J to participate in the CEIP or type L to leave.
If you didn't get the text from the preceding screenshot, you may get the following error message:
. : File C:\Program Files (x86)\VMware\Infrastructure\vSphere PowerCLI\Scripts\Initialize-PowerCLIEnvironment.ps1 cannot be loaded because running scripts is disabled on this system. For more information, see about_Execution_Policies at http://go.microsoft.com/fwlink/?LinkID=135170.
Then, read the following section, Modifying the PowerShell execution policy, to solve this problem.
If this is the first time that you are using Microsoft PowerShell on the computer on which you installed PowerCLI, you have to change the execution policy to be able to start PowerCLI.
The Microsoft PowerShell execution policies define when you can run scripts or load configuration files. The possible values for the execution policy are Restricted, AllSigned, RemoteSigned, Unrestricted, Bypass, and Undefined.
|
Policy |
Description |
|
|
This is the default execution policy. It allows you to run commands at the Command Prompt, but disables the execution of scripts. It will also disable the start of PowerCLI. |
|
|
With the |
|
|
The |
|
|
When the execution policy is set to |
|
|
The |
|
|
The |
You can check the current execution policy setting with the following command:
PowerCLI C:\> Get-ExecutionPolicy
Get-ExecutionPolicy is a Microsoft PowerShell commandlet (cmdlet). Cmdlets are commands built into PowerShell or PowerCLI. They follow a verb-noun naming convention. The get cmdlets retrieve information about the item that is specified as the noun part of the cmdlet.
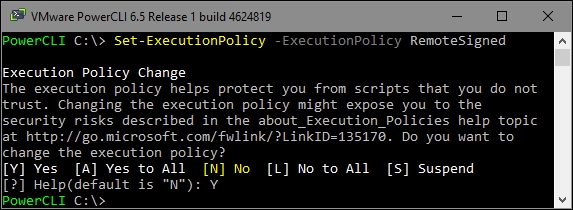
Set the execution policy to RemoteSigned to be able to start PowerCLI and run scripts written on the local computer with the Set-ExecutionPolicy -ExecutionPolicy RemoteSigned command.
Note
You have to run the Set-ExecutionPolicy -ExecutionPolicy RemoteSigned command from a PowerShell or PowerCLI session that you started using the Run as Administrator option, or you will get the following error message:
Set-ExecutionPolicy : Access to the registry key 'HKEY_LOCAL_MACHINE\SOFTWARE\Microsoft\PowerShell\1\ShellIds\Microsoft.PowerShell' is denied.
If you are using both the 32-bit and the 64-bit versions of PowerCLI, you have to run this command in both versions.
In the following screenshot of the PowerCLI console, you will see the output of the Set-ExecutionPolicy -ExecutionPolicy RemoteSigned command if you run this command in a PowerCLI session started with Run as Administrator.
You can get more information about execution policies by typing the following command:
PowerCLI C:\> Get-Help about_Execution_Policies
To get more information about signing your scripts, type the following command:
PowerCLI C:\> Get-Help about_signing
Note
If you get an error message saying Get-Help could not find about_Execution_Policies in a help file, you have to run the Update-Help cmdlet in a PowerShell, or PowerCLI session started with Run as Administrator first. The Update-Help cmdlet downloads the newest help files for Microsoft PowerShell modules and installs them on your computer. Because Microsoft updates the Microsoft PowerShell help files on a regular basis, it is recommended to run the Update-Help cmdlet on a regular basis also.
If you want certain PowerCLI commands to be executed every time you start a PowerCLI session, you can put these commands in a PowerShell profile. The commands in a PowerShell profile will be executed every time you start a new PowerCLI session. There are six PowerShell profiles, two specific for the PowerShell console, two specific for the PowerShell Integrated Scripting Environment (ISE), and two used by both the PowerShell console and the PowerShell ISE. The PowerShell console and the PowerShell ISE have their own profiles for:
All users, current host
Current user, current host
The two profiles used by both the PowerShell console and the PowerShell ISE are:
All users, all hosts
Current user, all hosts
You can retrieve the locations for the different profiles of the PowerShell console by executing the following command in the PowerShell console. In this command, the $PROFILE variable is a standard PowerShell variable that returns an object containing the locations of the PowerShell profiles. This object is piped to the Format-List -Force command to display all of the properties of the $PROFILE object in a list:
PowerCLI C:\> $PROFILE | Format-List -Force


    AllUsersAllHosts       : C:\Windows\System32\WindowsPowerShell\v1.0\p
                         rofile.ps1
AllUsersCurrentHost    : C:\Windows\System32\WindowsPowerShell\v1.0\M
                         icrosoft.PowerShell_profile.ps1
CurrentUserAllHosts    : C:\Users\robert\Documents\WindowsPowerShell\
                         profile.ps1
CurrentUserCurrentHost : C:\Users\robert\Documents\WindowsPowerShell\
                         Microsoft.PowerShell_profile.ps1
Length                 : 76
Note
Downloading the example code
Detailed steps to download the code bundle are mentioned in the Preface of this book. Please have a look.
The code bundle for the book is also hosted on GitHub at: https://github.com/rosbook/effective_robotics_programming_with_ros . We also have other code bundles from our rich catalog of books and videos available at https://github.com/PacktPublishing/ . Check them out!
As you can see in the output of the preceding command, the $PROFILE object has four properties AllUsersAllHosts, AllUsersCurrentHost, CurrentUserAllHosts, and CurrentUserCurrentHost that contain the locations of the different profiles.
To list the locations of the PowerShell profiles of the PowerShell ISE, you have to execute the preceding command in the PowerShell ISE. This gives the following output:
PS C:\> $PROFILE | Format-List -Force


    AllUsersAllHosts       : C:\Windows\System32\WindowsPowerShell\v1.0\p
                         rofile.ps1
AllUsersCurrentHost    : C:\Windows\System32\WindowsPowerShell\v1.0\M
                         icrosoft.PowerShellISE_profile.ps1
CurrentUserAllHosts    : C:\Users\robert\Documents\WindowsPowerShell\
                         profile.ps1
CurrentUserCurrentHost : C:\Users\robert\Documents\WindowsPowerShell\
                         Microsoft.PowerShellISE_profile.ps1
Length                 : 79
Note
You can start the PowerShell ISE from a Command Prompt by running powershell_ise.exe. You can start the PowerShell ISE from within a PowerShell console with the alias ise.
The default value for the $PROFILE variable is the value of the $PROFILE.CurrentUserCurrentHost property. So you can use $PROFILE instead of $PROFILE.CurrentUserCurrentHost.
You can determine if a specific profile exists by using the Test-Path cmdlet. The following command will test if the profile specified by $PROFILE exists:
PowerCLI C:\> Test-Path -Path $PROFILE
False
If a profile does not exist, as in the preceding example, you can create the profile using the New-Item cmdlet. If the directories in the path do not exist, by using the -Force parameter the New-Item cmdlet will create the directories. The following command will create the current user/current host profile and will also create the missing directories in the path:
PowerCLI C:\> New-Item -Path $PROFILE -ItemType file -Force

         Directory: C:\Users\robert\Documents\WindowsPowerShell

    Mode             LastWriteTime        Length  Name
----           ------------------     ------  ----
-a--           1/7/2017   2:01 PM          0  Microsoft.PowerShell_pro
                                              file.ps1
After creating the PowerShell profile, you can edit the profile using the PowerShell ISE with the following command:
PowerCLI C:\> ise $PROFILE
If you put the commands from the preceding section, Modifying the PowerShell execution policy, the new colors of the messages will be used in all of your PowerCLI sessions.
Before you can do useful things with PowerCLI, you have to connect to a vCenter Server or an ESXi server. And if you are finished, it is a good practice to disconnect your session. We will discuss how to do this in the following sections Connecting to a server, Connecting to multiple servers, Suppressing certificate warnings , and Disconnecting from a server.
If you are not connected to a vCenter or an ESXi server, you will get an error message if you try to run a PowerCLI cmdlet. Let's try to retrieve a list of all of your data centers using the following command:
PowerCLI C:\> Get-Datacenter
The output of the preceding command is as follows:
Get-Datacenter : 1/7/2017 1:37:17 PM    Get-Datacenter        You are
    not currently connected to any servers. Please connect first using a
    Connect cmdlet.
At line:1 char:1
+ Get-Datacenter
+ ~~~~~~~~~~~~~~
    + CategoryInfo          : ResourceUnavailable: (:) [Get-
                                  Datacenter], ViServerConnectionException
    + FullyQualifiedErrorId : Core_BaseCmdlet_NotConnectedError,
                                  VMware.VimAutomation.ViCore.Cmdlets.
                                  Commands.GetDatacenter
You can see that this gives an error message. You first have to connect to a vCenter Server or an ESXi server using the Connect-VIServer cmdlet. If you have a vCenter Server, you only need to connect to the vCenter Server and not to the individual ESXi servers. It is possible to connect to multiple vCenter Servers or ESXi servers at once. The Connect-VIServer cmdlet has the following syntax. The syntax contains two parameter sets. The first parameter set is the default:
Connect-VIServer [-Server] <String[]> [-Port <Int32>] [-Protocol
    <String>] [-Credential <PSCredential>] [-User <String>] [-Password
    <String>] [-Session <String>] [-NotDefault] [-SaveCredentials]
    [-AllLinked] [-Force] [<CommonParameters>]
In the Default parameter set, the -Server parameter is required. The second parameter set can be used to select a server from a list of recently connected servers:
Connect-VIServer -Menu [<CommonParameters>]
In the Menu parameter set, the -Menu parameter is required. You cannot combine parameters from the Default parameter set with the Menu parameter set.
Let's first try to connect to a vCenter Server with the following command:
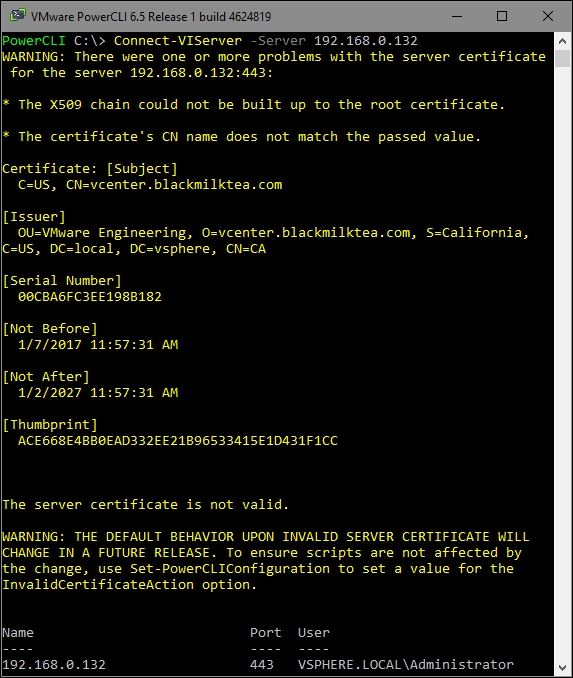
PowerCLI C:\> Connect-VIServer -Server 192.168.0.132
192.168.0.132 is the IP address of the vCenter Server in my home lab. Replace this IP address with the IP address or DNS name of your vCenter or ESXi server.
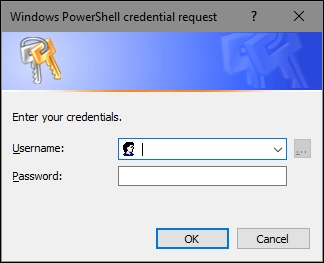
The preceding command will pop up a window in which you have to specify server credentials to connect to your server if your Windows session credentials don't have rights on your server. Enter values for User name and Password and click on OK.
If you specified valid credentials, you would get output similar to the following:
Name                           Port  User
----                           ----  ----
192.168.0.132                  443   root
You can also specify a username and password on the command line as follows:
PowerCLI C:\> Connect-VIServer -Server 192.168.0.132 -User admin
    -Password pass
You can also save the credentials in a variable with the following command:
PowerCLI C:\> $Credential = Get-Credential
The preceding command will pop up a window in which you can type the username and password.
You can now use the $Credential variable to connect to a server using the -Credential parameter, as follows:
PowerCLI C:\> Connect-VIServer -Server 192.168.0.132 -Credential
    $Credential
You can also use the PowerCLI credential store. This will be discussed in the Using the credential store section, later in this chapter.
The default protocol that the Connect-VIServer cmdlet uses is HTTPS. If you want to make a connection with the HTTP protocol, you can do that with the following command:
PowerCLI C:\> Connect-VIServer -Server 192.168.0.132 -Protocol HTTP
If you have multiple vCenter Servers in Linked Mode, you can use the Connect-VIServer -AllLinked parameter to connect all of these vCenter Servers at once, as follows:
PowerCLI C:\> Connect-VIserver -Server 192.168.0.132 -Credential
    $Credential -AllLinked
The Connect-VIServer -Menu command gives you a list of previously connected servers from which you can pick one, as shown in the following command line:
PowerCLI C:\> Connect-VIServer -Menu
Select a server from the list (by typing its number and pressing
    Enter):
[1] 192.168.0.132
[2] 192.168.0.133
Type the number of the server you want to connect to.
It is possible in PowerCLI to connect to multiple servers at once. You can do this by specifying more than one server, as follows:
PowerCLI C:\> Connect-VIServer -Server vCenter1,vCenter2
The first time you try to do this, you will get the following message:
Working with multiple default servers?


        Select [Y] if you want to work with more than one default
servers. In this case, every time when you connect to a different
server using Connect-VIServer, the new server connection is stored in
 an array variable together with the previously connected servers.
When you run a cmdlet and the target servers cannot be determined
from the specified parameters, the cmdlet runs against all servers
stored in the array variable.
    Select [N] if you want to work with a single default server. In
this case, when you run a cmdlet and the target servers cannot be
determined from the specified parameters, the cmdlet runs against the
 last connected server.

        WARNING: WORKING WITH MULTIPLE DEFAULT SERVERS WILL BE ENABLED BY
 DEFAULT IN A FUTURE RELEASE. You can explicitly set your own
preference at any time by using the DefaultServerMode parameter of
Set-PowerCLIConfiguration.

     [Y] Yes  [N] No  [S] Suspend  [?] Help (default is "Y"):
Press Enter or type Y to work with multiple default servers.
As the message says, you can always connect to multiple servers, but your commands will only work against the last server you connected to unless you have enabled working with multiple servers.
You can see the current value of DefaultVIServerMode with the Get-PowerCLIConfiguration cmdlet:
PowerCLI C:\> Get-PowerCLIConfiguration


    Scope    ProxyPolicy     DefaultVIServerMode InvalidCertificateAction
-----    -----------     ------------------- ------------------------
Session  UseSystemProxy  Multiple            Unset
User                     Multiple
AllUsers
If you want to change DefaultVIServerMode from single to multiple, you can do that with the Set-PowerCLIConfiguration cmdlet. This cmdlet has the following syntax:
Set-PowerCLIConfiguration [-ProxyPolicy <ProxyPolicy>]
    [-DefaultVIServerMode <DefaultVIServerMode>] [-InvalidCertificateAction
    <BadCertificateAction>] [-ParticipateInCeip <Boolean>]
    [-CEIPDataTransferProxyPolicy <ProxyPolicy>] [-
    DisplayDeprecationWarnings <Boolean>] [-WebOperationTimeoutSeconds
    <Int32>] [-VMConsoleWindowBrowser <String>] [-Scope
    <ConfigurationScope>] [-WhatIf] [-Confirm] [<CommonParameters>]
You can change DefaultVIServerMode from single to multiple with the following command:
PowerCLI C:\> Set-PowerCLIConfiguration -DefaultVIServerMode Multiple
    -Scope User
All of the servers that you are currently connected to are stored in the variable $global:DefaultVIServers. If DefaultVIServerMode is set to multiple, your PowerCLI cmdlets will run against all servers stored in the $global:DefaultVIServers variable.
The last server you are connected to is stored in the variable $global:DefaultVIServer. If DefaultVIServerMode is set to single, your PowerCLI cmdlets will only run against the server stored in the $global:DefaultVIServer variable.
If your vCenter Server does not have valid server certificates, the Connect-VIserver cmdlet will display some warning messages, as shown in the following screenshot:
It is a good practice to supply your vCenter Server and ESXi servers with certificates signed by a certificate authority (CA). You can find information on how to do this in the VMware Knowledge Base article, Replacing default certificates with CA signed SSL certificates in vSphere 6.x (2111219) at http://kb.vmware.com/kb/2111219.
If you don't have valid certificates, you can suppress the warning messages using the Set-PowerCLIConfiguration cmdlet with the following command:
PowerCLI C:\ > Set-PowerCLIConfiguration -InvalidCertificateAction
    Ignore
The preceding command will modify InvalidCertificationAction in the AllUsers scope. You have to run this command using the Run as Administrator PowerCLI session. Otherwise, you will get the following error message:
Set-PowerCLIConfiguration : Only administrators can change settings for
    all users.
At line:1 char:1
+ Set-PowerCLIConfiguration -InvalidCertificateAction Ignore
+ ~~~~~~~~~~~~~~~~~~~~~~~~~~~~~~~~~~~~~~~~~~~~~~~~~~~~~~~~~~
    + CategoryInfo          : NotSpecified: (:)
                                  [Set-PowerCLIConfiguration],
                                  InvalidArgument
    + FullyQualifiedErrorId : VMware.VimAutomation.ViCore.Types.V1.
                                  ErrorHandling.InvalidArgument, VMware.
                                  VimAutomation.ViCore.Cmdlets.Commands.
                                  SetVIToolkitConfiguration
To disconnect from a vSphere server, you have to use the Disconnect-VIServer cmdlet. The Disconnect-VIServer cmdlet has the following syntax:
Disconnect-VIServer [[-Server] <VIServer[]>] [-Force]
    [-WhatIf] [-Confirm] [<CommonParameters>]
To disconnect all of your server connections, type the following command:
PowerCLI C:\> Disconnect-VIServer -Server * -Force
The output of the preceding command is as follows:
Confirm
Are you sure you want to perform this action?
Performing operation "Disconnect VIServer" on Target "User:
    VSPHERE.LOCAL\Administrator, Server: 192.168.0.132, Port: 443".
[Y] Yes  [A] Yes to All  [N] No  [L] No to All  [S] Suspend
    [?]  Help (default is "Y"):
Type Y or Enter to disconnect from the server.
If you don't want to be prompted with Are you sure you want to perform this action?, you can use the -Confirm:$false option as follows:
PowerCLI C:\> Disconnect-VIServer -Server * -Force
    -Confirm:$false
It may be that you want to disconnect only one session and not all. In that case, specify the server name or IP address of the server you want to disconnect. The following command only disconnects the latest session from server 192.168.0.132:
PowerCLI C:\> Disconnect-VIServer -Server 192.168.0.132
Disconnecting one or more sessions will also change the value of the $global:DefaultVIServers and $global:DefaultVIServer variables.
To see the current setting of InvalidCertificationAction, you can use the Get-PowerCLIConfiguration cmdlet. The syntax of this cmdlet is as follows:
Get-PowerCLIConfiguration [-Scope <ConfigurationScope>]
    [<CommonParameters>]
The following example will retrieve the PowerCLI configuration and shows the InvalidCertificateAction value for all scopes:
PowerCLI C:\> Get-PowerCLIConfiguration |
>> Select-Object -Property Scope, InvalidCertificateAction,
    DisplayDeprecationWarnings |
>> Format-Table -AutoSize
>>


       Scope InvalidCertificateAction DisplayDeprecationWarnings
   ----- ------------------------ --------------------------
 Session                    Unset                       True
    User
AllUsers
As you can see in the output, there are three different scopes for which you can modify the PowerCLI configuration: Session, User, and AllUsers. The Set-PowerCLIConfiguration cmdlet will modify the AllUser scope if you don't specify a scope.
The DisplayDeprecationWarnings property shown in the preceding output will be discussed in the section,
Suppressing deprecated warnings
, later in this chapter.
If you are logged in to your computer with a domain account, you can use your Windows session credentials to connect to a vCenter or ESXi server. If you are not logged in to your computer with a domain account or your domain account has no rights in vSphere, you have to supply account information every time you connect to a vCenter or ESXi server.
To prevent yourself from having to do this, you can store credentials in the credential store. These stored credentials will be used as default if you connect to a server that is stored in the credential store. You can use the -SaveCredentials parameter of the Connect-VIServer cmdlet to indicate that you want to save the specified credentials in the local credential store, as follows:
PowerCLI C:\> Connect-VIServer -Server 192.168.0.132 -User admin
    -Password pass -SaveCredentials
You can also create a new entry in the credential store with the New-VICredentialStoreItem cmdlet:
PowerCLI C:\> New-VICredentialStoreItem -Host 192.168.0.132
    -User Admin -Password pass
You can not only store credentials for vCenter Servers but also for ESXi servers, using the following command:
PowerCLI C:\> New-VICredentialStoreItem -Host ESX1 -User root
    -Password VMware1!
To get a listing of all of your stored credentials, type the following command:
PowerCLI C:\> Get-VICredentialStoreItem
And to remove a stored credential you can use the following command:
PowerCLI C:\> Remove-VICredentialStoreItem -Host ESX1 -User root
The stored credentials are stored in a file on your computer. The default credential store file location is: %APPDATA%\VMware\credstore\vicredentials.xml. But it is also possible to create other credential store files. You can see the contents of the default credential store file with the following command:
PowerCLI C:\> Get-Content -Path $env:APPDATA\VMware\credstore
    \vicredentials.xml
The passwords stored in a credential store file are encrypted. But you can easily retrieve the stored passwords with the following command:
PowerCLI C:\> Get-VICredentialStoreItem |
>> Select-Object -Property Host,User,Password
Now that we know how to connect to a server, let's do something useful with PowerCLI. Most of the people who begin using PowerCLI create reports, so create a list of all of your virtual machines as your first report. You have to use the Get-VM cmdlet to retrieve a list of your virtual machines. The syntax of the Get-VM cmdlet is as follows. The first parameter set is the default:
Get-VM [[-Name] <String[]>] [-Server <VIServer[]>]
    [-Datastore <StorageResource[]>] [-Location <VIContainer[]>]
    [-Tag <Tag[]>] [-NoRecursion] [<CommonParameters>]
The second parameter set is for retrieving virtual machines connected to specific virtual switches:
Get-VM [[-Name] <String[]>] [-Server <VIServer[]>] [-VirtualSwitch
    <VirtualSwitchBase[]>] [-Tag <Tag[]>] [<CommonParameters>]
The third parameter set is for retrieving virtual machines by ID:
Get-VM [-Server <VIServer[]>] -Id <String[]> [<CommonParameters>]
The -Id parameter is required. The fourth parameter set is for retrieving virtual machines by related object:
Get-VM -RelatedObject <VmRelatedObjectBase[]> [<CommonParameters>]
The -RelatedObject parameter is required. You can use these four parameter sets to filter the virtual machines based on name, server, datastore, location, distributed switch, ID, or related object.
Create your first report with the following command:
PowerCLI C:\> Get-VM
This will create a list of all of your virtual machines. You will see the name, power state, the number of CPU's, and the amount of memory in GB for each virtual machine, as shown in the following command-line output:
Name                 PowerState NumCPUs MemoryGB
----                 ---------- -------- --------
Dc1                  PoweredOn  2        4.000
VM1                  PoweredOn  1        0.250
DNS1                 PoweredOn  2        8.000
The Name, PowerState, NumCPU, and MemoryGB properties are the properties that you will see by default if you use the Get-VM cmdlet. However, the virtual machine object in PowerCLI has a lot of other properties that are not shown by default. You can see them all by piping the output of the Get-VM cmdlet to the Format-List cmdlet using the pipe character |. The Format-List cmdlet displays object properties and their values in a list format, as shown in the following command-line output:
PowerCLI C:\> Get-VM -Name DC1 | Format-List -Property *


    Name                    : DC1
PowerState              : PoweredOff
Notes                   :
Guest                   : DC1:
NumCPU                  : 1
CoresPerSocket          : 1
MemoryMB                : 4096
MemoryGB                : 4
VMHostId                : HostSystem-host-10
VMHost                  : 192.168.0.133
VApp                    :
FolderId                : Folder-group-v9
Folder                  : Discovered virtual machine
ResourcePoolId          : ResourcePool-resgroup-8
ResourcePool            : Resources
HARestartPriority       : ClusterRestartPriority
HAIsolationResponse     : AsSpecifiedByCluster
DrsAutomationLevel      : AsSpecifiedByCluster
VMSwapfilePolicy        : Inherit
VMResourceConfiguration : CpuShares:Normal/1000
                          MemShares:Normal/40960
Version                 : v13
PersistentId            : 50399fa1-6d65-a26f-1fd2-b635d0e8610f
GuestId                 : windows9Server64Guest
UsedSpaceGB             : 30.000001807697117328643798828
ProvisionedSpaceGB      : 34.175447797402739524841308594
DatastoreIdList         : {Datastore-datastore-11}
ExtensionData           : VMware.Vim.VirtualMachine
CustomFields            : {}
Id                      : VirtualMachine-vm-46
Uid                     : /VIServer=vsphere.local\administrator@192.
                          168.0.132:443/VirtualMachine=VirtualMachin
                          e-vm-46/
Client                  : VMware.VimAutomation.ViCore.Impl.V1.VimCli
                          Ent
You can select specific properties with the Select-Object cmdlet. Say you want to make a report that shows the Name, Notes, VMHost, and Guest properties for all your virtual machines. You can do that with the following command:
PowerCLI C:\> Get-VM | Select-Object -Property Name,Notes,VMHost,Guest
The output of the preceding command is as follows:
Name              Notes      VMHost        Guest
----              -----      ------        -----
DC1                          192.168.0.133 DC1:
VM1                          192.168.0.134 VM1:
DNS1              DNS Server 192.168.0.134 DNS1:
In PowerShell, parameters can be positional. This means that you can omit the parameter name if you put the parameter values in the right order. In the preceding example, the -Property parameter of the Select-Object cmdlet can be omitted. So the preceding command can also be written as:
PowerCLI C:\> Get-VM | Select-Object Name,Notes,VMHost,Guest
In the examples in this book, I will always use the parameter names.
You will probably have also seen the following warning messages:
WARNING: The 'Description' property of VirtualMachine type is
    deprecated. Use the 'Notes' property instead.
WARNING: The 'HardDisks' property of VirtualMachine type is
    deprecated. Use 'Get-HardDisk' cmdlet instead.
WARNING: The 'NetworkAdapters' property of VirtualMachine type is
    deprecated. Use 'Get-NetworkAdapter' cmdlet instead.
WARNING: The 'UsbDevices' property of VirtualMachine type is
    deprecated. Use 'Get-UsbDevice' cmdlet instead.
WARNING: The 'CDDrives' property of VirtualMachine type is
    deprecated. Use 'Get-CDDrive' cmdlet instead.
WARNING: The 'FloppyDrives' property of VirtualMachine type is
    deprecated. Use 'Get-FloppyDrive' cmdlet instead.
WARNING: The 'Host' property of VirtualMachine type is deprecated.
    Use the 'VMHost' property instead.
WARNING: The 'HostId' property of VirtualMachine type is deprecated.
    Use the 'VMHostId' property instead.
WARNING: PowerCLI scripts should not use the 'Client' property. The
    property will be removed in a future release.
These warning messages show the properties that should not be used in your scripts because they are deprecated and might be removed in a future PowerCLI release. Personally, I like these warnings because they remind me of the properties that I should not use anymore. But if you don't like these warnings, you can stop them from appearing with the following command:
PowerCLI C:\> Set-PowerCLIConfiguration -DisplayDeprecationWarnings
    $false -Scope User
You can also use wildcard characters to select specific virtual machines. To display only the virtual machines that have names that start with an A or a, type the following command:
PowerCLI C:\> Get-VM -Name A*
Parameter values are not case sensitive. The asterisk (*) is a wildcard character that matches zero or more characters, starting at the specified position. Another wildcard character is the question mark (?), which matches any character at the specified position. To get all virtual machines with a three-letter name that ends with e, use the following command:
PowerCLI C:\> Get-VM -Name ??e
You can also specify some specific characters, as shown in the following command:
PowerCLI C:\> Get-VM -Name [bc]*
The preceding command displays all of the virtual machines that have names starting with b or c. You can also specify a range of characters, as shown in the following command:
PowerCLI C:\> Get-VM -Name *[0-4]
The preceding command lists all of the virtual machines that have names ending with 0, 1, 2, 3, or 4.
If you want to filter properties that don't have their own Get-VM parameter, you can pipe the output of the Get-VM cmdlet to the Where-Object cmdlet. Using the Where-Object cmdlet, you can set the filter on any property. Let's display a list of all of your virtual machines that have more than one virtual CPU using the following command:
PowerCLI C:\> Get-VM | Where-Object {$_.NumCPU -gt 1}
In this example, the Where-Object cmdlet has a PowerShell scriptblock as a parameter. A scriptblock is a PowerShell script surrounded by braces. In this scriptblock, you see $_. When using commands in the pipeline, $_ represents the current object. In the preceding example, $_ represents the virtual machine object that is passed through the pipeline. $_.NumCPU is the NumCPU property of the current virtual machine in the pipeline. -gt means greater than, so the preceding command shows all virtual machines' objects where the NumCPU property has a value greater than 1.
PowerShell V3 introduced a new, easier syntax for the Where-Object cmdlet. You don't have to use a scriptblock anymore. You can now use the following command:
PowerCLI C:\> Get-VM | Where-Object NumCPU -gt 1
Isn't the preceding command much more like simple English?
In the preceding section, Filtering objects, you saw an example of the -gt comparison operator. In the following table, we will show you all of the PowerShell comparison operators:
|
Operator |
Description |
|
|
Equal to. |
|
|
Not equal to. |
|
|
Greater than. |
|
|
Greater than or equal to. |
|
|
Less than. |
|
|
Less than or equal to. |
|
|
Match using the wildcard character ( |
|
|
Does not match using the wildcard character ( |
|
|
Matches a string using regular expressions. |
|
|
Does not match a string. Uses regular expressions. |
|
|
Tells whether a collection of reference values includes a single test value. |
|
|
Tells whether a collection of reference values does not include a single test value. |
|
|
Tells whether a test value appears in a collection of reference values. |
|
|
Tells whether a test value does not appear in a collection of reference values. |
In the preceding table, you see three different operators for some functions. So what is the difference? The c variant is case sensitive. The two-letter variant and the i variant are case-insensitive. The i variant is made to make it clear that you want to use the case insensitive operator.
The Where-Object cmdlet has two aliases: ? and where. Therefore, both the following commands will display a list of all your virtual machines that have more than one virtual CPU:
PowerCLI C:\> Get-VM | ? {$_.NumCPU -gt 1}


PowerCLI C:\> Get-VM | Where NumCPU -gt 1
Note
Using aliases will save you from the trouble of typing in the PowerCLI console. However, it is good practice to use the full cmdlet names when you write a script. This will make the script much more readable and easier to understand.
To see a list of all of the aliases that are defined for cmdlets, type the following command:
PowerCLI C:\> Get-Alias
You can create aliases using the New-Alias cmdlet. For example, to create an alias childs for the Get-ChildItem cmdlet, you can use the following command:
PowerCLI C:\> New-Alias -Name childs -Value Get-ChildItem
Similar to the Get-VM cmdlet, which retrieves your virtual machines, is the Get-VMHost cmdlet, which displays your hosts. The Get-VMHost cmdlet has the following syntax. The first parameter set is the default:
Get-VMHost [[-Name] <String[]>] [-NoRecursion] [-Datastore
    <StorageResource[]>] [-State <VMHostState[]>] [-Location
    <VIContainer[]>]
    [-Tag <Tag[]>] [-Server <VIServer[]>][<CommonParameters>]
The second parameter set is for retrieving hosts connected to specific distributed virtual switches:
Get-VMHost [[-Name] <String[]>] [-DistributedSwitch
    <DistributedSwitch[]>] [-Tag <Tag[]>] [-Server <VIServer[]>]
    [<CommonParameters>]
The third parameter set is for retrieving hosts by virtual machine or resource pool:
Get-VMHost [[-Name] <String[]>] [-NoRecursion] [-VM <VirtualMachine[]>]
    [-ResourcePool <ResourcePool[]>] [-Datastore <StorageResource[]>]
    [-Location <VIContainer[]>] [-Tag<Tag[]>] [-Server <VIServer[]>]
    [<CommonParameters>]
The fourth parameter set is for retrieving hosts by ID:
Get-VMHost [-Server <VIServer[]>] -Id <String[]> [<CommonParameters>]
The -Id parameter is required. The fifth parameter set is for retrieving hosts by related object:
Get-VMHost [-RelatedObject] <VMHostRelatedObjectBase[]>
    [<CommonParameters>]
The -RelatedObject parameter is required.
Don't mix parameters from different sets or you will get an error as follows:
PowerCLI C:\> Get-VMHost -Id HostSystem-host-22 -Name 192.168.0.133
Get-VMHost : Parameter set cannot be resolved using the specified named
    parameters.
At line:1 char:1
+ Get-VMHost -Id HostSystem-host-22 -Name 192.168.0.133
+ ~~~~~~~~~~~~~~~~~~~~~~~~~~~~~~~~~~~~~~~~~~~~~~~~~~~~~
    + CategoryInfo          : InvalidArgument: (:) [Get-VMHost],
                                  ParameterBindingException
    + FullyQualifiedErrorId : AmbiguousParameterSet,
                                  VMware.VimAutomation
                                  .ViCore.Cmdlets.Commands.GetVMHost
To get a list of all of your hosts, type the following command:
PowerCLI C:\> Get-VMHost
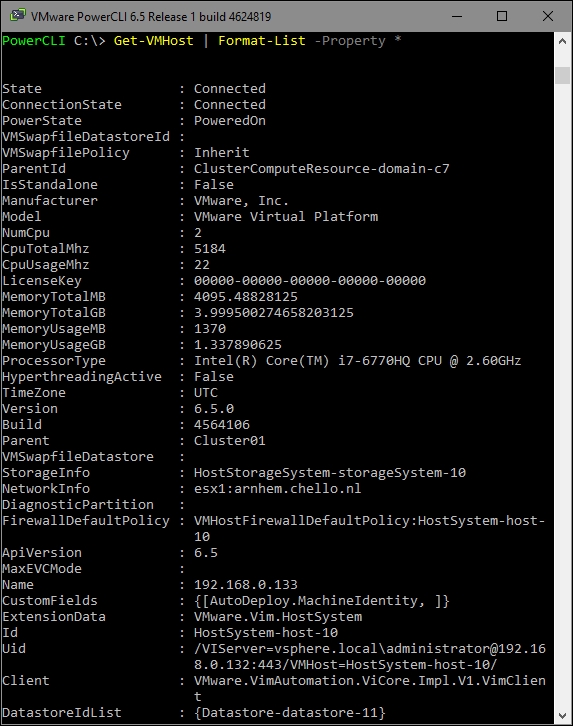
By default, only the Name, ConnectionState, PowerState, NumCPU, CpuUsageMhz, CpuTotalMhz, MemoryUsageGB, MemoryTotalGB, and Version properties are shown. To get a list of all of the properties, type the following command:
PowerCLI C:\> Get-VMHost | Format-List -Property *
The output of this command can be seen in the following screenshot:
You can use the Get-VMHost parameters or the Where-Object cmdlet to filter the hosts you want to display, as we did with the Get-VM cmdlet.
Instead of displaying the output of your PowerCLI commands in the PowerCLI console, you can also display the output in a grid view. A grid view is a popup that looks like a spreadsheet with rows and columns. To display the output of the Get-VMHost cmdlet in a grid view, type the following command:
PowerCLI C:\> Get-VMHost | Out-GridView
The preceding command opens the window of the following screenshot:

You can create filters to display only certain rows, and you can sort columns by clicking on the column header. You can also reorder columns by dragging and dropping them. In the following screenshot, we created a filter to show only the hosts with a CpuUsageMhz value greater than or equal to 22. We also changed the order of the ConnectionState and PowerState columns.

Isn't that cool?
In this chapter, we looked at downloading and installing PowerCLI, participating in the VMware CEIP, and modifying the PowerShell execution policy to be able to start PowerCLI. You learned to create a PowerShell profile containing commands that run every time you start PowerShell or PowerCLI. We showed you how to connect to and disconnect from a server and introduced the credential store to save you from having to specify credentials when you connect to a server. You also learned how to get a list of your virtual machines or hosts and how to stop deprecated warnings. You learned to filter objects by using the PowerShell comparison operators and found out about aliases for cmdlets. Finally, we concluded the chapter with grid views.
In the next chapter, we will introduce some basic PowerCLI concepts.