


 Download code from GitHub
Chapter 1: Introduction to Amazon SageMaker
Machine learning (ML) practitioners use a large collection of tools in the course of their projects: open source libraries, deep learning frameworks, and more. In addition, they often have to write their own tools for automation and orchestration. Managing these tools and their underlying infrastructure is time-consuming and error-prone.
This is the very problem that Amazon SageMaker was designed to address (https://aws.amazon.com/sagemaker/). Amazon SageMaker is a fully managed service that helps you quickly build and deploy ML models. Whether you're just beginning with ML or you're an experienced practitioner, you'll find SageMaker features to improve the agility of your workflows, as well as the performance of your models. You'll be able to focus 100% on the ML problem at hand, without spending any time installing, managing, and scaling ML tools and infrastructure.
In this first chapter, we're going to learn what the main capabilities of SageMaker are, how they help solve pain points faced by ML practitioners, and how to set up SageMaker:
- Exploring the capabilities of Amazon SageMaker
- Demonstrating the strengths of Amazon SageMaker
- Setting up Amazon SageMaker on your local machine
- Setting up an Amazon SageMaker notebook instance
- Setting up Amazon SageMaker Studio
Technical requirements
You will need an AWS account to run the examples included in this chapter. If you haven't got one already, please point your browser to https://aws.amazon.com/getting-started/ to learn about AWS and its core concepts, and to create an AWS account. You should also familiarize yourself with the AWS Free Tier (https://aws.amazon.com/free/), which lets you use many AWS services for free within certain usage limits.
You will need to install and configure the AWS Command-line Interface (CLI) for your account (https://aws.amazon.com/cli/).
You will need a working Python 3.x environment. Be careful not to use Python 2.7, as it is no longer maintained. Installing the Anaconda distribution (https://www.anaconda.com/) is not mandatory but is strongly encouraged as it includes many projects that we will need (Jupyter, pandas, numpy, and more).
Code examples included in the book are available on GitHub at https://github.com/PacktPublishing/Learn-Amazon-SageMaker. You will need to install a Git client to access them (https://git-scm.com/).
Exploring the capabilities of Amazon SageMaker
Amazon SageMaker was launched at AWS re:Invent 2017. Since then, a lot of new features have been added: you can see the full (and ever-growing) list at https://aws.amazon.com/about-aws/whats-new/machine-learning.
In this section, you'll learn about the main capabilities of Amazon SageMaker and their purpose. Don't worry, we'll dive deep on each of them in later chapters. We will also talk about the SageMaker Application Programming Interfaces (APIs), and the Software Development Kits (SDKs) that implement them.
The main capabilities of Amazon SageMaker
At the core of Amazon SageMaker is the ability to build, train, optimize, and deploy models on fully managed infrastructure, and at any scale. This lets you focus on studying and solving the ML problem at hand, instead of spending time and resources on building and managing infrastructure. Simply put, you can go from building to training to deploying more quickly. Let's zoom in on each step and highlight relevant SageMaker capabilities.
Building
Amazon SageMaker provides you with two development environments:
- Notebook instances: Fully managed Amazon EC2 instances that come preinstalled with the most popular tools and libraries: Jupyter, Anaconda, and so on.
- Amazon SageMaker Studio: A full-fledged integrated development environment for ML projects.
When it comes to experimenting with algorithms, you can choose from the following:
- A collection of 17 built-in algorithms for ML and deep learning, already implemented and optimized to run efficiently on AWS. No ML code to write!
- A collection of built-in open source frameworks (TensorFlow, PyTorch, Apache MXNet, scikit-learn, and more), where you simply bring your own code.
- Your own code running in your own container: custom Python, R, C++, Java, and so on.
- Algorithms and pretrained models from AWS Marketplace for ML (https://aws.amazon.com/marketplace/solutions/machine-learning).
In addition, Amazon SageMaker Autopilot uses AutoML to automatically build, train, and optimize models without the need to write a single line of ML code.
Amazon SageMaker also includes two major capabilities that help with building and preparing datasets:
- Amazon SageMaker Ground Truth: Annotate datasets at any scale. Workflows for popular use cases are built in (image detection, entity extraction, and more), and you can implement your own. Annotation jobs can be distributed to workers that belong to private, third-party, or public workforces.
- Amazon SageMaker Processing: Run data processing and model evaluation batch jobs, using either scikit-learn or Spark.
Training
As mentioned earlier, Amazon SageMaker takes care of provisioning and managing your training infrastructure. You'll never spend any time managing servers, and you'll be able to focus on ML. On top of this, SageMaker brings advanced capabilities such as the following:
- Managed storage using either Amazon S3, Amazon EFS, or Amazon FSx for Lustre depending on your performance requirements.
- Managed spot training, using Amazon EC2 Spot instances for training in order to reduce costs by up to 80%.
- Distributed training automatically distributes large-scale training jobs on a cluster of managed instances
- Pipe mode streams infinitely large datasets from Amazon S3 to the training instances, saving the need to copy data around.
- Automatic model tuning runs hyperparameter optimization in order to deliver high-accuracy models more quickly.
- Amazon SageMaker Experiments easily tracks, organizes, and compares all your SageMaker jobs.
- Amazon SageMaker Debugger captures the internal model state during training, inspects it to observe how the model learns, and detects unwanted conditions that hurt accuracy.
Deploying
Just as with training, Amazon SageMaker takes care of all your deployment infrastructure, and brings a slew of additional features:
- Real-time endpoints: This creates an HTTPS API that serves predictions from your model. As you would expect, autoscaling is available.
- Batch transform: This uses a model to predict data in batch mode.
- Infrastructure monitoring with Amazon CloudWatch: This helps you to view real-time metrics and keep track of infrastructure performance.
- Amazon SageMaker Model Monitor: This captures data sent to an endpoint, and compares it with a baseline to identify and alert on data quality issues (missing features, data drift, and more).
- Amazon SageMaker Neo: This compiles models for a specific hardware architecture, including embedded platforms, and deploys an optimized version using a lightweight runtime.
- Amazon Elastic Inference: This adds fractional GPU acceleration to CPU-based instances in order to find the best cost/performance ratio for your prediction infrastructure.
The Amazon SageMaker API
Just like all other AWS services, Amazon SageMaker is driven by APIs that are implemented in the language SDKs supported by AWS (https://aws.amazon.com/tools/). In addition, a dedicated Python SDK, aka the 'SageMaker SDK,' is also available. Let's look at both, and discuss their respective benefits.
The AWS language SDKs
Language SDKs implement service-specific APIs for all AWS services: S3, EC2, and so on. Of course, they also include SageMaker APIs, which are documented at https://docs.aws.amazon.com/sagemaker/latest/dg/api-and-sdk-reference.html.
When it comes to data science and ML, Python is the most popular language, so let's take a look at the SageMaker APIs available in boto3, the AWS SDK for the Python language (https://boto3.amazonaws.com/v1/documentation/api/latest/reference/services/sagemaker.html). These APIs are quite low level and verbose: for example, create_training_job() has a lot of JSON parameters that don't look very obvious. You can see some of them in the next screenshot. You may think that this doesn't look very appealing for everyday ML experimentation… and I would totally agree!

Figure 1.1 A partial view of the create_training_job() API in boto3
Indeed, these service-level APIs are not meant to be used for experimentation in notebooks. Their purpose is automation, through either bespoke scripts or Infrastructure-as-Code tools such as AWS CloudFormation (https://aws.amazon.com/cloudformation) and Terraform (https://terraform.io). Your DevOps team will use them to manage production, where they do need full control over each possible parameter.
So, what should you use for experimentation? You should use the Amazon SageMaker SDK.
The Amazon SageMaker SDK
The Amazon SageMaker SDK (https://github.com/aws/sagemaker-python-sdk) is a Python SDK specific to Amazon SageMaker. You can find its documentation at https://sagemaker.readthedocs.io/en/stable/.
Note:
The code examples in this book are based on the first release of the SageMaker SDK v2, released in August 2020. For the sake of completeness, and to help you migrate your own notebooks, the companion GitHub repository includes examples for SDK v1 and v2.
Here, the abstraction level is much higher: the SDK contains objects for models, estimators, models, predictors, and so on. We're definitely back into ML territory.
For instance, this SDK makes it extremely easy and comfortable to fire up a training job (one line of code) and to deploy a model (one line of code). Infrastructure concerns are abstracted away, and we can focus on ML instead. Here's an example. Don't worry about the details for now:
# Configure the training job my_estimator = TensorFlow(    'my_script.py',    role=my_sageMaker_role,    instance_type='ml.p3.2xlarge',    instance_count=1,    framework_version='2.1.0')
# Train the model my_estimator.fit('s3://my_bucket/my_training_data/')
# Deploy the model to an HTTPS endpoint my_predictor = my_estimator.deploy(    initial_instance_count=1,     instance_type='ml.c5.2xlarge')
Now that we know a little more about Amazon SageMaker, let's see how it helps typical customers make their ML workflows more agile and more efficient.
Demonstrating the strengths of Amazon SageMaker
Alice and Bob are both passionate, hardworking people who try their best to build great ML solutions. Unfortunately, a lot of things stand in their way and slow them down.
In this section, let's look at the challenges that they face in their daily projects, and how Amazon SageMaker could help them be more productive.
Solving Alice's problems
Alice has a PhD and works in a large public research lab. She's a trained data scientist, with a strong background in math and statistics. She spends her time on large scientific projects involving bulky datasets. Alice generally doesn't know much about IT and infrastructure, and she honestly doesn't care at all for these topics. Her focus is on advancing her research, and publishing papers.
For her daily work, she can rely on her own powerful (but expensive) desktop workstation. She enjoys the fact that she can work on her own, but she can only experiment with a fraction of her dataset if she wants to keep training times reasonable.
She tries to maintain the software configuration of her machine herself, as IT doesn't know much about the esoteric tools she uses. When something goes wrong, she wastes precious hours fixing it, and that's frustrating.
When Alice wants to run large experiments, she has to use remote servers hosted in the computing centre: a farm of very powerful multi-GPU servers, connected to a petabyte of network-attached storage. Of course, she has to share these servers with other researchers. Every week, the team leads meet and try to prioritize projects and workloads: this is never easy, and decisions often need to be escalated to the lab director.
Let's see how SageMaker and cloud computing can help Alice.
Launching an inexpensive SageMaker notebook instance in minutes, Alice could start running some sample notebooks, and she would quickly become familiar with the service, as it's based on the same tools she already uses. Scaling up, she then could train her own model on a cluster of powerful GPU instances, created on demand with just a couple of lines of code. That's more computing power than she would have ever managed using in the computing centre, and she wouldn't have to set up anything!
Thanks to the automatic model tuning feature in SageMaker, Alice would also be able to significantly improve the accuracy of her models in just a few hours of parallel optimization. Again, doing this with her previous setup would have been impossible due to the lack of computing resources. Deploying models would be equally straightforward: adapting a couple of lines of code found in a sample notebook, Alice would use the batch transform feature to predict her test dataset, again spending no time at all worrying about tools or infrastructure.
Last but not least, keeping track of her expenses would be easy: the AWS console would tell her how much she's spent, which would be less than expected thanks to the on-demand nature of SageMaker infrastructure!
Solving Bob's problems
Bob is a DevOps engineer, and he's in charge of a large training cluster shared by a team of data scientists. They can start their distributed jobs in seconds, and it's just simpler for Bob to manage a single cluster. Auto Scaling is set up, but capacity planning is still needed to find the right amount of EC2 instances and to optimize the cost using the right mix of Reserved, Spot, and On-Demand instances. Bob has a weekly meeting with the team to make sure they'll have enough instances… and they also ping him on Slack when they need extra capacity on the fly. Bob tries to automatically reduce capacity at night and on weekends when the cluster is less busy, but he's quite sure they're spending too much anyway. Oh, well.
Once models have been trained and validated, Bob uses Continuous Integration and Continuous Deployment (CI/CD) to deploy them automatically to the production Docker cluster. Bob maintains bespoke containers for training and prediction: libraries, dependencies, and in-house tools. That takes a bit of time, but he enjoys doing it. He just hopes that no one will ask him to do PyTorch and Apache MXNet too.
Let's see how Bob could use SageMaker to improve his ML workflows.
As SageMaker is based on Docker containers, Bob could get rid of his bespoke containers and use their built-in counterparts. Migrating the training workloads to SageMaker would be pretty easy. This would help Bob get rid of his training cluster, and let every data scientist train completely on demand instead. With Managed Spot Training, Bob could certainly optimize training costs even more.
The data science team would quickly adopt advanced features like distributed training, Pipe mode, and automatic model tuning. This would save them a lot of time, and the team would no longer have to maintain the kludgy code they have written to implement similar features.
Of course, Alice and Bob are fictional characters. Yet, I keep meeting many customers who share some (and sometimes all) of their pain points. That may be your case too, so please let me get you started with Amazon SageMaker.
Setting up Amazon SageMaker on your local machine
A common misconception is that you can't use SageMaker outside of the AWS cloud. Obviously, it is a cloud-based service, and its most appealing capabilities require cloud infrastructure to run. However, many developers like to set up their development environment their own way, and SageMaker lets them do that: in this section, you will learn how to install the SageMaker SDK on your local machine or on a local server. In later chapters, you'll learn how to train and deploy models locally.
It's good practice to isolate Python environments in order to avoid dependency hell. Let's see how we can achieve this using two popular projects: virtualenv (https://virtualenv.pypa.io) and Anaconda (https://www.anaconda.com/).
Installing the SageMaker SDK with virtualenv
If you've never worked with virtualenv before, please read this tutorial before proceeding – https://packaging.python.org/guides/installing-using-pip-and-virtual-environments/:
- First, let's create a new environment named
sagemaker, and activate it:$ mkdir workdir $ cd workdir $ python3 -m venv sagemaker $ source sagemaker/bin/activate
- Now, let's install
boto3, the SageMaker SDK, and thepandaslibrary (https://pandas.pydata.org/), which is also required:$ pip install boto3 sagemaker pandas
- Now, let's quickly check that we can import these SDKs in Python:
$ python3
Python 3.7.4 (default, Aug 13 2019, 15:17:50)>>> import boto3 >>> import sagemaker >>> print(boto3.__version__)1.12.39 >>> print(sagemaker.__version__)1.55.3 >>> exit
The installation looks fine. Your own versions will certainly be newer and that's fine. Now, let's run a quick test with a local Jupyter server (https://jupyter.org/). If Jupyter isn't installed on your machine, you can find instructions at https://jupyter.org/install:
- First, let's create a Jupyter kernel based on our virtual environment:
$ pip install ipykernel $ python3 -m ipykernel install --user --name=sagemaker
- Then, we can launch Jupyter:
$ jupyter notebook
- Creating a new notebook, we can see that the
sagemakerkernel is available, so let's select it in the New menu, as seen in the following screenshot:
Figure 1.2 Creating a new notebook
- Finally, we can check that the SDKs are available, by importing them and printing their version, as shown in the following screenshot:
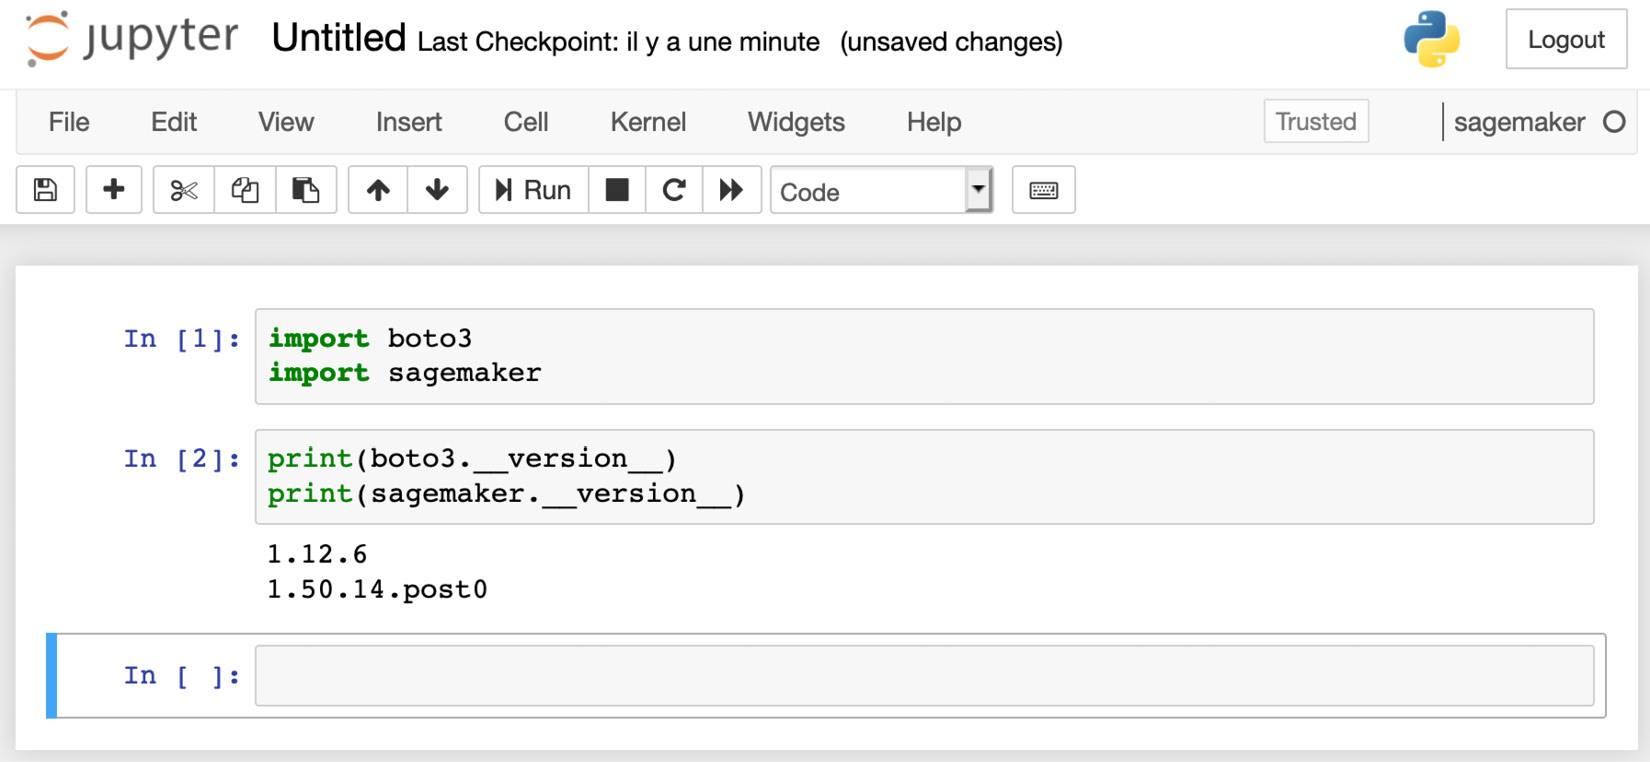
Figure 1.3 Checking the SDK version
This completes the installation with virtualenv. Don't forget to terminate Jupyter, and to deactivate your virtualenv:
$ deactivate
Installing the SageMaker SDK with Anaconda
Anaconda includes a package manager named conda that lets you create and manage isolated environments. If you've never worked with conda before, you should do the following first:
- Install Anaconda: https://docs.anaconda.com/anaconda/install/
- Read this tutorial: https://docs.conda.io/projects/conda/en/latest/user-guide/getting-started.html
Perform the following steps to install the Sagemaker SDK with conda:
- Let's create and activate a new
condaenvironment namedconda-sagemaker:$ conda create -y -n conda-sagemaker $ conda activate conda-sagemaker
- Then, we install
pandas,boto3, and the SageMaker SDK. The latter has to be installed withpip, as it's not available as acondapackage:$ conda install -y boto3 pandas $ pip install sagemaker
- Now, let's add Jupyter and its dependencies to the environment, and create a new kernel:
$ conda install -y jupyter ipykernel $ python3 -m ipykernel install --user --name conda-sagemaker
- Then, we can launch Jupyter, and check that the
conda-sagemakerkernel is present in the New menu, as is visible in the next screenshot:$ jupyter notebook

Figure 1.4 Creating a new conda environment
- As shown in the following screenshot, we can create a notebook using this kernel, and check that the SDKs are imported correctly:
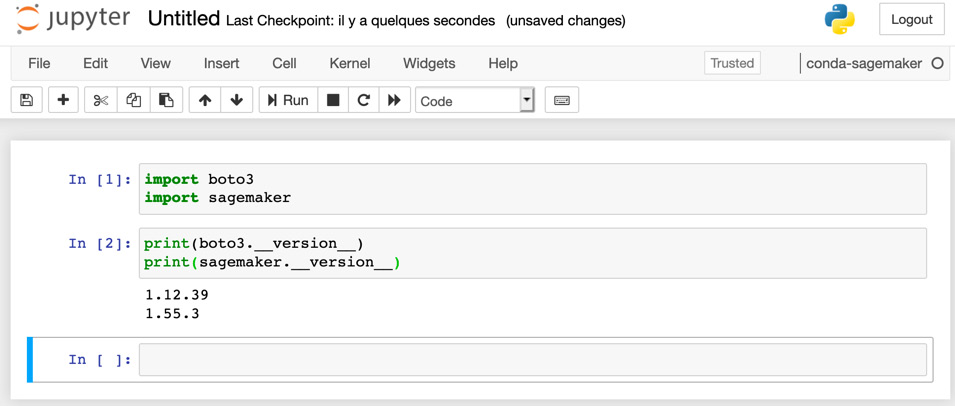
Figure 1.5 Checking the SDK version
This completes the installation with conda. Whether you'd rather use it over virtualenv is largely a matter of personal preference. You can definitely run all notebooks in this book and build your own projects with one or the other.
A word about AWS permissions
Amazon Identity and Access Management (IAM) enables you to manage access to AWS services and resources securely (https://aws.amazon.com/iam). Of course, this applies to Amazon SageMaker as well, and you need to make sure that your AWS user has sufficient permissions to invoke the SageMaker API.
Note:
If you're not familiar with IAM at all, please read the following documentation: https://docs.aws.amazon.com/IAM/latest/UserGuide/introduction.html
You can run a quick test by using the AWS CLI on one of the SageMaker APIs, for example, list-endpoints. I'm using the eu-west-1 region here, but feel free to use the region that is nearest to you:
$ aws sagemaker list-endpoints --region eu-west-1 { "Endpoints": []}
If you get an error message complaining about insufficient permissions, you need to update the IAM role attached to your AWS user.
If you own the AWS account in question, you can easily do this yourself in the IAM console, by adding the AmazonSageMakerFullAccess managed policy to your role. Note that this policy is extremely permissive: this is fine for a development account, but certainly not for a production account.
If you work with an account where you don't have administrative rights (such as a company-provided account), please contact your IT administrator to add SageMaker permissions to your AWS account.
For more information on SageMaker permissions, please refer to the documentation: https://docs.aws.amazon.com/sagemaker/latest/dg/security-iam.html.
Setting up an Amazon SageMaker notebook instance
Experimentation is a key part of the ML process. Developers and data scientists use a collection of open source tools and libraries for data exploration and processing, and of course, to evaluate candidate algorithms. Installing and maintaining these tools takes a fair amount of time, which would probably be better spent on studying the ML problem itself!
In order to solve this problem, Amazon SageMaker makes it easy to fire up a notebook instance in minutes. A notebook instance is a fully managed Amazon EC2 instance that comes preinstalled with the most popular tools and libraries: Jupyter, Anaconda (and its conda package manager), numpy, pandas, deep learning frameworks, and even NVIDIA GPU drivers.
Note:
If you're not familiar with S3 at all, please read the following documentation:https://docs.aws.amazon.com/AmazonS3/latest/dev/Welcome.html
Let's create one such instance using the AWS Console (https://console.aws.amazon.com/sagemaker/):
- In the Notebook section of the left-hand vertical menu, click on Notebook instances, as shown in the next screenshot:

Figure 1.6 Creating a notebook instance
Note:
The AWS console is a living thing. By the time you're reading this, some screens may have been updated. Also, you may notice small differences from one region to the next, as some features or instance types are not available there.
- Then, click on Create notebook instance. In the Notebook instance settings box, we need to enter a name, and select an instance type: as you can see in the drop-down list, SageMaker lets us pick from a very wide range of instance types. As you would expect, pricing varies according to the instance size, so please make sure you familiarize yourself with instance features and costs (https://aws.amazon.com/sagemaker/pricing/).
- We'll stick to
ml.t2.mediumfor now. As a matter of fact, it's an excellent default choice if your notebooks only invoke SageMaker APIs that create fully managed infrastructure for training and deployment – no need for anything larger. If your workflow requires local data processing and model training, then feel free to scale up as needed.We can ignore Elastic Inference for now, it will be covered in Chapter 13, Optimizing Prediction Cost and Performance. Thus, your setup screen should look like the following screenshot:

Figure 1.7 Creating a notebook instance
- As you can see in the following screenshot, we could optionally apply a lifecycle configuration, a script that runs either when a notebook instance is created or restarted, in order to install additional libraries, clone repositories, and so on. We could also add additional storage (the default is set to 5 GB):

Figure 1.8 Creating a notebook instance
- In the Permissions and encryption section, we need to create an Amazon IAM role for the notebook instance: it will allow it to access storage in Amazon S3, to create Amazon SageMaker infrastructure, and so on.
Select Create a new role, which opens the following screen:

Figure 1.9 Creating an IAM role
The only decision we have to make here is whether we want to allow our notebook instance to access specific Amazon S3 buckets. Let's select Any S3 bucket and click on Create role. This is the most flexible setting for development and testing, but we'd want to apply much stricter settings for production. Of course, we can edit this role later on in the IAM console, or create a new one.
Optionally, we can disable root access to the notebook instance, which helps lock down its configuration. We can also enable storage encryption using Amazon Key Management Service (https://aws.amazon.com/kms). Both features are extremely important in high-security environments, but we won't enable them here.
Once you've completed this step, your screen should look like this, although the name of the role will be different:

Figure 1.10 Creating an IAM role
- As shown in the following screenshot, the optional Network section lets you pick the Amazon Virtual Private Cloud (VPC) where the instance will be launched. This is useful when you need tight control over network flows from and to the instance, for example, to deny it access to the internet. Let's not use this feature here:

Figure 1.11 Setting the VPC
- The optional Git repositories section lets you add one or more Git repositories that will be automatically cloned on the notebook instance when it's first created. You can select any public Git repository, or select one from a list of repositories that you previously defined in Amazon SageMaker: the latter can be done under Git repositories in the Notebook section of the left-hand vertical menu.
Let's clone one of my repositories to illustrate, and enter its name as seen in the following screenshot. Feel free to use your own!

Figure 1.12 Setting Git repositories
- Last but not least, the optional Tags section lets us tag notebook instances. It's always good practice to tag AWS resources, as this makes it much easier to manage them later on. Let's add a couple of tags.
- As shown in the following screenshot, let's click on Create notebook instance:

Figure 1.13 Setting tags
Under the hood, SageMaker fires up a fully managed Amazon EC2 instance, using an Amazon Machine Image (AMI) preinstalled with Jupyter, Anaconda, deep learning libraries, and so on. Don't look for it in the EC2 console, you won't see it.
- Five to ten minutes later, the instance is in service, as shown in the following screenshot. Let's click on Open JupyterLab:
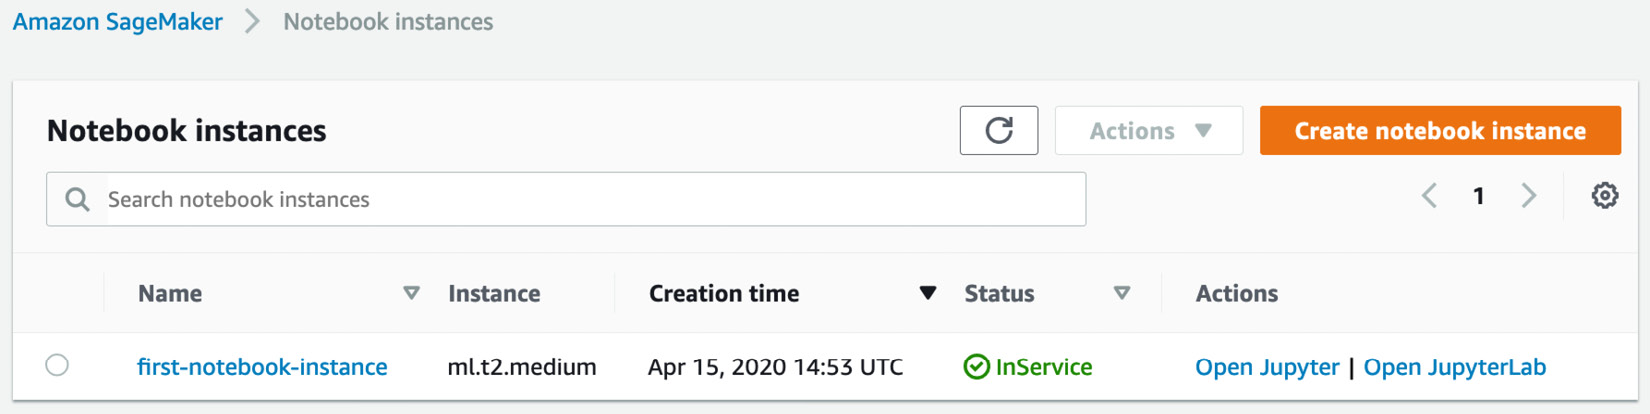
Figure 1.14 Opening a notebook instance
We'll jump straight into Jupyter Lab. As shown in the following screenshot, we see in the left-hand panel that the repository has been cloned. In the Launcher panel, we see the many conda environments that are readily available for TensorFlow, PyTorch, Apache MXNet, and more:
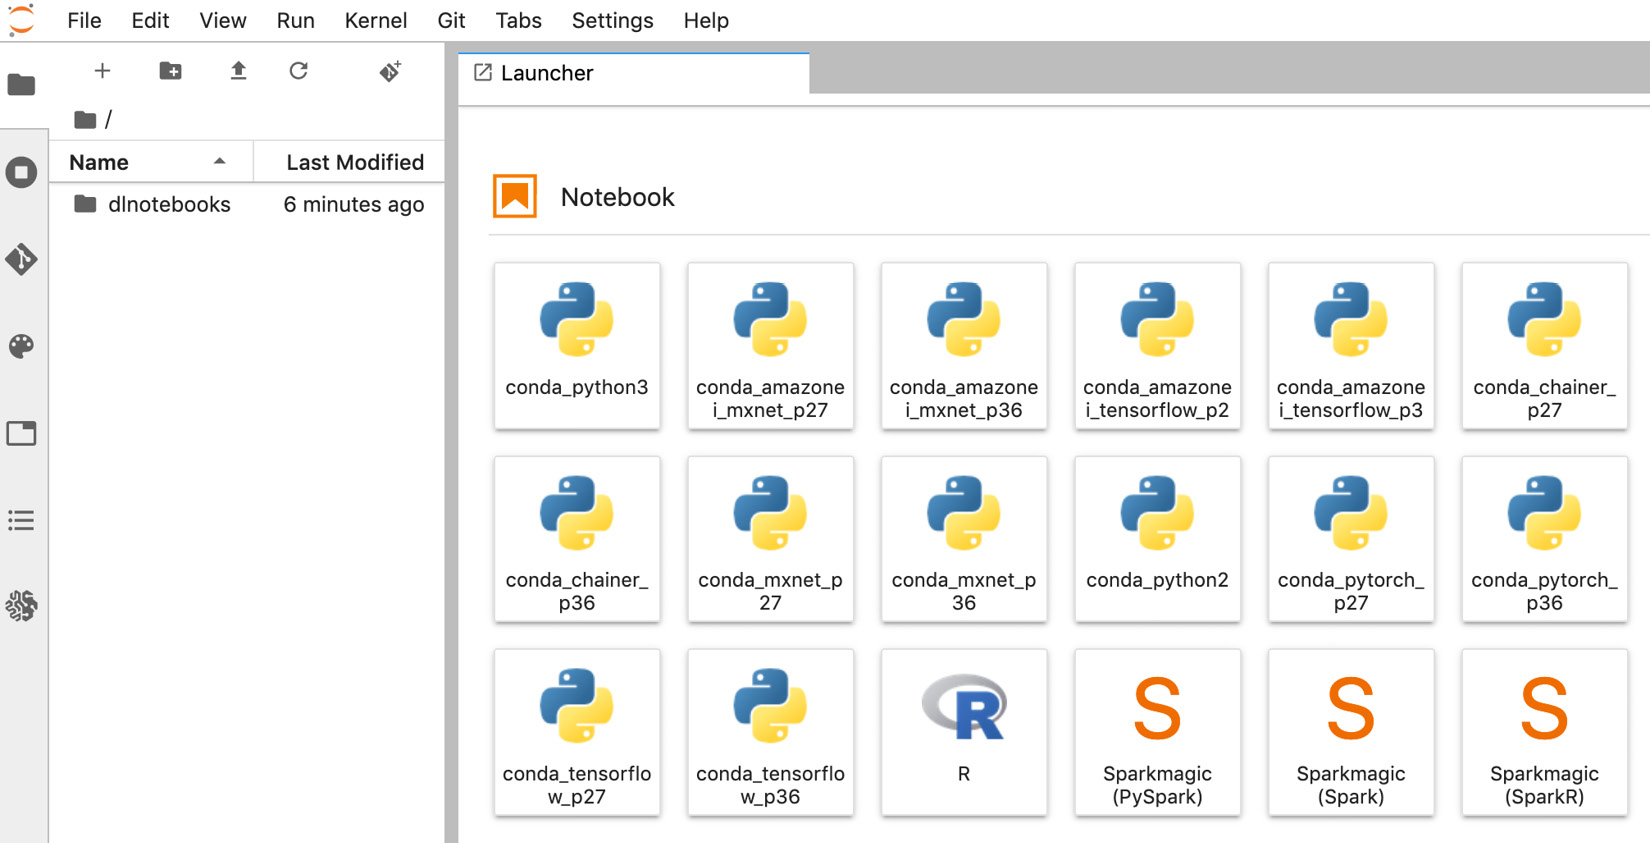
Figure 1.15 Notebook instance welcome screen
The rest is vanilla Jupyter, and you can get to work right away!
Coming back to the AWS console, we see that we can stop, start, and delete a notebook instance, as shown in the next screenshot:
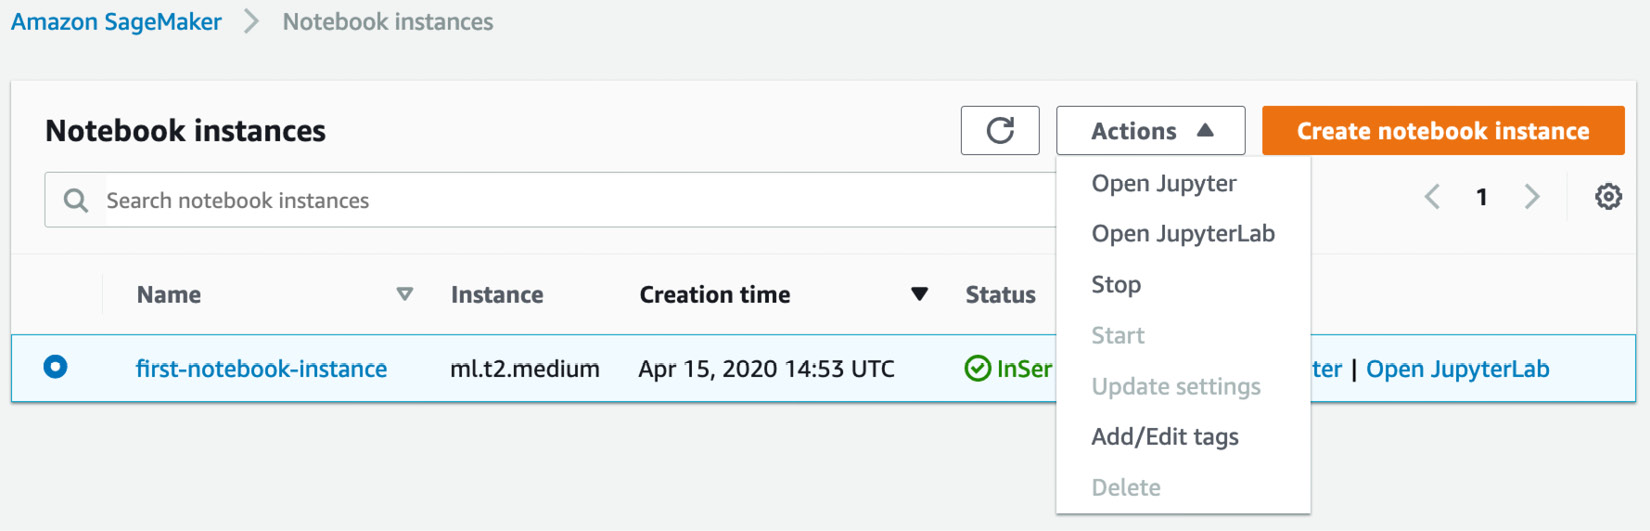
Figure 1.16 Stopping a notebook instance
Stopping a notebook instance is identical to stopping an Amazon EC2 instance: storage is persisted until the instance is started again.
When a notebook instance is stopped, you can then delete it: the storage will be destroyed, and you won't be charged for anything any longer.
If you're going to use this instance to run the examples in this book, I'd recommend stopping it and restarting it. This will save you the trouble of recreating it again and again, your work will be preserved, and the costs will really be minimal.
Setting up Amazon SageMaker Studio
Amazon SageMaker Studio goes one step further in integrating the ML tools you need from experimentation to production. At its core is an integrated development environment based on Jupyter that makes it instantly familiar.
In addition, SageMaker Studio is integrated with other SageMaker capabilities, such as SageMaker Experiments to track and compare all jobs, SageMaker Autopilot to automatically create ML models, and more. A lot of operations can be achieved in just a few clicks, without having to write any code.
SageMaker Studio also further simplifies infrastructure management. You won't have to create notebook instances: SageMaker Studio provides you with compute environments that are readily available to run your notebooks.
Note:
This section requires basic knowledge of Amazon VPC and Amazon IAM. If you're not familiar with them at all, please read the following documentation:a) https://docs.aws.amazon.com/vpc/latest/userguide/what-is-amazon-vpc.html b) https://docs.aws.amazon.com/IAM/latest/UserGuide/introduction.html
Onboarding to Amazon SageMaker Studio
You can access SageMaker Studio using any of these three options:
- Use the quick start procedure: This is the easiest option for individual accounts, and we'll walk through it in the following paragraphs.
- Use AWS Single Sign-On (SSO): If your company has an SSO application set up, this is probably the best option. You can learn more about SSO onboarding at https://docs.aws.amazon.com/sagemaker/latest/dg/onboard-sso-users.html. Please contact your IT administrator for details.
- Use Amazon IAM: If your company doesn't use SSO, this is probably the best option. You can learn more about SSO onboarding at https://docs.aws.amazon.com/sagemaker/latest/dg/onboard-iam.html. Again, please contact your IT administrator for details.
Onboarding with the quick start procedure
Perform the following steps to access the SageMaker Studio with the quick start procedure:
- First, open the AWS Console in one of the regions where Amazon SageMaker Studio is available, for example, https://us-east-2.console.aws.amazon.com/sagemaker/.
- As shown in the following screenshot, the left-hand vertical panel has a link to SageMaker Studio:

Figure 1.17 Opening SageMaker Studio
- Clicking on this link opens the onboarding screen, and you can see its first section in the next screenshot:

Figure 1.18 Running Quick start
- Let's select Quick start. Then, we enter the username we'd like to use to log into SageMaker Studio, and we create a new IAM role as shown in the preceding screenshot. This opens the following screen:

Figure 1.19 Creating an IAM role
The only decision we have to make here is whether we want to allow our notebook instance to access specific Amazon S3 buckets. Let's select Any S3 bucket and click on Create role. This is the most flexible setting for development and testing, but we'd want to apply much stricter settings for production. Of course, we can edit this role later on in the IAM console, or create a new one.
- Once we've clicked on Create role, we're back to the previous screen, where we just have to click on Submit to launch the onboarding procedure. Depending on your account setup, you may get an extra screen asking you to select a VPC and a subnet. I'd recommend selecting any subnet in your default VPC.
- A few minutes later, SageMaker Studio is in service, as shown in the following screenshot. We could add extra users if we needed to, but for now, let's just click on Open Studio:

Figure 1.20 Launching SageMaker Studio
Don't worry if this takes a few more minutes, as SageMaker Studio needs to complete the first-run setup of your environment. As shown in the following screenshot, SageMaker Studio opens, and we see the familiar JupyterLab layout:
Note:
SageMaker Studio is a living thing. By the time you're reading this, some screens may have been updated. Also, you may notice small differences from one region to the next, as some features or instance types are not available everywhere.

Figure 1.21 SageMaker Studio welcome screen
- We can immediately create our first notebook. In the Launcher tab, let's select Data Science, and click on Notebook – Python 3.
- This opens a notebook, as is visible in the following screenshot. We first check that SDKs are readily available. If this is the first time you've launched the Data Science image, please wait for a couple of minutes for the environment to start:

Figure 1.22 Checking the SDK version
- When we're done working with SageMaker Studio, all we have to do is close the browser tab. If we want to resume working, we just have to go back to the SageMaker console, and click on Open Studio.
Now that we've completed this exercise, let's review what we learned in this chapter.
Summary
In this chapter, you discovered the main capabilities of Amazon SageMaker, and how they help solve your ML pain points. By providing you with managed infrastructure and pre-installed tools, SageMaker lets you focus on the ML problem itself. Thus, you can go more quickly from experimenting with models to deploying them in production.
Then, you learned how to set up Amazon SageMaker on your local machine, on a notebook instance, and on Amazon SageMaker Studio. The latter is a managed ML IDE where many other SageMaker capabilities are just a few clicks away.
In the next chapter, we'll see how you can use Amazon SageMaker and other AWS services to prepare your datasets for training.


