


 Download code from GitHub
Understanding Azure Pipelines
This book will be one of your favorite books in the Microsoft DevOps world as it provides a comprehensive guide to learning all about Azure Pipelines and will allow you to become an experienced Azure DevOps engineer. An Azure DevOps engineer is an individual who is responsible for designing and implementing continuous integration and continuous deployment (CI/CD) pipelines using the Azure Pipelines service, which is a component of Azure DevOps. Azure DevOps is a group of Microsoft services that help a project team achieve the project’s goal.
In this chapter, you will be introduced to the CI/CD and Azure DevOps concepts in greater detail and will learn about the advantages of using Azure Pipelines to create CI/CD pipelines for the application deployment process. More specifically, in this chapter, you will learn about the following topics:
- What is CI/CD?
- Introducing Azure DevOps
- Introducing Azure Pipelines and its components
- Comparing Azure Pipelines with other CI/CD tools
- Setting up agent pools
- Creating a personal access token (PAT)
- Setting up and updating self-host agents
- Setting up deployment groups
Technical requirements
You can find the code for this chapter at https://github.com/PacktPublishing/Implementing-CI-CD-Using-Azure-Pipelines/tree/main/ch01.
What is CI/CD?
CI/CD is the workflow process for automation development and deployment that developers should know about to improve their skills.
CI is the workflow process for automating the process of building and testing code whenever a team member commits changes to Git, which is a form of version control that’s run on a source control repository platform such as Azure Repos, GitHub, GitLab, and others. CI creates a modern culture for all developers to share their code, including unit tests, by merging all changes into a shared version control repository after finishing a small task. CI runs based on committing code triggers to grab the latest code from the shared version control repository to build, test, and validate any branch that they commit. Using CI allows you to rapidly discover error code issues and correct them to ensure all developer code is of good quality.
CD involves automating the process of building, testing, configuring, and deploying from the CI workflow process to specific environments, such as QA, staging, and production.
This workflow is illustrated in the following figure:
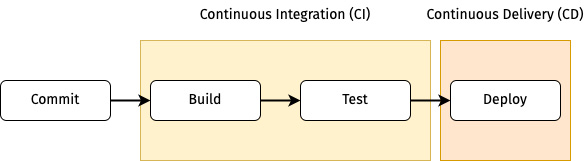
Figure 1.1 – CI/CD diagram
CI/CD reduces human error and the routine operation of the manual build, test, and deploy stages for any developer. It helps the developer focus only on application development.
This book will focus on the CI/CD tool Azure Pipelines, which is a comprehensive service for DevOps and a part of the ecosystem of services in Azure DevOps. Before we look at this further, let’s introduce Azure DevOps.
Introducing Azure DevOps
Many CI/CD tools are used to support modern software development, such as Azure Pipelines, GitLab CI/CD, GitHub Actions, and Bitbucket Pipelines. One of the most widely used is Azure Pipelines; this is a part of Azure DevOps, which consists of the following five services:
- Azure Boards is an Azure DevOps sub-service that’s used to track all tasks related to a project conveniently in one place. It is suitable for teamwork. It helps with collaboration because it supports Kanban boards, backlogs, team dashboards, and custom reporting, which can create a connection between the tasks and source version repositories such as GitHub or Azure Repos.
- Azure Pipelines is an Azure DevOps sub-service that’s used to build, test, integrate, and deploy CI/CD processes. It helps reduce delivery errors and allows teams to focus solely on developing clean and readable code in software development; this service can be accessed through the Azure DevOps web portal (
https://dev.azure.com/{your-organization}). This book will focus on this service due to this benefit. - Azure Repos is an Azure DevOps sub-service for controlling the version of the source code. It is easy to manage code in one place. Easy maintenance can also help you define rules so that you can deploy code safely to desired environments, such as merge checks or static code analysis after the team creates the pull request. The examples in this book will use Azure Repos.
- Azure Test Plans is an Azure DevOps sub-service that helps test or quality assurance teams write use case scenarios to easily deliver the test results to the customer. The tester or quality assurance team creates system integration testing (SIT) and user acceptance testing (UAT) on Azure Test Plans. It can display test results as dashboard reports and include comments or feedback. Azure Test Plans also helps the team understand the test process of the project on the same page.
- Azure Artifacts is an Azure DevOps sub-service that enables developers to share and manage all their packages that result from building code in one place. Developers can publish packages to their feeds and share them within the same team, organization, and even publicly. Developers can also load the packages from different public repositories such as https://www.nuget.org/ or https://www.npmjs.com/. Azure Artifacts also supports multiple package types, such as NuGet, npm, Python, Maven, and Universal Packages.
All these services fall under the umbrella of Azure DevOps, which covers the necessary development process for a project. You don’t need to use additional services for development.
Introducing Azure Pipelines and its components
Azure Pipelines is a CI/CD platform for building, testing, and deploying your code to a live application. First, let’s take a look at its key components.
Exploring the key components
There are some key concepts that you need to understand when creating an Azure pipeline:
- An agent is the software that runs a job within a server. It can be a Microsoft-hosted agent or a self-hosted agent.
- A pipeline is a workflow process for CI/CD for your application development. It can define your idea of how to build, test, integrate, and deploy your project.
- A trigger is an action that calls a pipeline to run.
- A stage is a flow of defined jobs in a pipeline, and each stage can have one or more jobs. The benefit of using a stage is that you can rerun job(s) under it. This means you do not need to rerun the whole pipeline. For example, let’s say the developer creates a pipeline containing two stages: the build stage and the deployment stage. If the deployment stage fails, then they can only rerun the failed job under the deployment stage.
- A job is a group of one or more steps set in a stage. It is useful when you need to run a set of steps in a different operating system environment.
- A step can be a task or script and is the smallest piece of a pipeline:
- A task is a pre-defined script that your idea can define.
- A script is an action that uses the command-line interface (CLI), PowerShell, or Bash. It depends on the operating system agent that you choose for a job. For example, if you use a command line to run on a Linux agent, it will use a bash script. PowerShell runs on a macOS agent and will use a PowerShell core for cross-platform scripts.
- A target is a destination of the pipeline. It can be Azure Artifacts, an Azure resource service (such as Azure App Services, Azure Functions, Azure Container Apps, Azure Kubernetes Services, and so on), or invoke a REST API such as webhooks on Microsoft Teams.
Now, let’s look at how these components interact with each other:
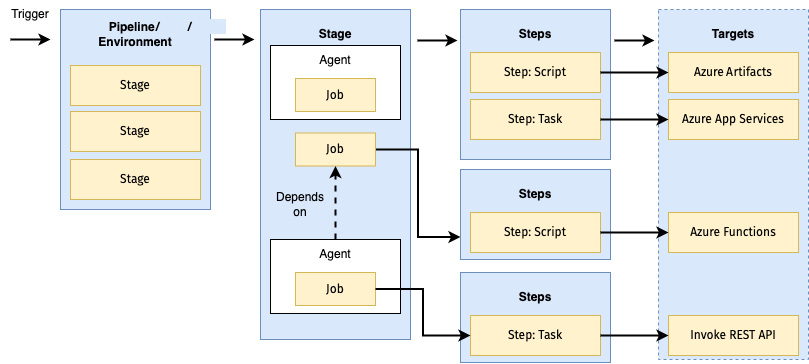
Figure 1.2 – Key components
This section described the meaning of and relationship between key objects. Before we take a more in-depth look at the different aspects of this platform, let’s learn how we can start using it.
Signing up for Azure Pipelines
Two methods can be used for signing up:
- Sign up with a Microsoft account: To do this, complete the following steps:
- Go to https://azure.microsoft.com/en-us/services/devops/pipelines.
- Click on Start free.
- Log in with your Microsoft account.
- Enter a name for your organization.
- You must always log in to your organization using
https://dev.azure.com/{your-organization}.
- Sign up with a GitHub account: To do this, complete the following steps:
- Go to https://azure.microsoft.com/en-us/services/devops/pipelines.
- Click on Start free with GitHub.
- Log in with your GitHub account.
- Enter a name for your organization.
- You must always log in to your organization using https://dev.azure.com/
{your-organization}.
Once you’ve signed up for an Azure Pipelines account, you are ready to create a new project for building your code and release the built code to the live application.
Creating a new project
Creating a new project is the first step after you sign up, before creating any CI/CD pipeline. Upon creating a project, you can set project visibility:
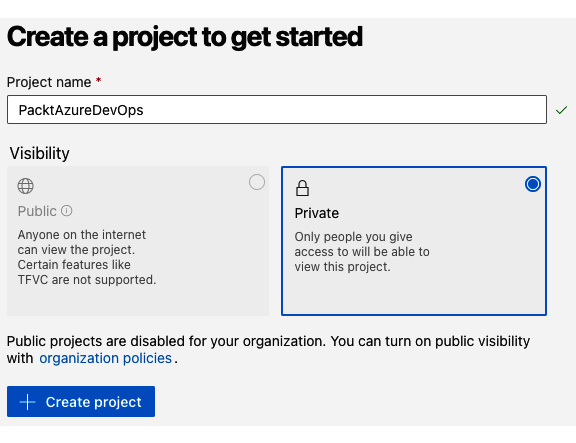
Figure 1.3 – Creating a new project
You can enter a project name and select Visibility, then click Create project.
Inviting team members
When you need to work with a team, you must add a new member by inviting one or more team members. Follow these steps to invite a team member:
- Click on your project’s name in the web portal and click Project settings:
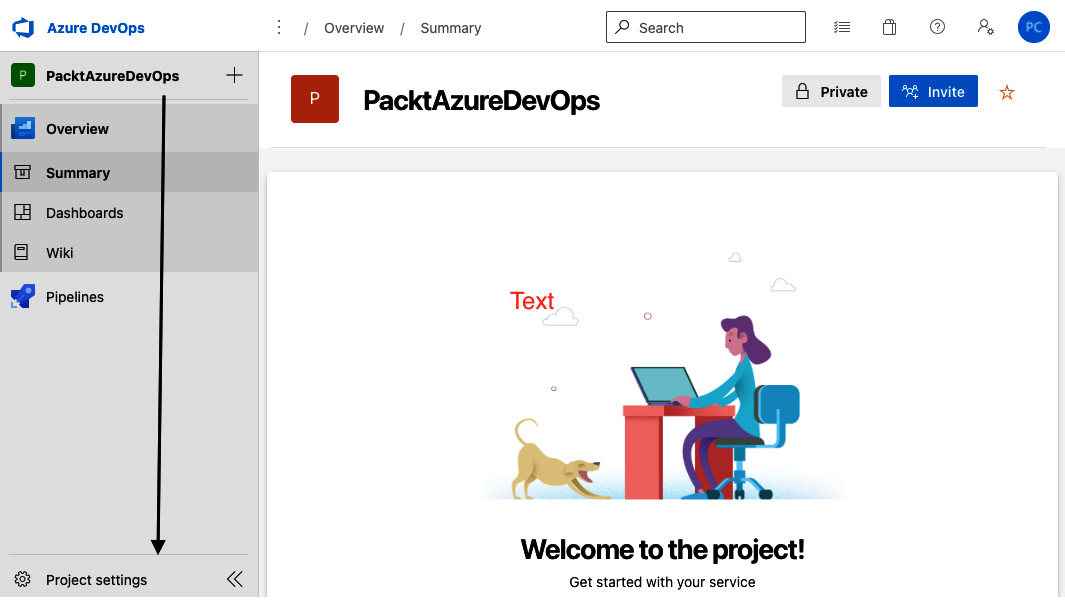
Figure 1.4 – Project settings
- Select Teams | Add:
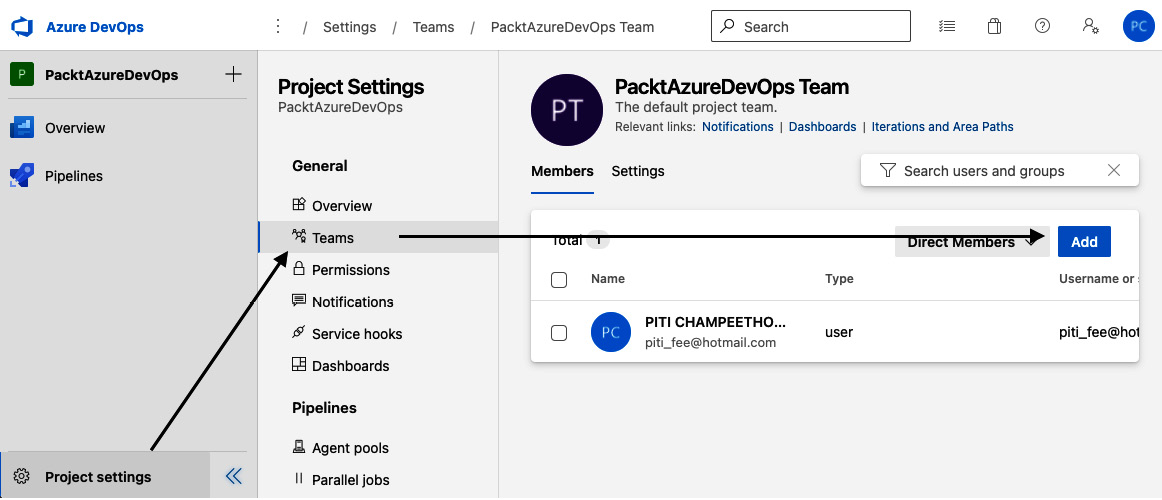
Figure 1.5 – Adding a new team member
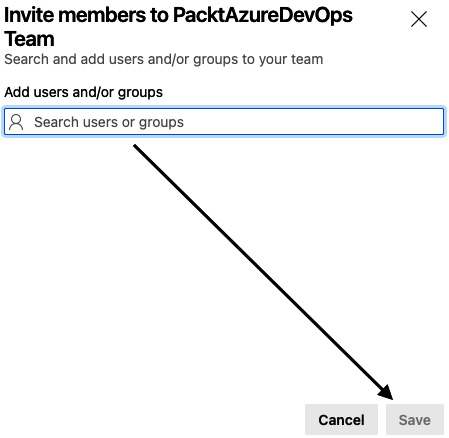
Figure 1.6 – Inviting team members
Now that you’ve invited your collaborators to join your project, let’s delve into how we can start using this service.
Creating Azure pipelines
There are two ways to create Azure pipelines:
- Using the Classic interface (create Azure pipelines from the web Azure DevOps portal) while following these basic steps:
- Configure Azure Pipelines to use your Azure Repos Git repository.
- Use Azure Pipelines to create and configure your build and release pipeline using drag and drop from the Azure DevOps portal.
- Push your code to your version control repository. The pipeline will be automatically initiated by the default trigger and the defined tasks will be executed.
- Using YAML syntax (create YAML files and commit them to the code repository) while following these basic steps:
- Configure Azure Pipelines to use your Azure Repos Git repository.
- Edit your
azure-pipelines.ymlfile by defining your custom build. - Push your code to your version control repository. This action runs the default trigger.
Let’s illustrate the Azure Pipelines YAML method for ease of understanding:

Figure 1.7 – Azure Pipelines YAML steps
There are different pipeline features available for both these methods, with some available for both and others only featuring in one. We’ll look at these in detail in the next section.
Feature availability
Some pipeline features are only available when using the classic interface or YAML. The following table displays which features are available for which of these methods:
|
Feature |
YAML |
Classic |
Description |
|
Agents |
Yes |
Yes |
To define the resource where the pipeline can run. |
|
Approvals |
Yes |
Yes |
To define the validation steps for additional checking before completing a deployment stage. |
|
Artifacts |
Yes |
Yes |
To define the library packages for publishing or consuming different package types. |
|
Caching |
Yes |
Yes |
To define an additional task to reduce the build time by allowing outputs or downloaded dependencies to store them on the agents and reuse them again. |
|
Conditions |
Yes |
Yes |
To define the specific conditions before running a job. |
|
Container jobs |
Yes |
No |
To define the specific jobs to run in a container. |
|
Demands |
Yes |
Yes |
To define the specific pipeline to ensure requirements are met before a pipeline stage is run. |
|
Dependencies |
Yes |
Yes |
To define specific requirements for validation before running the next job or stage. |
|
Deployment groups |
No |
Yes |
To define a logical group for the code that will be deployed to the target machines. |
|
Deployment group jobs |
Yes |
Yes |
To define a job to release to a deployment group. |
|
Deployment jobs |
Yes |
No |
To define the deployment steps. |
|
Environment |
Yes |
No |
To define a collection of resources targeted for deployment. |
|
Gates |
Yes |
Yes |
To support automatic collection and evaluation of external health signals before completing a release stage. Available with classic release only. |
|
Jobs |
Yes |
Yes |
To define the execution sequence of a set of steps. |
|
Service connections |
Yes |
Yes |
To define a connection to a remote service required to execute tasks in a job. |
|
Service containers |
Yes |
No |
To define a service that you can use to manage the life cycle of a containerized service. |
|
Stages |
Yes |
Yes |
To define flow jobs within a pipeline. |
|
Task groups |
No |
Yes |
To define a set of sequence tasks as a single reusable task. |
|
Tasks |
Yes |
Yes |
To define the building blocks that construct a pipeline. |
|
Templates |
Yes |
No |
To define reusable content, logic, and parameters. |
|
Triggers |
Yes |
Yes |
To define a specific event that causes a pipeline to run. |
|
Variables |
Yes |
Yes |
To define a value for data replacement and pass it to the pipeline. |
|
Variable groups |
Yes |
Yes |
To define the storage of values that you want to control and make available across multiple pipelines. |
Table 1.1 – Pipeline features
Apart from these features, there are source version control repositories that Azure Pipelines can connect to. We’ll look at these in detail in the next section.
Availability of source version control repositories
YAML pipelines only support some version control repositories. The following table displays which version control repositories can support which method:
|
Repository |
YAML |
Classic Interface |
|
Azure Repos |
Yes |
Yes |
|
GitHub |
Yes |
Yes |
|
GitHub Enterprise Server |
Yes |
Yes |
|
Bitbucket Cloud |
Yes |
Yes |
|
Bitbucket Server |
No |
Yes |
|
Subversion |
No |
Yes |
Table 1.2 – Comparing repositories
In this section, we discussed all the available features of Azure Pipelines. In the next section, we will convert the key components of Azure Pipelines into a YAML structure to manage it better.
Understanding the YAML structure of Azure Pipelines
Usually, creating a file called azure-pipelines.yml will help you remember which YAML file is used for azure-pipelines in the source code repository. The basic Azure Pipelines YAML structure is as follows:
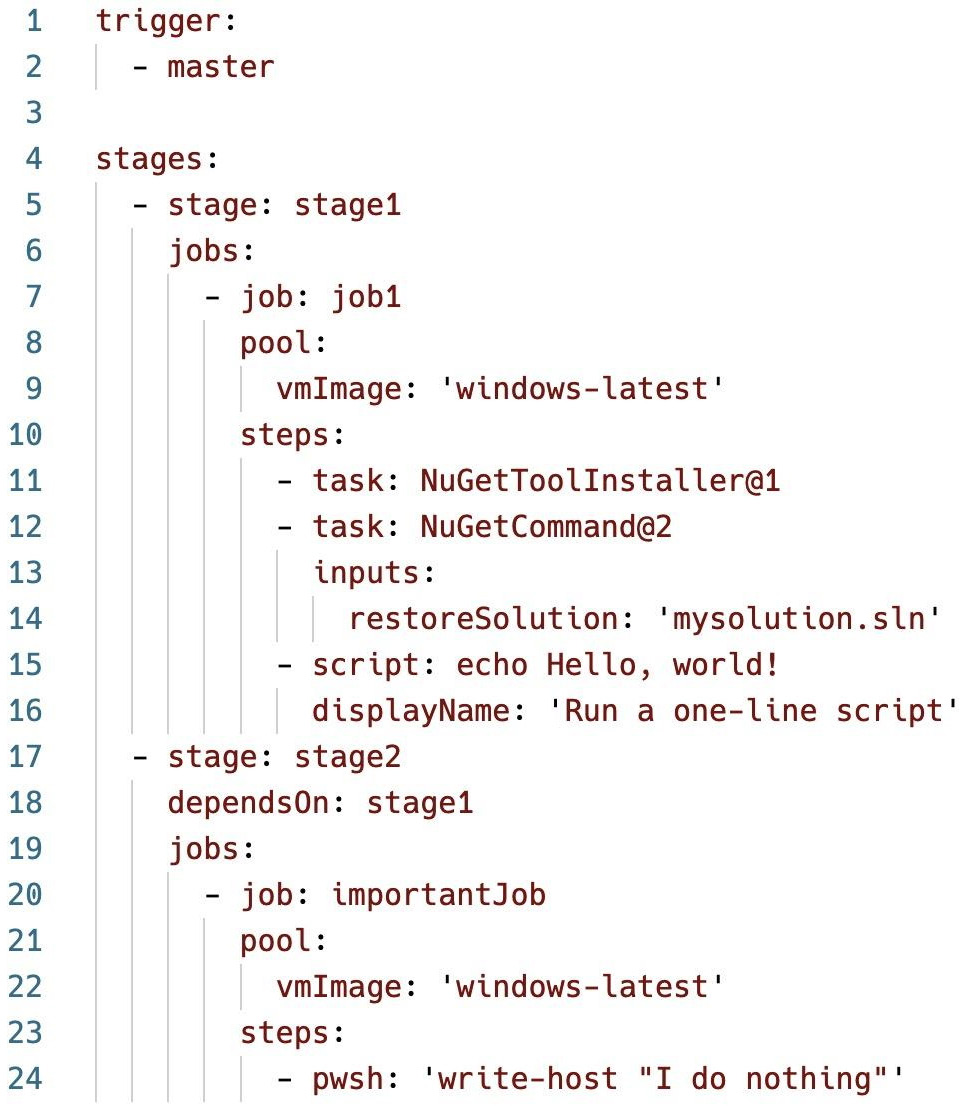
Figure 1.8 – azure-pipelines.yml file
The azure-pipelines.yml file in this example contains a typical structure:
- There are two stages,
stage1andstage2, and each stage contains ajobstep. - Lines 1-2 show the pipeline runs when the developer pushes changes on the main (
master) branch. - Lines 8-9 and 21-22 show the pipeline uses a Microsoft-hosted agent with the
windows-latestoperating system image. - Line 11 is a pre-created script for using the NuGet library. You can access this script in the
ch1folder in this book’s GitHub repository. - Line 12 is a pre-created script for using the NuGet command line.
- Line 15 is a command line to run the
echocommand. - Line 24 is a PowerShell Core script that is cross-platform.
As you can see, the basic YAML structure is rather simple to understand. Once you’ve prepared the YAML file, you can see the status for running it. We will discuss this in the next section.
Viewing the Azure pipelines' status
The Azure pipelines' status is displayed on the Azure DevOps web portal under the running pipeline:
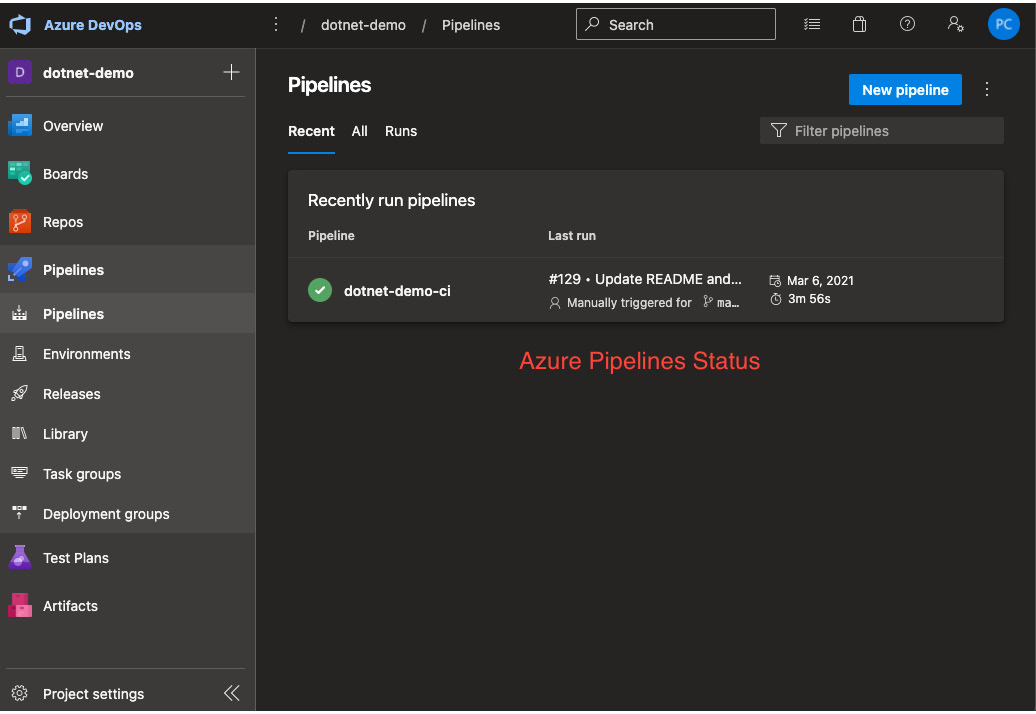
Figure 1.9 – The Azure pipelines' status
Clicking on the current pipeline status row will take you to the historical status of the pipeline. Two colors are used to indicate the status: green and red. These indicate successful and failed pipelines, respectively.
This section described all the components and their relationships. In the next section, you will understand the key differences between Azure Pipelines and other commonly used CI/CD tools.
Comparing Azure Pipelines with other CI/CD tools
Azure Pipelines has different features compared to other CI/CD services currently on the market. Let’s take a closer look:
|
Features |
Azure Pipelines |
GitHub Actions |
GitLab CI |
Bitbucket Pipelines |
|
|
X |
X |
- |
- |
|
Loop statement |
X |
- |
- |
- |
|
Online service – CI/CD minutes free usage per month |
1,800 |
2,000 |
400 |
50 |
|
Online service – free package storage (GB) |
2 |
0.5 |
5 |
1 |
|
Self-hosted agents |
X |
X |
X |
X |
|
Free users |
5 |
Unlimited |
Unlimited |
5 |
Table 1.3 – CI/CD tools comparison
This will help you understand the important factors to consider when you’re trying to decide on the right tool for your CI/CD platform.
Before you start to build a pipeline for application deployment, we must prepare the necessary agent pools, as demonstrated in the next section.
Setting up agent pools
Before using Azure Pipelines to build code and deploy code, you need at least one build agent. There are two build agent types: Microsoft-hosted build agent, which is included by default, and self-hosted build agent. Each agent type will be located under an agent pool, which is a collection of build and release agents.
A Microsoft-hosted build agent will be located under an agent pool called Azure Pipelines. You can create a new agent pool for self-hosted build agents and assign them under it.
To create pools, follow these steps:
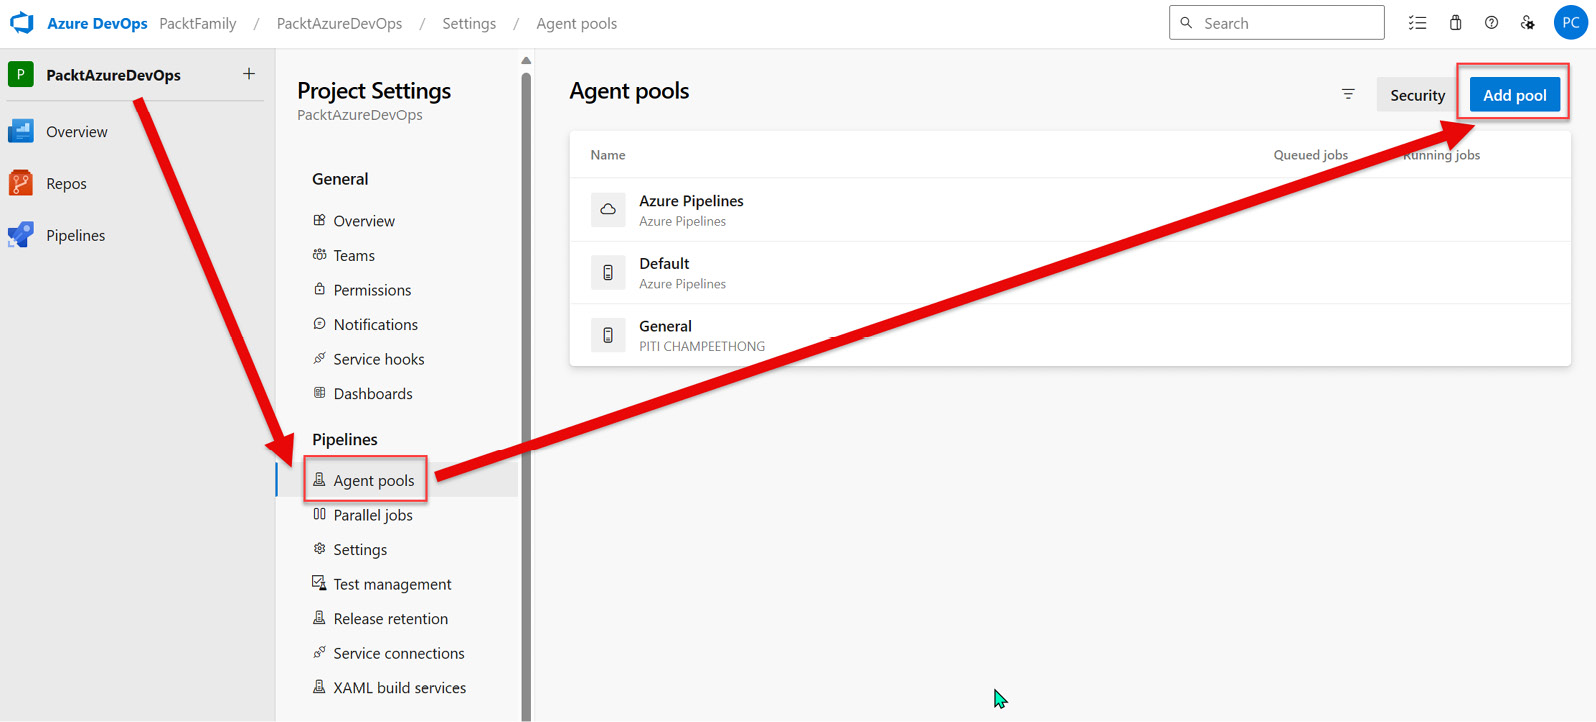
Figure 1.10 – Adding a pool
- Enter the information shown in the following screenshot and then click Create:
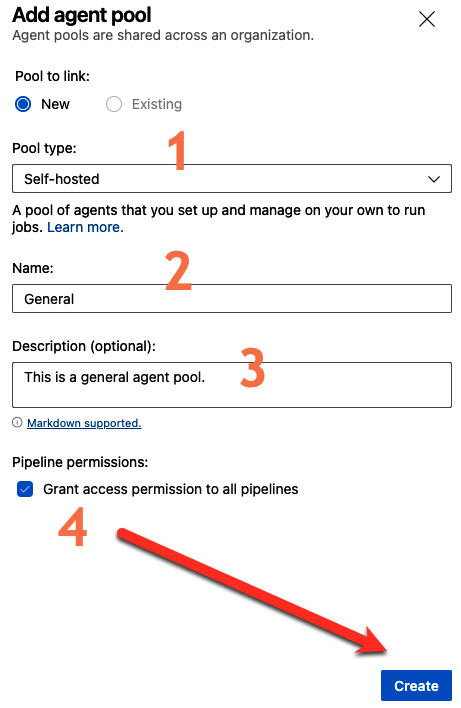
Figure 1.11 – Creating an agent pool
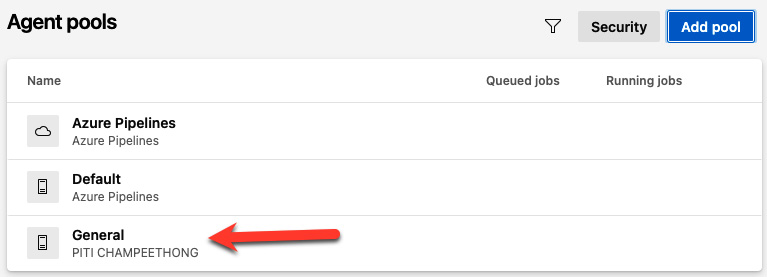
Figure 1.12 – Displaying the new agent pool
Once you’ve finished creating the new agent pool, you can start creating and setting up the self-hosted agent under a new agent pool. The following section will show you how to create a personal access token (PAT).
Creating a PAT
Before you can create self-hosted agents on your server or machine, you must create a PAT. To do this, follow these instructions:
- Go to the Settings menu under your personal icon and click on Personal access tokens:
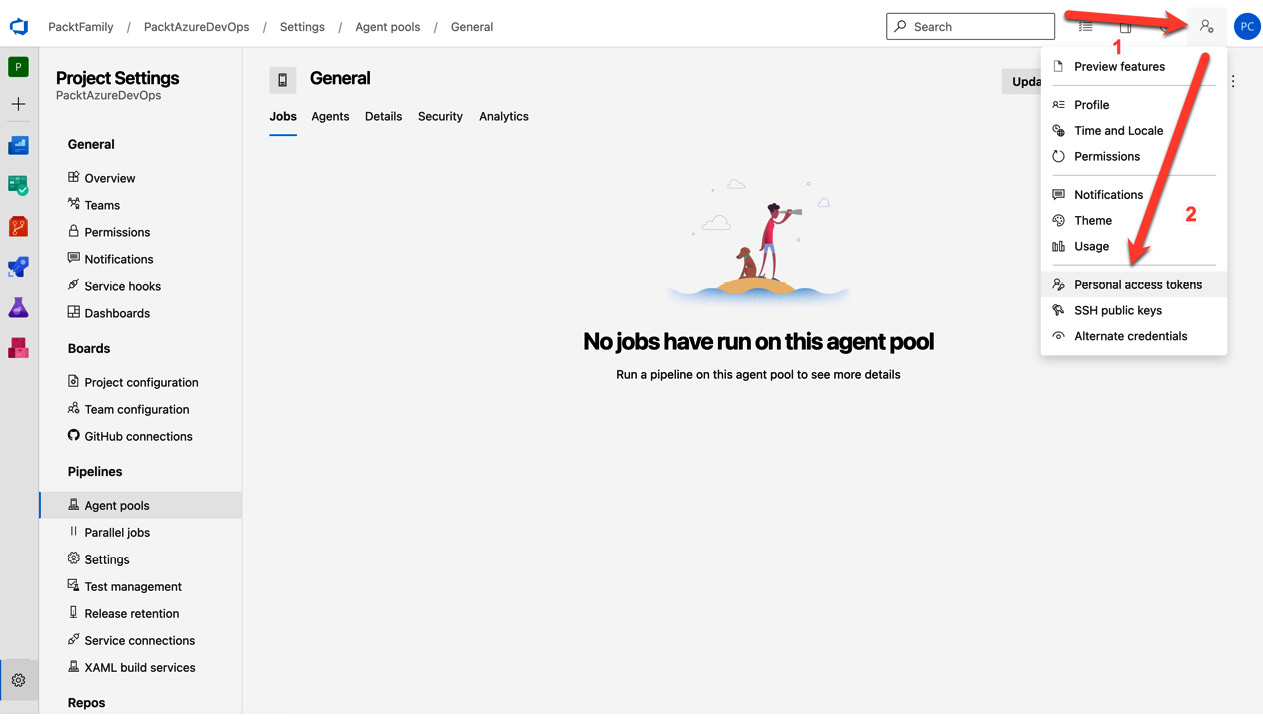
Figure 1.13 – Creating PATs
- Click on New Token:
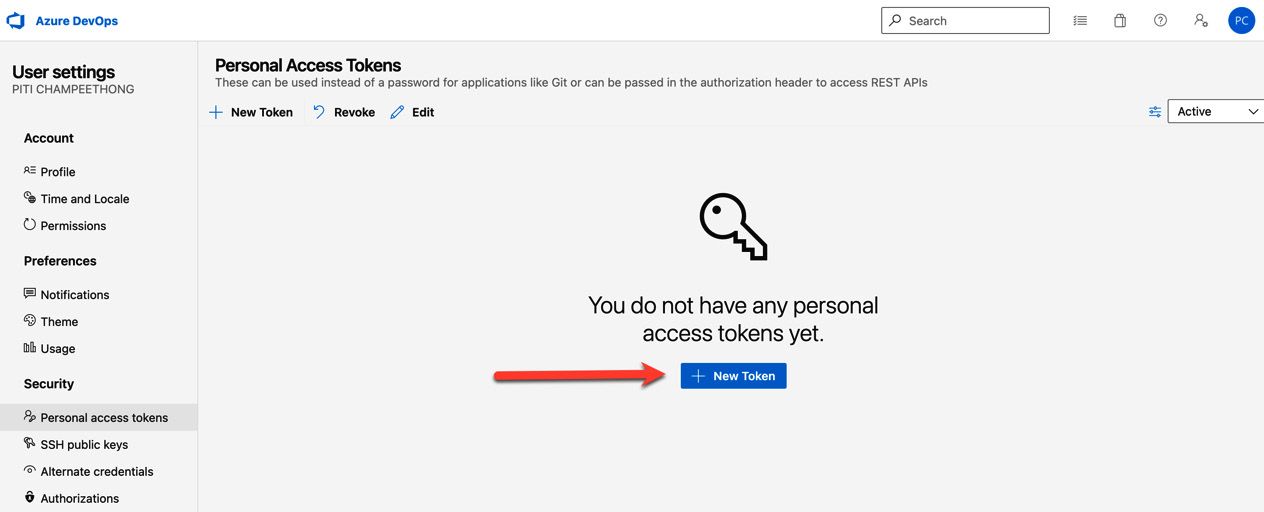
Figure 1.14 – New Token
- Enter the required information:
- Name: Enter the name you need
- Organization: Select an organization you will link to
- Expiration (UTC): There are four choices – 30 days, 60 days, 90 days, and custom-defined but under 2 years
- Scopes: Select Custom defined | Agents Pools with Read & manage | Auditing with Read Audit Log:
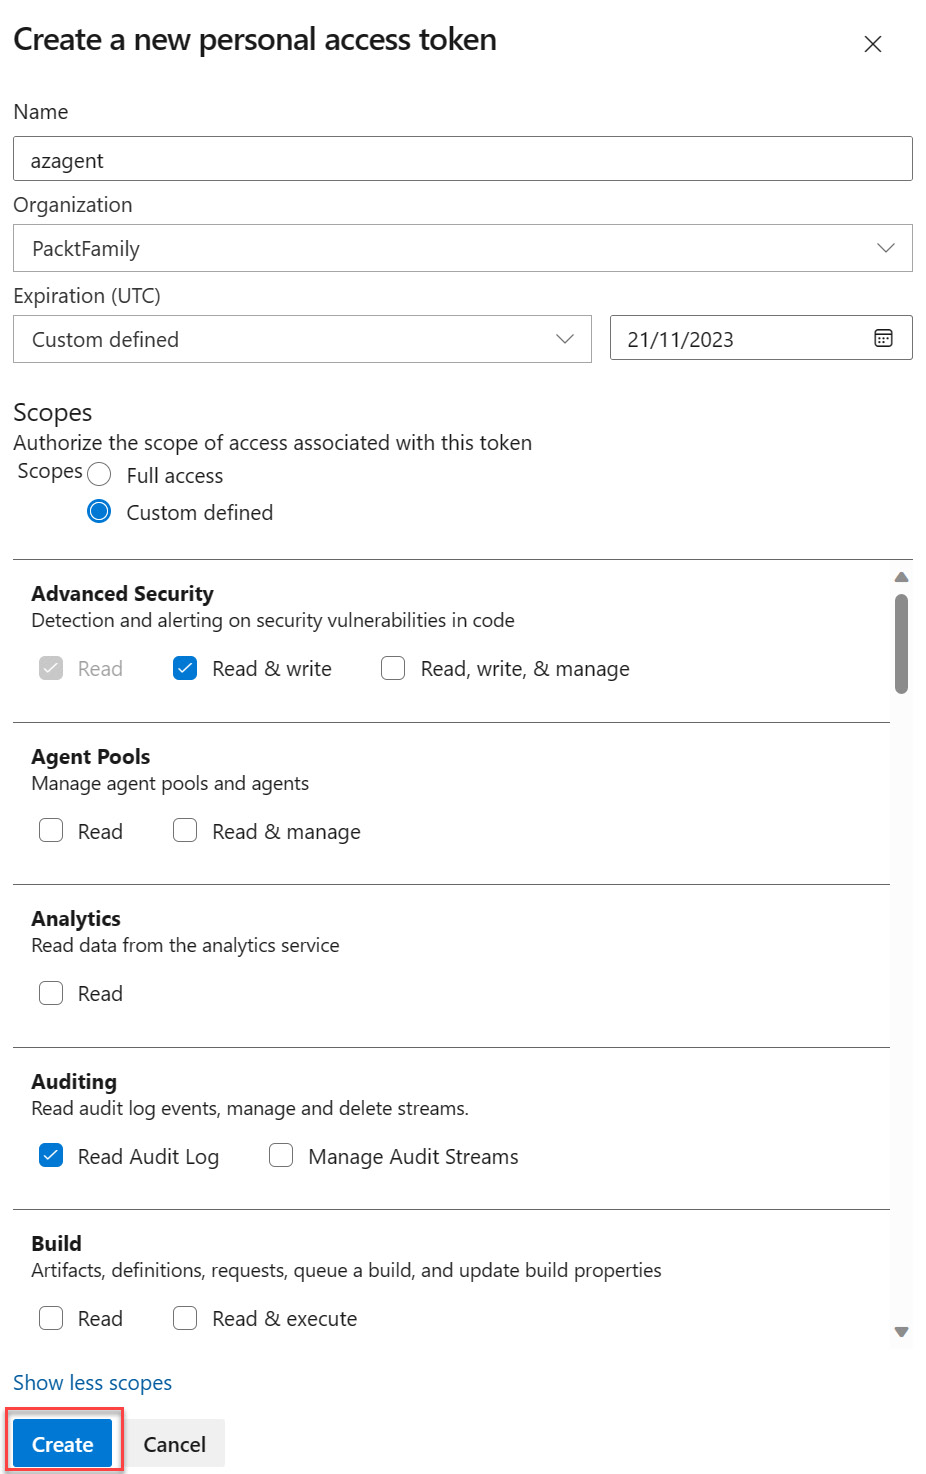
Figure 1.15 – Entering the required information
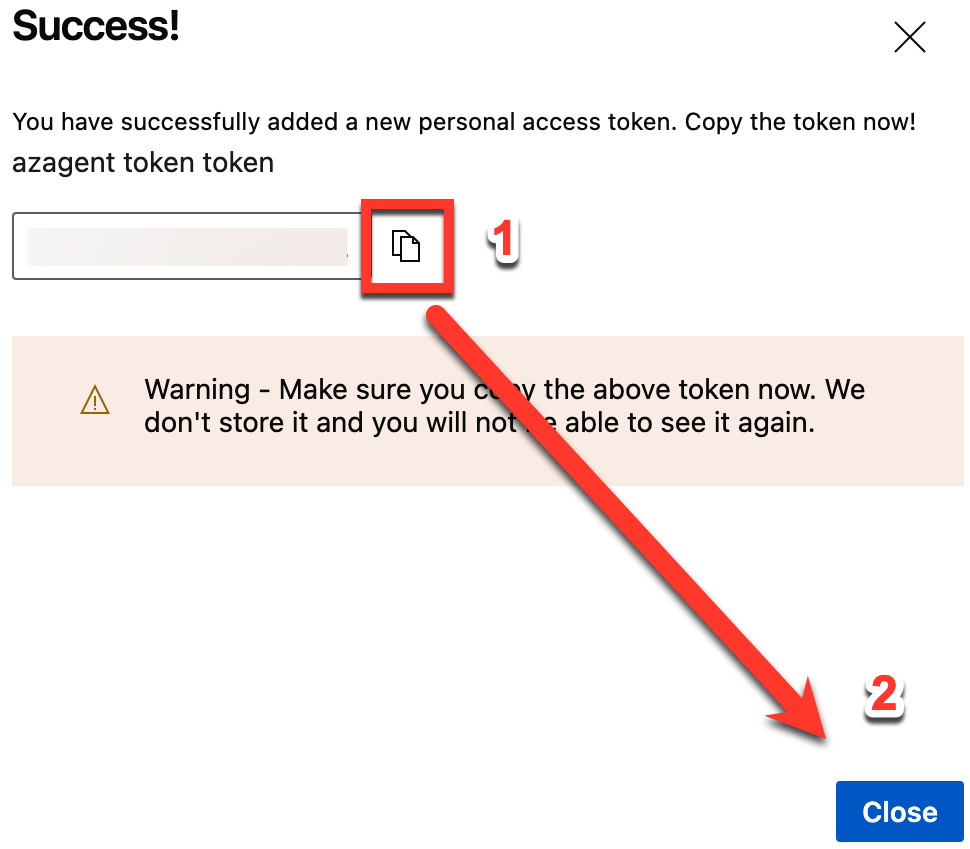
Figure 1.16 – Copying the PAT
Now, you are ready to set up a self-hosted agent.
Setting up self-hosted agents
After you’ve created a PAT, you can create a new self-hosted agent under a new agent pool. To do this, follow these steps:
- Click on PacktAzureDevOps | Agent pools | General:
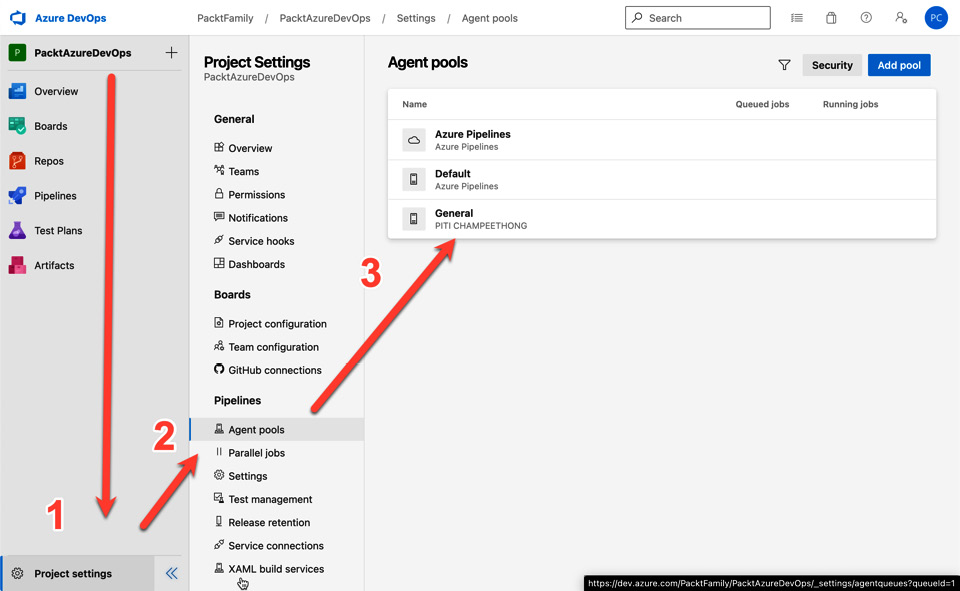
Figure 1.17 – Entering a new agent pool
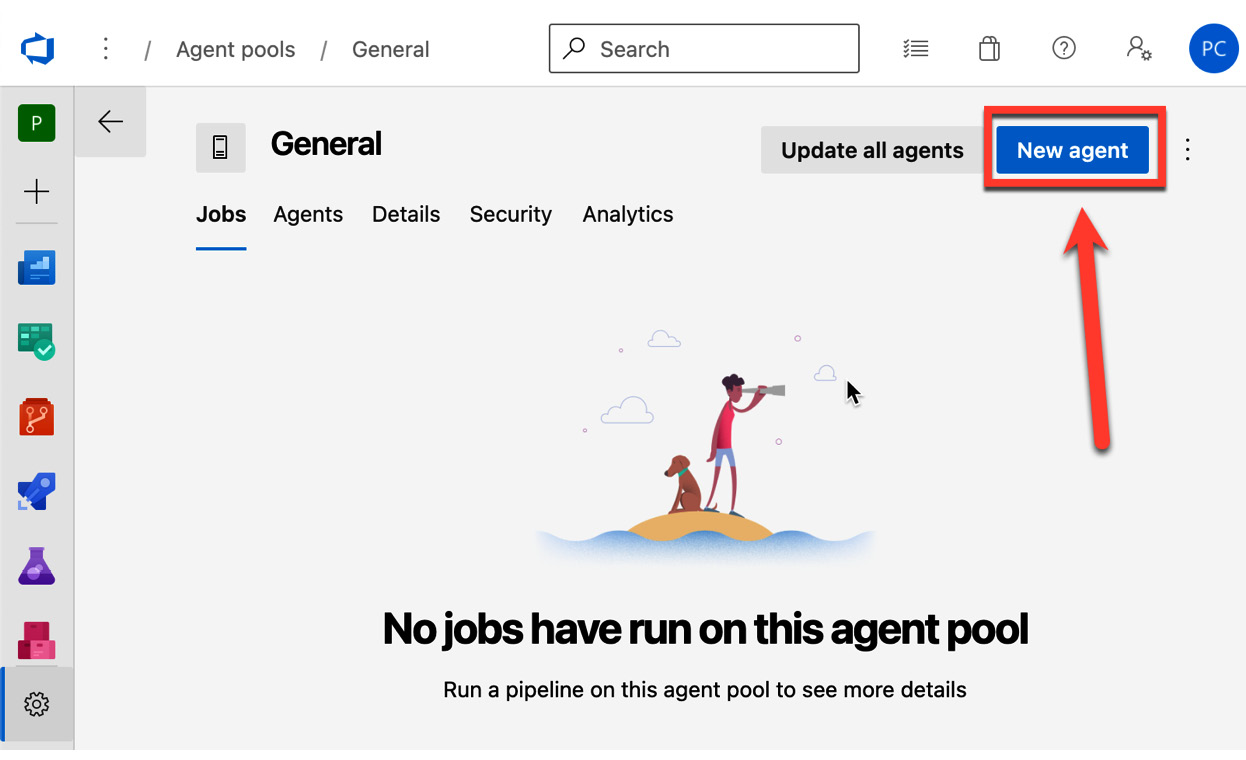
Figure 1.18 – Entering a new agent
- You can download a self-hosted agent based on your operating system. Three operating system options will show you how to download and set them up:
- Windows users can download build agent software from the Windows tab. There are two options, as shown in the following screenshot: Windows 64-bit (x64) and Windows 32-bit (x86):
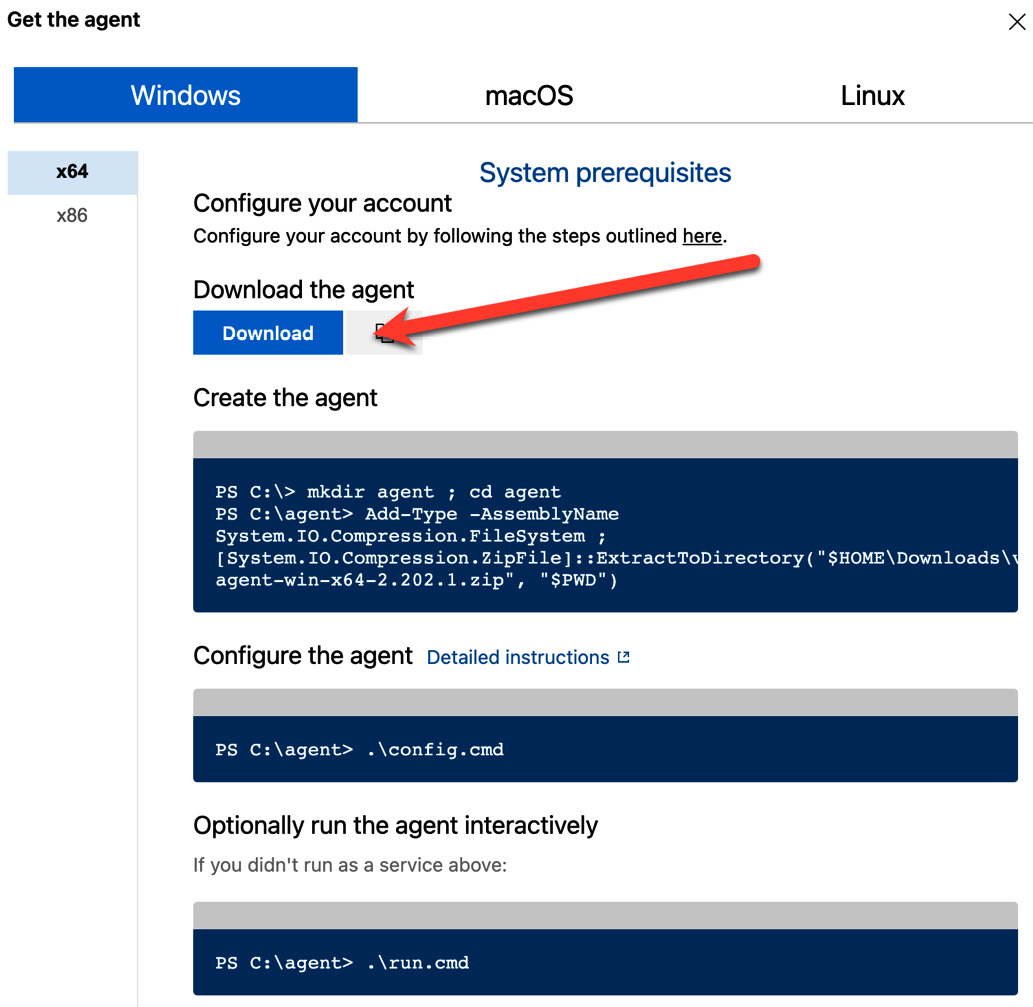
Figure 1.19 – The Windows agent for setting up a file
- To set up a Windows agent, you need to run on PowerShell as an administrator.
- Mac users can download build agent software from the macOS tab:
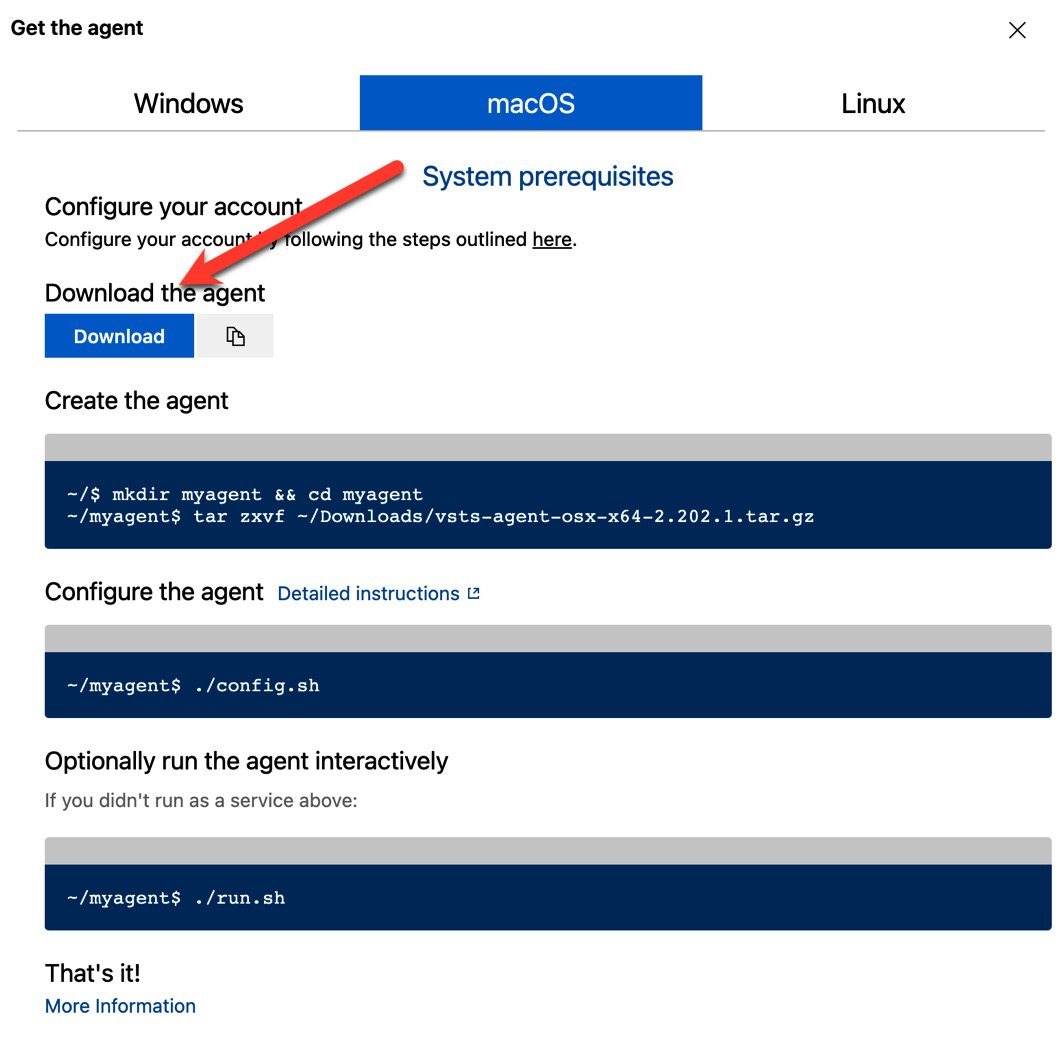
Figure 1.20 – macOS agent
- You don’t need to use the
bashcommand in the administrator role to set up the macOS agent. - Linux users can download build agent software from the Linux tab. There are four options for computer architecture – x64, ARM, ARM64, and RHEL6:
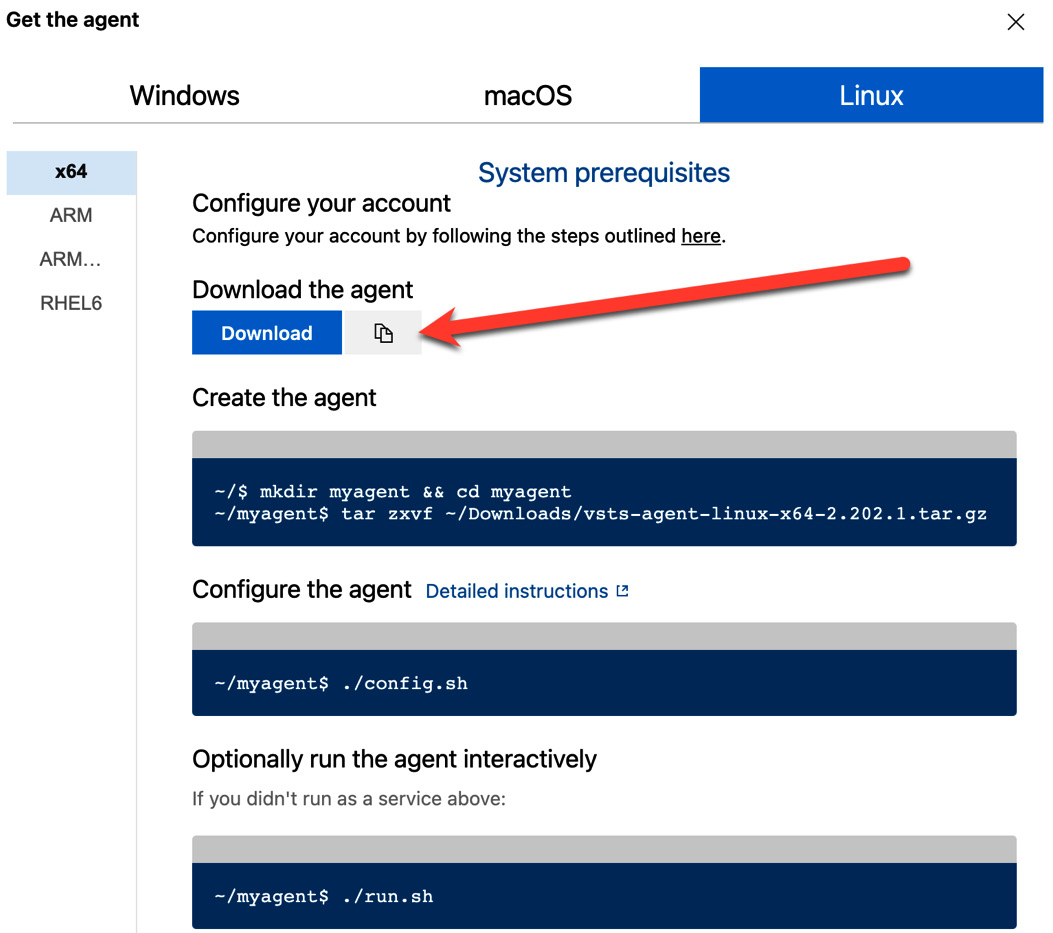
Figure 1.21 – Linux agent
- You don’t need to use a
rootuser for installation to set up a Linux agent.
- After configuring the agent in each operating system, you must enter the following information:
Enter (Y/N) Accept the Team Explorer Everywhere license agreement now? (press enter for N) > Y
Enter server URL > https://dev.azure.com/yourOrganization
Enter authentication type (press enter for PAT) > [ENTER]
Enter personal access token > [Personal Access Token]
Enter agent pool (press enter for default) > General
Enter agent name (press enter for [computer name]) > agent01
Enter work folder (press enter for _work) > [ENTER]
- Once you start the service, you will see that
agent01is active:
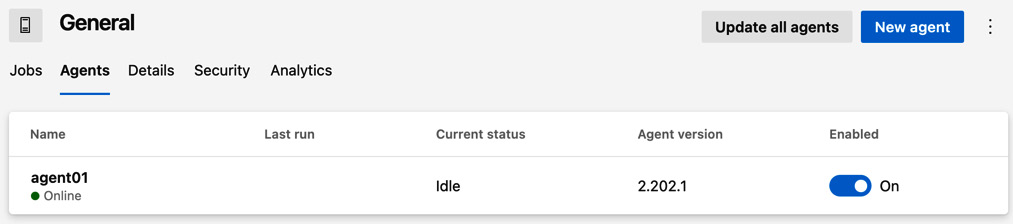
Figure 1.22 – The agent status dashboard
- You can see the Online status of the build agent that has already been created:
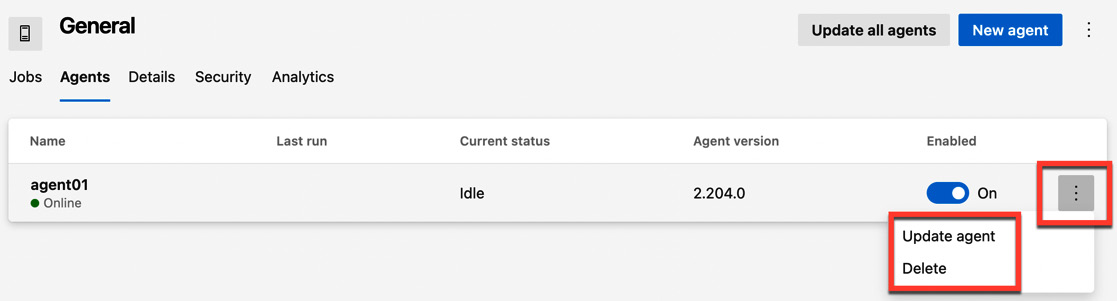
Figure 1.23 – The action menu of the agent
- You can delete the agent and update to a new version of the agent by clicking on the button with the ellipses or three dots.
You are now ready to create the build and deployment on the agent01 build agent. However, you need to set up the deployment group so that you can deploy your application on a local web server such as Microsoft Internet and Information Services (IIS). We’ll do this in the next section.
Setting up deployment groups
Deployment groups are logical agent groupings for application deployment on target machines based on environments – they are typically named based on your project needs and promotion levels before they go to production. Agents are installed in each environment. Each agent under the deployment groups supports only Windows and Linux.
These deployment groups can be divided based on environments, such as development (Dev), quality assurance (QA), user acceptance testing (UAT), and production (Prod), as shown in the following figure:
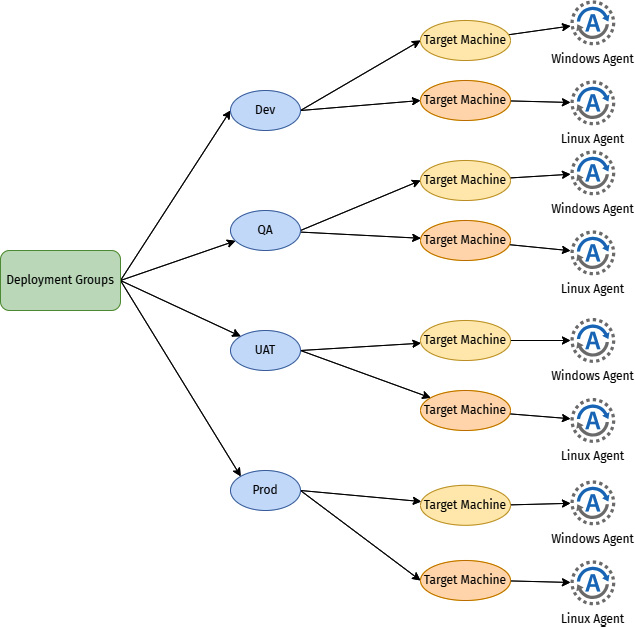
Figure 1.24 – Deployment groups concept
To create a deployment group, follow these instructions:
- Navigate to Pipelines | Deployment groups | Groups | Add a deployment group:
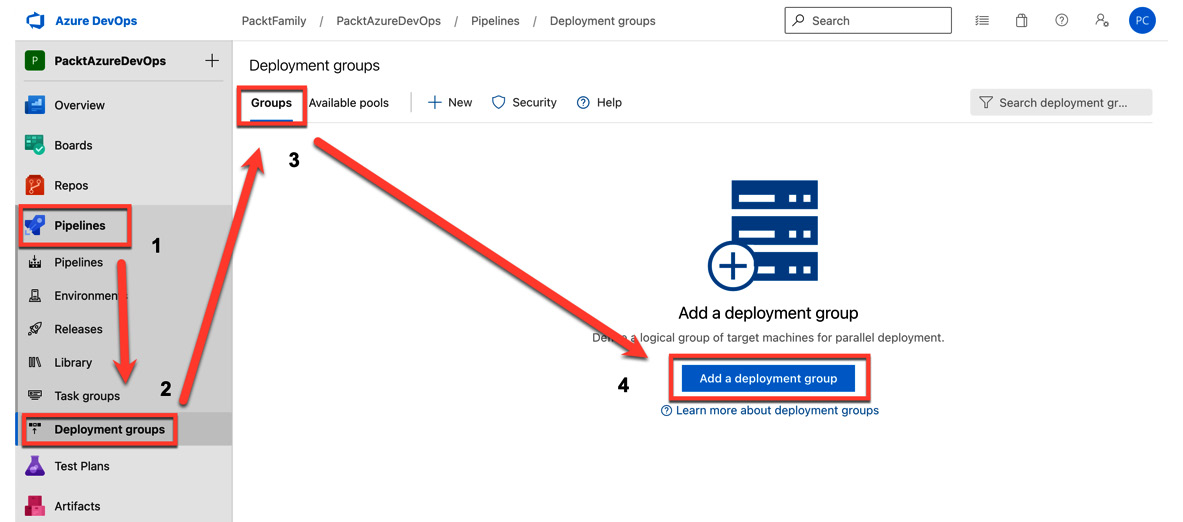
Figure 1.25 – Adding a deployment group
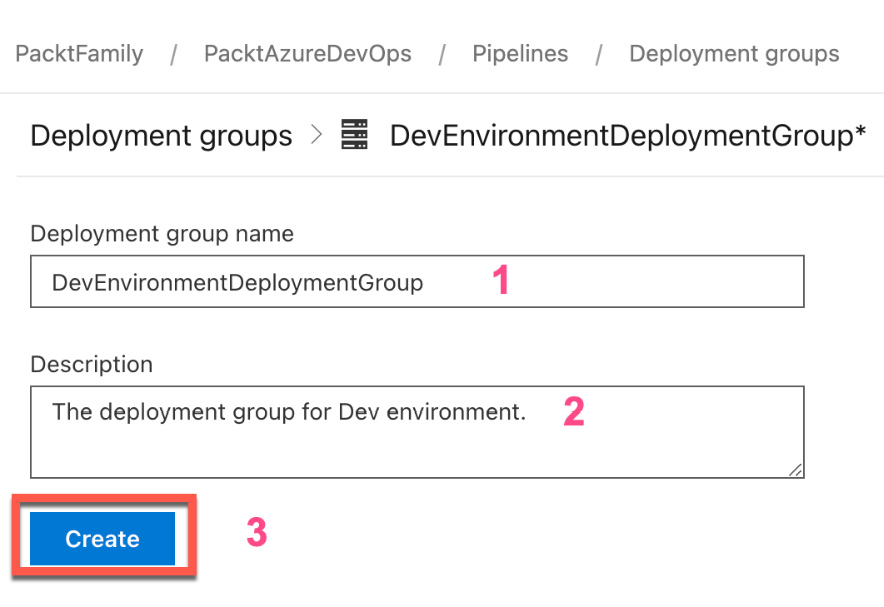
Figure 1.26 – Entering deployment group information
- After creating the deployment group, you must set up the deployment agent under your deployment group. There are two operating systems the deployment agents support:
- Windows users can install an agent of the deployment group by copying the PowerShell script and running it with an administrator command prompt:
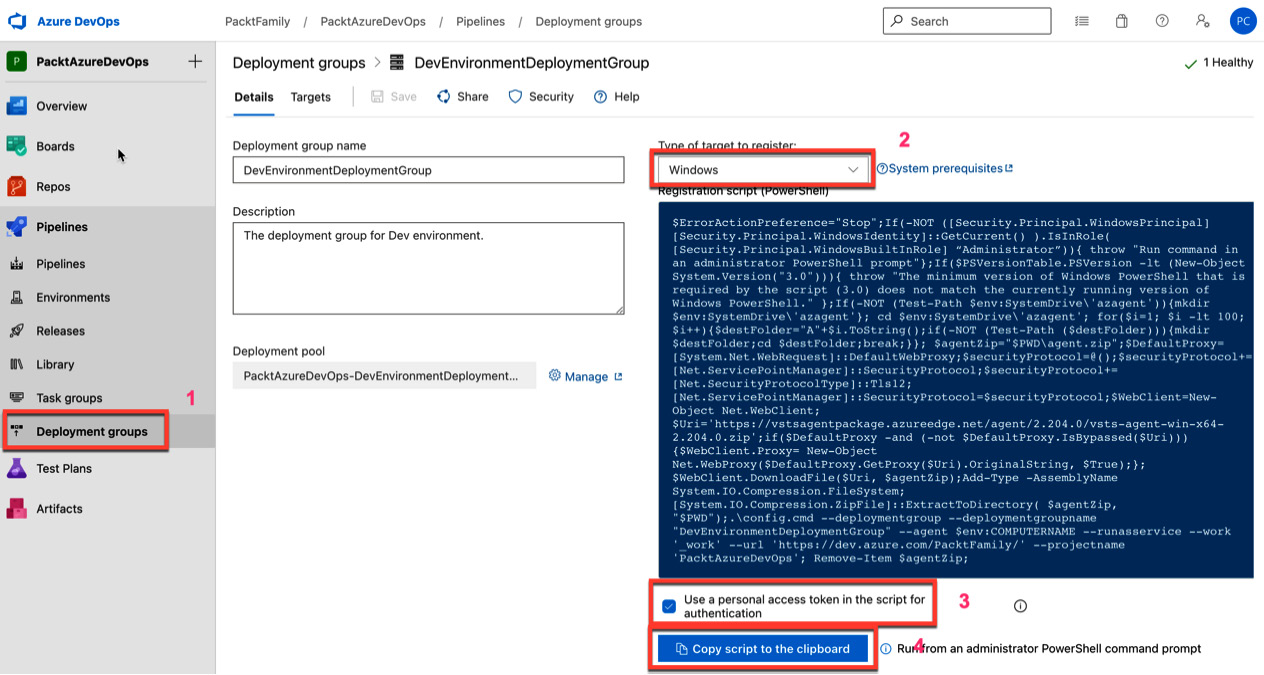
Figure 1.27 – Script to deploy an agent on Windows
- Linux users can install an agent of the deployment group by copying the bash shell script and running it with an administrator command prompt:

Figure 1.28 – Script to deploy an agent on Linux
- After setting up the agent for deployment groups, you will see that the build agent of the deployment group is online:

Figure 1.29 – The deployment agent is online
After setting up the build and deployment agent on a self-hosted computer, you are ready to create your first Azure pipeline.
Summary
In this chapter, you learned about the key concepts involved in CI/CD, which is a part of the Azure DevOps service from Microsoft. You learned about the basic structure of Azure Pipelines YAML and the difference between Azure Pipelines and other services currently on the market. You also learned about the fundamentals of Azure Pipelines, which will help you prepare your CI/CD pipelines for all real-world scenarios discussed later in this book. Finally, you learned how to set up agent pools, deployment groups, and self-hosted agents to prepare for the hands-on projects in the following chapters.
In the next chapter, you will apply the knowledge you’ve gained from this chapter to basic concepts and features and learn how to create a pipeline.