


We will be building a new app in Angular, and in the process, become more familiar with the framework. This app will also help us explore some new capabilities of Angular.
The topics that we will cover in this chapter include the following:
- 7 Minute Workout problem description: We detail the functionality of the app that we build in this chapter.
- Code organization: For our first real app, we will try to explain how to organize code, specifically Angular code.
- Designing the model: One of the building blocks of our app is its model. We design the app model based on the app's requirements.
- Understanding the data binding infrastructure: While building the 7 Minute Workout view, we will look at the data binding capabilities of the framework, which include property, attribute, class, style, and event bindings.
- Exploring the Angular platform directives: Some of the directives that we will cover are
ngFor,ngIf,ngClass,ngStyle, andngSwitch.
- Cross-component communication with input properties: As we build nested components, we learn how input properties can be used to pass data from the parent to its child components.
- Cross-component communication with events: Angular components can subscribe to and raise events. We get introduced to event binding support in Angular.
- Angular pipes: Angular pipes provide a mechanism to format view content. We explore some standard Angular pipes and build our own pipe to support conversions from seconds to hh:mm:ss.
Let's get started! The first thing we will do is to define our 7 Minute Workout app.
We want everyone reading this book to be physically fit. Therefore, this book should serve a dual purpose; it should not only stimulate your grey matter but also urge you to look after your physical fitness. What better way to do it than to build an app that targets physical fitness!
7 Minute Workout is an exercise/workout app that requires us to perform a set of 12 exercises in quick succession within the seven-minute time span. 7 Minute Workout has become quite popular due to its bite-sized length and great benefits. We cannot confirm or refute the claims, but doing any form of strenuous physical activity is better than doing nothing at all. If you are interested to know more about the workout, then check out http://well.blogs.nytimes.com/2013/05/09/the-scientific-7-minute-workout/.
The technicalities of the app include performing a set of 12 exercises, dedicating 30 seconds for each of the exercises. This is followed by a brief rest period before starting the next exercise. For the app that we are building, we will be taking rest periods of 10 seconds each. So, the total duration comes out at a little more than seven minutes.
At the end of the chapter, we will have the 7 Minute Workout app ready, which will look something like the following:
The 7 Minute Workout app
The code for this app can be downloaded from the GitHub site (https://github.com/chandermani/angular6byexample) dedicated to this book. Since we are building the app incrementally, we have created multiple checkpoints that map to GitHub branches such as checkpoint2.1, checkpoint2.2, and so on. During the narration, we will highlight the branch for reference. These branches will contain the work done on the app up until that point in time.
So, let's get started!
Remember that we are building on a modern platform for which browsers still lack support. Therefore, directly referencing script files in HTML is out of the question (while common, it's a dated approach that we should avoid anyway). Browsers do not understand TypeScript; this implies that there has to be a process that converts code written in TypeScript into standard JavaScript (ES5). Hence, having a build set up for any Angular app becomes imperative. And thanks to the growing popularity of Angular, we are never short of options.
If you are a frontend developer working on the web stack, you cannot avoid Node.js. This is the most widely used platform for web/JavaScript development. So, no prizes for guessing that most of the Angular build solutions out there are supported by Node. Packages such as Grunt, Gulp, JSPM, and webpack are the most common building blocks for any build system.
For this book and this sample app, we endorse Angular CLI (http://bit.ly/ng6be-angular-cli). A command line tool, it has a build system and a scaffolding tool that hugely simplifies Angular's development workflow. It is popular, easy to set up, easy to manage, and supports almost everything that a modern build system should have. More about it later.
As with any mature framework, Angular CLI is not the only option out there on the web. Some of the notable starter sites plus build setups created by the community are as follows:
Start site | Location |
| |
|
Let's start with installing Angular CLI. On the command line, type the following:
npm i -g @angular/cliOnce installed, Angular CLI adds a new command ng to our execution environment. To create a new Angular project from the command line, run the following command:
ng new PROJECT-NAMEThis generates a folder structure with a bunch of files, a boilerplate Angular application, and a preconfigured build system. To run the application from the command line, execute the following:
ng serve --openAnd you can see a basic Angular application in action!
For our 7 Minute Workout app, instead of starting from scratch, we are going to start from a version that is based on the project structure generated by ng new with minor modification. Start with the following steps:
Note
Curious about what the default project includes? Go ahead and run ng new PROJECT-NAME. Look at the generated content structure and the Angular CLI documentation to get an idea of what's part of a default setup.
- Download the base version of this app from http://bit.ly/ngbe-base and unzip it to a location on your machine. If you are familiar with how Git works, you can just clone the repository and check out the
basebranch:
git checkout baseThis code serves as the starting point for our app.
- Navigate to the
trainerfolder from the command line and execute the commandnpm installfrom the command line to install the package dependencies for our application.
Note
Packages in the Node.js world are third-party libraries (such as Angular for our app) that are either used by the app or support the app's building process. npm is a command-line tool for pulling these packages from a remote repository.
ng serve --openThis compiles and runs the app. If the build process goes fine, the default browser window/tab will open with a rudimentary app page (http://localhost:4200/). We are all set to begin developing our app in Angular!
But before we do that, it would be interesting to know a bit more about Angular CLI and the customization that we have done on the default project template that Angular CLI generates.
Angular CLI was created with the aim of standardizing and simplifying the development and deployment workflow for Angular apps. As the documentation suggests:
"The Angular CLI makes it easy to create an application that already works, right out of the box. It already follows our best practices!"
It incorporates:
- A build system based on webpack
- A scaffolding tool to generate all standard Angular artifacts including modules, directives, components, and pipes
- Adherence to Angular style guide (http://bit.ly/ngbe-styleguide), making sure we use community-driven standards for projects of every shape and size
Note
You may have never heard the term style guide, or may not understand its significance. A style guide in any technology is a set of guidelines that help us organize and write code that is easy to develop, maintain, and extend. To understand and appreciate Angular's own style guide, some familiarity with the framework itself is desirable, and we have started that journey.
- A targeted linter; Angular CLI integrates with codelyzer (http://bit.ly/ngbe-codelyzer), a static code analysis tool that validates our Angular code against a set of rules to make sure that the code we write adheres to standards laid down in the Angular style guide
- Preconfigured unit and end-to-end (e2e) test framework
And much more!
Imagine if we had to do all this manually! The steep learning curve would quickly overwhelm us. Thankfully, we don't have to deal with it, Angular CLI does it for us.
Note
The Angular CLI build setup is based on webpack, but it does not expose the underlying webpack configuration; this is intentional. The Angular team wanted to shield developers from the complexities and internal workings of webpack. The ultimate aim of Angular CLI is to eliminate any entry level barriers and make setting up and running Angular code simple.
It doesn't mean Angular CLI is not configurable. There is a config file (angular.json) that we can use to alter the build setup. We will not cover that here. Check the configuration file for 7 Minute Workout and read the documentation here: http://bit.ly/ng6be-angular-cli-config.
The tweaks that we have done to the default generated project template are:
- Referenced Bootstrap CSS in the
style.cssfile. - Upgraded some npm library versions.
- Changed the prefix configuration for generated code to use
abe(short for Angular By Example) fromapp. With this change, all our components and directive selectors will be prefixed byabeinstead ofapp. Checkapp.component.ts; theselectorisabe-rootinstead ofapp-root.
While on the topic of Angular CLI and builds, there is something that we should understand before proceeding.
What happens to the TypeScript code we write?
Browsers, as we all know, only work with JavaScript, they don't understand TypeScript. We hence need a mechanism to convert our TypeScript code into plain JavaScript (ES5 is our safest bet). The TypeScript compiler does this job. The compiler takes the TypeScript code and converts it into JavaScript. This process is commonly referred to as transpiling, and since the TypeScript compiler does it, it's called a transpiler.
Note
JavaScript as a language has evolved over the years with every new version adding new features/capabilities to the language. The latest avatar, ES2015, succeeds ES5 and is a major update to the language. While released in June 2015, some of the older browsers still lack support for the ES2015 flavor, of JavaScript making its adoption a challenge.
When transpiling code from TypeScript to JavaScript, we can specify the flavor of JavaScript to use. As mentioned earlier, ES5 is our safest bet, but if we plan to work with only the latest and greatest browsers, go for ES2015. For 7 Minute Workout, our code to transpile to is ES5 format. We set this TypeScript compiler configuration in tsconfig.json (see the target property).
Interestingly, transpilation can happen at both build/compile time and at runtime:
- Build-time transpilation: Transpilation as part of the build process takes the script files (in our case, TypeScript
.tsfiles) and compiles them into plain JavaScript. Angular CLI does build-time transpilation. - Runtime transpilation: This happens in the browser at runtime. We directly reference the TypeScript files (
.tsin our case), and the TypeScript compiler, which is loaded in the browser beforehand, compiles these script files on the fly. This is a workable setup only for small examples/code snippets, as there is an additional performance overhead involved in loading the transpiler and transpiling the code on the fly.
The process of transpiling is not limited to TypeScript. Every language targeted towards the web, such as CoffeeScript, ES2015, (yes JavaScript itself!) or any other language that is not inherently understood by a browser needs transpilation. There are transpilers for most languages, and the prominent ones (other than TypeScript) are tracuer and babel.
The Angular CLI build system takes care of setting up the TypeScript compiler and sets up file watchers that recompile the code every time we make changes to our TypeScript file.
Note
If you are new to TypeScript, remember that TypeScript does not depend on Angular; in fact, Angular has been built on TypeScript. I highly recommend that you look at the official documentation on TypeScript (https://www.typescriptlang.org/) and learn the language outside the realms of Angular.
Let's get back to the app we are building and start exploring the code setup.
The advantage of Angular CLI is that is dictates a code organization structure that works for applications of all sizes. Here is how the current code organization looks:
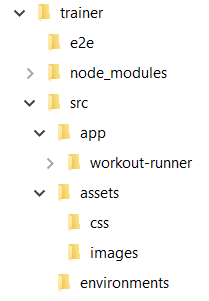
traineris the application root folder.- The files inside
trainerare configuration files and some standard files that are part of every standard node application. - The
e2efolder will contain end to end tests for the app. srcis the primary folder where all the development happens. All the application artifacts go intosrc.- The
assetsfolder insidesrchosts static content (such as images, CSS, audio files, and others). - The
appfolder has the app's source code. - The
environmentsfolder is useful to set configurations for different deployment environments (such as dev, qa, production).
To organize Angular code inside the app folder, we take a leaf from the Angular style guide (http://bit.ly/ng6be-style-guide) released by the Angular team.
The style guide recommends the use of feature folders to organize code. With feature folders, files linked to a single feature are placed together. If a feature grows, we break it down further into sub features and tuck the code into sub folders. Consider the app folder to be our first feature folder! As the application grows, app will add sub features for better code organization.
Let's get straight into building the application. Our first focus area, the app's model!
Designing the model for this app requires us to first detail the functional aspects of the 7 Minute Workout app, and then derive a model that satisfies those requirements. Based on the problem statement defined earlier, some of the obvious requirements are as follows:
- Being able to start the workout.
- Providing a visual clue about the current exercise and its progress. This includes the following:
- Providing a visual depiction of the current exercise
- Providing step-by-step instructions on how to do a specific exercise
- The time left for the current exercise
- Notifying the user when the workout ends.
Some other valuable features that we will add to this app are as follows:
- The ability to pause the current workout.
- Providing information about the next exercise to follow.
- Providing audio clues so that the user can perform the workout without constantly looking at the screen. This includes:
- A timer click sound
- Details about the next exercise
- Signaling that the exercise is about to start
- Showing related videos for the exercise in progress and the ability to play them.
As we can see, the central themes for this app are workout and exercise. Here, a workout is a set of exercises performed in a specific order for a particular duration. So, let's go ahead and define the model for our workout and exercise.
Based on the requirements just mentioned, we will need the following details about an exercise:
- The name. This should be unique.
- The title. This is shown to the user.
- The description of the exercise.
- Instructions on how to perform the exercise.
- Images for the exercise.
- The name of the audio clip for the exercise.
- Related videos.
With TypeScript, we can define the classes for our model.
The Exercise class looks as follows:
export class Exercise {
  constructor(
    public name: string,
    public title: string,
    public description: string,
    public image: string,
    public nameSound?: string,
    public procedure?: string,
    public videos?: Array<string>) { }
}
Note
TypeScript tips
Declaring constructor parameters with public or private is a shorthand for creating and initializing class members at one go. The ? suffix after nameSound, procedure, and videos implies that these are optional parameters.
For the workout, we need to track the following properties:
- The name. This should be unique.
- The title. This is shown to the user.
- The exercises that are part of the workout.
- The duration for each exercise.
- The rest duration between two exercises.
The model class to track workout progress (WorkoutPlan) looks as follows:
export class WorkoutPlan {
  constructor(
    public name: string,
    public title: string,
    public restBetweenExercise: number,
    public exercises: ExercisePlan[],
    public description?: string) { }

  totalWorkoutDuration(): number { ... }
}
The totalWorkoutDuration function returns the total duration of the workout in seconds.
WorkoutPlan has a reference to another class in the preceding definition, ExercisePlan. It tracks the exercise and the duration of the exercise in a workout, which is quite apparent once we look at the definition of ExercisePlan:
export class ExercisePlan {
  constructor(
    public exercise: Exercise,
    public duration: number) { }
}
Let me save you some typing and tell you where to get the model classes, but before that, we need to decide where to add them. We are ready for our first feature.
The primary feature of 7 Minute Workout is to execute a predefined set of exercises. Hence we are going to create a feature module now and later add the feature implementation to this module. We call this module workout-runner. Let's initialize the feature with Angular CLI's scaffolding capabilities.
From the command line, navigate to the trainer/src/app folder and run the following:
ng generate module workout-runner --module app.module.tsFollow the console logs to know what files are generated. The command essentially:
- Creates a new Angular
WorkoutRunnerModulemodule inside a newworkout-runnerfolder - Imports the newly created module into the main application module app (
app.module.ts)
We now have a new feature module.
Note
Make special note of the conventions Angular CLI follows when scaffolding Angular artifacts. From the preceding example, the module name provided with the command line was workout-runner. While the generated folder and filenames use the same name, the class name for the generated module is WorkoutRunnerModule (pascal case with the Module suffix).
Open the newly generated module definition (workout-runner.module.ts) and look at the generated content. WorkoutRunnerModule imports CommonModule, a module with common Angular directives such as ngIf and ngFor, allowing us to use these common directives across any component/directive defined in WorkoutRunnerModule.
Copy the model.ts file from http://bit.ly/ng6be-2-1-model-ts into the workout-runner folder. Shortly, we will see how these model classes are utilized.
Since we have started with a preconfigured Angular app, we just need to understand how the app starts.
The app bootstrapping process for 7 Minute Workout can be carried out from the src folder. There is a main.ts file that bootstraps the application by calling the following:
platformBrowserDynamic().bootstrapModule(AppModule)
    .catch(err => console.log(err));
The heavy lifting is done by the Angular CLI, which compiles the application, includes the script and CSS reference into index.html, and runs the application. We don't need to configure anything. These configurations are part of the default Angular CLI configuration (.angular-cli.json).
We have created a new module and added some model classes to the module folder. Before we go any further and start implementing the feature, let's talk a bit about Angular modules.
As the 7 Minute Workout app grows and we add new components/directives/pipes/other artifacts to it, a need arises to organize these items. Each of these items needs to be part of an Angular module.
A naïve approach would be to declare everything in our app's root module (AppModule), as we did with WorkoutRunnerComponent, but this defeats the whole purpose of Angular modules.
To understand why a single-module approach is never a good idea, let's explore Angular modules.
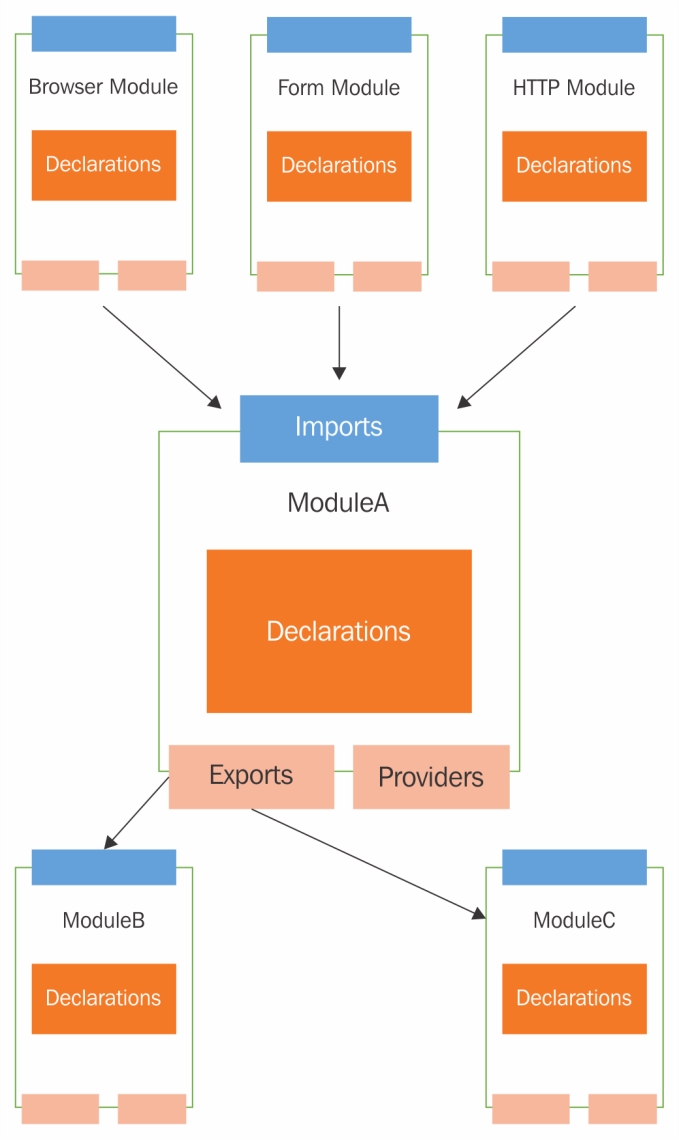
In Angular, modules are a way to organize code into chunks that belong together and work as a cohesive unit. Modules are Angular's way of grouping and organizing code.
An Angular module primarily defines:
- The components/directives/pipes it owns
- The components/directives/pipes it makes public for other modules to consume
- Other modules that it depends on
- Services that the module wants to make available application-wide
Any decent-sized Angular app will have modules interlinked with each other: some modules consuming artifacts from other, some providing artifacts to others, and some modules doing both.
As a standard practice, module segregation is feature-based. One divides the app into features or subfeatures (for large features) and modules are created for each of the features. Even the framework adheres to this guideline as all of the framework constructs are divided across modules:
- There is
CommonModulethat aggregates the standard framework constructs used in every browser-based Angular app - There is
RouterModuleif we want to use the Angular routing framework - There is
HtppModuleif our app needs to communicate with the server over HTTP
Angular modules are created by applying the @NgModule decorator to a TypeScript class. The decorator definition exposes enough metadata, allowing Angular to load everything the module refers to.
The decorator has multiple attributes that allow us to define:
- External dependencies (using
imports). - Module artifacts (using
declarations). - Module exports (using
exports). - The services defined inside the module that need to be registered globally (using
providers). - The main application view, called the root component, which hosts all other app views. Only the root module should set this using the
bootstrapproperty.
This diagram highlights the internals of a module and how they link to each other:
Note
Modules defined in the context of Angular (using the @NgModule decorator) are different from modules we import using the import statement in our TypeScript file. Modules imported through the import statement are JavaScript modules, which can be in different formats adhering to CommonJS, AMD, or ES2015 specifications, whereas Angular modules are constructs used by Angular to segregate and organize its artifacts. Unless the context of the discussion is specifically a JavaScript module, any reference to module implies an Angular module. We can learn more about this here: http://bit.ly/ng2be6-module-vs-ngmodule.
We hope one thing is clear from all this discussion: creating a single application-wide module is not the right use of Angular modules unless you are building something rudimentary.
It's time to get into the thick of the action; let's build our first component.
WorkoutRunnerComponent, is the central piece of our 7 Minute Workout app and it will contain the logic to execute the workout.
What we are going to do in the WorkoutRunnerComponent implementation is as follows:
- Start the workout
- Show the workout in progress and show the progress indicator
- After the time elapses for an exercise, show the next exercise
- Repeat this process until all the exercises are over
We are ready to create (or scaffold) our component.
From the command line, navigate to the src/app folder and execute the following ng command:
ng generate component workout-runner -isThe generator generates a bunch of files (three) in the workout-runner folder and updates the module declaration in WorkoutRunnerModule to include the newly created WorkoutRunnerComponent.
Note
The -is flag is used to stop generation of a separate CSS file for the component. Since we are using global styles, we do not need component-specific styles.
Note
Remember to run this command from the src/app folder and not from the src/app/workout-runner folder. If we run the preceding command from src/app/workout-runner, Angular CLI will create a new subfolder with the workout-runner component definition.
The preceding ng generate command for component generates these three files:
<component-name>.component.html: This is the component's view HTML.<component-name>.component.spec.ts: Test specification file used in unit testing.<component-name>.component.ts: Main component file containing component implementation.
Again, we will encourage you to have a look at the generated code to understand what gets generated. The Angular CLI component generator saves us some keystrokes and once generated, the boilerplate code can evolve as desired.
Note
While we see only four decorator metadata properties (such as templateUrl), the component decorator supports some other useful properties too. Look at the Angular documentation for component to learn more about these properties and their application.
An observant reader might have noticed that the generated selector property value has a prefix abe; this is intentional. Since we are extending the HTML domain-specific language (DSL) to incorporate a new element, the prefix abe helps us demarcate HTML extensions that we have developed. So instead of using <workout-runner></workout-runner> in HTML we use <abe-workout-runner></abe-workout-runner>. The prefix value has been configured in angular.json, see the prefix property.
We now have the WorkoutRunnerComponent boilerplate; let's start adding the implementation, starting with adding the model reference.
In workout-runner.component.ts, import all the workout models:
import {WorkoutPlan, ExercisePlan, Exercise} from './model';Next, we need to set up the workout data. Let's do that by adding some code in the generated ngOnInit function and related class properties to the WorkoutRunnerComponent class:
workoutPlan: WorkoutPlan;
restExercise: ExercisePlan;
ngOnInit() {
   this.workoutPlan = this.buildWorkout();
   this.restExercise = new ExercisePlan(
     new Exercise('rest', 'Relax!', 'Relax a bit', 'rest.png'),
     this.workoutPlan.restBetweenExercise);
}
ngOnInit is a special function that Angular calls when a component is initialized. We will talk about ngOnInit shortly.
The buildWorkout on WorkoutRunnerComponent sets up the complete workout, as we will define shortly. We also initialize a restExercise variable to track even the rest periods as exercise (note that restExercise is an object of type ExercisePlan).
The buildWorkout function is a lengthy function, so it's better to copy the implementation from the workout runner's implementation available in Git branch checkpoint2.1 (http://bit.ly/ng6be-2-1-workout-runner-component-ts). The buildWorkout code looks as follows:
buildWorkout(): WorkoutPlan {
let workout = new WorkoutPlan('7MinWorkout',
"7 Minute Workout", 10, []);
workout.exercises.push(
new ExercisePlan(
new Exercise(
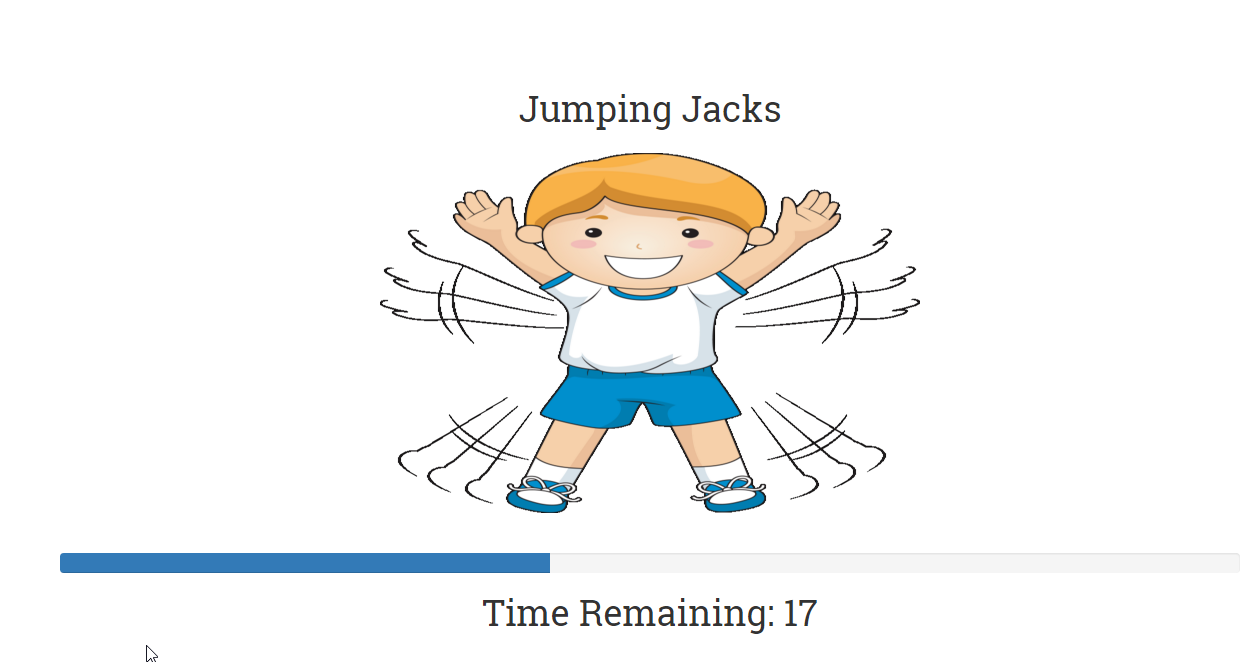
'jumpingJacks',
'Jumping Jacks',
'A jumping jack or star jump, also called side-straddle hop
is a physical jumping exercise.',
'JumpingJacks.png',
'jumpingjacks.wav',
`Assume an erect position, with feet together and
arms at your side. ...`,
['dmYwZH_BNd0', 'BABOdJ-2Z6o', 'c4DAnQ6DtF8']),
30));
// (TRUNCATED) Other 11 workout exercise data.
return workout;
} This code builds the WorkoutPlan object and pushes the exercise data into the exercises array (an array of ExercisePlan objects), returning the newly built workout.
The initialization is complete; now, it's time to actually implement the start workout. Add a start function to the WorkoutRunnerComponent implementation, as follows:
start() {
   this.workoutTimeRemaining =
   this.workoutPlan.totalWorkoutDuration();
   this.currentExerciseIndex = 0;
   this.startExercise(this.workoutPlan.exercises[this.currentExerciseIndex]);
}
Then declare the new variables used in the function at the top, with other variable declarations:
workoutTimeRemaining: number;
currentExerciseIndex: number;
The workoutTimeRemaining variable tracks the total time remaining for the workout, and currentExerciseIndex tracks the currently executing exercise index. The call to startExercise actually starts an exercise. This is how the code for startExercise looks:
startExercise(exercisePlan: ExercisePlan) {
    this.currentExercise = exercisePlan;
    this.exerciseRunningDuration = 0;
    const intervalId = setInterval(() => {
      if (this.exerciseRunningDuration >=  this.currentExercise.duration) {
          clearInterval(intervalId);
      }
      else { this.exerciseRunningDuration++; }
    }, 1000);
}
We start by initializing currentExercise and exerciseRunningDuration. The currentExercise variable tracks the exercise in progress and exerciseRunningDuration tracks its duration. These two variables also need to be declared at the top:
currentExercise: ExercisePlan;
exerciseRunningDuration: number;
We use the setInterval JavaScript function with a delay of one second (1,000 milliseconds) to make progress. Inside the setInterval callback, exerciseRunningDuration is incremented with each passing second. The nested clearInterval call stops the timer once the exercise duration lapses.
Note
TypeScript arrow functions
The callback parameter passed to setInterval (()=>{...}) is a lambda function (or an arrow function in ES 2015). Lambda functions are short-form representations of anonymous functions, with added benefits. You can learn more about them at http://bit.ly/ng2be-ts-arrow-functions.
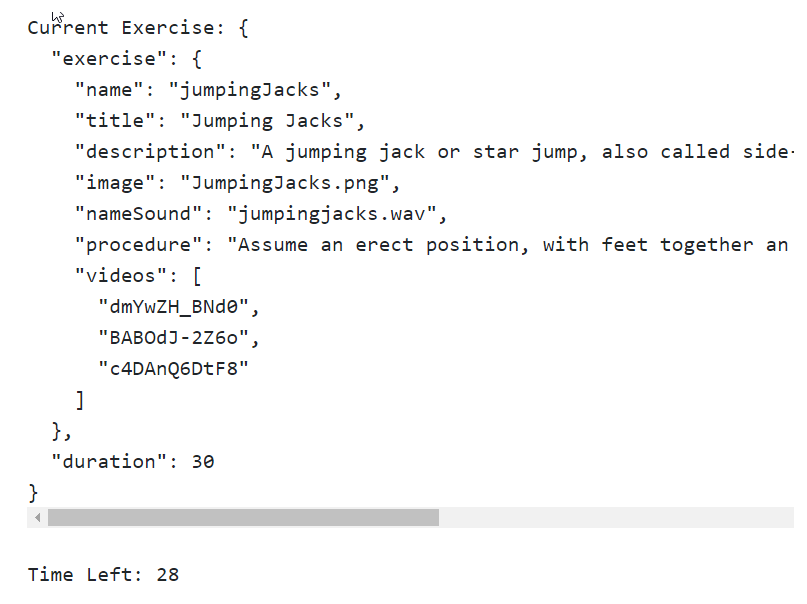
The first cut of the component is almost complete, except it currently has a static view (UI) and hence we cannot verify the implementation. We can quickly rectify this situation by adding a rudimentary view definition. Open workout-runner.component.ts, comment out the templateUrl property, and add an inline template property (template) and set it to the following:
template: `<pre>Current Exercise: {{currentExercise | json}}</pre>
<pre>Time Left: {{currentExercise.duration - exerciseRunningDuration}}</pre>`,
Note
Strings enclosed in backticks (` `) are a new addition to ES2015. Also called template literals, such string literals can be multiline and allow expressions to be embedded inside (not to be confused with Angular expressions). Look at the MDN article at http://bit.ly/template-literals for more details.
Note
Inline versus external view templateThe preceding template property is an example of inline component template. This allows the component developer to specify the component template inline instead of using a separate HTML file. The inline template approach generally works for components with a trivial view. Inline templates have a disadvantage: formatting HTML becomes difficult and IDE support is very limited as the content is treated as a string literal. When we externalize HTML, we can develop a template as a normal HTML document. We recommend you use an external template file (specified using templateUrl) for elaborate views. Angular CLI by default generates an external template reference, but we can affect this behavior by passing the --inline-template flag to the ng component generation command, such as --inline-template true.
The preceding template HTML will render the raw ExercisePlan object and the exercise time remaining. It has an interesting expression inside the first interpolation: currentExercise | json. The currentExercise property is defined in WorkoutRunnerComponent, but what about the | symbol and what follows it (json)? In the Angular world, it is called a pipe. The sole purpose of a pipe is to transform/format template data.
The json pipe here does JSON data formatting. You will learn more about pipes later in this chapter, but to get a general sense of what the json pipe does, we can remove the json pipe plus the | symbol and render the template; we are going to do this next.
To render the new WorkoutRunnerComponent implementation, it has to be added to the root component's view. Modify src/components/app/app.component.html and replace the h3 tag with the following code:
<div class="container body-content app-container">
      <abe-workout-runner></abe-workout-runner>
</div>
While the implementation may look complete, there is a crucial piece missing. Nowhere in the code do we actually start the workout. The workout should start as soon as we load the page.
Component lifecycle hooks are going to rescue us!
The life of an Angular component is eventful. Components get created, change state during their lifetime, and finally, they are destroyed. Angular provides some lifecycle hooks/functions that the framework invokes (on the component) when such an event occurs. Consider these examples:
- When a component is initialized, Angular invokes
ngOnInit - When a component's data-bound properties change, Angular invokes
ngOnChanges - When a component is destroyed, Angular invokes
ngOnDestroy
As developers, we can tap into these key moments and perform some custom logic inside the respective component.
The hook we are going to utilize here is ngOnInit. The ngOnInit function gets fired the first time the component's data-bound properties are initialized, but before the view initialization starts.
Note
While ngOnInit and the class constructor seem to look similar, they have a different purpose. A constructor is a language feature and it is used to initialize class members. ngOnInit, on the other hand, is used to do some initialization stuff once the component is ready. Avoid use of a constructor for anything other than member initialization.
Update the ngOnInit function to the WorkoutRunnerComponent class with a call to start the workout:
ngOnInit() {
    ...
    this.start();
}
Angular CLI as part of component scaffolding already generates the signature for ngOnInit. The ngOnInit function is declared on the OnInit interface, which is part of the core Angular framework. We can confirm this by looking at the import section of WorkoutRunnerComponent:
import {Component,OnInit} from '@angular/core';
...
export class WorkoutRunnerComponent implements OnInit {
Note
There are a number of other lifecycle hooks, including ngOnDestroy, ngOnChanges, and ngAfterViewInit, that components support, but we are not going to dwell on any of them here. Look at the developer guide (https://angular.io/guide/lifecycle-hooks) on lifecycle hooks to learn more about other such hooks.
Note
Implementing the interface (OnInit in the preceding example) is optional. These lifecycle hooks work as long as the function name matches. We still recommend you use interfaces to clearly communicate the intent.
Time to run our app! Open the command line, navigate to the trainer folder, and type this line:
ng serve --openThe code compiles, but no UI is rendered. What is failing us? Let's look at the browser console for errors.
Open the browser's dev tools (common keyboard shortcut F12) and look at the console tab for errors. There is a template parsing error. Angular is not able to locate the abe-workout-runner component. Let's do some sanity checks to verify our setup:
WorkoutRunnerComponentimplementation complete - check- Component declared in
WorkoutRunnerModule- check WorkoutRunnerModuleimported intoAppModule- check
Still, the AppComponent template cannot locate the WorkoutRunnerComponent. Is it because WorkoutRunnerComponent and AppComponent are in different modules? Indeed, that is the problem! While WorkoutRunnerModule has been imported into AppModule, WorkoutRunnerModule still does not export the new WorkoutRunnerComponent that will allow AppComponent to use it.
Note
Remember, adding a component/directive/pipe to the declaration section of a module makes them available inside the module. It's only after we export the component/directive/pipe that it becomes available to be used across modules.
Let's export WorkoutRunnerComponent by updating the export array of the WorkoutRunnerModule declaration to the following:
declarations: [WorkoutRunnerComponent],
exports:[WorkoutRunnerComponent]
This time, we should see the following output:
Note
Always export artifacts defined inside an Angular module if you want them to be used across other modules.
The model data updates with every passing second! Now you'll understand why interpolations ({{ }}) are a great debugging tool.
Note
This will also be a good time to try rendering currentExercise without the json pipe and see what gets rendered.
We are not done yet! Wait long enough on the page and we realize that the timer stops after 30 seconds. The app does not load the next exercise data. Time to fix it!
Update the code inside the setInterval function:
if (this.exerciseRunningDuration >=  this.currentExercise.duration) {
   clearInterval(intervalId);
   const next: ExercisePlan = this.getNextExercise();
   if (next) {
     if (next !== this.restExercise) {
       this.currentExerciseIndex++;
        }
     this.startExercise(next);}
   else { console.log('Workout complete!'); }
}
The if condition if (this.exerciseRunningDuration >= this.currentExercise.duration) is used to transition to the next exercise once the time duration of the current exercise lapses. We use getNextExercise to get the next exercise and call startExercise again to repeat the process. If no exercise is returned by the getNextExercise call, the workout is considered complete.
During exercise transitioning, we increment currentExerciseIndex only if the next exercise is not a rest exercise. Remember that the original workout plan does not have a rest exercise. For the sake of consistency, we have created a rest exercise and are now swapping between rest and the standard exercises that are part of the workout plan. Therefore, currentExerciseIndex does not change when the next exercise is rest.
Let's quickly add the getNextExercise function too. Add the function to the WorkoutRunnerComponent class:
getNextExercise(): ExercisePlan {
    let nextExercise: ExercisePlan = null;
    if (this.currentExercise === this.restExercise) {
      nextExercise = this.workoutPlan.exercises[this.currentExerciseIndex + 1];
    }
    else if (this.currentExerciseIndex < this.workoutPlan.exercises.length - 1) {
      nextExercise = this.restExercise;
    }
    return nextExercise;
}
The getNextExercise function returns the next exercise that needs to be performed.
Note
Note that the returned object for getNextExercise is an ExercisePlan object that internally contains the exercise details and the duration for which the exercise runs.
The implementation is quite self-explanatory. If the current exercise is rest, take the next exercise from the workoutPlan.exercises array (based on currentExerciseIndex); otherwise, the next exercise is rest, given that we are not on the last exercise (the else if condition check).
With this, we are ready to test our implementation. The exercises should flip after every 10 or 30 seconds. Great!
Note
The current build setup automatically compiles any changes made to the script files when the files are saved; it also refreshes the browser after these changes. But just in case the UI does not update or things do not work as expected, refresh the browser window. If you are having a problem with running the code, look at the Git branch checkpoint2.1 for a working version of what we have done thus far. Or if you are not using Git, download the snapshot of Checkpoint 2.1 (a ZIP file) from http://bit.ly/ng6be-checkpoint2-1. Refer to the README.md file in the trainer folder when setting up the snapshot for the first time.
We have done enough work on the component for now, let's build the view.
Most of the hard work has already been done while defining the model and implementing the component. Now, we just need to skin the HTML using the super-awesome data binding capabilities of Angular. It's going to be simple, sweet, and elegant!
For the 7 Minute Workout view, we need to show the exercise name, the exercise image, a progress indicator, and the time remaining. Replace the local content of the workout-runner.component.html file with the content of the file from the Git branch checkpoint2.2, (or download it from http://bit.ly/ng6be-2-2-workout-runner-component-html). The view HTML looks as follows:
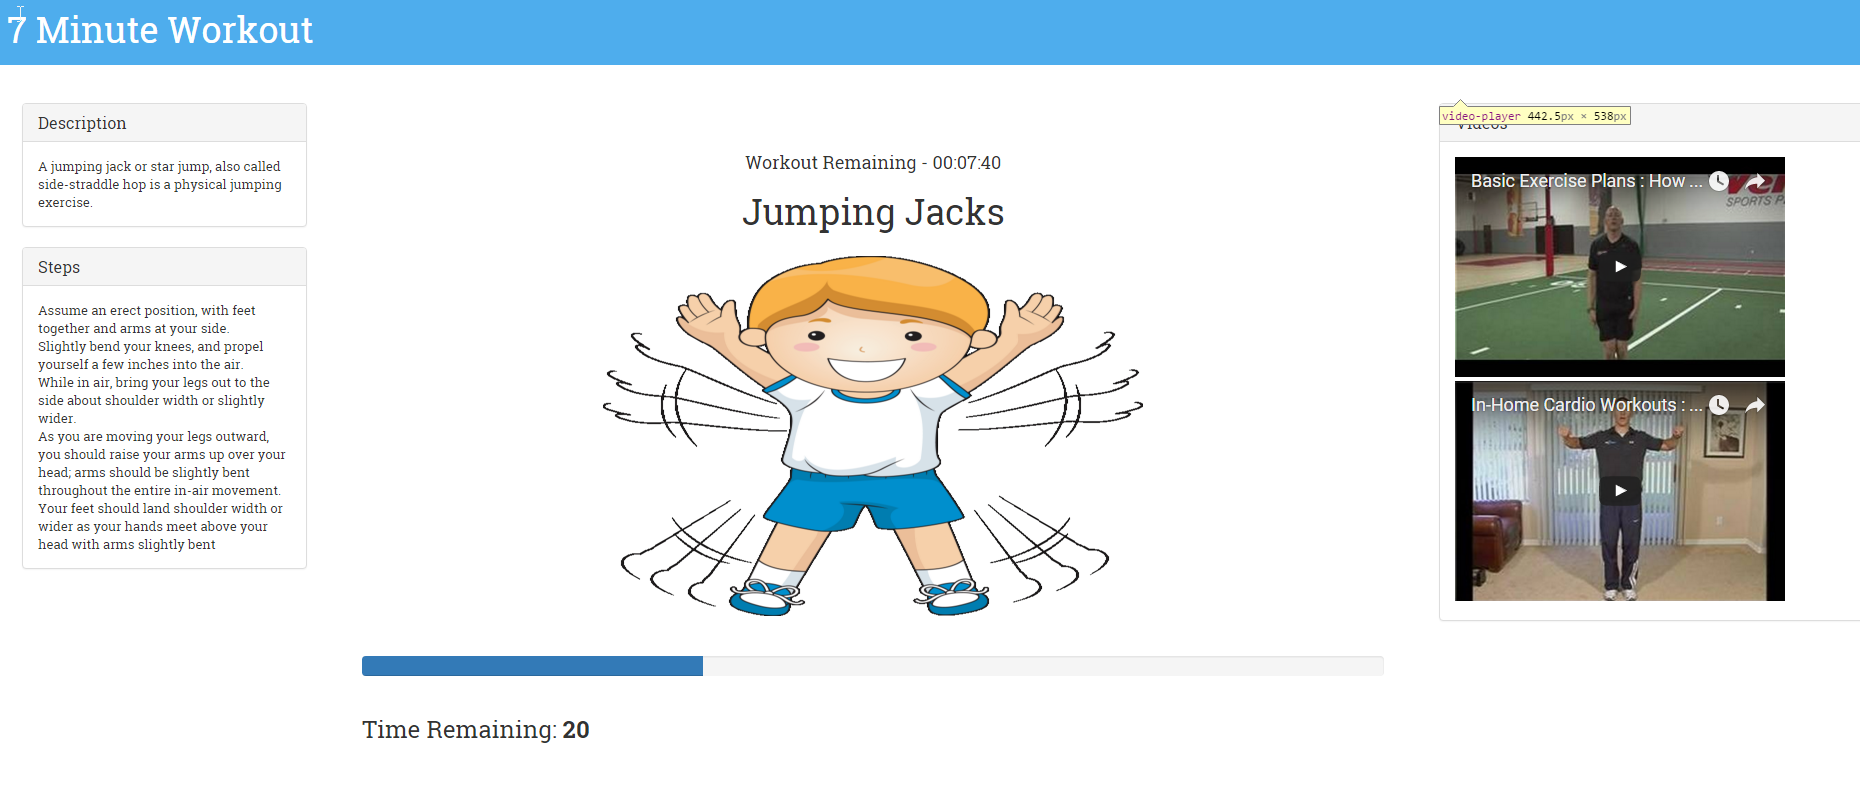
<div class="row">
  <div id="exercise-pane" class="col-sm">
    <h1 class="text-center">{{currentExercise.exercise.title}}</h1>
    <div class="image-container row">
      <img class="img-fluid col-sm" [src]="'/assets/images/' +
                                      currentExercise.exercise.image" />
    </div>
    <div class="progress time-progress row">
      <div class="progress-bar col-sm"
            role="progressbar"
            [attr.aria-valuenow]="exerciseRunningDuration"
            aria-valuemin="0"
            [attr.aria-valuemax]="currentExercise.duration"
            [ngStyle]="{'width':(exerciseRunningDuration/currentExercise.duration) *
                                                                100 + '%'}">
      </div>
    </div>
    <h1>Time Remaining: {{currentExercise.duration-exerciseRunningDuration}}</h1>
  </div>
</div>
WorkoutRunnerComponent currently uses an inline template; instead, we need to revert back to using an external template. Update the workout-runner.component.ts file and get rid of the template property, then uncomment templateUrl, which we commented out earlier.
Before we understand the Angular pieces in the view, let's just run the app again. Save the changes in workout-runner.component.html and if everything went fine, we will see the workout app in its full glory:
The basic app is now up and running. The exercise image and title show up, the progress indicator shows the progress, and exercise transitioning occurs when the exercise time lapses. This surely feels great!
Note
If you are having a problem with running the code, look at the Git branch checkpoint2.2 for a working version of what we have done thus far. You can also download the snapshot of checkpoint2.2 (a ZIP file) from this GitHub location: http://bit.ly/ng6be-checkpoint-2-2. Refer to the README.md file in the trainer folder when setting up the snapshot for the first time.
Looking at the view HTML, other than some Bootstrap styles, there are some interesting Angular pieces that need our attention. Before we dwell on these view constructs in detail, let's break down these elements and provide a quick summary:
<h1 ...>{{currentExercise.exercise.title}}</h1>: Uses interpolation<img ... [src]="'/assets/images/' + currentExercise.exercise.image" .../>: Uses property binding to bind thesrcproperty of the image to the component model propertycurrentExercise.exercise.image<div ... [attr.aria-valuenow]="exerciseRunningDuration" ... >: Uses attribute binding to bind the aria attribute on div toexerciseRunningDuration< div ... [ngStyle]="{'width':(exerciseRunningDuration/currentExercise.duration) * 100 + '%'}">: Uses a directivengStyleto bind thestyleproperty on the progress-bardivto an expression that evaluates the exercise progress
Phew! There is a lot of binding involved. Let's dig deeper into the binding infrastructure.
Most modern JavaScript frameworks today come with strong model-view binding support, and Angular is no different. The primary aim of any binding infrastructure is to reduce the boilerplate code that a developer needs to write to keep the model and view in sync. A robust binding infrastructure is always declarative and terse.
The Angular binding infrastructure allows us to transform template (raw) HTML into a live view that is bound to model data. Based on the binding constructs used, data can flow and be synced in both directions: from model to view and view to model.
The link between the component's model and its view is established using the template or templateUrl property of the @Component decorator. With the exception of the script tag, almost any piece of HTML can act as a template for the Angular binding infrastructure.
To make this binding magic work, Angular needs to take the view template, compile it, link it to the model data, and keep it in sync with model updates without the need for any custom boilerplate synchronization code.
Based on the data flow direction, these bindings can be of three types:
- One-way binding from model to view: In model-to-view binding, changes to the model are kept in sync with the view. Interpolations, property, attribute, class, and style bindings fall in this category.
- One-way binding from view to model: In this category, view changes flow towards the model. Event bindings fall in this category.
- Two-way/bidirectional binding: Two-way binding, as the name suggests, keeps the view and model in sync. There is a special binding construct used for two-way binding,
ngModel, and some standard HTML data entry elements such asinputandselectsupport two-way binding.
Let's understand how to utilize the binding capabilities of Angular to support view templatization. Angular provides these binding constructs:
- Interpolations
- Property binding
- Attribute binding
- Class binding
- Style binding
- Event binding
This is a good time to learn about all these binding constructs. Interpolation is the first one.
Interpolations are quite simple. The expression (commonly known as a template expression) inside the interpolation symbols ({{ }}) is evaluated in the context of the model (or the component class members), and the outcome of the evaluation (string) is embedded in HTML. A handy framework construct to display a component's data/properties. We render the exercise title and the exercise time remaining using interpolation:
<h1>{{currentExercise.exercise.title}}</h1>
...
<h1>Time Remaining: {{currentExercise.duration?-exerciseRunningDuration}}</h1>
Remember that interpolations synchronize model changes with the view. Interpolation is one way of binding from a model to a view.
Interpolations, in fact, are a special case of property binding, which allows us to bind any HTML element/component properties to a model. We will shortly discuss how an interpolation can be written using property binding syntax. Consider interpolation as syntactical sugar over property binding.
Property bindings allow us to bind native HTML/component properties to the component's model and keep them in sync (from model->view). Let's look at property binding from a different context.
Look at this view excerpt from the 7 Minute Workout's component view (workout-runner.component.html):
<img class="img-responsive" [src]="'/static/images/' + currentExercise.exercise.image" />
It seems that we are setting the src attribute of img to an expression that gets evaluated at runtime. But are we really binding to an attribute? Or is this a property? Are properties and attributes different?
In Angular realms, while the preceding syntax looks like it is setting an HTML element's attribute, it is, in fact, doing property binding. Moreover, since many of us are not aware of the difference between an HTML element's properties and its attributes, this statement is very confusing. Therefore, before we look at how property bindings work, let's try to grasp the difference between an element's property and its attribute.
Take any DOM element API and you will find attributes, properties, functions, and events. While events and functions are self-explanatory, it is difficult to understand the difference between properties and attributes. In daily use, we use these words interchangeably, which does not help much either. Take, for example, this line of code:
<input type="text" value="Awesome Angular">
When the browser creates a DOM element (HTMLInputElement to be precise) for this input textbox, it uses the value attribute on input to set the initial state of the value property of input to Awesome Angular.
After this initialization, any changes to the value property of input do not reflect on the value attribute; the attribute always has Awesome Angular (unless set explicitly again). This can be confirmed by querying the input state.
Suppose we change the input data to Angular rocks! and query the input element state:
input.value // value property
The value property always returns the current input content, which is Angular rocks!. Whereas this DOM API function:
input.getAttribute('value') // value attribute Returns the value attribute, and is always the Awesome Angular that was set initially.
The primary role of an element attribute is to initialize the state of the element when the corresponding DOM object is created.
There are a number of other nuances that add to this confusion. These include the following:
- Attribute and property synchronization is not consistent across properties. As we saw in the preceding example, changes to the
valueproperty oninputdo not affect thevalueattribute, but this is not true for all property-value pairs. Thesrcproperty of an image element is a prime example of this; changes to property or attribute values are always kept in sync.
- It's surprising to learn that the mapping between attributes and properties is also not one-to-one. There are a number of properties that do not have any backing attribute (such as
innerHTML), and there are also attributes that do not have a corresponding property defined on the DOM (such ascolspan). - Attribute and property mapping adds to this confusion too, as they do not follow a consistent pattern. An excellent example of this is available in the Angular developer's guide, which we are going to reproduce here verbatim:
Note
The disabled attribute is another peculiar example. A button's disabled property is false by default so the button is enabled. When we add the disabled attribute, its presence alone initializes the button's disabled property to true so the button is disabled. Adding and removing the disabled attribute disables and enables the button. The value of the attribute is irrelevant, which is why we cannot enable a button by writing <button disabled="false">Still Disabled</button>.
The aim of this discussion is to make sure that we understand the difference between the properties and attributes of a DOM element. This new mental model will help us as we continue to explore the framework's property and attribute binding capabilities. Let's get back to our discussion on property binding.
Now that we understand the difference between a property and an attribute, let's look at the binding example again:
<img class="img-responsive" [src]="'/static/images/' + currentExercise.exercise.image" />
The [propertName] square bracket syntax is used to bind the img.src property to an Angular expression.
The general syntax for property binding looks as follows:
[target]="sourceExpression";
In the case of property binding, the target is a property on the DOM element or component. With property binding, we can literally bind to any property on the element's DOM. The src property on the img element is what we use; this binding works for any HTML element and every property on it.
Note
Binding source and targetIt is important to understand the difference between source and target in an Angular binding. The property appearing inside [] is a target, sometimes called binding target. The target is the consumer of the data and always refers to a property on the component/element. The source expression constitutes the data source that provides data to the target.
At runtime, the expression is evaluated in the context of the component's/element's property (the WorkoutRunnerComponent.currentExercise.exercise.image property in the preceding case).
Note
Always remember to add square brackets [] around the target. If we don't, Angular treats the expression as a string constant and the target is simply assigned the string value.
Property binding, event binding, and attribute binding do not use the interpolation symbol. The following is invalid: [src]="{{'/static/images/' + currentExercise.exercise.image}}".
Note
If you have worked on AngularJS, property binding together with event binding allows Angular to get rid of a number of directives, such as ng-disable, ng-src, ng-key*, ng-mouse*, and a few others.
From a data binding perspective, Angular treats components in the same way as it treats native elements. Hence, property binding works on component properties too! Components can define input and output properties that can be bound to the view, such as this:
<workout-runner [exerciseRestDuration]="restDuration"></workout-runner>
This hypothetical snippet binds the exerciseRestDuration property on the WorkoutRunnerComponent class to the restDuration property defined on the container component (parent), allowing us to pass the rest duration as a parameter to the WorkoutRunnerComponent. As we enhance our app and develop new components, you will learn how to define custom properties and events on a component.
Note
We can enable property binding using the bind- syntax, which is a canonical form of property binding. This implies that [src]="'/assets/images/' + currentExercise.exercise.image" is equivalent to the following: bind-src="'/static/images/' + currentExercise.exercise.image".
Note
Property binding, like interpolation, is unidirectional, from the component/element source to the view. Changes to the model data are kept in sync with the view.
The template view that we just created has only one property binding (on [src]). The other bindings with square brackets aren't property bindings. We will cover them shortly.
We concluded the section on interpolations by describing interpolation as syntactical sugar over property binding. The intent was to highlight how both can be used interchangeably. The interpolation syntax is terser than property binding and hence is very useful. This is how Angular interprets an interpolation:
<h3>Main heading - {{heading}}</h3>
<h3 [text-content]="' Main heading - '+ heading"></h3>
Angular translates the interpolation in the first statement into the textContent property binding (second statement).
Interpolation can be used in more places than you can imagine. The following example contrasts the same binding using interpolation and property binding:
<img [src]="'/assets/images/' + currentExercise.exercise.image" />
<img src="/assets/images/{{currentExercise.exercise.image}}" />      // interpolation on attribute

<span [text-content]="helpText"></span>
<span>{{helpText}}</span>
While property binding (and interpolations) makes it easy for us to bind any expression to the target property, we should be careful with the expression we use. Angular's change detection system will evaluate your expression binding multiple times during the life cycle of the application, as long as our component is alive. Therefore, while binding an expression to a property target, keep these two guidelines in mind.
A property binding expression should evaluate quickly. Slow expression evaluation can kill your app's performance. This happens when a function performing CPU intensive work is part of an expression. Consider this binding:
<div>{{doLotsOfWork()}}</div> Angular will evaluate the preceding doLotsOfWork() expression every time it performs a change detection run. These change detection runs happen more often than we imagine and are based on some internal heuristics, so it becomes imperative that the expressions we use evaluate quickly.
If a function is used in a binding expression, it should be side effect-free. Consider yet another binding:
<div [innerHTML]="getContent()"></div>
And the underlying function, getContent:
getContent() {
  var content=buildContent();
  this.timesContentRequested +=1;
  return content;
}
The getContent call changes the state of the component by updating the timesContentRequested property every time it is called. If this property is used in views such as:
<div>{{timesContentRequested}}</div> Angular throws errors such as:
Expression '{{getContent()}}' in AppComponent@0:4' has changed after it was checked. Previous value: '1'. Current value: '2'Note
The Angular framework works in two modes, dev and production. If we enable production mode in the application, the preceding error does not show up. Look at the framework documentation at http://bit.ly/enableProdMode for more details.
The bottom line is that your expression used inside property binding should be side effect-free.
Let's now look at something interesting, [ngStyle], which looks like a property binding, but it's not. The target specified in [] is not a component/element property (div does not have an ngStyle property), it's a directive.
Two new concepts need to be introduced, target selection and directives.
As a framework, Angular tries to enhance the HTML DSL (short for Domain-Specific Language):
- Components are referenced in HTML using custom tags such as
<abe-workout-runner></abe-workout-runner>(not part of standard HTML constructs). This highlights the first extension point. - The use of
[]and()for property and event binding defines the second. - And then there are directives, the third extension point which are further classified into attribute and structural directives, and components (components are directive too!).
While components come with their own view, attribute directives are there to enhance the appearance and/or behavior of existing elements/components.
Structural directives do not have their own view too; they change the DOM layout of the elements on which they are applied. We will dedicate a complete section later in the chapter to understanding these structural directives.
The ngStyle directive used in the workout-runner view is, in fact, an attribute directive:
<div class="progress-bar" role="progressbar"
 [ngStyle] = "{'width':(exerciseRunningDuration/currentExercise.duration) * 100 + '%'}"></div>
The ngStyle directive does not have its own view; instead, it allows us to set multiple styles (width in this case) on an HTML element using binding expressions. We will be covering a number of framework attribute directives later in this book.
Note
Directive nomenclature
Directives is an umbrella term used for component directives (also known as components), attribute directives, and structural directives. Throughout the book, when we use the term directive, we will be referring to either an attribute directive or a structural directive depending on the context. Component directives are always referred to as components.
With a basic understanding of the directive types that Angular has, we can comprehend the process of target selection for binding.
The target specified in [] is not limited to a component/element property. While the property name is a common target, the Angular templating engine actually does heuristics to decide the target type. Angular first searches the registered known directives (attribute or structural) that have matching selectors before looking for a property that matches the target expression. Consider this view fragment:
<div [ngStyle]='expression'></div>
The search for a target starts with a framework looking at all internal and custom directives with a matching selector (ngStyle). Since Angular already has an NgStyle directive, it becomes the target (the directive class name is NgStyle, whereas the selector is ngStyle). If Angular did not have a built-in NgStyle directive, the binding engine would have looked for a property called ngStyle on the underlying component.
If nothing matches the target expression, an unknown directive error is thrown.
That completes our discussion on target selection. The next section is about attribute binding.
The only reason attribute binding exists in Angular is that there are HTML attributes that do not have a backing DOM property. The colspan and aria attributes are some good examples of attributes without backing properties. The progress bar div in our view uses attribute binding.
Note
If attribute directives are still playing your head, I cannot blame you, it can become a bit confusing. Fundamentally, they are different. Attribute directives (such as [ngStyle]) change the appearance or behavior of DOM elements and as the name suggests are directives. There is no attribute or property named ngStyle on any HTML element. Attribute binding, on the other hand, is all about binding to HTML attributes that do not have backing for a DOM property.
The 7 Minute Workout uses attribute binding at two places, [attr.aria-valuenow] and [attr.aria-valuemax]. We may ask a question: can we use standard interpolation syntax to set an attribute? No, that does not work! Let's try it: open workout-runner.component.html and replace the two aria attributes attr.aria-valuenow and attr.aria-valuemax enclosed in [] with this highlighted code:
<div class="progress-bar" role="progressbar"
    aria-valuenow = "{{exerciseRunningDuration}}"
    aria-valuemin="0"
    aria-valuemax= "{{currentExercise.duration}}"  ...> </div>
Save the view and if the app is not running, run it. This error will pop up in the browser console:
Can't bind to 'ariaValuenow' since it isn't a known native property in WorkoutRunnerComponent ...
Angular is trying to search for a property called ariaValuenow in the div that does not exist! Remember, interpolations are actually property bindings.
We hope that this gets the point across: to bind to an HTML attribute, use attribute binding.
To support attribute binding, Angular uses a prefix notation, attr, within []. An attribute binding looks as follows:
[attr.attribute-name]="expression"
Revert to the original aria setup to make attribute binding work:
<div ... [attr.aria-valuenow]="exerciseRunningDuration"
[attr.aria-valuemax]="currentExercise.duration" ...> While we have not used style and class-based binding in our workout view, these are some binding capabilities that can come in handy. Hence, they are worth exploring.
We use class binding to set and remove a specific class based on the component state, as follows:
[class.class-name]="expression"
This adds class-name when expression is true and removes it when it is false. A simple example can look as follows:
<div [class.highlight]="isPreferred">Jim</div> // Toggles the highlight class
Use style bindings to set inline styles based on the component state:
[style.style-name]="expression";
While we have used the ngStyle directive for the workout view, we could have easily used style binding as well, as we are dealing with a single style. With style binding, the same ngStyle expression would become the following:
[style.width.%]="(exerciseRunningDuration/currentExercise.duration) * 100"
width is a style, and since it takes units too, we extend our target expression to include the % symbol.
Note
Remember that style. and class. are convenient bindings for setting a single class or style. For more flexibility, there are corresponding attribute directives: ngClass and ngStyle.
Earlier in the chapter, we formally introduced directives and their classifications. One of the directives types, attribute directives (again, don't confuse them with attribute binding, which we introduced in the preceding section) are the focus of our attention in the next section.
Attribute directives are HTML extensions that change the look, feel or behavior of a component/element. As described in the section on Angular directives, these directives do not define their own view.
Other than ngStyle and ngClass directives, there are a few more attribute directives that are part of the core framework. ngValue, ngModel, ngSelectOptions, ngControl, and ngFormControl are some of the attribute directives that Angular provides.
Since 7 Minute Workout uses the ngStyle directive, it would be wise to dwell more on this directive and its close associate ngClass.
Note
While the next section is dedicated to learning how to use the ngClass and ngStyle attribute directives, it is not until Chapter 4, Angular Directives in Depth, that we learn how to create our own attribute directives.
Angular has two excellent directives that allow us to dynamically set styles on any element and toggle CSS classes. For the bootstrap progress bar, we use the ngStyle directive to dynamically set the element's style, width, as the exercise progresses:
<div class="progress-bar" role="progressbar" ...
    [ngStyle]="{'width':(exerciseRunningDuration/currentExercise.duration) * 100 + '%'}"> </div>
ngStyle allows us to bind one or more styles to a component's properties at once. It takes an object as a parameter. Each property name on the object is the style name, and the value is the Angular expression bound to that property, such as the following example:
<div [ngStyle]= "{
'width':componentWidth,
'height':componentHeight,
'font-size': 'larger',
'font-weight': ifRequired ? 'bold': 'normal' }"></div>
The styles can not only bind to component properties (componentWidth and componentHeight), but also be set to a constant value ('larger'). The expression parser also allows the use of the ternary operator (?:); check out isRequired.
If styles become too unwieldy in HTML, we also have the option of writing in our component a function that returns the object hash, and setting that as an expression:
<div [ngStyle]= "getStyles()"></div>
Moreover, getStyles on the component looks as follows:
getStyles () {
    return {
      'width':componentWidth,
      ...
    }
}
ngClass works on the same lines too, except that it is used to toggle one or multiple classes. For example, check out the following code:
<div [ngClass]= "{'required':inputRequired, 'email':whenEmail}"></div> The required class is applied when inputRequired is true and is removed when it evaluates to false.
Note
Directives (custom or platform) like any other Angular artifact, always belong to a module. To use them across modules, the module needs to be imported. Wondering where ngStyle is defined? ngStyle is part of the core framework module, CommonModule,, and has been imported in the workout runner module definition (workout-runner.module.ts). CommonModule defines a number of handy directives that are used across Angular.
Well! That covers everything we had to learn about our newly developed view.
Note
And as described earlier, if you are having a problem with running the code, look at the Git branch checkpoint2.2. If not using Git, download the snapshot of checkpoint2.2 (a ZIP file) from http://bit.ly/ng2be-checkpoint2-2. Refer to the README.md file in the trainer folder when setting up the snapshot for the first time.
Time to add some enhancements and learn a bit more about the framework!
For people who are doing this workout for the first time, it will be good to detail the steps involved in each exercise. We can also add references to some YouTube videos for each exercise to help the user understand the exercise better.
We are going to add the exercise description and instructions in the left panel and call it the description panel. We will also add references to YouTube videos in the right panel, which is the video player panel. To make things more modular and learn some new concepts, we are going to create independent components for each description panel and video panel.
The model data for this is already available. The description and procedure properties in the Exercise class (see model.ts) provide the necessary details about the exercise. The videos array contains some related YouTube video IDs, which will be used to fetch these videos.
An Angular app is nothing but a hierarchy of components, similar to a tree structure. As of now, 7 Minute Workout has two components, the root component, AppComponent, and its child, WorkoutRunnerComponent, in line with the HTML component layout, which now looks as follows:
<abe-root>
    ...
    <abe-workout-runner>...</abe-workout-runner>
</abe-root>
Run the app and do a view source to verify this hierarchy. As we all more components to implement new features in the application this component tree grows and branches out.
We are going to add two subcomponents to WorkoutRunnerComponent, one each to support the exercise description and exercise videos. While we could have added some HTML directly to the WorkoutRunnerComponent view, what we are hoping here is to learn a bit more about cross-component communication. Let's start with adding the description panel on the left and understand how a component can accept inputs.
Navigate to the workour-runner folder and generate a boilerplate exercise description component:
ng generate component exercise-description -isTo the generated exercise-description.component.ts file, add the highlighted code:
import { Component, OnInit, Input } from '@angular/core';
...
export class ExerciseDescriptionComponent {
  @Input() description: string;
  @Input() steps: string;
}
The @Input decorator signifies that the component property is available for data binding. Before we dig into the @Input decorator, let's complete the view and integrate it with WorkoutRunnerComponent.
Copy the view definition for exercise description, exercise-description.component.html, from the Git branch checkpoint2.3, in the workout-runner/exercise-description folder. Look at the highlighted HTML for the exercise description:
<div class="card-body">
    <div class="card-text">{{description}}</div>
</div>
...
<div class="card-text">
{{steps}}
</div>
The preceding interpolation references the input properties of ExerciseDescriptionComponent: description and steps.
The component definition is complete. Now, we just need to reference ExerciseDescriptionComponent in WorkoutRunnerComponent and provide values for description and steps for the ExerciseDescriptionComponent view to render correctly.
Open workout-runner.component.html and update the HTML fragments as highlighted in the following code. Add a new div called description-panel before the exercise-pane div and adjust some styles on the exercise-pane div, as follows:
<div class="row">
    <div id="description-panel" class="col-sm-3">
        <abe-exercise-description
            [description]="currentExercise.exercise.description"
            [steps]="currentExercise.exercise.procedure"></abe-exercise-description>
   </div>
   <div id="exercise-pane" class="col-sm-6">
   ...
If the app is running, the description panel should show up on the left with the relevant exercise details.
Note
WorkoutRunnerComponent was able to use ExerciseDescriptionComponent because it has been declared on WorkoutRunnerModule (see the workout-runner.module.ts declaration property). The Angular CLI component generator does this work for us.
Look back at the abe-exercise-description declaration in the preceding view. We are referring to the description and steps properties in the same manner as we did with the HTML element properties earlier in the chapter (<img [src]='expression' ...). Simple, intuitive, and very elegant!
The Angular data binding infrastructure makes sure that whenever the currentExercise.exercise.description and currentExercise.exercise.procedure properties on WorkoutRunnerComponent change, the bound properties on ExerciseDescriptionComponent, description, and steps are also updated.
Note
The @Input decoration can take a property alias as a parameter, which means the following: consider a property declaration such as: @Input("myAwesomeProperty") myProperty:string. It can be referenced in the view as follows: <my-component [myAwesomeProperty]="expression"....
The power of the Angular binding infrastructure allows us to use any component property as a bindable property by attaching the @Input decorator (and @Output too) to it. We are not limited to basic data types such as string, number, and boolean; there can be complex objects too, which we will see next as we add the video player:
Generate a new component in the workout-runner directory for the video player:
ng generate component video-player -isUpdate the generated boilerplate code by copying implementation from video-player.component.ts and video-player.component.html available in the Git branch checkpoint2.3 in the trainer/src/components/workout-runner/video-player folder (GitHub location: http://bit.ly/ng6be-2-3-video-player).
Let's look at the implementation for the video player. Open video-player.component.ts and check out the VideoPlayerComponent class:
export class VideoPlayerComponent implements OnInit, OnChanges {
  private youtubeUrlPrefix = '//www.youtube.com/embed/';

  @Input() videos: Array<string>;
  safeVideoUrls: Array<SafeResourceUrl>;

  constructor(private sanitizer: DomSanitizationService) { }

  ngOnChanges() {
    this.safeVideoUrls = this.videos ?
        this.videos
            .map(v => this.sanitizer.bypassSecurityTrustResourceUrl(this.youtubeUrlPrefix + v))
    : this.videos;
  }
}
The videos input property here takes an array of strings (YouTube video codes). While we take the videos array as input, we do not use this array directly in video player view; instead, we transform the input array into a new array of safeVideoUrls and bind it. This can be confirmed by looking at the view implementation:
<div *ngFor="let video of safeVideoUrls">
   <iframe width="198" height="132" [src]="video" frameborder="0" allowfullscreen></iframe>
</div>
The view also uses a new Angular directive called ngFor to bind to the safeVideoUrls array. The ngFor directive belongs to a class of directives called structural directives. The directive's job is to take an HTML fragment and regenerate it based on the number of elements in the bound collection.
If you are confused about how the ngFor directive works with safeVideoUrls, and why we need to generate safeVideoUrls instead of using the videos input array, wait for a while as we are shortly going to address these queries. But, let's first complete the integration of VideoPlayerComponent with WorkoutRunnerComponent to see the final outcome.
Update the WorkoutRunnerComponent view by adding the component declaration after the exercise-pane div:
<div id="video-panel" class="col-sm-3">
    <abe-video-player [videos]="currentExercise.exercise.videos"></abe-video-player>
</div>
The VideoPlayerComponent's videos property binds to the exercise's videos collection.
Start/refresh the app and the video thumbnails should show up on the right.
Note
If you are having a problem with running the code, look at the Git branch checkpoint2.3 for a working version of what we have done thus far. You can also download the snapshot of checkpoint2.3 (a ZIP file) from http://bit.ly/ng6be-checkpoint-2-3. Refer to the README.md file in the trainer folder when setting up the snapshot for the first time.
Now, it's time to go back and look at the parts of the VideoPlayerComponent implementation. We specifically need to understand:
- How the
ngFordirective works - Why there is a need to transform the input
videosarray intosafeVideoUrls - The significance of the Angular component life cycle event
OnChanges(used in the video player)
To start with, it's time to formally introduce ngFor and the class of directives it belongs to: structural directives.
The third categorization of directives, structural directives, work on the components/elements to manipulate their layout.
The Angular documentation describes structural directives in a succinct manner:
"Instead of defining and controlling a view like a Component Directive, or modifying the appearance and behavior of an element like an Attribute Directive, the Structural Directive manipulates the layout by adding and removing entire element sub-trees."
Since we have already touched upon component directives (such as workout-runner and exercise-description) and attribute directives (such as ngClass and ngStyle), we can very well contrast their behaviors with structural directives.
The ngFor directive belongs to this class. We can easily identify such directives by the * prefix. Other than ngFor, Angular comes with some other structural directives such as ngIf and ngSwitch.
Every templating language has constructs that allow the templating engine to generate HTML (by repetition). Angular has NgForOf. The NgForOfdirective is a super useful directive used to duplicate a piece of an HTML fragment n number of times. Let's again look at how we have used NgForOf in the video player:
<div *ngFor="let video of safeVideoUrls">
   <iframe width="198" height="132" [src]="video" frameborder="0" allowfullscreen></iframe>
</div>
Note
The directive selector for NgForOf is {selector: '[ngFor][ngForOf]'}, so we can use either ngFor or ngForOf in the view template. We also at times refer to this directive as ngFor.
The preceding code repeats the div fragment for each exercise video (using the safeVideoUrls array). The let video of safeVideoUrls string expression is interpreted as follows: take each video in the safeVideoUrls array and assign it to a template input variable, video.
This input variable can now be referenced inside the ngFor template HTML, as we do when we set the src property binding.
Interestingly, the string assigned to the ngFor directive is not a typical Angular expression. Instead, it's a microsyntax—a micro language, which the Angular engine can parse.
Note
You can learn more about microsyntax in Angular's developer guide: http://bit.ly/ng6be-micro-syntax.
This microsyntax exposes a number of iteration context properties that we can assign to template input variables and use them inside the ngFor HTML block.
One such example is index. index increases from 0 to the length of the array for each iteration, something similar to a for loop, in any programming language. The following example shows how to capture it:
<div *ngFor="let video of videos; let i=index">
     <div>This is video - {{i}}</div>
</div>
Other than index, there are some more iteration context variables; these include first, last, even, and odd. This context data allows us to do some nifty stuff. Consider this example:
<div *ngFor="let video of videos; let i=index; let f=first">
     <div [class.special]="f">This is video - {{i}}</div>
</div>
It applies a special class to the first video div.
The NgForOf directive can be applied to HTML elements as well as our custom components. This is a valid use of NgForOf:
<user-profile *ngFor="let userDetail of users" [user]= "userDetail"></user-profile>
Always remember to add an asterisk (*) before ngFor (and other structural directives). * has a significance.
The * prefix is a terser format to represent a structural directive. Take, for example, the usage of ngFor by the video player. The ngFor template:
<div *ngFor="let video of safeVideoUrls">
   <iframe width="198" height="132" [src]="video" frameborder="0" allowfullscreen></iframe>
</div>
Actually expands to the following:
<ng-template ngFor let-video [ngForOf]="safeVideoUrls">
    <div>
        <iframe width="198" height="132"  [src]="video" ...></iframe>
    </div>
</ng-template>
The ng-template tag is an Angular element that has a declaration for ngFor, a template input variable (video), and a property (ngForOf) that points to the safeVideoUrls array. Both the preceding declarations are a valid usage of ngFor.
Not sure about you, but I prefer the terser first format for ngFor!
Since NgForOf generates HTML based on collection elements, it is notorious for causing performance issues. But we cannot blame the directive. It does what it is supposed to do: iterate and generate elements! If the underlying collection is huge, UI rendering can take a performance hit, especially if the collection changes too often. The cost of continuously destroying and creating elements in response to a changing collection can quickly become prohibitive.
One of the performance tweaks for NgForOf allows us to alter the behavior of ngForOf when it comes to creating and destroying DOM elements (when the underlying collection elements are added or removed).
Imagine a scenario where we frequently get an array of objects from the server and bind it to the view using NgForOf. The default behavior of NgForOf is to regenerate the DOM every time we refresh the list (since Angular does a standard object equality check). However, as developers, we may very well know not much has changed. Some new objects may have been added, some removed, and maybe some modified. But Angular just regenerates the complete DOM.
To alleviate this situation, Angular allows us to specify a custom tracking function, which lets Angular know when two objects being compared are equal. Have a look at the following function:
trackByUserId(index: number, hero: User) { return user.id; } A function such as this can be used in the NgForOf template to tell Angular to compare the user object based on its id property instead of doing a reference equality check.
This is how we then use the preceding function in the NgForOf template:
<div *ngFor="let user of users; trackBy: trackByUserId">{{user.name}}</div> NgForOf will now avoid recreating DOM for users with IDs already rendered.
Remember, Angular may still update the existing DOM elements if the bound properties of a user have changed.
That's enough on the ngFor directive; let's move ahead.
We still need to understand the role of the safeVideoUrls and the OnChange life cycle events in the VideoPlayerComponent implementation. Let's tackle the former first and understand the need for safeVideoUrls.
The easiest way to understand why we need to bind to safeVideoUrls instead of the videos input property is by trying the videos array out. Replace the existing ngFor fragment HTML with the following:
<div *ngFor="let video of videos">
    <iframe width="198" height="132"
        [src]="'//www.youtube.com/embed/' + video"  frameborder="0" allowfullscreen></iframe>
</div>
And look at the browser's console log (a page refresh may be required). There are a bunch of errors thrown by the framework, such as:
Error: unsafe value used in a resource URL context (see http://g.co/ng/security#xss)
No prize for guessing what is happening! Angular is trying to safeguard our application against a Cross-Site Scripting (XSS) attack.
Such an attack enables the attacker to inject malicious code into our web pages. Once injected, the malicious code can read data from the current site context. This allows it to steal confidential data and also impersonate the logged-in user, hence gaining access to privileged resources.
Angular has been designed to block these attacks by sanitizing any external code/script that is injected into an Angular view. Remember, content can be injected into a view through a number of mechanisms, including property/attribute/style bindings or interpolation.
Consider an example of binding HTML markup through a component model to the innerHTML property of an HTML element (property binding):
this.htmlContent = '<span>HTML content.</span>'    // Component

<div [innerHTML]="htmlContent"> <!-- View -->
While the HTML content is emitted, any unsafe content (such as a script) if present is stripped.
But what about Iframes? In our preceding example, Angular is blocking property binding to Iframe's src property too. This is a warning against third-party content being embedded in our own site using Iframe. Angular prevents this too.
All in all, the framework defines four security contexts around content sanitization. These include:
- HTML content sanitization, when HTML content is bound using the
innerHTMLproperty - Style sanitization, when binding CSS into the
styleproperty - URL sanitization, when URLs are used with tags such as
anchorandimg - Resource sanitization, when using
Iframesorscripttags; in this case, content cannot be sanitized and hence it is blocked by default
Angular is trying its best to keep us out of danger. But at times, we know that the content is safe to render and hence want to circumvent the default sanitization behavior.
To let Angular know that the content being bound is safe, we use DomSanitizer and call the appropriate method based on the security contexts just described. The available functions are as follows:
bypassSecurityTrustHtmlbypassSecurityTrustScriptbypassSecurityTrustStylebypassSecurityTrustUrlbypassSecurityTrustResourceUrl
In our video player implementation, we use bypassSecurityTrustResourceUrl; it converts the video URL into a trusted SafeResourceUrl object:
this.videos.map(v => this.sanitizer.bypassSecurityTrustResourceUrl(this.youtubeUrlPrefix + v))
The map method transforms the videos array into a collection of SafeResourceUrl objects and assigns it to safeVideoUrls.
Each of the methods listed previously takes a string parameter. This is the content we want Angular to know is safe. The return object, which could be any of SafeStyle, SafeHtml, SafeScript, SafeUrl, or SafeResourceUrl, can then be bound to the view.
Note
A comprehensive treatment of this topic is available in the framework security guide available at http://bit.ly/ng6be-security. A highly recommended read!
The last question to answer is why do this in the OnChanges Angular life cycle event?
The OnChanges life cycle event is triggered whenever the component's input(s) change. In the case of VideoPlayerComponent, it is the videos array input property that changes whenever a new exercise is loaded. We use this life cycle event to recreate the safeVideoUrls array and re-bind it to the view. Simple!
Video panel implementation is now complete. Let's add a few more minor enhancements and explore it a bit more in Angular.
One of the sore points in the current app is the formatting of the exercise steps. It's a bit difficult to read these steps.
The steps should either have a line break (<br>) or be formatted as an HTML list for easy readability. This seems to be a straightforward task, and we can just go ahead and change the data that is bound to the step interpolation, or write a pipe that can add some HTML formatting using the line delimiting convention (.). For a quick verification, let's update the first exercise steps in workout-runner.component.ts by adding a break (<br>) after each line:
`Assume an erect position, with feet together and arms at your side. <br>
 Slightly bend your knees, and propel yourself a few inches into the air. <br>
 While in air, bring your legs out to the side about shoulder width or slightly wider. <br>
 ...
As the workout restarts, look at the first exercise steps. The output does not match our expectations, as shown here:
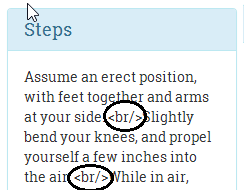
The break tags were literally rendered in the browser. Angular did not render the interpolation as HTML; instead, it escaped the HTML characters, and we know why, security!
How to fix it? Easy! Replace the interpolation with the property binding to bind step data to the element's innerHTML property (in exercise-description.html), and you are done!
<div class="card-text" [innerHTML]="steps">
Refresh the workout page to confirm.
Note
Preventing Cross-Site Scripting Security (XSS) issues
By using innerHTML, we instruct Angular to not escape HTML, but Angular still sanitizes the input HTML as described in the security section earlier. It removes things such as <script> tags and other JavaScript to safeguard against XSS attacks. If you want to dynamically inject styles/scripts into HTML, use the DomSanitizer to bypass this sanitization check.
Time for another enhancement! It's time to learn about Angular pipes.
It will be nice if we can tell the user the time left to complete the workout and not just the duration of the exercise in progress. We can add a countdown timer somewhere in the exercise pane to show the overall time remaining.
The approach that we are going to take here is to define a component property called workoutTimeRemaining. This property will be initialized with the total time at the start of the workout and will reduce with every passing second until it reaches zero. Since workoutTimeRemaining is a numeric value, but we want to display a timer in the hh:mm:ss format, we need to make a conversion between the seconds data and the time format. Angular pipes are a great option for implementing such a feature.
The primary aim of a pipe is to format the data displayed in the view. Pipes allow us to package this content transformation logic (formatting) as a reusable element. The framework itself comes with multiple predefined pipes, such as date, currency, lowercase, uppercase, slice, and others.
This is how we use a pipe with a view:
{{expression | pipeName:inputParam1}} An expression is followed by the pipe symbol (|), which is followed by the pipe name and then an optional parameter (inputParam1) separated by a colon (:). If the pipe takes multiple inputs, they can be placed one after another separated by a colon, such as the inbuilt slice pipe, which can slice an array or string:
{{fullName | slice:0:20}} //renders first 20 characters The parameter passed to the pipe can be a constant or a component property, which implies we can use template expressions with pipe parameter. See the following example:
{{fullName | slice:0:truncateAt}} //renders based on value truncateAt Here are some examples of the use of the date pipe, as described in the Angular date documentation. Assume that dateObj is initialized to June 15, 2015 21:43:11 and locale is en-US:
{{ dateObj | date }}               // output is 'Jun 15, 2015        '
{{ dateObj | date:'medium' }}      // output is 'Jun 15, 2015, 9:43:11 PM'
{{ dateObj | date:'shortTime' }}   // output is '9:43 PM            '
{{ dateObj | date:'mmss' }}        // output is '43:11'
Some of the most commonly used pipes are the following:
- date: As we just saw, the date filter is used to format the date in a specific manner. This filter supports quite a number of formats and is locale-aware too. To know about the other formats supported by the date pipe, check out the framework documentation at http://bit.ly/ng2-date.
- uppercase and lowercase: These two pipes, as the name suggests, change the case of the string input.
- decimal and percent:
decimalandpercentpipes are there to format decimal and percentage values based on the current browser locale. - currency: This is used to format numeric values as a currency based on the current browser locale:
    {{14.22|currency:"USD" }} <!-Renders USD 14.22 -->
{{14.22|currency:"USD":'symbol'}} <!-Renders $14.22 -->- json: This is a handy pipe for debugging that can transform any input into a string using
JSON.stringify. We made good use of it at the start of this chapter to render theWorkoutPlanobject (see the Checkpoint 2.1 code). - slice: This pipe allows us to split a list or a string value to create a smaller trimmed down list/string. We saw an example in the preceding code.
We are not going to cover the preceding pipes in detail. From a development perspective, as long as we know what pipes are there and what they are useful for, we can always refer to the platform documentation for exact usage instructions.
A really powerful feature of pipes is that they can be chained, where the output from one pipe can serve as the input to another pipe. Consider this example:
{{fullName | slice:0:20 | uppercase}} The first pipe slices the first 20 characters of fullName and the second pipe transforms them to uppercase.
Now that we have seen what pipes are and how to use them, why not implement one for the 7 Minute Workout app: a seconds to time pipe?
SecondsToTimePipe, as the name suggests, should convert a numeric value into the hh:mm:ss format.
Create a folder shared in the workout-runner folder and from the shared folder invoke this CLI command to generate the pipe boilerplate:
ng generate pipe seconds-to-timeNote
The shared folder has been created to add common components/directives/pipes that can be used in the workout-runner module. It is a convention we follow to organize shared code at different levels. In the future, we can create a shared folder at the app module level, which has artifacts shared globally. In fact, if the second to time pipe needs to be used across other application modules, it can also be moved into the app module.
Copy the following transform function implementation into seconds-to-time.pipe.ts(the definition can also be downloaded from the Git branch checkpoint.2.4 on the GitHub site at http://bit.ly/nng6be-2-4-seconds-to-time-pipe-ts):
export class SecondsToTimePipe implements PipeTransform {
  transform(value: number): any {
    if (!isNaN(value)) {
      const hours = Math.floor(value / 3600);
      const minutes = Math.floor((value - (hours * 3600)) / 60);
      const seconds = value - (hours * 3600) - (minutes * 60);

      return ('0' + hours).substr(-2) + ':'
        + ('0' + minutes).substr(-2) + ':'
        + ('0' + seconds).substr(-2);
    }
    return;
  }
}
In an Angular pipe, the implementation logic goes into the transform function. Defined as part of the PipeTransform interface, the preceding transform function transforms the input seconds value into an hh:mm:ss string. The first parameter to the transform function is the pipe input. The subsequent parameters, if provided, are the arguments to the pipe, passed using a colon separator (pipe:argument1:arugment2..) from the view.
For SecondsToTimePipe, while Angular CLI generates a boilerplate argument (args?:any), we do not make use of any pipe argument as the implementation does not require it.
The pipe implementation is quite straightforward, as we convert seconds into hours, minutes, and seconds. Then, we concatenate the result into a string value and return the value. The addition of 0 on the left for each of the hours, minutes, and seconds variables is done to format the value with a leading 0 in case the calculated value for hours, minutes, or seconds is less than 10.
The pipe that we just created is just a standard TypeScript class. It's the Pipe decorator (@Pipe) that instructs Angular to treat this class as a pipe:
@Pipe({
  name: 'secondsToTime'
})
The pipe definition is complete, but to use the pipe in WorkoutRunnerComponent the pipe has to be declared on WorkoutRunnerModule. Angular CLI has already done this for us as part of the boilerplate generation (see the declaration section in workout-runner.module.ts).
Now we just need to add the pipe in the view. Update workout-runner.component.html by adding the highlighted fragment:
<div class="exercise-pane" class="col-sm-6">
    <h4 class="text-center">Workout Remaining - {{workoutTimeRemaining | secondsToTime}}</h4>
    <h1 class="text-center">{{currentExercise.exercise.title}}</h1>
Surprisingly, the implementation is still not complete! There is one more step left. We have a pipe definition, and we have referenced it in the view, but workoutTimeRemaining needs to update with each passing second for SecondsToTimePipe to be effective.
We have already initialized WorkoutRunnerComponent's workoutTimeRemaining property in the start function with the total workout time:
start() {
    this.workoutTimeRemaining = this.workoutPlan.totalWorkoutDuration();
    ...
}
Now the question is: how to update the workoutTimeRemaining variable with each passing second? Remember that we already have a setInterval set up that updates exerciseRunningDuration. While we can write another setInterval implementation for workoutTimeRemaining, it will be better if a single setInterval setup can take care of both the requirements.
Add a function called startExerciseTimeTracking to WorkoutRunnerComponent; it looks as follows:
startExerciseTimeTracking() {
    this.exerciseTrackingInterval = window.setInterval(() => {
      if (this.exerciseRunningDuration >= this.currentExercise.duration) {
        clearInterval(this.exerciseTrackingInterval);
        const next: ExercisePlan = this.getNextExercise();
        if (next) {
          if (next !== this.restExercise) {
            this.currentExerciseIndex++;
          }
          this.startExercise(next);
        }
        else {
          console.log('Workout complete!');
        }
        return;
      }
      ++this.exerciseRunningDuration;
      --this.workoutTimeRemaining;
    }, 1000);
  }
As you can see, the primary purpose of the function is to track the exercise progress and flip the exercise once it is complete. However, it also tracks workoutTimeRemaining (it decrements this counter). The first if condition setup just makes sure that we clear the timer once all the exercises are done. The inner if conditions are used to keep currentExerciseIndex in sync with the running exercise.
This function uses a numeric instance variable called exerciseTrackingInterval. Add it to the class declaration section. We are going to use this variable later to implement an exercise pausing behavior.
Remove the complete setInterval setup from startExercise and replace it with a call to this.startExerciseTimeTracking();. We are all set to test our implementation. If required, refresh the browser and verify the implementation:

The next section is about another inbuilt Angular directive, ngIf, and another small enhancement.
It will be nice for the user to be told what the next exercise is during the short rest period between exercises. This will help them prepare for the next exercise. So let's add it.
To implement this feature, we can simply output the title of the next exercise from the workoutPlan.exercises array. We show the title next to the Time Remaining countdown section.
Change the workout div (class="exercise-pane") to include the highlighted content, and remove existing Time Remainingh1:
<div class="exercise-pane">
<!-- Exiting html -->
   <div class="progress time-progress">
       <!-- Exiting html -->
   </div>
<div class="row">
      <h4 class="col-sm-6 text-left">Time Remaining:
        <strong>{{currentExercise.duration-exerciseRunningDuration}}</strong>
      </h4>
      <h4 class="col-sm-6 text-right" *ngIf="currentExercise.exercise.name=='rest'">Next up:
        <strong>{{workoutPlan.exercises[currentExerciseIndex + 1].exercise.title}}</strong>
      </h4>
    </div>
</div>
We wrap the existing Time Remaining h1 and add another h3 tag to show the next exercise inside a new div with some style updates. Also, there is a new directive, ngIf, in the second h3. The * prefix implies that it belongs to the same set of directives that ngFor belongs: structural directives. Let's talk a bit about ngIf.
The ngIf directive is used to add or remove a specific section of the DOM based on whether the expression provided to it returns true or false. The DOM element is added when the expression evaluates to true and is destroyed otherwise. Isolate the ngIf declaration from the preceding view:
ngIf="currentExercise.details.name=='rest'"
The directive expression checks whether we are currently in the rest phase and accordingly shows or hides the linked h3.
Also in the same h3, we have an interpolation that shows the name of the exercise from the workoutPlan.exercises array.
A word of caution here: ngIf adds and destroys the DOM element, and hence it is not similar to the visibility constructs that we employed to show and hide elements. While the end result of style, display:none is the same as that of ngIf, the mechanism is entirely different:
<div [style.display]="isAdmin" ? 'block' : 'none'">Welcome Admin</div>
Versus this line:
<div *ngIf="isAdmin" ? 'block' : 'none'">Welcome Admin</div>
With ngIf, whenever the expression changes from false to true, a complete re-initialization of the content occurs. Recursively, new elements/components are created and data binding is set up, starting from the parent down to the children. The reverse happens when the expression changes from true to false: all of this is destroyed. Therefore, using ngIf can sometimes become an expensive operation if it wraps a large chunk of content and the expression attached to it changes very often. But otherwise, wrapping a view in ngIf is more performant than using CSS/style-based show or hide, as neither the DOM is created nor the data binding expressions are set up when the ngIf expression evaluates to false.
New version of Angular support branching constructs too. This allows us to implement the if then else flow in the view HTML. The following sample has been lifted directly from the platform documentation of ngIf:
<div *ngIf="show; else elseBlock">Text to show</div>
<ng-template #elseBlock>Alternate text while primary text is hidden</ng-template>
The else binding points to a ng-template with template variable #elseBlock.
There is another directive that belongs in this league: ngSwitch. When defined on the parent HTML, it can swap the child HTML elements based on the ngSwitch expression. Consider this example:
<div id="parent" [ngSwitch] ="userType">
<div *ngSwitchCase="'admin'">I am the Admin!</div>
<div *ngSwitchCase="'powerUser'">I am the Power User!</div>
<div *ngSwitchDefault>I am a normal user!</div>
</div>
We bind the userType expression to ngSwitch. Based on the value of userType (admin, powerUser, or any other userType), one of the inner div elements will be rendered. The ngSwitchDefault directive is a wildcard match/fallback match, and it gets rendered when userType is neither admin nor powerUser.
If you have not realized it yet, note that there are three directives working together here to achieve switch-case-like behavior:
ngSwitchngSwitchCasengSwitchDefault
Coming back to our next exercise implementation, we are ready to verify the implementation, start the app, and wait for the rest period. There should be a mention of the next exercise during the rest phase, as shown here:
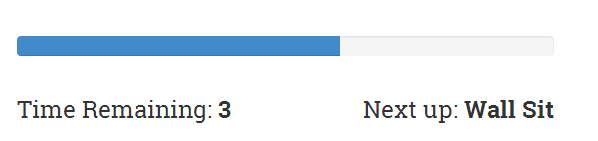
The app is shaping up well. If you have used the app and done some physical workouts along with it, you will be missing the exercise pause functionality badly. The workout just does not stop until it reaches the end. We need to fix this behavior.
To pause an exercise, we need to stop the timer. We also need to add a button somewhere in the view that allows us to pause and resume the workout. We plan to do this by drawing a button overlay over the exercise area in the center of the page. When clicked on, it will toggle the exercise state between paused and running. We will also add keyboard support to pause and resume the workout using the key binding p or P. Let's update the component.
Update the WorkoutRunnerComponent class, add these three functions, and add a declaration for the workoutPaused variable:
workoutPaused: boolean;
...
pause() {
    clearInterval(this.exerciseTrackingInterval);
    this.workoutPaused = true;
}

resume() {
    this.startExerciseTimeTracking();
    this.workoutPaused = false;
}

pauseResumeToggle() {
    if (this.workoutPaused) { this.resume();    }
    else {      this.pause();    }
}
The implementation for pausing is simple. The first thing we do is cancel the existing setInterval setup by calling clearInterval(this.exerciseTrackingInterval);. While resuming, we again call startExerciseTimeTracking, which again starts tracking the time from where we left off.
Now we just need to invoke the pauseResumeToggle function for the view. Add the following content to workout-runner.html:
<div id="exercise-pane" class="col-sm-6">
    <div id="pause-overlay" (click)="pauseResumeToggle()"><span class="pause absolute-center"
            [ngClass]="{'ion-md-pause' : !workoutPaused, 'ion-md-play' : workoutPaused}">
        </span>
</div>
    <div class="row workout-content">
The click event handler on the div toggles the workout running state, and the ngClass directive is used to toggle the class between ion-md-pause and ion-md-play- standard Angular stuff. What is missing now is the ability to pause and resume on a P key press.
One approach could be to apply a keyup event handler on the div:
<div id="pause-overlay" (keyup)= "onKeyPressed($event)">
But there are some shortcomings to this approach:
There is a better way to implement this; attach the event handler to the global window event keyup. This is how the event binding should be applied on the div:
<div id="pause-overlay" (window:keyup)= "onKeyPressed($event)">
Make note of the special window: prefix before the keyup event. We can use this syntax to attach events to any global object, such as the document. A handy and very powerful feature of Angular binding infrastructure! The onKeyPressed event handler needs to be added to WorkoutRunnerComponent. Add this function to the class:
onKeyPressed(event: KeyboardEvent) {
    if (event.which === 80 || event.which === 112) {
      this.pauseResumeToggle();
    }
  }
The $event object is the standard DOM event object that Angular makes available for manipulation. Since this is a keyboard event, the specialized class is KeyboardEvent. The which property is matched to ASCII values of p or P. Refresh the page and you should see the play/pause icon when your mouse hovers over the exercise image, as follows:
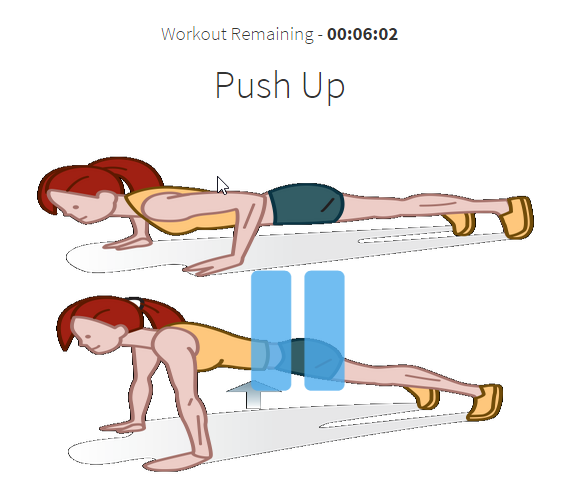
While we are on the topic of event binding, it would be a good opportunity to explore Angular's event binding infrastructure
Angular event binding allows a component to communicate with its parent through events.
If we look back at the app implementation, what we have encountered thus far are the property/attribute bindings. Such bindings allow a component/element to take inputs from the outside world. The data flows into the component.
Event bindings are the reverse of property bindings. They allow a component/element to inform the outside world about any state change.
As we saw in the pause/resume implementation, event binding employs round brackets (()) to specify the target event:
<div id="pause-overlay" (click)="pauseResumeToggle()">
This attaches a click event handler to the div that invokes the expression pauseResumeToggle() when the div is clicked.
Note
Like properties, there is a canonical form for events too. Instead of using round brackets, the on- prefix can be used: on-click="pauseResumeToggle()"
Angular supports all types of events. Events related to keyboard inputs, mouse movements, button clicks, and touches. The framework even allows us to define our own event for the components we create, such as:
<workout-runner (paused)= "stopAudio()"></workout-runner>
It is expected that events have side effects; in other words, an event handler may change the state of the component, which in turn may trigger a chain reaction in which multiple components react to the state change and change their own state. This is unlike a property binding expression, which should be side-effect-free. Even in our implementation, clicking on the div element toggles the exercise run state.
When Angular attaches event handlers to standard HTML element events, the event propagation works in the same way as standard DOM event propagation works. This is also called event bubbling. Events on child elements are propagated upwards, and hence event binding is also possible on a parent element, as follows:
<div id="parent " (click)="doWork($event)"> Try
  <div id="child ">me!</div>
</div>
Clicking on either of the divs results in the invocation of the doWork function on the parent div. Moreover, $event.target contains the reference to the div that dispatched the event.
Event bubbling stops if the expression assigned to the target evaluates to a falsey value (such as void, false). Therefore, to continue propagation, the expression should evaluate to true:
<div id="parent" (click)="doWork($event) || true">
Here too, the $event object deserves some special attention.
Angular makes an $event object available whenever the target event is triggered. This $event contains the details of the event that occurred.
The important thing to note here is that the shape of the $event object is decided based on the event type. For HTML elements, it is a DOM event object (https://developer.mozilla.org/en-US/docs/Web/Events), which may vary based on the actual event.
But if it is a custom component event, what is passed in the $event object is decided by the component implementation.
We have now covered most of the data binding capabilities of Angular, with the exception of two-way binding. A quick introduction to the two-way binding constructs is warranted before we conclude the chapter.
Two-way binding helps us keep the model and view in sync. Changes to the model update the view and changes to the view update the model. The obvious area where two-way binding is applicable is form input. Let's look at a simple example:
<input [(ngModel)]="workout.name">
The ngModel directive here sets a two-way binding between the input's value property and the workout.name property on the underlying component. Anything that the user enters in the preceding input is synced with workout.name, and any changes to workout.name are reflected back on the preceding input.
Interestingly, we can achieve the same result without using the ngModel directive too, by combining both property and event binding syntax. Consider the next example; it works in the same way as input before:
<input [value]="workout.name"
    (input)="workout.name=$event.target.value" >
There is a property binding set up on the value property and an event binding set up on the input event that make the bidirectional sync work.
We will get into more details on two-way binding in Chapter 2, Personal Trainer, where we build our own custom workouts.
We have created a diagram that summarizes the data flow patterns for all the bindings that we have discussed thus far. Here is a handy diagram to help you memorize each of the binding constructs and how data flows:
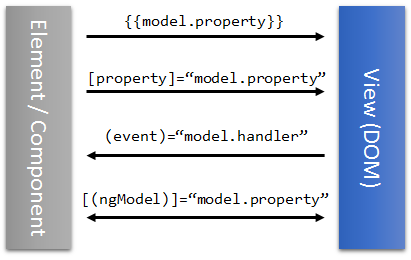
We now have a fully functional 7 Minute Workout, with some bells and whistles too, and hopefully you had fun creating the app. It's time to conclude the chapter and summarize the lessons.
Note
If you are having a problem with running the code, look at the Git branch checkpoint2.4 for a working version of what we have done thus far. You can also download a snapshot of checkpoint2.4 (a ZIP file) from this GitHub location: http://bit.ly/ng6be-checkpoint-2-4. Refer to the README.md file in the trainer folder when setting up the snapshot for the first time.
It's time now to look at eventing in more depth. Let's add audio support to 7-Minute Workout.
For the 7-Minute Workout app, adding sound support is vital. One cannot exercise while constantly staring at the screen. Audio clues help the user perform the workout effectively as they can just follow the audio instructions.
Here is how we are going to support exercise tracking using audio clues:
- A ticking clock soundtrack progress during the exercise
- A half-way indicator sounds, indicating that the exercise is halfway through
- An exercise-completion audio clip plays when the exercise is about to end
- An audio clip plays during the rest phase and informs users about the next exercise
There will be an audio clip for each of these scenarios.
Modern browsers have good support for audio. The HTML5 <audio> tag provides a mechanism to embed audio clips into HTML content. We too will use the <audio> tag to play back our clips.
Since the plan is to use the HTML <audio> element, we need to create a wrapper directive that allows us to control audio elements from Angular. Remember that directives are HTML extensions without a view.
Note
The checkpoint3.4 Git and the trainer/static/audio folder contain all the audio files used for playback; copy them first. If you are not using Git, a snapshot of the chapter code is available at http://bit.ly/ng6be-checkpoint-3-4. Download and unzip the contents and copy the audio files.
If you have worked a lot with JavaScript and jQuery, you may have realized we have purposefully shied away from directly accessing the DOM for any of our component implementations. There has not been a need to do it. The Angular data-binding infrastructure, including property, attribute, and event binding, has helped us manipulate HTML without touching the DOM.
For the audio element too, the access pattern should be Angularish. In Angular, the only place where direct DOM manipulation is acceptable and practiced is inside directives. Let's create a directive that wraps access to audio elements.
Navigate to trainer/src/app/shared and run this command to generate a template directive:
ng generate directive my-audioNote
Since it is the first time we are creating a directive, we encourage you to look at the generated code.
Since the directive is added to the shared module, it needs to be exported too. Add the MyAudioDirective reference in the exports array too (shared.module.ts). Then update the directive definition with the following code:
    import {Directive, ElementRef} from '@angular/core';

    @Directive({
      selector: 'audio',
      exportAs: 'MyAudio'
    })
    export class MyAudioDirective {
      private audioPlayer: HTMLAudioElement;
      constructor(element: ElementRef) {
        this.audioPlayer = element.nativeElement;
      }
    }
The MyAudioDirective class is decorated with @Directive. The @Directive decorator is similar to the @Component decorator except we cannot have an attached view. Therefore, no template or templateUrl is allowed!
The preceding selector property allows the framework to identify where to apply the directive. We have replaced the generated [abeMyAudioDirective] attribute selector with just audio. Using audio as the selector makes our directive load for every <audio> tag used in HTML. The new selector works as an element selector.
Note
In a standard scenario, directive selectors are attribute-based (such as [abeMyAudioDirective] for the generated code), which helps us identify where the directive has been applied. We deviate from this norm and use an element selector for the MyAudioDirective directive. We want this directive to be loaded for every audio element, and it becomes cumbersome to go to each audio declaration and add a directive-specific attribute. Hence an element selector.
The use of exportAs becomes clear when we use this directive in view templates.
The ElementRef object injected in the constructor is the Angular element (audio in this case) for which the directive is loaded. Angular creates the ElementRef instance for every component and directive when it compiles and executes the HTML template. When requested in the constructor, the DI framework locates the corresponding ElementRef and injects it. We use ElementRef to get hold of the underlying audio element in the code (the instance of HTMLAudioElement). The audioPlayer property holds this reference.
The directive now needs to expose an API to manipulate the audio player. Add these functions to the MyAudioDirective directive:
    stop() {
      this.audioPlayer.pause();
    }

    start() {
      this.audioPlayer.play();
    }
    get currentTime(): number {
      return this.audioPlayer.currentTime;
    }

    get duration(): number {
      return this.audioPlayer.duration;
    }

    get playbackComplete() {
      return this.duration == this.currentTime;
    }
The MyAudioDirective API has two functions (start and stop) and three getters (currentTime, duration, and a Boolean property called playbackComplete). The implementations for these functions and properties just wrap the audio element functions.
Note
Learn about these audio functions from the MDN documentation here: http://bit.ly/html-media-element.
To understand how we use the audio directive, let's create a new component that manages audio playback.
If we go back and look at the audio cues that are required, there are four distinct audio cues, and hence we are going to create a component with five embedded <audio> tags (two audio tags work together for next-up audio).
From the command line go to the trainer/src/app/workout-runner folder and add a new WorkoutAudioComponent component using Angular CLI.
Open workout-audio.component.html and replace the existing view template with this HTML snippet:
<audio #ticks="MyAudio" loop src="/assets/audio/tick10s.mp3"></audio>
<audio #nextUp="MyAudio" src="/assets/audio/nextup.mp3"></audio>
<audio #nextUpExercise="MyAudio" [src]="'/assets/audio/' + nextupSound"></audio>
<audio #halfway="MyAudio" src="/assets/audio/15seconds.wav"></audio>
<audio #aboutToComplete="MyAudio" src="/assets/audio/321.wav"></audio>
There are five <audio> tags, one for each of the following:
- Ticking audio: The first audio tag produces the ticking sound and is started as soon as the workout starts.
- Next up audio and exercise audio: There next two audio tags work together. The first tag produces the "Next up" sound. And the actual exercise audio is handled by the third tag (in the preceding code snippet).
- Halfway audio: The fourth audio tag plays halfway through the exercise.
- About to complete audio: The final audio tag plays a piece to denote the completion of an exercise.
Did you notice the usage of the # symbol in each of the audio tags? There are some variable assignments prefixed with #. In the Angular world, these variables are known as template reference variables or at times template variables.
As the platform guide defines:
A template reference variable is often a reference to a DOM element or directive within a template.
Note
Don't confuse them with the template input variables that we have used with the ngFor directive earlier, *ngFor="let video of videos". The template input variable's (video in this case) scope is within the HTML fragment it is declared, whereas the template reference variable can be accessed across the entire template.
Look at the last section where MyAudioDirective was defined. The exportAs metadata is set to MyAudio. We repeat that same MyAudio string while assigning the template reference variable for each audio tag:
#ticks="MyAudio"
The role of exportAs is to define the name that can be used in the view to assign this directive to a variable. Remember, a single element/component can have multiple directives applied to it. exportAs allows us to select which directive should be assigned to a template-reference variable based on what is on the right side of equals.
Typically, template variables, once declared, give access to the view element/component they are attached to, to other parts of the view, something we will discuss shortly. But in our case, we will use template variables to refer to the multiple MyAudioDirective from the parent component's code. Let's understand how to use them.
Update the generated workout-audio.compnent.ts with the following outline:
import { Component, OnInit, ViewChild } from '@angular/core';
import { MyAudioDirective } from '../../shared/my-audio.directive';

@Component({
 ...
})
export class WorkoutAudioComponent implements OnInit {
  @ViewChild('ticks') private ticks: MyAudioDirective;
  @ViewChild('nextUp') private nextUp: MyAudioDirective;
  @ViewChild('nextUpExercise') private nextUpExercise: MyAudioDirective;
  @ViewChild('halfway') private halfway: MyAudioDirective;
  @ViewChild('aboutToComplete') private aboutToComplete: MyAudioDirective;
  private nextupSound: string;

  constructor() { }
  ...
}
The interesting bit in this outline is the @ViewChild decorator against the five properties. The @ViewChild decorator allows us to inject a child component/directive/element reference into its parent. The parameter passed to the decorator is the template variable name, which helps DI match the element/directive to inject. When Angular instantiates the main WorkoutAudioComponent, it injects the corresponding audio directives based on the @ViewChild decorator and the template reference variable name passed. Let's complete the basic class implementation before we look at @ViewChild in detail.
Note
Without exportAs set on the MyAudioDirective directive, the @ViewChild injection injects the related ElementRef instance instead of the MyAudioDirective instance. We can confirm this by removing the exportAs attribute from myAudioDirective and then looking at the injected dependencies in WorkoutAudioComponent.
The remaining task is to just play the correct audio component at the right time. Add these functions to WorkoutAudioComponent:
stop() {
    this.ticks.stop();
    this.nextUp.stop();
    this.halfway.stop();
    this.aboutToComplete.stop();
    this.nextUpExercise.stop();
  }
  resume() {
    this.ticks.start();
    if (this.nextUp.currentTime > 0 && !this.nextUp.playbackComplete)
        { this.nextUp.start(); }
    else if (this.nextUpExercise.currentTime > 0 && !this.nextUpExercise.playbackComplete)
         { this.nextUpExercise.start(); }
    else if (this.halfway.currentTime > 0 && !this.halfway.playbackComplete)
        { this.halfway.start(); }
    else if (this.aboutToComplete.currentTime > 0 && !this.aboutToComplete.playbackComplete)
        { this.aboutToComplete.start(); }
  }

  onExerciseProgress(progress: ExerciseProgressEvent) {
    if (progress.runningFor === Math.floor(progress.exercise.duration / 2)
      && progress.exercise.exercise.name != 'rest') {
      this.halfway.start();
    }
    else if (progress.timeRemaining === 3) {
      this.aboutToComplete.start();
    }
  }

  onExerciseChanged(state: ExerciseChangedEvent) {
    if (state.current.exercise.name === 'rest') {
      this.nextupSound = state.next.exercise.nameSound;
      setTimeout(() => this.nextUp.start(), 2000);
      setTimeout(() => this.nextUpExercise.start(), 3000);
    }
  }
Having trouble writing these functions? They are available in the checkpoint3.3 Git branch.
There are two new model classes used in the preceding code. Add their declarations to model.ts, as follows (again available in checkpoint3.3):
export class ExerciseProgressEvent {
    constructor(
        public exercise: ExercisePlan,
        public runningFor: number,
        public timeRemaining: number,
        public workoutTimeRemaining: number) { }
}

export class ExerciseChangedEvent {
    constructor(
        public current: ExercisePlan,
        public next: ExercisePlan) { }
}
These are model classes to track progress events. The WorkoutAudioComponent implementation consumes this data. Remember to import the reference for ExerciseProgressEvent and ExerciseProgressEvent in workout-audio.component.ts.
To reiterate, the audio component consumes the events by defining two event handlers: onExerciseProgress and onExerciseChanged. How the events are generated becomes clear as we move along.
The start and resume functions stop and resume audio whenever a workout starts, pauses, or completes. The extra complexity in the resume function it to tackle cases when the workout was paused during next up, about to complete, or half-way audio playback. We just want to continue from where we left off.
The onExerciseProgress function should be called to report the workout progress. It's used to play the halfway audio and about-to-complete audio based on the state of the workout. The parameter passed to it is an object that contains exercise progress data.
The onExerciseChanged function should be called when the exercise changes. The input parameter contains the current and next exercise in line and helps WorkoutAudioComponent to decide when to play the next up exercise audio.
We touched upon two new concepts in this section: template reference variables and injecting child elements/directives into the parent. It's worth exploring these two concepts in more detail before we continue with the implementation. We'll start with learning more about template reference variables.
Template reference variables are created on the view template and are mostly consumed from the view. As you have already learned, these variables can be identified by the # prefix used to declare them.
One of the greatest benefits of template variables is that they facilitate cross-component communication at the view template level. Once declared, such variables can be referenced by sibling elements/components and their children. Check out the following snippet:
    <input #emailId type="email">Email to {{emailId.value}}
    <button (click)= "MailUser(emaild.value)">Send</button>
This snippet declares a template variable, emailId, and then references it in the interpolation and the button click expression.
The Angular templating engine assigns the DOM object for input (an instance of HTMLInputElement) to the emailId variable. Since the variable is available across siblings, we use it in a button's click expression.
Template variables work with components too. We can easily do this:
    <trainer-app>
     <workout-runner #runner></workout-runner>
     <button (click)= "runner.start()">Start Workout</button>
    </trainer-app>
In this case, runner has a reference to the WorkoutRunnerComponent object, and the button is used to start the workout.
You may not have noticed but there is something interesting about the template variable assignments described in the last few sections. To recap, the three examples that we have used are:
<audio #ticks="MyAudio" loop src="/static/audio/tick10s.mp3"></audio>

<input #emailId type="email">Email to {{emailId.value}}

<workout-runner #runner></workout-runner>
What got assigned to the variable depends on where the variable was declared. This is governed by rules in Angular:
- If a directive is present on the element, such as
MyAudioDirectivein the first example shown previously, the directive sets the value. TheMyAudioDirectivedirective sets theticksvariable to an instance ofMyAudioDirective. - If there is no directive present, either the underlying HTML DOM element is assigned or a component object is assigned (as shown in the
inputandworkout-runnerexamples).
We will be employing this technique to implement the workout audio component integration with the workout runner component. This introduction gives us the head start that we need.
The other new concept that we promised to cover is child element/directive injection using the ViewChild and ViewChildren decorators.
The @ViewChild decorator instructs the Angular DI framework to search for some specific child component/directive/element in the component tree and inject it into the parent. This allows the parent component to interact with child components/element using the reference to the child, a new communication pattern!
In the preceding code, the audio element directive (the MyAudioDirective class) is injected into the WorkoutAudioComponent code.
To establish the context, let's recheck a view fragment from WorkoutAudioComponent:
<audio #ticks="MyAudio" loop src="/static/audio/tick10s.mp3"></audio>
Angular injects the directive (MyAudioDirective) into the WorkoutAudioComponent property: ticks. The search is done based on the selector passed to the @ViewChild decorator. Let's see the audio example again:
@ViewChild('ticks') private ticks: MyAudioDirective;The selector parameter on ViewChild can be a string value, in which case Angular searches for a matching template variable, as before.
Or it can be a type. This is valid and should inject an instance of MyAudioDirective:
@ViewChild(MyAudioDirective) private ticks: MyAudioDirective;
However, it does not work in our case. Why? Because there are multiple MyAudioDirective directives declared in the WorkoutAudioComponent view, one for each of the <audio> tags. In such a scenario, the first match is injected. Not very useful. Passing the type selector would have worked if there was only one <audio> tag in the view!
Note
Properties decorated with @ViewChild are sure to be set before the ngAfterViewInit event hook on the component is called. This implies such properties are null if accessed inside the constructor.
Angular also has a decorator to locate and inject multiple child components/directives: @ViewChildren.
@ViewChildren works similarly to @ViewChild, except it can be used to inject multiple child types into the parent. Again taking the previous audio component above as an example, using @ViewChildren, we can get all the MyAudioDirective directive instances in WorkoutAudioComponent, as shown here:
@ViewChildren(MyAudioDirective) allAudios: QueryList<MyAudioDirective>;
Look carefully; allAudios is not a standard JavaScript array, but a custom class, QueryList<Type>. The QueryList class is an immutable collection that contains the reference to the components/directives that Angular was able to locate based on the filter criteria passed to the @ViewChildren decorator. The best thing about this list is that Angular will keep this list in sync with the state of the view. When directives/components get added/removed from the view dynamically, this list is updated too. Components/directives generated using ng-for are a prime example of this dynamic behavior. Consider the preceding @ViewChildren usage and this view template:
<audio *ngFor="let clip of clips" src="/static/audio/ "+{{clip}}></audio> The number of MyAudioDirective directives created by Angular depends upon the number of clips. When @ViewChildren is used, Angular injects the correct number of MyAudioDirective instances into the allAudio property and keeps it in sync when items are added or removed from the clips array.
While the usage of @ViewChildren allows us to get hold of all MyAudioDirective directives, it cannot be used to control the playback. You see, we need to get hold of individual MyAudioDirective instances as the audio playback timing varies. Hence the distinct @ViewChild implementation.
Once we get hold of the MyAudioDirective directive attached to each audio element, it is just a matter of playing the audio tracks at the right time.
While we have componentized the audio playback functionality into WorkoutAudioComponent, it is and always will be tightly coupled to the WorkoutRunnerComponent implementation. WorkoutAudioComponent derives its operational intelligence from WorkoutRunnerComponent. Hence the two components need to interact. WorkoutRunnerComponent needs to provide the WorkoutAudioComponent state change data, including when the workout started, exercise progress, workout stopped, paused, and resumed.
One way to achieve this integration would be to use the currently exposed WorkoutAudioComponent API (stop, resume, and other functions) from WorkoutRunnerComponent.
Something can be done by injecting WorkoutAudioComponent into WorkoutRunnerComponent, as we did earlier when we injected MyAudioDirective into WorkoutAudioComponent.
Declare the WorkoutAudioComponent in the WorkoutRunnerComponent's view, such as:
<div class="row pt-4">...</div>
<abe-workout-audio></abe-workout-audio>
Doing so gives us a reference to the WorkoutAudioComponent inside the WorkoutRunnerComponent implementation:
@ViewChild(WorkoutAudioComponent) workoutAudioPlayer: WorkoutAudioComponent;
The WorkoutAudioComponent functions can then be invoked from WorkoutRunnerComponent from different places in the code. For example, this is how pause would change:
    pause() {
      clearInterval(this.exerciseTrackingInterval);
      this.workoutPaused = true;
      this.workoutAudioPlayer.stop();
    }
And to play the next-up audio, we would need to change parts of the startExerciseTimeTracking function:
this.startExercise(next);
this.workoutAudioPlayer.onExerciseChanged(new ExerciseChangedEvent(next, this.getNextExercise()));
This is a perfectly viable option where WorkoutAudioComponent becomes a dumb component controlled by WorkoutRunnerComponent. The only problem with this solution is that it adds some noise to the WorkoutRunnerComponent implementation. WorkoutRunnerComponent now needs to manage audio playback too.
There is an alternative, however.
WorkoutRunnerComponent can expose events that are triggered during different times of workout execution, such as workout started, exercise started, and workout paused. The advantage of having WorkoutRunnerComponent expose events is that it allows us to integrate other components/directives with WorkoutRunnerComponent using the same events. Be it the WorkoutAudioComponent or components we create in future.
Till now we have only explored how to consume events. Angular allows us to raise events too. Angular components and directives can expose custom events using the EventEmitter class and the @Output decorator.
Add these event declarations to WorkoutRunnerComponent at the end of the variable declaration section:
workoutPaused: boolean;
@Output() exercisePaused: EventEmitter<number> =
    new EventEmitter<number>();
@Output() exerciseResumed: EventEmitter<number> =
    new EventEmitter<number>()
@Output() exerciseProgress:EventEmitter<ExerciseProgressEvent> =
    new EventEmitter<ExerciseProgressEvent>();
@Output() exerciseChanged: EventEmitter<ExerciseChangedEvent> =
    new EventEmitter<ExerciseChangedEvent>();
@Output() workoutStarted: EventEmitter<WorkoutPlan> =
    new EventEmitter<WorkoutPlan>();
@Output() workoutComplete: EventEmitter<WorkoutPlan> =
    new EventEmitter<WorkoutPlan>();
The names of the events are self-explanatory, and within our WorkoutRunnerComponent implementation, we need to raise them at the appropriate times.
Remember to add the ExerciseProgressEvent and ExerciseChangeEvent imports to the model already declared on top. And add the Output and EventEmitter imports to @angular/core.
Let's try to understand the role of the @Output decorator and the EventEmitter class.
We covered a decent amount of Angular eventing capabilities in this chapter. Specifically, we learned how we can consume any event on a component, directive, or DOM element using the bracketed () syntax. How about raising our own events?
In Angular, we can create and raise our own events, events that signify something noteworthy has happened in our component/directive. Using the @Output decorator and the EventEmitter class, we can define and raise custom events.
Remember this: it is through events that components can communicate with the outside world. When we declare:
@Output() exercisePaused: EventEmitter<number> = new EventEmitter<number>();
It signifies that WorkoutRunnerComponent exposes an event, exercisePaused (raised when the workout is paused).
To subscribe to this event, we can do the following:
<abe-workout-runner (exercisePaused)="onExercisePaused($event)"></abe-workout-runner>
This looks absolutely similar to how we did the DOM event subscription in the workout runner template. See this sample stipped from the workout-runner's view:
<div id="pause-overlay" (click)="pauseResumeToggle()" (window:keyup)="onKeyPressed($event)">
The @Output decorator instructs Angular to make this event available for template binding. Events created without the @Output decorator cannot be referenced in HTML.
Note
The @Output decorator can also take a parameter, signifying the name of the event. If not provided, the decorator uses the property name: @Output("workoutPaused") exercisePaused: EventEmitter<number> .... This declares a workoutPaused event instead of exercisePaused.
Like any decorator, the @Output decorator is there just to provide metadata for the Angular framework to work with. The real heavy lifting is done by the EventEmitter class.
Angular embraces reactive programming (also dubbed Rx-style programming) to support asynchronous operations with events. If you are hearing this term for the first time or don't have much idea about what reactive programming is, you're not alone.
Reactive programming is all about programming against asynchronous data streams. Such a stream is nothing but a sequence of ongoing events ordered based on the time they occur. We can imagine a stream as a pipe generating data (in some manner) and pushing it to one or more subscribers. Since these events are captured asynchronously by subscribers, they are called asynchronous data streams.
The data can be anything, ranging from browser/DOM element events to user input to loading remote data using AJAX. With Rx style, we consume this data uniformly.
In the Rx world, there are Observers and Observables, a concept derived from the very popular Observer design pattern. Observables are streams that emit data. Observers, on the other hand, subscribe to these events.
The EventEmitter class in Angular is primarily responsible for providing eventing support. It acts both as an observer and observable. We can fire events on it and it can also listen to events.
There are two functions available on EventEmitter that are of interest to us:
emit: As the name suggests, use this function to raise events. It takes a single argument that is the event data.emitis the observable side.subscribe: Use this function to subscribe to the events raised byEventEmitter.subscribeis the observer side.
Let's do some event publishing and subscriptions to understand how the preceding functions work.
Look at the EventEmitter declaration. These have been declared with the type parameter. The type parameter on EventEmitter signifies the type of data emitted.
Let's add the event implementation to workout-runner.component.ts, starting from the top of the file and moving down.
Add this statement to the end of the start function:
this.workoutStarted.emit(this.workoutPlan);
We use the emit function of EventEmitter to raise a workoutStarted event with the current workout plan as an argument.
To pause, add this line to raise the exercisePaused event:
this.exercisePaused.emit(this.currentExerciseIndex);
To resume, add the following line:
this.exerciseResumed.emit(this.currentExerciseIndex);
Each time, we pass the current exercise index as an argument to emit when raising the exercisePaused and exerciseResumed events.
Inside the startExerciseTimeTracking function, add the highlighted code after the call to startExercise:
this.startExercise(next);
this.exerciseChanged.emit(new ExerciseChangedEvent(next, this.getNextExercise()));
The argument passed contains the exercise that is going to start (next) and the next exercise in line (this.getNextExercise()).
To the same function, add the highlighted code:
this.tracker.endTracking(true);
this.workoutComplete.emit(this.workoutPlan);
this.router.navigate(['finish']);
The event is raised when the workout is completed.
In the same function, we raise an event that communicates the workout progress. Add this statement:
--this.workoutTimeRemaining;
this.exerciseProgress.emit(new ExerciseProgressEvent(
    this.currentExercise,
    this.exerciseRunningDuration,
    this.currentExercise.duration -this.exerciseRunningDuration,
    this.workoutTimeRemaining));
That completes our eventing implementation.
As you may have guessed, WorkoutAudioComponent now needs to consume these events. The challenge here is how to organize these components so that they can communicate with each other with the minimum dependency on each other.
As the implementation stands now, we have:
- A basic
WorkoutAudioComponentimplementation - Augmented
WorkoutRunnerComponentby exposing workout life cycle events
These two components just need to talk to each other now.
If the parent needs to communicate with its children, it can do this by:
- Property binding: The parent component can set up a property binding on the child component to push data to the child component. For example, this property binding can stop the audio player when the workout is paused:
<workout-audio [stopped]="workoutPaused"></workout-audio>
Property binding, in this case, works fine. When the workout is paused, the audio is stopped too. But not all scenarios can be handled using property bindings. Playing the next exercise audio or halfway audio requires a bit more control.
- Calling functions on child components: The parent component can also call functions on the child component if it can get hold of the child component. We have already seen how to achieve this using the
@ViewChildand@ViewChildrendecorators in theWorkoutAudioComponentimplementation. This approach and its shortcomings have also been discussed briefly in the Integrating WorkoutAudioComponent section.
There is one more not-so-good option. Instead of the parent referencing the child component, the child references the parent component. This allows the child component to call the parent component's public functions or subscribe to parent component events.
We are going to try this approach and then scrap the implementation for a better one! A lot of learning can be derived from the not-so-optimal solution we plan to implement.
Add the WorkoutAudioComponent to the WorkoutRunnerComponent view just before the last closing div:
<abe-workout-audio></abe-workout-audio>
Next, inject WorkoutRunnerComponent into WorkoutAudioComponent. Open workout-audio.component.ts and add the following declaration and update the constructor:
private subscriptions: Array<any>;

constructor( @Inject(forwardRef(() => WorkoutRunnerComponent))
    private runner: WorkoutRunnerComponent) {
    this.subscriptions = [
      this.runner.exercisePaused.subscribe((exercise: ExercisePlan) =>
          this.stop()),
      this.runner.workoutComplete.subscribe((exercise: ExercisePlan) =>
          this.stop()),
      this.runner.exerciseResumed.subscribe((exercise: ExercisePlan) =>
          this.resume()),
      this.runner.exerciseProgress.subscribe((progress: ExerciseProgressEvent) =>
          this.onExerciseProgress(progress)),
      this.runner.exerciseChanged.subscribe((state: ExerciseChangedEvent) =>
          this.onExerciseChanged(state))];
    }
And remember to add these imports:
    import {Component, ViewChild, Inject, forwardRef} from '@angular/core';
    import {WorkoutRunnerComponent} from '../workout-runner.component'
Let's try to understand what we have done before running the app. There is some amount of trickery involved in the construction injection. If we directly try to inject WorkoutRunnerComponent into WorkoutAudioComponent, it fails with Angular complaining of not being able to find all the dependencies. Read the code and think carefully; there is a subtle dependency cycle issue lurking. WorkoutRunnerComponent is already dependent on WorkoutAudioComponent, as we have referenced WorkoutAudioComponent in the WorkoutRunnerComponent view. Now by injecting WorkoutRunnerComponent in WorkoutAudioComponent, we have created a dependency cycle.
Cyclic dependencies are challenging for any DI framework. When creating a component with a cyclic dependency, the framework has to somehow resolve the cycle. In the preceding example, we resolve the circular dependency issue by using an @Inject decorator and passing in the token created using the forwardRef() global framework function.
Once the injection is done correctly, inside the constructor, we attach a handler to the WorkoutRunnerComponent events, using the subscribe function of EventEmitter. The arrow function passed to subscribe is called whenever the event occurs with a specific event argument. We collect all the subscriptions into a subscription array. This array comes in handy when we unsubscribe, which we need to, to avoid memory leaks.
A bit about EventEmitter: the EventEmmiter subscription (subscribe function) takes three arguments:
subscribe(generatorOrNext?: any, error?: any, complete?: any) : any
- The first argument is a callback, which is invoked whenever an event is emitted
- The second argument is an error callback function, invoked when the observable (the part that is generating events) errors out
- The final argument takes a callback function that is called when the observable is done publishing events
We have done enough to make audio integration work. Run the app and start the workout. Except for the ticking audio, all the \ audio clips play at the right time. You may have to wait some time to hear the other audio clips. What is the problem?
As it turns out, we never started the ticking audio clip at the start of the workout. We can fix it by either setting the autoplay attribute on the ticks audio element or using the component life cycle events to trigger the ticking sound. Let's take the second approach.
The injected MyAudioDirective in WorkoutAudioComponent, shown as follows, is not available till the view is initialized:
<audio #ticks="MyAudio" loop src="/assets/audio/tick10s.mp3"></audio>
<audio #nextUp="MyAudio" src="/assets/audio/nextup.mp3"></audio>
...
We can verify it by accessing the ticks variable inside the constructor; it will be null. Angular has still not done its magic and we need to wait for the children of WorkoutAudioComponent to be initialized.
The component's life cycle hooks can help us here. The AfterViewInit event hook is called once the component's view has been initialized and hence is a safe place from which to access the component's child directives/elements. Let's do it quickly.
Update WorkoutAudioComponent by adding the interface implementation, and the necessary imports, as highlighted:
import {..., AfterViewInit} from '@angular/core';
...
export class WorkoutAudioComponent implements OnInit, AfterViewInit {
    ngAfterViewInit() {
          this.ticks.start();
    }
Go ahead and test the app. The app has come to life with full-fledged audio feedback. Nice!
While everything looks fine and dandy on the surface, there is a memory leak in the application now. If, in the middle of the workout, we navigate away from the workout page (to the start or finish page) and again return to the workout page, multiple audio clips play at random times.
It seems that WorkoutRunnerComponent is not getting destroyed on route navigation, and due to this, none of the child components are destroyed, including WorkoutAudioComponent. The net result? A new WorkoutRunnerComponent is being created every time we navigate to the workout page but is never removed from the memory on navigating away.
The primary reason for this memory leak is the event handlers we have added in WorkoutAudioComponent. We need to unsubscribe from these events when the audio component unloads, or else the WorkoutRunnerComponent reference will never be dereferenced.
Another component lifecycle event comes to our rescue here: OnDestroy Add this implementation to the WorkoutAudioComponent class:
    ngOnDestroy() {
      this.subscriptions.forEach((s) => s.unsubscribe());
    }
Also, remember to add references to the OnDestroy event interface as we did for AfterViewInit.
Hope the subscription array that we created during event subscription makes sense now. One-shot unsubscribe!
This audio integration is now complete. While this approach is not an awfully bad way of integrating the two components, we can do better. Child components referring to the parent component seems to be undesirable.
What if WorkoutRunnerComponent and WorkoutAudioComponent were organized as sibling components?
If WorkoutAudioComponent and WorkoutRunnerComponent become siblings, we can make good use of Angular's eventing and template reference variables. Confused? Well, to start with, this is how the components should be laid out:
    <workout-runner></workout-runner>
    <workout-audio></workout-audio>
Does it ring any bells? Starting from this template, can you guess how the final HTML template would look? Think about it before you proceed further.
Still struggling? As soon as we make them sibling components, the power of the Angular templating engine comes to the fore. The following template code is enough to integrate WorkoutRunnerComponent and WorkoutAudioComponent:
<abe-workout-runner (exercisePaused)="wa.stop()"
    (exerciseResumed)="wa.resume()"
    (exerciseProgress)= "wa.onExerciseProgress($event)"
    (exerciseChanged)= "wa.onExerciseChanged($event)"
    (workoutComplete)="wa.stop()"
    (workoutStarted)="wa.resume()">
</abe-workout-runner>
<abe-workout-audio #wa></abe-workout-audio>
The WorkoutAudioComponent template variable, wa, is being manipulated by referencing the variable in the event handler expressions on WorkoutRunnerComponent. Quite elegant! We still need to solve the biggest puzzle in this approach: Where does the preceding code go? Remember, WorkoutRunnerComponent is loaded as part of route loading. Nowhere in the code have we had a statement like this:
<workout-runner></workout-runner>
We need to reorganize the component tree and bring in a container component that can host WorkoutRunnerComponent and WorkoutAudioComponent. The router then loads this container component instead of WorkoutRunnerComponent. Let's do it.
Generate a new component code from command line by navigating to trainer/src/app/workout-runner and executing:
ng generate component workout-container -isCopy the HTML code with the events described to the template file. The workout container component is ready.
We just need to rewire the routing setup. Open app-routing.module.ts. Change the route for the workout runner and add the necessary import:
import {WorkoutContainerComponent}
        from './workout-runner/workout-container/workout-container.component';
..
{ path: '/workout', component: WorkoutContainerComponent },
And we have a working audio integration that is clear, concise, and pleasing to the eye!
It's time now to wrap up the chapter, but not before addressing the video player dialog glitch introduced in the earlier sections. The workout does not stop/pause when the video player dialog is open.
We are not going to detail the fix here, and urge the readers to give it a try without consulting the checkpoint3.4 code.
Here is an obvious hint. Use the eventing infrastructure!
And another one: raise events from VideoPlayerComponent, one for each playback started and ended.
And one last hint: the open function on the dialog service (Modal) returns a promise, which is resolved when the dialog is closed.
Note
If you are having a problem with running the code, look at the checkpoint3.4 Git branch for a working version of what we have done thus far. Or if you are not using Git, download the snapshot of checkpoint3.4 (a ZIP file) from http://bit.ly/ng6be-checkpoint-3-4. Refer to the README.md file in the trainer folder when setting up the snapshot for the first time.
We started this chapter with the aim of creating a complex Angular app. The 7 Minute Workout app fitted the bill, and you learned a lot about the Angular framework while building this app.
To build the app, we started off by defining the model of the app. Once the model was in place, we started the actual implementation by building an Angular component. Angular components are nothing but classes that are decorated with a framework-specific decorator, @Component.
We also learned about Angular modules and how Angular uses them to organize code artifacts.
Once we had a fully functional component, we created a supporting view for the app. We also explored the data binding capabilities of the framework, including property, attribute, class, style, and event binding. Plus, we highlighted how interpolations are a special case of property binding.
Components are a special class of directives that have an attached view. We touched upon what directives are and the special classes of directives, including attribute and structural directives.
We learned how to perform cross-component communication using input properties. The two child components that we put together (ExerciseDescriptionComponent and VideoPlayerComponent) derived their inputs from the parent WorkoutRunnerComponent using input properties.
We then covered another core construct in Angular, pipes. We saw how to use pipes such as the date pipe and how to create one of our own.
Throughout the chapter, we touched upon a number of Angular directives, including the following:
ngClass/ngStyle: For applying multiple styles and classes using Angular binding capabilitiesngFor: For generating dynamic HTML content using a looping constructngIf: For conditionally creating/destroying DOM elementsngSwitch: For creating/destroying DOM elements using the switch-case construct
We now have a basic 7 Minute Workout app. For a better user experience, we have added a number of small enhancements to it too, but we are still missing some good-to-have features that would make our app more usable. From the framework perspective, we have purposefully ignored some core/advanced concepts such as change detection, dependency injection, componentrouting, and data flow patterns.
Lastly, we touched upon an important topic: cross-component communication, primarily using Angular eventing. We detailed how to create custom events using the @Output decorator and EventEmitter.
The @ViewChild and @ViewChildren decorators that we touched upon in this chapter helped us understand how a parent can get hold of a child component for use. Angular DI also allows injecting a parent component into a child.
We concluded this chapter by building a WorkoutAudioComponent and highlighted how sibling-component communication can happen using Angular events and template variables.
What's next? We are going to build a new app, Personal Trainer. This app will allow us to build our own custom workouts. Once we can create our own workout, we are going to morph the 7-Minute Workout app into a generic Workout Runner app that can run workouts that we build using Personal Trainer.
For the next chapter, we'll showcase Angular's form capabilities while we build a UI that allows us to create, update, and view our own custom workouts/exercises.


