


So your new shiny BeagleBone (black?) is out of its packaging, and you have marveled enough at how it is engineered — now what? This is the question we will dive right into in this chapter. We will set up the necessary driver software on your host computer (be it Windows, Linux, or Mac), remotely connect to our board to look around a bit, and go over some basics on how to operate Beagle. The main topics in this chapter are:
Introducing the BeagleBone hardware
The operating system controlling the board
Logging into Linux and performing basic file operations
Creating a Hello World Python program
As a brain, our board has an ARM Cortex-A8 processor. BeagleBone runs at 720 MHz on the original version (white-colored PCB), and on the newer version, it runs at 1 GHz. You might have heard about this processor before as it is used in some of today's smartphones as well. However, the numbers by themselves might not necessarily tell us much, but it suffices to say that it's powerful enough to run a full-blown operating system.
We have compiled a list of the main hardware differences between the White and Black models:
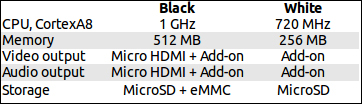
Most importantly, the black version has the HDMI output which means that one could easily connect it to a TV or monitor and send audio through the same cable. Both boards can also get additional audio features via add-on boards, which are called capes in the Beagle world. We will talk more about capes in Chapter 5, Implementing Periodic Tasks.
Both boards also contain a plethora of other hardware features. The most interesting of those are 4 Universal Asynchronous Receivers/Transmitters (UARTs), 8 Pulse Width Modulators (PWMs), 65 General-Purpose Input/Output (GPIO) pins, 2 SPI buses, 2 I2C buses, 1 Analog-to-Digital converter (ADC), and 4 timers. We will start using GPIO pins and PWMs in the next chapter. The Serial Peripheral Interface (SPI) and Inter-Integrated Circuit (I2C) buses have been adopted by the semiconductor industry to serve as communication buses when very high transmission speeds are not required. During the course of this book, we will not integrate any kind of external hardware using these buses per se; we will explain their operating principles in Appendix, Security, Debugging, and I2C and SPI. Generally, in this book, we will focus on the "Black" BeagleBone version. While the foundation is basically the same on these two boards, there are some significant differences as well. For example, we can see that the extension headers and their GPIO pins are different! You will have to double-check the header pins for the White model and adjust your code accordingly.
Your new development board comes with a pre-prepared operating system image from the BeagleBoard.org Foundation. The original White model comes with a 4 GB microSD card that contains the bootable OS image, and the Black model has it preprogrammed into the internal eMMC memory.
Note
If you will think about changing the OS yourself, it's good to keep in mind that eMMC is only 2 GB in size, so it might not be enough for all the OS configurations (especially since you should leave some meaningful empty space also for your own files).
The BeagleBoard.org Foundation has selected a Linux distribution called Angstrom to be shipped with their BeagleBoard and BeagleBone development boards.
Since the Linux kernel supports ARM natively, you are not limited to a certain distribution or any distribution for that matter. In this book, we will stick to the current default selection as it is likely that the open source community and the BeagleBoard.org Foundation will keep supporting Angstrom as they have for the last 5 years or so. Thus, we can assume that these instructions would stay relevant for the longest time that way.
Don't worry if you are not yet familiar with Linux. You will learn the relevant configuration options and maintenance tasks while going through the chapters in this book; as you begin to work with the system in depth, you will soon become proficient enough to maintain the system yourself. It will also be a nice primer into headless systems and remote terminals that are accessed and operated via terminal connections.
Since we will be using our board over the terminal connection from our host,only the initial driver setup, connection initiation, and a couple of minor things will be different for different host operating systems along the way. We will mention them separately at those occasions.
After that, we will (almost) always work directly on the target to keep the same instructions for any type of host.
Tip
With embedded systems, often, the computer you use for development is different from the board you are working on, but both of them still contain similar software, configurations, and so on. In these situations, words such as "target" and "host" can be used to easily identify the subject we are talking about. Saying, for example, "Did you check the network configuration on the target?" is not as ambiguous as "Did you check the network configuration?". We will also stick to this form where relevant.
So first, to set up our host, we need to install the drivers for our target.
First, with an Internet browser of your choice, navigate to http://beagleboard.org/static/beaglebone/latest/Drivers/ and depending on your host machine type, go into the subdirectory to find the necessary drivers.
We will first have to find out if our system is 32 bit or 64 bit. Microsoft has prepared a helpful page at http://support.microsoft.com/kb/827218 where you can find instructions on how to find out your system type on any of the recent Windows platforms. If you are running a 64-bit system, download the BONE_D64.exe file or the BONE_DRV.exe file and install the driver. The BeagleBoard.org Foundation seems to have decided not to go through the process of digitally signing the driver, so Windows will probably ask/complain about this several times; proceed with the installation anyway as it won't cause any harm to your system.
We need to install HoRNDIS-rel4.pkg for networking and FTDI_Ser.dmg for serial connections. Go ahead and download both of them, then double-click on each one to install them.
No particular driver is needed for Beagle in Linux, but there are some udev rules that are helpful for accessing the serial console. Download the script file in the web page and open a terminal emulator (from the application menu). Then, add executable permissions to the downloaded script and execute it as a super user:
jlumme@simppa:~$ cd Downloads/
jlumme@simppa:~/Downloads$ chmod u+x mkudevrule.sh
jlumme@simppa:~/Downloads$ sudo ./mkudevrule.sh
[sudo] password for jlumme:
jlumme@simppa:~/Downloads$
In the preceding console command, you can see that we have used a prefix sudo in our call to ./mkudevrule.sh. This is actually a special command that tells the system that the mkudevrule.sh script needs to be executed with root privileges. Root privileges mean administrative rights. These are required as the script is placing the files within a folder that needs those privileges.
Now you should have a new rule file in /etc/udev/rules.d called 73-beaglebone.rules.
Now that the drivers are set up, you can use the microUSB cable that came with the board to plug in the board to the USB port on your host machine, and the board will start booting up.
Note
Keep in mind that the USB 2.0 specification specifies a maximum current of 500 mA, which can be provided by a single port. This might not be enough if you connect many peripherals to the USB port using a USB hub. In those cases, you will need to use a 5-volt DC power supply to power the board.
On the board, there are five LEDs in total; they are all located on the side of the power and LAN connectors, as shown in this picture (many thanks to the BeagleBoard Foundation for allowing us to use this picture):
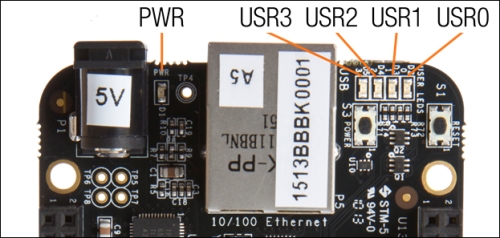
The default configuration for the user LEDs is:
USR0: This LED is a heartbeat LED; by default, it will keep flashing while the system is powered on
USR1: This LED blinks when the microSD card is being accessed
USR2: This LED will blink during the CPU activity
USR3: This LED will blink when eMMC memory is being accessed
When the system is starting up, it will not be accessible via USB before the USB drivers are initialized. To debug boot time issues, it is possible to see startup debug traces via a serial console connection on Header J1. This is an advanced topic that is described in Appendix, Security, Debugging, and I2C and SPI.
The boot process usually takes around 10 seconds, after which you will be able to connect to the board. There are several ways to connect to the target, and we will talk about two of those. If you are familiar with Linux, you probably already know how console logins work, but if you are not—no worries as we will cover some basics.
The login procedure is slightly different in Windows than it is in Mac OS X and Linux, but there's not a great difference between the two.
On Windows, you will need to install a program to create SSH connections. We recommend PuTTY. PuTTY is a free and open source terminal emulator/serial console that we can use to connect to our console login session on the board.
From the PuTTY Download Page at http://www.chiark.greenend.org.uk/~sgtatham/putty/download.html, you can download the putty.exe file for Windows on Intel x86. It should be the first download link on the page. It's just an executable; you don't need to install anything. Once the download is complete, launch PuTTY, and in the Host Name (or IP address) field, enter 192.168.7.2:
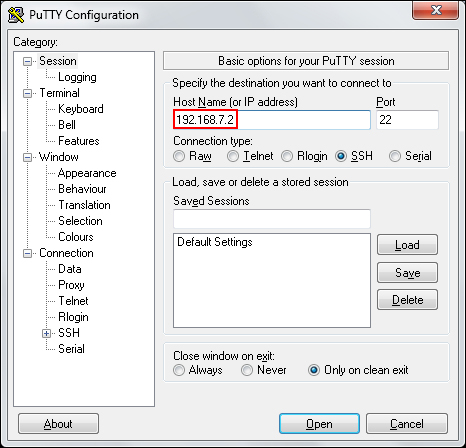
When the system asks for the login name, enter root and just press the Enter key for the password. You should now be connected to the board. Accept the RSA fingerprint query that BeagleBone uses to identify itself.
Tip
The RSA fingerprint that is received from BeagleBone is a public key that can be used to identify whether the remote host is actually the host that you imagine it to be. This topic is out of scope for this book, but it's good to know that in this way, one can identify a trusted host over the network. These SSH connections are also automatically encrypted.
In Linux and Mac OS X, open the console or terminal (you can find it in the application menu); you can just use regular SSH applications to connect to the remote host.
jlumme@simppa:~$ ssh root@192.168.7.2
The authenticity of host '192.168.7.2 (192.168.7.2)' can't be established.
RSA key fingerprint is a1:cb:9f:8b:f4:6f:79:52:47:87:83:db:d6:9a:70:6e.
Are you sure you want to continue connecting (yes/no)? yes
Warning: Permanently added '192.168.7.2' (RSA) to the list of known hosts.
root@192.168.7.2's password: [Just press enter here]
root@beaglebone:~#
Notice how we supplied the username root to the SSH application before the IP address. If you don't supply it, the system will try to login with your default username which is not available. Now we're inside our target, and we're ready to start giving commands to it.
Another way to log in to our system is to use a web browser. This is not as convenient, but it can be useful if you can't, for some reason, install the SSH software on the computer. Open the browser window and navigate to http://192.168.7.2. The web server on the target should show you a welcome page. Scroll down until you find the Gate ONE SSH Client section; this text is a link which starts an SSH session over the browser. It will be slower to use, but you can still use it to operate on the board in situations where you might not be able to install additional software, for example, at a friend's house.
Note
The address (192.168.7.2) that we used to log in to our board is actually the default address for the board when it is connected to the host via a USB connection. If you are facing difficulties in connecting to the IP address, you might want to try "ejecting the USB drive" from your development PC. Older versions of the BeagleBone OS software required this, but the newer software versions do not.
If you want to connect to the board via the router and Ethernet connection, the address will be different. To check the Ethernet interface IP address, you can use the ifconfig eth0
(when first connected to the board via USB.
Let's take one step back now, and talk about terminals and consoles for a minute.
If you are not familiar with Linux, maybe you have never used the computer from the command line, but instead have always used the provided Graphical User Interface (GUI). GUIs are great and provide beautiful graphics, animations, and a superior usability experience overall. However, they also demand a lot of resources. And we're not only talking about memory or CPU performance, but peripherals such as keyboards, monitors, and mice. As you noticed, our board has none of these. Of course, you can connect those via the available USB and HDMI ports, but since our target is to build a standalone system, in this book, we will focus on the remote and console operations of our target.
Now, while performing the steps in the previous section, when we logged into the target, we actually started a terminal session. Here, we can control the board with the command line. Using the command line will take some time to get used to; but once you are comfortable with it, it's very fast and efficient to use. Commands can also be chained to be executed sequentially; this is called scripting. You will find a lot of scripts on the Internet that perform a certain task in a specified order. Did you notice that in the Preparing the host machine section for Linux, we set udev permissions with the mkudevrule.sh file? This was also a command-line script. While it's not necessary to become a command-line guru to write and execute programs on our board, we need to go over a few basic things about console operation.
Tip
Linux, unlike Windows, does not have a central registry that keeps the information of the system. Everything in Linux is built on top of files, even the hardware under the /dev/ folder. Or more accurately, almost everything is accessible in Linux through the filesystem. Some of the files might not be the actual files that are permanently saved onto a disk, but you can still access (read) them in pretty much the same way. It's important to become at least somewhat familiar with operating on files in the console.
When you log into the system, you are placed in the home folder of the user you used to log in as, in our case, root.
Tip
In Linux, root is a user that corresponds to an administrator. He can perform all the tasks on the system and has the rights to add other users, perhaps with fewer privileges. For now, we will keep using root even though it is not a good practice in general. You might want to read up on "Linux and user rights" from the Internet.
You can always see the current folder with the command pwd (think of it as an acronym for the present working directory):
root@beaglebone:~# pwd
/home/root
root@beaglebone:~#
You can move between folders with the command cd (change directory).The cd command takes one input parameter that specifies the directory you want to change to. For example, to go one folder up in the hierarchy, you type cd ...You might have noticed that the current folder structure starts with /. This is the root point of the whole filesystem on our Linux OS. You can go and take a look at it:
root@beaglebone:~# cd /
root@beaglebone:/# ls
bin dev home lost+found mnt run sys usr
boot etc lib media proc sbin tmp var
To list the contents of the current folder, we use the command ls. Here, you can see that there are quite a few folders in the filesystem. For example, /home/folder contains the home folders of all the users of this system. Take another example where, in the folders /bin and /usr/bin, you can find programs and commands that can be executed on this system (programs like ls and pwd are also in the /bin folder). Remember how we said that everything is a file? Well, so are the basic commands!
Tip
Did you notice that when we navigated away from the root user's home folder to the current folder, the last character changed to show the current folder? This is because ~ is a shorthand to indicate the user's home folder. You can always go back to the user's home folder by just typing cd and pressing Enter.
Let's go back to the home folder and look at what we can find there:
root@beaglebone:/# cd
root@beaglebone:~# ls -l
total 4
drwxr-xr-x 2 root root 4096 Jan  1 00:01 Desktop
root@beaglebone:~#
Notice how we first called the change directory command without any parameter? This means that the user wants to change to his or her home folder. In this case, it is /home/root/; other users might have different home folders. This time we also added a parameter -l to the command. A parameter gives additional instructions to the ls command, in this case, to use a long listing format. Now, in the long listing format, there is much more information visible about the files in this directory. The first column is especially important; it defines the access rights to this particular file. There are four basic file-access right properties:
Why are the properties listed several times then? This is because of the nature of how file-access restrictions work in Linux. File restrictions can be specified separately to three levels: user, group, and everyone. They are listed in that order.
For someone who's new to Linux, this might sound a bit confusing; maybe a practical example can help you understand this. Let's create a new file. We can do this, for example, by launching a text editor that comes with the default installation. There are several editors available; for now, we will use an editor called nano. It is easy to understand and will probably feel familiar even to users who have not used command-line editors before.
So, to create a file in the current folder, just type nano testfile.txt and an editor should pop up on the screen:
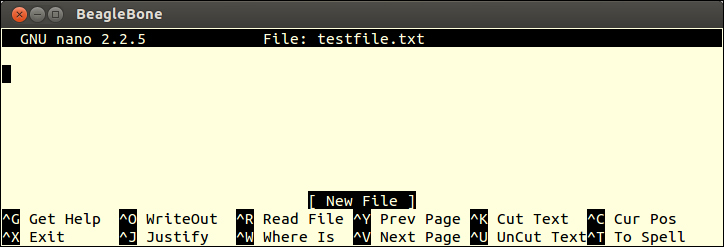
Write any sentence in the window and press Ctrl + X to exit. The program will ask you if you wish to save the file; in that case, press Y and then Enter to confirm the filename, testfile.txt. Now, let's list the directory again:
root@beaglebone:~# ls -l
total 8
drwxr-xr-x 2 root root 4096 Jan  1 00:01 Desktop
-rw-r--r-- 1 root root   20 Jan  1 01:24 testfile.txt
We notice that the freshly created testfile.txt file now has the default file access rights set. You can see that it was created by user root and belongs to the group root (the root root part). Only the owner of this file can write to it (the first part rw-). Let's try modifying the file permissions and give everyone the rights to write to this file. For this, we can use a command called chmod (derived from "change mode"):
root@beaglebone:~# chmod a+w testfile.txt
root@beaglebone:~# ls -l
total 8
drwxr-xr-x 2 root root 4096 Jan  1 00:01 Desktop
-rw-rw-rw- 1 root root    4 Jan  1 02:01 testfile.txt
Now you can see that we gave everyone the (a) rights to write (+w) to that file, and the file permissions string (-rw-rw-rw-) has changed accordingly.
Tip
Logically, if you want to remove a permission, you have to use the minus sign (-) instead of the plus sign (+).
Why it's important to understand the file permissions is because, unlike some systems where only certain file types can be executed, in Linux, any file with an executable bit set is executable. Thus, our Python programs will also require an executable bit to be set. To give executable permissions to a file, we can use the +x flag.
Tip
Usually, you don't necessarily want to give everyone execution rights; for example, you can call chmod u+x, which means that you only grant the current user the execution rights. As you probably already guessed, for groups you can use chmod g+x.
You must be anxious to try and test some code; let's take a look at a basic Hello World example.
Angstrom Linux already has Python preinstalled, so we can start right away. Let's open our text editor (nano) again, and create a file called hello.py. In the editor, just type the following lines:
#!/usr/bin/python

print "Hello world!"
Tip
Downloading the example code
You can download the example code files for all Packt books you have from your account at http://www.packtpub.com. If you purchased this book elsewhere, you can visit http://www.packtpub.com/support and register to have the files e-mailed directly to you.
Now, save the file, give it execution permissions, and try running it:
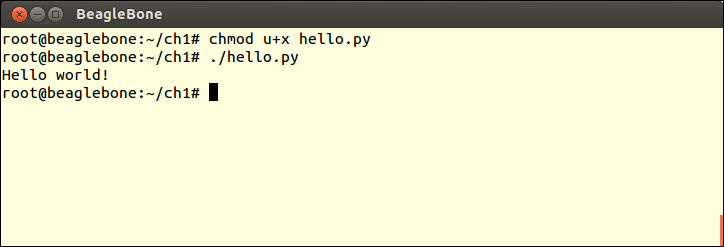
Congratulations, you have just created and executed your first program on the board!
Now, you might have noticed a couple of peculiar things. First, what is that #!/usr/bin/python line present in our code ? This is actually a Unix-specific information known as shebang. Shebang is meant for the program loader; it informs the system where to find a suitable interpreter for this file. As mentioned before, any file with execution permission set can be executed. But if the file is not written in native code (for example, compiled C code), the system depends on shebang information to find a suitable command interpreter.
Another thing we did was prepend ./ to the executable file. This is because by default, Linux searches for executables only in the folders that it is told to look from. By default, the root user's home folder is not one of those folders. The dot(.) is a shorthand to indicate the current folder. This shorthand is basically the same as if you had typed /home/root/hello.py.
This chapter gave us a very short introduction to Linux and our board. We talked a bit about the hardware, how to connect it to your host machine, how to login to the Linux system via SSH, and some very basic commands to perform operations on a Linux system.
You saw how files and folders are represented in the filesystem and how you could modify these permissions. We created our first program and successfully executed it in our target environment. From here on, we will start working on more complicated programs.
In the next chapter, we will connect an LED to our board and control it. Subsequently, chapter by chapter, we will start working through the different areas of our hardware, building up knowledge on how to control different peripheral devices and learning how to communicate with our Beagle remotely over a network.