Are you ready to take up the mobile challenge? Is your computer switched on, mouse and keyboard plugged in, and screen illuminating your desk? Then let's not wait a minute more!
Developing Android applications requires a specific set of tools. You may already know about the Android Software Development Kit for pure Java applications. However, getting full access to the power of Android devices requires more: the Android Native Development Kit.
Setting up a proper Android environment is not that complicated, however it can be rather tricky. Indeed, Android is still an evolving platform and recent additions, such as Android Studio or Gradle, are not well supported when it comes to NDK development. Despite these annoyances, anybody can have a ready-to-work environment in an hour.
In this first chapter, we are going to:
Install prerequisites packages
Set up an Android development environment
Launch an Android emulator
Connect an Android device for development
What differentiates mankind from animals is the use of tools. Android developers, the authentic species you belong to, are no different!
To develop applications on Android, we can use any of the following three platforms:
Microsoft Windows (XP and later)
Apple OS X (Version 10.4.8 or later)
Linux (distributions using GLibc 2.7 or later, such as latest versions of Ubuntu)
These systems are supported on x86 platforms (that is, PCs with processors such as Intel or AMD) in both 32- and 64-bit versions, except for Windows XP (32-bit only).
This is a good start but, unless you are able to read and write binary code as well as speak your mother tongue, having a raw OS is not enough. We also need software dedicated to Android development:
A JDK (Java Development Kit)
An Android SDK (Software Development Kit)
An Android NDK (Native Development Kit)
An IDE (Integrated Development Environment) such as Eclipse or Visual Studio (or vi for hard-core coders). Android Studio and IntelliJ are not yet well-suited for NDK development, although they provide basic support for native code.
A good old command-line shell to manipulate all these tools. We will use Bash.
Now that we know what tools are necessary to work with Android, let's start with the installation and setup process.
Note
The following section is dedicated to Windows. If you are a Mac or Linux user, you can jump to Setting up an OS X or Setting up Linux section.
Before installing the necessary tools, we need to set up Windows to host our Android development tools properly. Although it is not the most natural fit for Android development, Windows still provides a fully functional environment.
The following section explains how to set up the prerequisite packages on Windows 7. The process is the same for Windows XP, Vista, or 8.
To develop with the Android NDK on Windows, we need to set up a few prerequisites: Cygwin, a JDK, and Ant.
Go to http://cygwin.com/install.html and download the Cygwin setup program suitable for your environment. Once downloaded, execute it.
In the installation window, click on Next and then Install from Internet.

Follow the installation wizard screens. Consider selecting a download site from where Cygwin packages are downloaded in your country.
Then, when proposed, include the Devel, Make, Shells, and bash packages:

Follow the installation wizard until the end. This may take some time depending on your Internet connection.
Download Oracle JDK 7 from the Oracle website at http://www.oracle.com/technetwork/java/javase/downloads/index.html (or JDK 8, although it is not officially supported at the time this book is written). Launch and follow the installation wizard until the end.
Download Ant from its website at http://ant.apache.org/bindownload.cgi and unzip its binary package in the directory of your choice (for example,
C:\Ant).After installation, define JDK, Cygwin, and Ant locations in environment variables. To do so, open Windows Control Panel and go to the System panel (or right-click on the Computer item in the Windows Start menu and select Properties).
Then, go to Advanced system settings. The System Properties window appears. Finally, select the Advanced tab and click on the Environment Variables button.
In the Environment Variables window, inside the System variables list, add:
The
CYGWIN_HOMEvariable with theCygwininstallation directory as the value (for example,C:\Cygwin)The
JAVA_HOMEvariable with the JDK installation directory as the valueThe
ANT_HOMEvariable with the Ant installation directory as the value (for example,C:\Ant)
Prepend
%CYGWIN_HOME%\bin;%JAVA_HOME%\bin;%ANT_HOME%\bin;, all separated by a semicolon, at the beginning of yourPATHenvironment variable.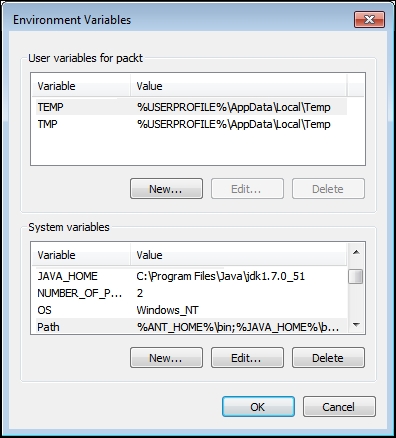
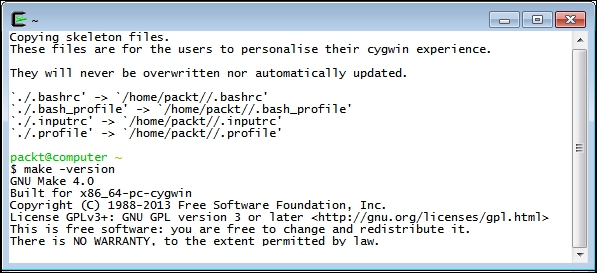
Finally, launch a Cygwin terminal. Your profile files get created on the first launch. Check the
makeversion to ensure Cygwin works:make –versionYou will see the following output:
Ensure JDK is properly installed by running Java and checking its version. Check carefully to make sure the version number corresponds to the newly installed JDK:
java –versionYou will see the following output on the screen:

From a classic Windows terminal, check the Ant version to make sure it is properly working:
ant -versionYou will see the following on the terminal:

Windows is now set up with all the necessary packages to host Android development tools:
Cygwin, which is an open source software collection, allows the Windows platform to emulate a Unix-like environment. It aims at natively integrating software based on the POSIX standard (such as Unix, Linux, and so on) into Windows. It can be considered as an intermediate layer between applications originated from Unix/Linux (but natively recompiled on Windows) and the Windows OS itself. Cygwin includes
Make, which is required by the Android NDK compilation system to build native code.A JDK 7, which contains the runtime and tools necessary to build Java applications on Android and run the Eclipse IDE as well as Ant. The only real trouble that you may encounter when installing a JDK is some interferences from a previous installation, such as an existing Java Runtime Environment (JRE). Proper JDK use can be enforced through the
JAVA_HOMEandPATHenvironment variables.Tip
Defining the
JAVA_HOMEenvironment variable is not required. However,JAVA_HOMEis a popular convention among Java applications, Ant being one of them. It first looks for thejavacommand inJAVA_HOME(if defined) before looking inPATH. If you install an up-to-date JDK in another location later on, do not forget to updateJAVA_HOME.Ant, which is a Java-based build automation utility. Although not a requirement, it allows building Android applications from the command line, as we will see in Chapter 2, Starting a Native Android Project. It is also a good solution to set up a continuous integration chain.
The next step consists of setting up the Android development kits.
Android requires specific development kits to develop applications: the Android SDK and NDK. Hopefully, Google has thought about the developer community and provides all the necessary tools for free.
In the following part, we will install these kits to start developing native Android applications on Windows 7.
The Android Studio bundle already contains the Android SDK. Let's install it.
Open your web browser and download the Android Studio bundle from http://developer.android.com/sdk/index.html.
Run the downloaded program and follow the installation wizard. When requested, install all Android components.

Then, choose the installation directories for Android Studio and the Android SDK (for example,
C:\Android\android-studioandC:\Android\sdk).Launch Android Studio to ensure it is properly working. If Android Studio proposes to import settings from a previous installation, select your preferred option and click on OK.

The Android Studio welcome screen should then appear. Close it.

Go to http://developer.android.com/tools/sdk/ndk/index.html and download the Android NDK (not SDK!) suitable for your environment. Extract the archive inside the directory of your choice (for example,
C:\Android\ndk).To easily access Android utilities from the command line, let's declare the Android SDK and NDK as environment variables. From now on, we will refer to these directories as
$ANDROID_SDKand$ANDROID_NDK.Open the Environment Variables system window, as we did previously. Inside the System variables list, add the following:
Prepend
%ANDROID_SDK%\tools;%ANDROID_SDK%\platform-tools;%ANDROID_NDK%;, all separated by a semicolon, at the beginning of yourPATHenvironment variable.
All Windows environment variables should be imported automatically by Cygwin when launched. Open a Cygwin terminal and list the Android devices connected to your computer (even if none are currently) with
adbto check whether SDK is working. No error should appear:adb devices
Check the
ndk-buildversion to ensure that NDK is working. If everything works, theMakeversion should appear:ndk-build -version
Open Android SDK Manager, located in the ADB bundle directory's root.

In the opened window, click on New to select all the packages and then click on the Install packages... button. Accept the licenses in the popup that appears and start the installation of Android development packages by clicking on the Install button.
After a few long minutes, all packages are downloaded and a confirmation message indicating that the Android SDK manager has been updated appears.
Validate and close the manager.
Android Studio is now installed on the system. Although it is now the official Android IDE, we are not going to use it much throughout the book because of its lack of support of the NDK. It is, however, absolutely possible to use Android Studio for Java development, and command line or Eclipse for C/C++.
The Android SDK has been set up through the Android Studio package. An alternative solution consists of manually deploying the SDK standalone package provided by Google. On the other hand, the Android NDK has been deployed manually from its archive. Both the SDK and NDK are made available through the command line thanks to a few environment variables.
To get a fully functional environment, all Android packages have been downloaded thanks to the Android SDK manager, which aims at managing all the platforms, sources, samples, and emulation features available through the SDK. This tool greatly simplifies the update of your environment when new SDK API and components are released. There is no need to reinstall or overwrite anything!
However, the Android SDK Manager does not manage the NDK, which explains why we downloaded it separately, and why you will need to update it manually in the future.
Tip
Installing all Android packages is not strictly necessary. Only the SDK platform (and possibly Google APIs) releases targeted by your application are really required. Installing all packages may avoid troubles when importing other projects or samples though.
The installation of your Android development environment is not over yet. We still need one more thing to develop comfortably with the NDK.
Apple computers have a reputation for being simple and easy to use. I must say that this adage is rather true when it comes to Android development. Indeed, as a Unix-based system, OS X is well adapted to run the NDK toolchain.
The following section explains how to set up the prerequisite packages on Mac OS X Yosemite.
To develop with the Android NDK on OS X, we need to set up a few prerequisites: a JDK, Developer Tools, and Ant.
A JDK is preinstalled on OS X 10.6 Snow Leopard and below. On these systems, Apple's JDK is in version 6. Since this version is deprecated, it is advised to install an up-to-date JDK 7 (or JDK 8, although it is not officially supported at the time this book is written).
On the other hand, OS X 10.7 Lion and above does not have a default JDK installed. Installing the JDK 7 is thus mandatory.
To do so, download Oracle JDK 7 from the Oracle website at http://www.oracle.com/technetwork/java/javase/downloads/index.html. Launch the
DMGand follow the installation wizard until the end.Check the Java version to ensure that the JDK is properly installed.
java -version
All Developer Tools are included in the XCode installation package (Version 5, at the time this book is written). XCode is provided on the AppStore for free. Starting from OS X 10.9, the Developer Tools package can be installed separately from a terminal prompt with the following command:
xcode-select --install
Then, from the popup window that appears, select Install.
To build native code with the Android NDK, whether XCode or the single Developer Tools package is installed, we need
Make. Open a terminal prompt and check theMakeversion to ensure that it correctly works:make –version
On OS X 10.9 and later, Ant must be installed manually. Download Ant from its website at http://ant.apache.org/bindownload.cgi and unzip its binary package in the directory of your choice (for example,
/Developer/Ant).Then, create or edit the file
~/.profileand make Ant available on the system path by appending the following:export ANT_HOME="/Developer/Ant" export PATH=${ANT_HOME}/bin:${PATH}Log out from your current session and log in again (or restart your computer) and check whether Ant is correctly installed by checking its version from the command line:
ant –version
Our OS X system is now set up with the necessary packages to host Android development tools:
A JDK 7, which contains the runtime and tools necessary to build Java applications on Android and to run the Eclipse IDE as well as Ant.
Developer Tools package, which packages various command-line utilities. It includes Make, which is required by the Android NDK compilation system to build native code.
Ant, which is a Java-based build automation utility. Although not a requirement, it allows building Android applications from the command line, as we will see in Chapter 2, Starting a Native Android Project. It is also a good solution to set up a continuous integration chain.
The next step consists of setting up the Android Development Kit.
Android requires specific development kits to develop applications: the Android SDK and NDK. Hopefully, Google has thought about the developer community and provides all the necessary tools for free.
In the following part, we are going to install these kits to start developing native Android applications on Mac OS X Yosemite.
The Android Studio bundle already contains the Android SDK. Let's install it.
Open your web browser and download the Android Studio bundle from http://developer.android.com/sdk/index.html.
Run the downloaded
DMGfile. In the window that appears, drag the Android Studio icon into Applications and wait for Android Studio to be fully copied on the system.
Run Android Studio from Launchpad.
If an error Unable to find a valid JVM appears (because Android Studio cannot find a suitable JRE when launched), you can run Android Studio from the command line as follows (using the appropriate JDK path):
export STUDIO_JDK=/Library/Java/JavaVirtualMachines/jdk1.7.0_71.jdk
open /Applications/Android\ Studio.apps
Tip
To solve the Android Studio startup issue, you can also install the former JDK 6 package provided by Apple. Beware! This version is outdated and thus, deprecated.
If Android Studio proposes to import settings from a previous installation, select your preferred option and click on OK.

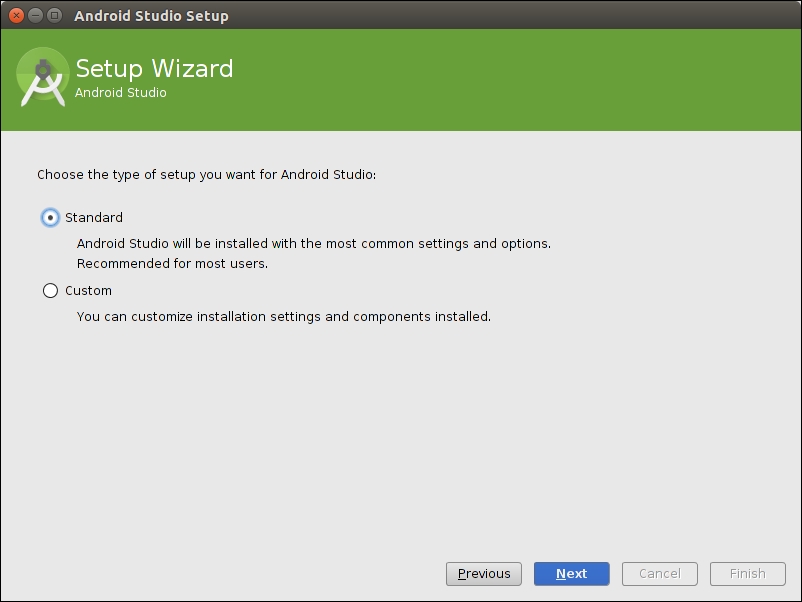
In the next Setup Wizard screen that appears, select the Standard installation type and continue the installation.

Complete the installation until the Android Studio welcome screen appears. Then, close Android Studio.

Go to http://developer.android.com/tools/sdk/ndk/index.html and download the Android NDK (not SDK!) archive suitable for your environment. Extract it inside the directory of your choice (for example,
~/Library/Android/ndk).To easily access Android utilities from the command line, let's declare the Android SDK and NDK as environment variables. From now on, we will refer to these directories as
$ANDROID_SDKand$ANDROID_NDK. Assuming you use the defaultBashcommand-line shell, create or edit.profile(which is a hidden file!) in your home directory and append the following instructions (adapt paths according to your installation):export ANDROID_SDK="~/Library/Android/sdk" export ANDROID_NDK="~/Library/Android/ndk" export PATH="${ANDROID_SDK}/tools:${ANDROID_SDK}/platform-tools:${ANDROID_NDK}:${PATH}"Log out from your current session and log in again (or restart your computer). List the Android devices connected to your computer (even if none currently are) with
adbto check whether Android SDK is working. No error should appear:adb devices
Check the
ndk-buildversion to ensure that NDK is working. If everything works, theMakeversion should appear:ndk-build -version
Open a terminal and start the Android SDK manager with the following command:
android
In the opened window, click on New to select all the packages and then click on the Install packages... button. Accept the licenses in the popup that appears and start the installation of all Android packages by clicking on the Install button.
After a few long minutes, all packages are downloaded and a confirmation message indicating that the Android SDK manager has been updated appears.
Validate and close the manager.
Android Studio is now installed on the system. Although it is now the official Android IDE, we will not use it much through the book because of its lack of support of the NDK. It is, however, absolutely possible to use Android Studio for Java development, and command line or Eclipse for C/C++.
The Android SDK has been set up through the Android Studio package. An alternative solution consists of manually deploying the SDK standalone package provided by Google. On the other hand, the Android NDK has been deployed manually from its archive. Both the SDK and NDK are made available through the command line, thanks to a few environment variables.
Tip
OS X is tricky when it comes to environment variables. They can be easily declared in .profile for applications launched from a terminal, as we just did. They can also be declared using an environment.plist file for GUI applications, which are not launched from Spotlight.
To get a fully functional environment, all Android packages have been downloaded thanks to the Android SDK manager, which aims at managing all the platforms, sources, samples, and emulation features available through the SDK. This tool greatly simplifies the update of your environment when new SDK API and components are released. There is no need to reinstall or overwrite anything!
However, the Android SDK manager does not manage the NDK, which explains why we downloaded it separately, and why you will need to update it manually in the future.
Tip
Installing all Android packages is not strictly necessary. Only the SDK platform (and possibly Google APIs) releases targeted by your application are really required. Installing all packages may avoid troubles importing other projects or samples though.
The installation of your Android development environment is not over yet. We still need one more thing to develop comfortably with the NDK.
Linux is naturally suited for Android development as the Android toolchain is Linux-based. Indeed, as a Unix-based system, Linux is well adapted to run the NDK toolchain. Beware, however, that commands to install packages may vary depending on your Linux distribution.
The following section explains how to set up the prerequisite packages on Ubuntu 14.10 Utopic Unicorn.
To develop with the Android NDK on Linux, we need to set up a few prerequisites: Glibc, Make, OpenJDK, and Ant.
From Command Prompt, check whether Glibc (the GNU C standard library) 2.7 or later, usually shipped with Linux systems by default, is installed:
ldd -–version
Makeis also required to build native code. Install it from the build-essential package (requires administrative privilege):sudo apt-get install build-essentialRun the following command to ensure
Makeis correctly installed, in which case its version is displayed:make –version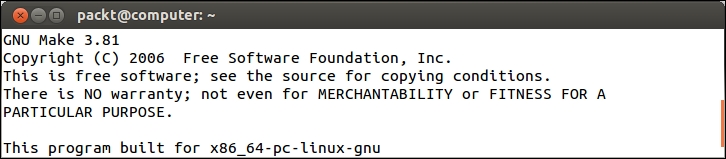
On 64-bit Linux systems, install the 32-bit libraries compatibility package, as Android SDK has binaries compiled for 32 bits only. To do so on Ubuntu 13.04 and earlier, simply install the
ia32-libspackage:sudo apt-get install ia32-libsOn Ubuntu 13.10 64 bits and later, this package has been removed. So, install the required packages manually:
sudo apt-get install lib32ncurses5 lib32stdc++6 zlib1g:i386 libc6-i386Install Java OpenJDK 7 (or JDK 8, although it is not officially supported at the time this book is written). Oracle JDK is also fine:
sudo apt-get install openjdk-7-jdkEnsure JDK is properly installed by running Java and checking its version:
java –version
Install Ant with the following command (requires administrative privilege):
sudo apt-get install antCheck whether Ant is properly working:
ant -version
Our Linux system is now prepared with the necessary packages to host Android development tools:
The build-essential package, which is a minimal set of tools for compilation and packaging on Linux Systems. It includes Make, which is required by the Android NDK compilation system to build native code. GCC (the GNU C Compiler) is also included but is not required as Android NDK already contains its own version.
32-bit compatibility libraries for 64-bit systems, since the Android SDK still uses 32-bit binaries.
A JDK 7, which contains the runtime and tools necessary to build Java applications on Android and run the Eclipse IDE as well as Ant.
Ant, which is a Java-based build automation utility. Although not a requirement, it allows building Android applications from the command line, as we will see in Chapter 2, Starting a Native Android Project. It is also a good solution to set up a continuous integration chain.
The next step consists of setting up the Android development kits.
Android requires specific development kits to develop applications: the Android SDK and NDK. Hopefully, Google has thought about the developer community and provides all the necessary tools for free.
In the following part, we will install these kits to start developing native Android applications on Ubuntu 14.10 Utopic Unicorn.
The Android Studio bundle already contains the Android SDK. Let's install it.
Open your web browser and download the Android Studio bundle from http://developer.android.com/sdk/index.html. Extract the downloaded archive in the directory of your choice (for example,
~/Android/Android-studio).Run the Android Studio script
bin/studio.sh. If Android Studio proposes to import settings from a previous installation, select your preferred option and click on OK.
In the next Setup Wizard screen that appears, select a Standard installation type and continue installation.
Complete installation until the Android Studio welcome screen. Then, close Android Studio.

Go to http://developer.android.com/tools/sdk/ndk/index.html and download the Android NDK (not SDK!) archive suitable for your environment. Extract it inside the directory of your choice (for example,
~/Android/Ndk).To easily access Android utilities from the command line, let's declare the Android SDK and NDK as environment variables. From now on, we will refer to these directories as
$ANDROID_SDKand$ANDROID_NDK. Edit your.profilefile (beware since this is a hidden file!) in your home directory and add the following variables at the end (adapt their path according to your installation directories):export ANDROID_SDK="~/Android/Sdk" export ANDROID_NDK="~/Android/Ndk" export PATH="${ANDROID_SDK}/tools:${ANDROID_SDK}/platform-tools:${ANDROID_NDK}:${PATH}"Log out from your current session and log in again (or restart your computer). List the Android devices connected to your computer (even if none currently are) with
adbto check whether Android SDK is working. No error should appear:adb devices
Check the
ndk-buildversion to ensure that NDK is working. If everything works, theMakeversion should appear:ndk-build -versionOpen a terminal and start the Android SDK manager with the following command:
android
In the opened window, click on New to select all the packages, and then click on the Install packages... button. Accept the licenses in the popup that appears and start the installation of all Android package by clicking on the Install button.
After a few long minutes, all packages are downloaded and a confirmation message indicating that the Android SDK manager has been updated appears.
Validate and close the manager.
Android Studio is now installed on the system. Although it is now the official Android IDE, we are not going to use it much throughout the book because of its lack of support of the NDK. It is, however, absolutely possible to use Android Studio for Java development, and the command line or Eclipse for C/C++.
The Android SDK has been set up through the Android Studio package. An alternative solution consists of manually deploying the SDK standalone package provided by Google. On the other hand, the Android NDK has been deployed manually from its archive. Both the SDK and NDK are made available through the command line, thanks to a few environment variables.
To get a fully functional environment, all Android packages have been downloaded thanks to the Android SDK manager, which aims at managing all the platforms, sources, samples, and emulation features available through the SDK. This tool greatly simplifies the update of your environment when new SDK API and components are released. There is no need to reinstall or overwrite anything!
However, the Android SDK manager does not manage the NDK, which explains why we downloaded it separately, and why you will need to update it manually in the future.
Tip
Installing all Android packages is not strictly necessary. Only the SDK platform (and possibly Google APIs) releases targeted by your application are really required. Installing all packages may avoid trouble when importing other projects or samples though.
The installation of not or Android development environment is not over yet. We still need one more thing to develop comfortably with the NDK.
Since the latest Android SDK releases, Eclipse and its plugins (ADT and CDT) need to be installed manually. To do so execute the following steps:
Go to http://www.eclipse.org/downloads/ and download Eclipse for Java developers. Extract the downloaded archive in the directory of your choice (for example,
C:\Android\eclipse on Windows,~/ Android/Eclipseon Linux, and~/Library/Android/eclipseon Mac OS X).Then, run Eclipse. If Eclipse asks for a workspace (which contains Eclipse settings and projects) when starting up, define the directory of your choice or leave the default settings and then click on OK.
When Eclipse has finished loading, close the welcome page. The following window should appear:

Go to Help | Install New Software…. Enter
https://dl-ssl.google.com/android/eclipsein the Work with: field and validate. After a few seconds, a Developer Tools plugin appears. Select it and click on the Next button.Tip
In case this step fails while accessing update sites, check your Internet connection. You may be either disconnected or connected behind a proxy. In the latter case, you can download the ADT plugin as a separate archive from the ADT web page and install it manually, or configure Eclipse to connect through a proxy.

Follow the wizard and accept conditions when asked. On the last wizard page, click on Finish to install ADT. A warning may appear indicating that the plugin content is unsigned. Ignore it and click on OK. When finished, restart Eclipse as requested.
Go back to Help | Install New Software…. Open the Work with combobox and select the item containing the Eclipse version name (here, Luna). Then, check the Show only software applicable to target environment option. Find Programming Languages in the plugin tree and unfold it. Finally, check all C/C++ plugins and click on Next.

Follow the wizard and accept conditions when asked. On the last wizard page, click on Finish. Wait until the installation is complete and restart Eclipse.
Go to Windows | Preferences... (Eclipse | Preferences... on Mac OS X) and then select Android on the left tree. If everything is fine, the SDK Location should be filled with the Android SDK path.

Then, on the same window, go to Android | NDK. The NDK Location field should be empty. Fill it with the Android NDK path and validate. If the path is wrong, Eclipse complains that the directory is not valid.

Eclipse is now up and running with the appropriate SDK and NDK configuration. Since the ADT package is no longer provided by Google, the Android development plugin ADT and the C/C++ Eclipse plugin CDT have to be installed manually in Eclipse.
Please note that Eclipse has been deprecated by Google and replaced by Android Studio. Sadly, Android Studio C/C++ and NDK support is rather limited for the moment. The only way to build native code is through Gradle, the new Android build system, whose NDK features are still unstable. If a comfortable IDE is essential to you, you can still use Android Studio for Java development and Eclipse for C/C++ though.
If you work on Windows, maybe you are Visual Studio adept. In that case, I advise you that a few projects, shown as follows, bring Android NDK development to Visual Studio:
Android++, which is a free extension for Visual Studio that can be found at http://android-plus-plus.com/. Although still in Beta at the time this book is written, Android++ looks quite promising.
NVidia Nsight, which can be downloaded with a developer account from the Nvidia developer website at https://developer.nvidia.com/nvidia-nsight-tegra (if you have a Tegra device). It packages together the NDK, a slightly customized version of Visual Studio, and a nice debugger.
VS-Android, which can be found at https://github.com/gavinpugh/vs-android, is an interesting Open Source project, which brings NDK tools to Visual Studio.
Our development environment is now almost ready. The last piece is missing though: an environment to run and test our applications.
The Android SDK provides everything we need to easily create a new emulator Android Virtual Device (AVD):
Open Android SDK Manager from a terminal by running the following command:
androidGo to Tools | Manage AVDs.... Alternatively, click on the dedicated Android Virtual Device Manager button in the main toolbar of Eclipse.
Then, click on the New button to create a new Android emulator instance. Fill the form with the following information and click on OK:

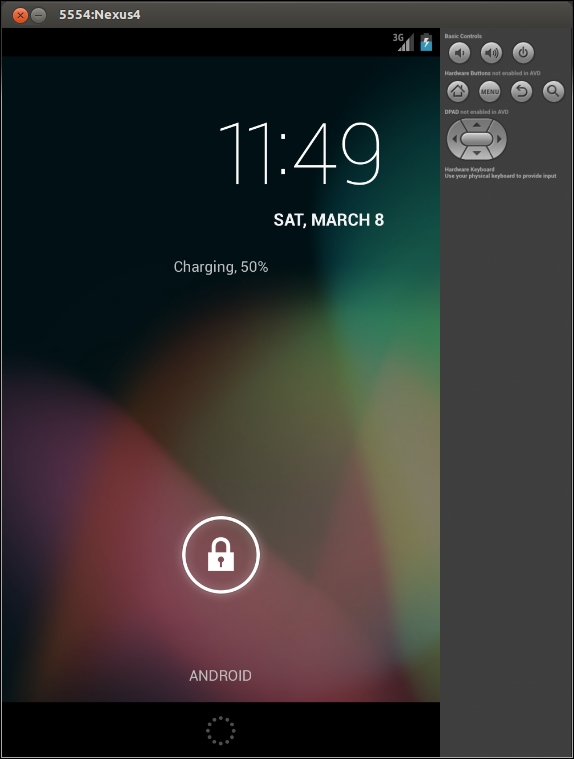
The newly created virtual device now appears in the Android Virtual Device Manager list. Select it and click on Start....
The Launch Options window appears. Tweak the display size depending on your screen size if needed and then click on Launch. The emulator starts up and after some time, your virtual device is loaded:
By default, the emulator SD card is read only. Although this is optional, you can set it in write mode by issuing the following command from a prompt:
adb shell
su
mount -o rw,remount rootfs /
chmod 777 /mnt/sdcard
exit
Android emulators can be easily managed through the Android Virtual Device manager. We are now able to test the applications we will develop in a representative environment. Even better, we can now test them in several conditions and resolutions without requiring a costly device. However, if emulators are useful development tools, take into account that emulation is not always perfectly representative and lacks some features, especially hardware sensors, which can be partially emulated.
Android Virtual Device manager is not the only place where we can manage emulators. We can also use the command-line tool emulator provided with the Android SDK. For example, to launch the Nexus4 emulator created earlier directly from a terminal prompt, enter the following:
emulator -avd Nexus4
While creating the Nexus4 AVD, acute readers might have been surprised to see we set CPU/ABI to Intel Atom (x86), whereas most Android devices run on ARM processors. Indeed, since Windows, OS X, and Linux all run on x86, only x86 Android emulator images can benefit from hardware and GPU acceleration. On the other hand, ARM ABI can run rather slow without it, but it may be more representative of the devices your application may run on.
Tip
To benefit from full hardware acceleration with an X86 AVD, you will need to install the Intel Hardware Accelerated Execution Manager (HAXM) on your Windows or Mac OS X system. On Linux, you can install KVM instead. These programs can work only if your CPU benefits from a Virtualization Technology (which is the case most of the time nowadays).
Acuter readers may be even more surprised that we have not selected the latest Android platform. The reason is simply that x86 images are not available for all Android platforms.
Note
The Snapshot option allows saving the emulator state before closing it. Sadly, this open is incompatible with GPU acceleration. You have to select either one.
As a final note, know that customizing additional options, such as the presence of a GPS, camera, and so on, is also possible when creating an AVD to test an application in limited hardware conditions. The screen orientation can be switched with Ctrl + F11 and Ctrl + F12 shortcuts. For more information on how to use and configure the emulator, check out the Android website at http://developer.android.com/tools/devices/emulator.html.
Although emulators can be of help, they are obviously nothing compared to a real device. So, take your Android device in hand, switch it on and let's try to connect it to our development platform. Any of the following steps may change depending on your manufacturer and phone language. So, please refer to your device documentation for specific instructions.
Device configuration is dependent on your target OS. To do so:
Configure your device driver on your OS if applicable:
If you use Windows, installation of a development device is manufacturer-specific. More information can be found at http://developer.android.com/tools/extras/oem-usb.html with a full list of device manufacturers. If you have a driver CD with your Android device, you can use it. Note that the Android SDK also contains some Windows drivers under
$ANDROID_SDK\extras\google\usb_driver. Specific instructions are available for Google development phones, Nexus One, and Nexus S at http://developer.android.com/sdk/win-usb.html.If you use OS X, simply connecting your development device to your Mac should be enough to get it working! Your device should be recognized immediately without installing anything. Mac's ease of use is not a legend.
If you are a Linux user, connecting your development device to your Distribution (at least on Ubuntu) should be enough to get it working too!
If your mobile device runs Android 4.2 or later, from the application list screen, go to Settings | About phone and tap several times on Build Number at the end of the list. After some efforts, Developer options will magically appear in your application list screen.
On Android 4.1 devices and earlier, Developer options should be visible by default.
Still on your device, from the application list screen, go to Settings | Developer options and enable Debugging and Stay awake.
Plug your device into your computer using a data connection cable. Beware! Some cables are charge-only cables and will not work for development! Depending on your device manufacturer, it may appear as a USB disk.
On Android 4.2.2 devices and later, a dialog Allow USB debugging? appears on the phone screen. Select Always allow from this computer to permanently allow debugging and then click on OK.
Open Command Prompt and execute the following:
adb devices
On Linux, if ????????? appears instead of your device name (which is likely), then
adbdoes not have proper access rights. A solution might be to restartadbas root (at your own risk!):sudo $ANDROID_SDK/platform-tools/adb kill-server sudo $ANDROID_SDK/platform-tools/adb devices
Another solution to find your Vendor ID and Product ID may be needed. Vendor ID is a fixed value for each manufacturer that can be found on the Android developer website at http://developer.android.com/tools/device.html (for example, HTC is
0bb4). The device's Product ID can be found using the result of thelsusbcommand in which we look for the Vendor ID (for example, here 0c87 is HTC Desire product ID):lsusb | grep 0bb4
Then, with root privilege, create a file
/etc/udev/rules.d/51-android.ruleswith your Vendor ID and Product ID and change file rights to 644:sudo sh -c 'echo SUBSYSTEM==\"usb\", SYSFS{idVendor}==\"<Your Vendor ID>\", ATTRS{idProduct}=\"<Your Product ID>\", GROUP=\"plugdev\", MODE=\"0666\" > /etc/udev/rules.d/52-android.rules' sudo chmod 644 /etc/udev/rules.d/52-android.rules
Finally, restart the
udevservice andadb:sudo service udev restart adb kill-server adb devices
Launch Eclipse and open the DDMS perspective (Window | Open Perspective | Other...). If working properly, your phone should be listed in the Devices view.
Tip
Eclipse is a compound of many views, such as the Package Explorer View, the Debug View, and so on. Usually, most of them are already visible, but sometimes they are not. In that case, open them through the main menu by navigating to Window | Show View | Other…. Views in Eclipse are grouped in Perspectives, which store workspace layout. They can be opened by going to Window | Open Perspective | Other…. Beware that some contextual menus may be available only in some perspectives.
Our Android device has been switched into development mode and connected to our workstation through the Android Debug Bridge daemon. ADB gets started automatically the first time it is called, either from Eclipse or the command line.
We also enabled the Stay awake option to stop automatic screen shutdown when the phone charges, or when developing with it! And, more important than anything, we discovered that HTC means High Tech Computer! Jokes apart, connection process can be tricky on Linux, although little trouble should be encountered nowadays.
Still having trouble with a reluctant Android device? That could mean any of the following:
ADB is malfunctioning. In that case, restart the ADB deamon or execute it with administrative privilege.
Your development device is not working properly. In that case, try restarting your device or disabling and re-enabling development mode. If that still does not work, then buy another one or use the emulator.
Your host system is not properly set up. In that case, check your device manufacturer instructions carefully to make sure the necessary driver is correctly installed. Check hardware properties to see whether it is recognized and turn on USB storage mode (if applicable) to see whether it is properly detected. Please refer to your device documentation.
Tip
When the charge-only mode is activated, SD card files and directories are visible to the Android applications installed on your phone but not to your computer. On the opposite side, when disk drive mode is activated, those are visible only from your computer. Check your connection mode when your application cannot access its resource files on an SD card.
ADB is a multi-facet tool which is used as a mediator between the development environment and devices. It is composed of:
A background process running on emulators and devices to receive orders or requests from your workstation.
A background server on your workstation communicating with connected devices and emulators. When listing devices, the ADB server is involved. When debugging, the ADB server is involved. When any communication with a device happens, the ADB server is involved!
A client running on your workstation and communicating with devices through the ADB server. The ADB client is what we interacted with to list devices.
ADB offers many useful options among which some are in the following table:
|
Command |
Description |
|---|---|
|
|
To get an exhaustive help with all options and flags available |
|
|
To print the whole device state |
|
|
To list all Android devices currently connected including emulators |
|
|
To install an application package. Append |
|
|
To terminate the ADB daemon |
|
|
To transfer a file to your computer |
|
|
To transfer a file to your device or emulator |
|
|
To restart an Android device programmatically |
|
|
To start a shell session on an Android device (more on this in Chapter 2, Starting a Native Android Project) |
|
|
To launch the ADB daemon |
|
|
To sleep until a device or emulator is connected to your computer (for example, in a script) |
ADB also provides optional flags to target a specific device when several are connected simultaneously:
|
|
To target a specific device by its name (device name can be found with adb devices) |
|
|
To target the current physical device if only one is connected (or an error message is raised) |
|
|
To target the currently running emulator if only one is connected (or an error message is raised) |
For example, to dump the emulator state when a device is connected at the same time, execute the following command:
adb -e bugreport
This is only an overview of what ADB can do. More information can be found on the Android developer website at http://developer.android.com/tools/help/adb.html.
Setting up our Android development platform is a bit tedious but is hopefully performed once and for all!
In summary, we installed all the prerequisite packages on our system. Some of them are specific to the target OS, such as Cygwin on Windows, Developer Tools on OS X, or build-essential packages on Linux. Then, we installed the Android Studio bundle, which contains both the Android Studio IDE and the Android SDK. The Android NDK has to be downloaded and set up separately.
Even if we will not use it much throughout this book, Android Studio remains one of the best choices for pure Java development. It is guaranteed to be maintained by Google and may become a good choice when Gradle NDK's integration gets more mature.
Meanwhile, the simplest solution is to go with Eclipse for NDK development. We installed Eclipse with the ADT and CDT plugin. These plugins integrate well together. They allow combining the power of Android Java and native C/C++ code into one single IDE.
Finally, we launched an Android emulator and connected an Android device to our development platform through the Android Debug Bridge.
Tip
With the Android NDK being "open", anybody can build its own version. The Crystax NDK is a special NDK package built by Dmitry Moskalchuk. It brings advanced features unsupported by the NDK (latest toolchains, Boost out of the box… exceptions were first supported by the CrystaxNDK). Advanced users can find it on the Crystax website at https://www.crystax.net/en/android/ndk.
We now have the necessary tools in our hands to shape our mobile ideas. In the next chapter, we will tame them to create, compile, and deploy our first Android project!