


 Download code from GitHub
Low-Level Network Device Interactions
In Chapter 1, Review of TCP/IP Protocol Suite and Python, we looked at the theories and specifications behind network communication protocols. We also took a quick tour of the Python language. In this chapter, we will start to dive deeper into the management of network devices using Python. In particular, we will examine the different ways in which we can use Python to programmatically communicate with legacy network routers and switches.
What do I mean by legacy network routers and switches? While it's hard to imagine any networking device coming out today without an application program interface (API) for programmatic communication, it is a known fact that many of the network devices deployed in previous years did not contain API interfaces. The intended method of management for those devices was through command line interfaces (CLIs) using terminal programs, which were originally developed with a human engineer in mind. The management relied on the engineer's interpretation of the data returned from the device for appropriate action. As one can imagine, as the number of network devices and the complexity of the network grew, it became increasingly difficult to manually manage them one by one.
Python has several great libraries and frameworks that can help with these tasks, such as Pexpect, Paramiko, Netmiko, NAPALM, and Nornir, amongst others. It is worth noting that there are several overlaps between these libraries in terms of code, dependencies, and the maintainers of the projects. For example, the Netmiko library was created by Kirk Byers in 2014 based on the Paramiko SSH library. In 2017, Kirk and others teamed up with David Barroso from the NAPALM project to create the Nornir framework to provide a pure Python network automation framework.
For the most part, the libraries can be used concurrently, for example, Ansible (covered in Chapter 4, The Python Automation Framework – Ansible Basics, and Chapter 5, The Python Automation Framework – Beyond Basics) uses both Paramiko and Ansible-NAPALM for its network modules.
With so many libraries in existence today, it's not possible to cover all of them in a reasonable number of pages. In this chapter, we will cover Pexpect first, then move on with examples from Paramiko. Once we understand the basics and operations of Paramiko, it is easy to branch out to other libraries such as Netmiko and NAPALM. In this chapter, we will take a look at the following topics:
- The challenges of the CLI
- Constructing a virtual lab
- The Python Pexpect library
- The Python Paramiko library
- Examples from other libraries
- The downsides of Pexpect and Paramiko
We have briefly discussed the shortfalls of managing network devices via command line interface. It has proven to be ineffective in network management with moderate size networks. This chapter will introduce Python libraries that can work with that limitation. First, let us discuss some of the challenges with CLI in more detail.
The challenges of the CLI
At the Interop expo in Las Vegas in 2014, Big Switch Networks' CEO Douglas Murray displayed the following slide to illustrate what had changed in data center networking (DCN) in the 20 years between 1993 to 2013:
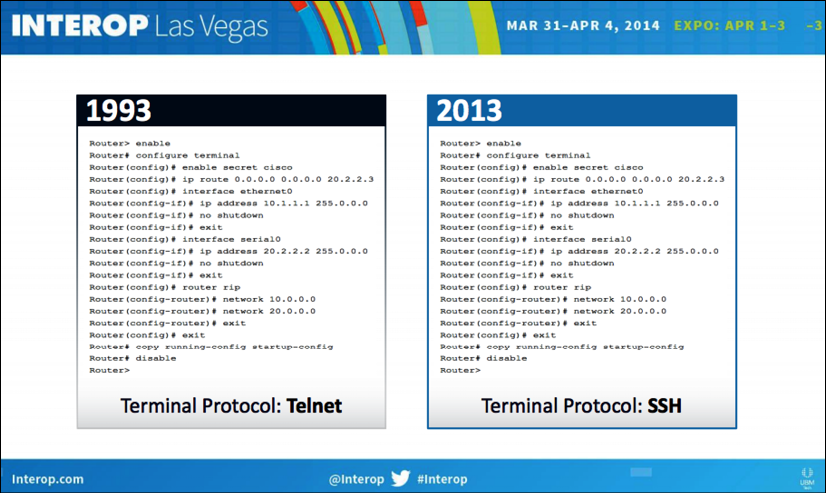
Figure 1: Data center networking changes (source: https://www.bigswitch.com/sites/default/files/presentations/murraydouglasstartuphotseatpanel.pdf)
His point was obvious: not much had changed in those 20 years in the way we manage network devices. While he might have been negatively biased toward the incumbent vendors when displaying this slide, his point is well taken. In his opinion, the only thing that had changed about managing routers and switches in 20 years was the protocol changing from the less secure Telnet to the more secure SSH.
It was right around the same time in 2014 that we started to see the industry coming to a consensus about the clear need to move away from manual, human-driven CLIs toward an automatic, computer-centric automation API. Make no mistake, we still need to directly communicate with the device when making network designs, bringing up initial proof of concepts, and deploying the topology for the first time. However, once we've moved beyond the initial deployment, the network management requirements are usually changed to consistently make the same changes reliably across network devices, to make the changes error-free, and to repeat them over and over again without the engineer being distracted or feeling tired. This requirement sounds like an ideal job for computers and our favorite language, Python.
Referring back to the slide, if the network devices can only be managed with the command line, the main challenge becomes replicating the interactions previously between the router and the administrator with a computer program. In the command line, the router will output a series of information and will expect the administrator to enter a series of manual commands based on the engineer's interpretation of the output. For example, in a Cisco Internetwork Operating System (IOS) device, you have to type in enable to get into a privileged mode, and upon receiving the returned prompt with the # sign, you then type in configure terminal in order to go into the configuration mode. The same process can further be expanded into the interface configuration mode and routing protocol configuration mode. This is in sharp contrast to a computer-driven, programmatic mindset. When the computer wants to accomplish a single task, say, put an IP address on an interface, it wants to structurally give all the information to the router at once, and it would expect a single yes or no answer from the router to indicate the success or failure of the task.
The solution, as implemented by both Pexpect and Paramiko, is to treat the interactive process as a child process and watch over the interaction between the child process and the destination device. Based on the returned value, the parent process will decide the subsequent action, if any.
I am sure we are all anxious to get started at using the Python libraries, but first, we will need to construct our network lab in order to have a network to test our code against. We will begin by looking at different ways we can build our network labs.
Constructing a virtual lab
Before we dive into the Python libraries and frameworks, let's examine the options of putting together a lab for the benefit of learning. As the old saying goes, "practice makes perfect" – we need an isolated sandbox to safely make mistakes, try out new ways of doing things, and repeat some of the steps to reinforce concepts that were not clear in the first try. It is easy enough to install Python and the necessary packages for the management host, but what about those routers and switches that we want to simulate?
To put together a network lab, we basically have two options: physical devices or virtual devices. Let's look at the advantages and disadvantages of the respective options.
Physical devices
This option consists of putting together a lab consisting of physical network devices that you can see and touch. If you are lucky enough, you might even be able to construct a lab that is an exact replication of your production environment:
- Advantages: It is an easy transition from lab to production. The topology is easier to understand for managers and fellow engineers who can look at and work on the devices if need be. In short, the comfort level with physical devices is extremely high because of familiarity.
- Disadvantages: It is relatively expensive to pay for a device that is only used in the lab. Physical devices require engineering hours to rack and stack and are not very flexible once constructed.
Virtual devices
These are emulations or simulations of actual network devices. They are either provided by the vendors or by the open source community:
- Advantages: Virtual devices are easier to set up, relatively cheap, and can make changes to the topology quickly.
- Disadvantages: They are usually a scaled-down version of their physical counterpart. Sometimes there are feature gaps between the virtual and the physical device.
Of course, deciding on a virtual or physical lab is a personal decision derived from a trade-off between the cost, ease of implementation, and the risk of having a gap between the lab and production. In some of the environments I have worked on, the virtual lab was used when doing an initial proof-of-concept while the physical lab was used when we moved closer to the final design.
In my opinion, as more and more vendors decide to produce virtual appliances, the virtual lab is the way to proceed in a learning environment. The feature gap of the virtual appliance is relatively small and specifically documented, especially when the virtual instance is provided by the vendor. The cost of the virtual appliance is relatively small compared to buying physical devices. The time-to-build using virtual devices is quicker because they are usually just software programs.
For this book, I will use a combination of physical and virtual devices for concept demonstration with a preference for virtual devices. For the examples we will see, the differences should be transparent. If there are any known differences between the virtual and physical devices pertaining to our objectives, I will make sure to list them.
You will see that for the examples in the book, I will always try to make the network topology as simple as possible while still able to demonstrate the concept at hand. Each virtual network usually consists of not more than a few nodes and often we will reuse the same virtual network for multiple labs.
As such, in previous editions, readers have been able to use many of the popular virtual network labs such as GNS3, Eve-NG, and other virtual machines.
For the examples in this book, I am using virtual machines from various vendors such as Juniper and Arista. At the time of writing, Arista vEOS can be downloaded for free from the Arista site. Juniper JunOS Olive, which I use, is not an official supported platform, but Juniper offers a free trial license for vMX that can be substituted. I am also using a network lab program from Cisco called Virtual Internet Routing Lab (VIRL), https://learningnetworkstore.cisco.com/virtual-internet-routing-lab-virl/cisco-personal-edition-pe-20-nodes-virl-20. It is a paid program, but in the following sections I will explain why I think it is a good option for virtual network labs.
Cisco VIRL
I remember when I first started to study for my Cisco Certified Internetwork Expert (CCIE) lab exam, I purchased some used Cisco equipment from eBay to study with. Even at a discount, each router and switch cost hundreds of US dollars, so to save money, I purchased some really outdated Cisco routers from the 1980s (search for Cisco AGS routers in your favorite search engine for a good chuckle), which significantly lacked features and horsepower, even for lab standards. As much as it made for an interesting conversation with family members when I turned them on (they were really loud), putting the physical devices together was not fun. They were heavy and clunky, it was a pain to connect all the cables, and to introduce link failure, I would literally unplug a cable.
Fast-forward a few years. Dynamips was created and I fell in love with how easy it was to create different network scenarios. This was especially important when I tried to learn a new concept. All you need is the IOS images from Cisco, a few carefully constructed topology files, and you can easily build a virtual network that you can test your knowledge on. I had a whole folder of network topologies, pre-saved configurations, and different version of images, as called for by different scenarios. The addition of a GNS3 frontend gives the whole setup a beautiful GUI facelift. With GNS3, you can just click and drop your links and devices; you can even print out the network topology for your manager or client right out of the GNS3 design panel.
The only thing that was lacking was the tool not being officially blessed by the vendor, that is Cisco, and the perceived lack of credibility because of it.
In 2015, the Cisco community decided to fulfill this need by releasing the Cisco VIRL. This is my preferred method of developing and trying out much of the Python code, both for this book and my own production use.
As of November 14, 2019, the personal edition 20-Node license is available for purchase for only USD $199.99 per year.
Even at a monetary cost, in my opinion, the VIRL platform offers a few advantages over other alternatives:
- Ease of use: As mentioned, all the images for IOSv, IOS-XRv, CSR1000v, NX-OSv, and ASAv are included in a single download.
- Official (kind of): Although support is community-driven, it is a widely used tool internally at Cisco. Because of its popularity, bugs get fixed quickly, new features are carefully documented, and useful knowledge is widely shared among its users.
- The cloud migration path: The project offers a logical migration path when your emulation grows out of the hardware power you have, such as Cisco dCloud (https://dcloud.cisco.com/), VIRL on Packet (http://virl.cisco.com/cloud/), and Cisco DevNet (https://developer.cisco.com/). This is an important feature that sometimes gets overlooked.
- The link and control-plane simulation: The tool can simulate latency, jitter, and packet loss on a per-link basis for real-world link characteristics. There is also a control-plane traffic generator for external route injection.
- Others: The tool offers some nice features, such as VM Maestro topology design and simulation control, AutoNetKit for automatic config generation, and user workspace management if the server is shared. There are also open source projects such as virlutils (https://github.com/CiscoDevNet/virlutils), which are actively worked on by the community to enhance the workability of the tool.
We will not use all of the features in VIRL in this book. But since this is a relatively new tool that is worth your consideration, if you do decide this is the tool you would like to use, I want to offer some of the setups I used.
VIRL tips
The VIRL website (http://virl.cisco.com/) offers lots of guidance, preparation, and documentation. I also find that the VIRL user community generally offers quick and accurate help. I will not repeat information already offered in those two places; however, some of the setups I use for the lab in this book follow.
My VIRL lab uses two virtual Ethernet interfaces for connections. The first interface is set up as network address translation (NAT) for the host machine's internet connection, and the second is used for local management interface connectivity (VMnet2 in the following example). I use a separate virtual machine with a similar network setup in order to run my Python code, with the first primary Ethernet used for internet connectivity and the second Ethernet connection to VMnet2 for lab device management network:
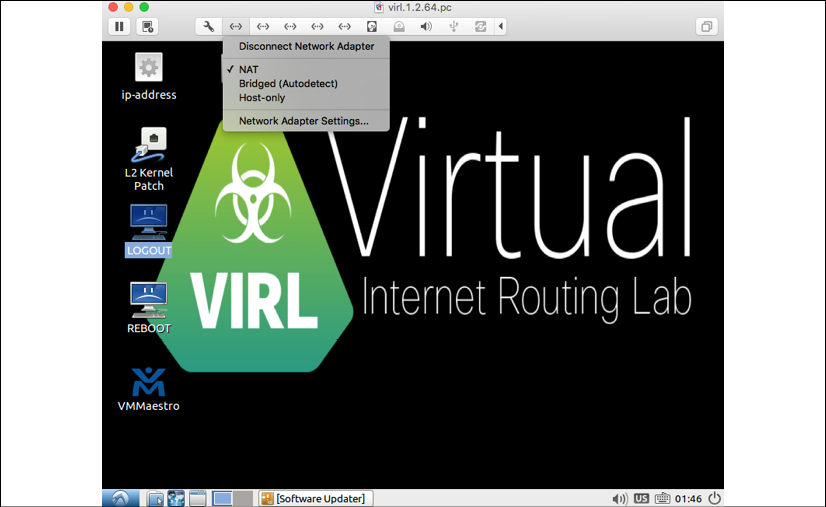
Figure 2: VIRL Ethernet adapter 1 changed to NAT
- VMnet2 is a custom network created to connect the Ubuntu host with the VIRL virtual machine:

Figure 3: VIRL Ethernet adapter 2 connects to VMNet2
In the Topology design option, I set the Management Network option to Shared flat network in order to use VMnet2 as the management network on the virtual routers:

Figure 4: Use Shared flat network for the VIRL management network
- Under the Node configuration, you have the option to statically configure the management IP. I try to statically set the management IP addresses instead of having them dynamically assigned by the software. This allows for more deterministic accessibility:
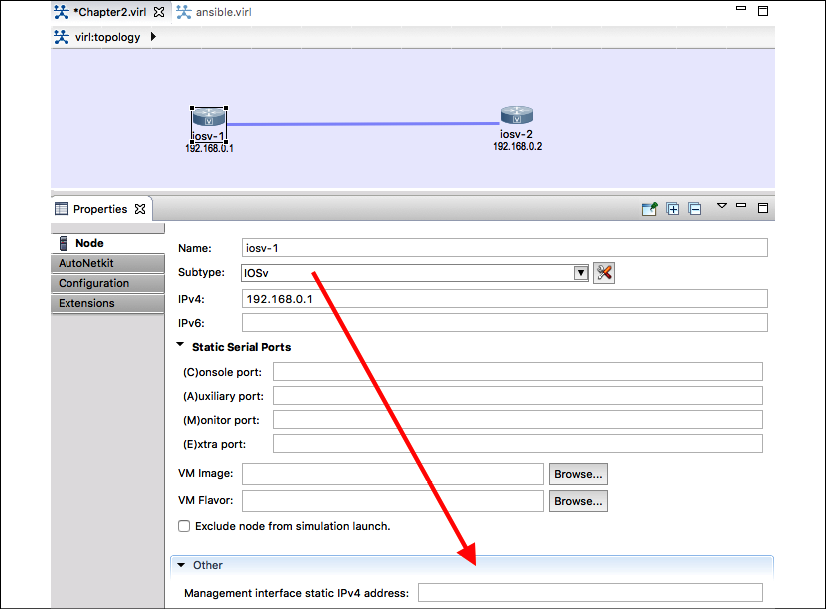
Figure 5: IOSv1 with static management IP
Cisco DevNet and dCloud
Cisco provides two other excellent, at the time of writing, free methods for practicing network automation with various Cisco gear. Both of the tools require a Cisco Connection Online (CCO) login. They are both really good, especially for the price point (they are free!).
The first tool is the Cisco DevNet (https://developer.cisco.com/) sandbox, which includes guided learning tracks, complete documentation, and sandbox remote labs, among other benefits. Some of the labs are always on, while others you need to reserve. The lab availability will depend on usage. It is a great alternative if you do not already have a lab at your own disposal. DevNet is certainly a tool that you should take full advantage of, regardless of whether you have a locally run VIRL host or not:
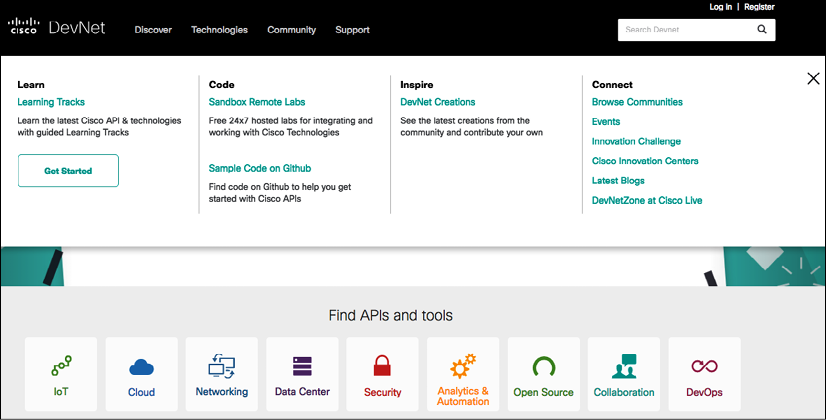
Figure 6: Cisco DevNet
Since its inception, Cisco DevNet has become the defacto destination for all things related to network programmability and automation at Cisco. In fact, in June 2019, Cisco announced many new tracks of DevNet certifications, https://developers.cisco.com/certification/
Another free online lab option for Cisco is https://dcloud.cisco.com/. You can think of dCloud as running VIRL on other people's servers without having to manage or pay for those resources. It seems that Cisco is treating dCloud as both a standalone product as well as an extension to VIRL. For example, in the use case of when you are unable to run more than a few IOS-XR or NX-OS instances locally, you can use dCloud to extend your local lab.
It is a relatively new tool, but it is definitely worth a look:
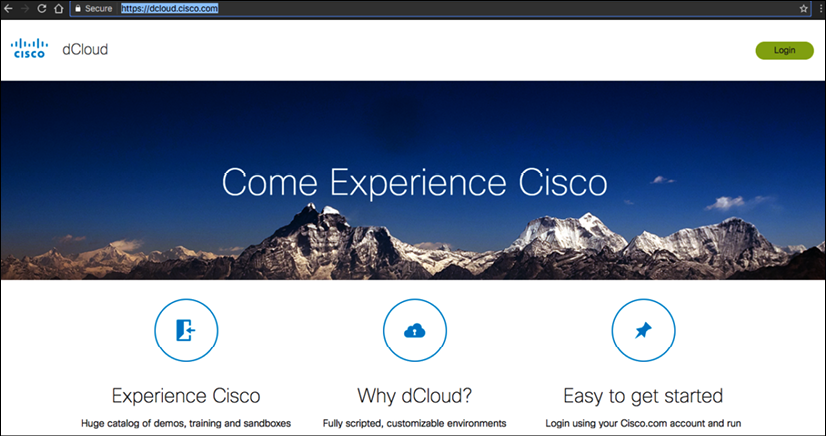
Figure 7: Cisco dCloud
GNS3
There are a few other virtual labs that I have used for other projects. The GNS3 tool is one of them:

Figure 8: GNS3 Website
As mentioned previously, GNS3 is what a lot of us used to study for certification tests and to practice for labs. The tool has really grown up from the early days of being the simple frontend for Dynamips into a viable commercial product. One of the downsides for Cisco-sponsored tools, such as VIRL, DevNet, and dCloud, is that they only contain Cisco technologies. Even though they provide ways for virtual lab devices to communicate with the outside world and to communicate with other vendor equipment, the steps are not very intuitive. GNS3 is vendor-neutral and can include a multi-vendor virtualized platform directly in the lab. This is typically done either by making a clone of the image (such as Arista vEOS) or by directly launching the network device image via other hypervisors (such as Juniper Olive emulation). GNS3 is useful when there is a need to incorporate multi-vendor technologies into the same lab.
Another multi-vendor network emulation environment that has gotten a lot of great reviews is the Emulated Virtual Environment Next Generation (Eve-NG): http://www.eve-ng.net/. I personally do not have much experience with the tool, but many of my colleagues and friends in the industry use it for their network labs.
There are also other virtualized platforms, such as Arista vEOS (https://eos.arista.com/tag/veos/), Juniper vMX (http://www.juniper.net/us/en/products-services/routing/mx-series/vmx/), and vSRX (http://www.juniper.net/us/en/products-services/security/srx-series/vsrx/), which you can use as a standalone virtual appliance during testing. They are great complementary tools for testing platform-specific features, such as the differences between the API versions on the platform. Many of them are offered as paid products on public cloud provider marketplaces for easier access. They often offer the identical feature as their physical counterpart.
Now that we have built our network lab, we can start to experiment with the Python libraries that can help with management and automation. We will begin with the Pexpect library.
Python Pexpect library
Pexpect is a pure Python module for spawning child applications, controlling them, and responding to expected patterns in their output. Pexpect works like Don Libes' Expect. Pexpect allows your script to spawn a child application and control it as if a human were typing commands.
Read the Pexpect docs at https://pexpect.readthedocs.io/en/stable/index.html
Let's take a look at the Python Pexpect library. Similar to the original Tool Command Language (TCL) Expect module by Don Libe, Pexpect launches or spawns another process and watches over it in order to control the interaction. The Expect tool was originally developed to automate interactive processes such as FTP, Telnet, and rlogin, and was later expanded to include network automation. Unlike the original Expect, Pexpect is entirely written in Python, which does not require TCL or C extensions to be compiled. This allows us to use the familiar Python syntax and its rich standard library in our code.
Python virtual environment
Let us start by using the Python virtual environment, which allows us to manage separate package installations for different projects. This is accomplished by creating a "virtual" isolated Python installation and installing packages into that virtual installation and we would not need to worry about breaking the packages installed globally or from other virtual environments. We will start by installing the Python pip tool, then create the virtual environment:
$ sudo apt update
$ sudo apt install python3-pip
$ python3 -m venv venv
$ source venv/bin/activate
(venv) $
(venv) $ which python
/home/echou/venv/bin/python
(venv) $ deactivate
As you can see from the output, we use the venv package from the Python 3 standard library, create the directory containing our environment, then activate it. While the virtual environment is activated, you will see the (venv) label in front of your hostname, indicating that you are in that virtual environment. When finished, you can use the deactivate command to exit the virtual environment. If interested, you can learn more about Python virtual environments here: https://packaging.python.org/guides/installing-using-pip-and-virtual-environments/#installing-virtualenv.
Python 2's usage and installation of a virtual environment is slightly different. You can find a number of tutorials online for Python 2 virtual environments.
Pexpect installation
Pexpect installation process is pretty straight forward:
(venv) $ pip install pexpect
If you are installing Python packages in the global environment, you will need to use root privilege, such as sudo pip install pexpect.
Do a quick to test to make sure the package is usable, make sure we start the Python interactive shell from the virtual environment:
(venv) $ python
Python 3.6.8 (default, Oct  7 2019, 12:59:55)
[GCC 8.3.0] on linux
Type "help", "copyright", "credits" or "license" for more information.
>>> import pexpect
>>> dir(pexpect)
['EOF', 'ExceptionPexpect', 'Expecter', 'PY3', 'TIMEOUT', '__all__', '__builtins__', '__cached__', '__doc__', '__file__', '__loader__', '__name__', '__package__', '__path__', '__revision__', '__spec__', '__version__', 'exceptions', 'expect', 'is_executable_file', 'pty_spawn', 'run', 'runu', 'searcher_re', 'searcher_string', 'spawn', 'spawnbase', 'spawnu', 'split_command_line', 'sys', 'utils', 'which']
Pexpect overview
For our first lab, we will construct a simple network with two IOSv devices connected back to back:

Figure 9: Lab topology
The devices will each have a loopback address in the 192.16.0.x/24 range and the management IP will be in the 172.16.1.x/24 range. The VIRL topology file is included in the accompanying downloadable files as well as on the GitHub repository (https://github.com/PacktPublishing/Mastering-Python-Networking-Third-Edition) for the book. You can import the topology to your own VIRL software. If you do not have VIRL, you can also view the necessary information by opening the topology file with a text editor. The file is simply an XML file with each node's information under the node element:
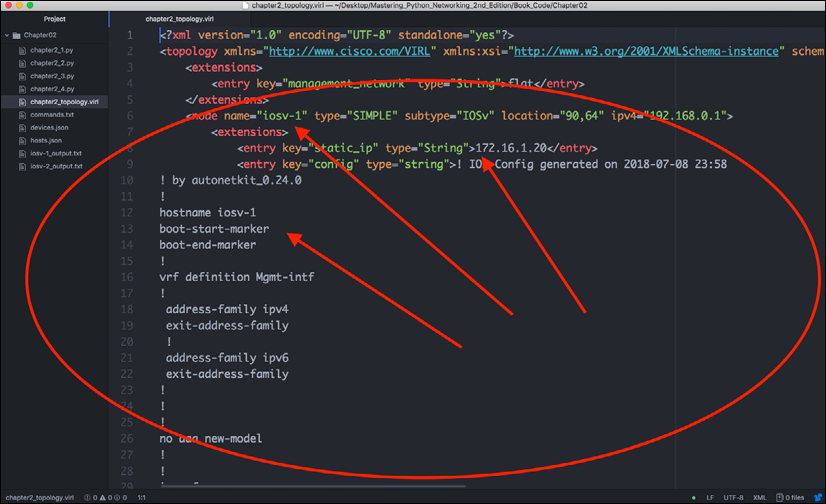
Figure 10: Lab node information
With the devices ready, let's take a look at how you would interact with the router if you were to telnet into the device:
(venv) $ telnet 172.16.1.20
Trying 172.16.1.20...
Connected to 172.16.1.20.
Escape character is '^]'.
<skip>
User Access Verification
Username: cisco
Password:
I used VIRL AutoNetKit to automatically generate the initial configuration of the routers, which generated the default username cisco, and the password cisco. Notice that the user is already in privileged mode because of the privilege assigned in the configuration:
iosv-1#sh run | i cisco
enable password cisco
username cisco privilege 15 secret 5 $1$SXY7$Hk6z8OmtloIzFpyw6as2G.
 password cisco
 password cisco
The auto-config also generated vty access for both telnet and SSH:
line con 0
 password cisco
line aux 0
line vty 0 4
 exec-timeout 720 0
 password cisco
 login local
 transport input telnet ssh
!
Let's see a Pexpect example using the Python interactive shell:
>>> import pexpect
>>> child = pexpect.spawn('telnet 172.16.1.20')
>>> child.expect('Username')
0
>>> child.sendline('cisco')
6
>>> child.expect('Password')
0
>>> child.sendline('cisco')
6
>>> child.expect('iosv-1#')
0
>>> child.sendline('show version | i V')
19
>>> child.before
b": \r\n**************************************************************************\r\n* IOSv is strictly limited to use for evaluation, demonstration and IOS  *\r\n* education. IOSv is provided as-is and is not supported by Cisco's      *\r\n* Technical Advisory Center. Any use or disclosure, in whole or in part, *\r\n* of the IOSv Software or Documentation to any third party for any       *\r\n* purposes is expressly prohibited except as otherwise authorized by     *\r\n* Cisco in writing.                                                      *\r\n**************************************************************************\r\n"
>>> child.sendline('exit')
5
>>> exit()
In the previous interactive example, Pexpect spawns off a child process and watches over it in an interactive fashion. There are two important methods shown in the example, expect() and sendline(). The expect() line indicates that the string in the Pexpect process looks for is an indicator for when the returned string is considered done. This is the expected pattern. In our example, we knew the router had sent us all the information when the hostname prompt (iosv-1#) was returned. The sendline() method indicates which words should be sent to the remote device as the command. There is also a method called send() but sendline() includes a linefeed, which is similar to pressing the Enter key at the end of the words you sent in your previous telnet session. From the router's perspective, it is just as if someone typed in the text from a Terminal. In other words, we are tricking the routers into thinking they are interfacing with a human being when they are actually communicating with a computer.
The before and after properties will be set to the text printed by the child application. The before properties will be set to the text printed by the child application up to the expected pattern. The after string will contain the text that was matched by the expected pattern. In our case, the before text will be set to the output between the two expected matches (iosv-1#), including the show version command. The after text is the router hostname prompt:
>>> child.sendline('show version | i V')
19
>>> child.expect('iosv-1#')
0
>>> child.before
b'show version | i V\r\nCisco IOS Software, IOSv Software (VIOS-ADVENTERPRISEK9-M), Version 15.6(3)M2, RELEASE SOFTWARE (fc2)\r\nProcessor board ID 9Y0KJ2ZL98EQQVUED5T2Q\r\n'
>>> child.after
b'iosv-1#'
If you are wondering about the b' in front of the return, it is a Python byte string (https://docs.python.org/3.7/library/stdtypes.html)
What would happen if you expected the wrong term? For example, if you typed in username with the lowercase "u" instead of Username after spawning the child application, then the Pexpect process would look for a string of username from the child process. In that case, the Pexpect process would just hang because the word username would never be returned by the router. The session would eventually time out, or you could manually exit out via Ctrl + C.
The expect() method waits for the child application to return a given string, so in the previous example, if you wanted to accommodate both lowercase and uppercase u, you could use the following term:
>>> child.expect('[Uu]sername')
The square bracket serves as an or operation that tells the child application to expect a lowercase or uppercase "u" followed by sername as the string. What we are telling the process is that we will accept either Username or username as the expected string.
For more information on Python regular expressions, go to: https://docs.python.org/3.7/library/re.html
The expect() method can also contain a list of options instead of just a single string; these options can also be regular expressions themselves. Going back to the previous example, you can use the following list of options to accommodate the two different possible strings:
>>> child.expect(['Username', 'username'])
Generally speaking, use the regular expression for a single expect string when you can fit the different hostname in a regular expression, whereas use the possible options if you need to catch completely different responses from the router, such as a password rejection. For example, if you use several different passwords for your login, you want to catch % Login invalid as well as the device prompt.
One important difference between Pexpect regular expressions and Python regular expressions is that Pexpect matching is non-greedy, which means they will match as little as possible when using special characters. Because Pexpect performs regular expressions on a stream, you cannot look ahead, as the child process generating the stream may not be finished. This means the special dollar sign character $ typically matching the end of the line is useless because .+ will always return no characters, and the .* pattern will match as little as possible. In general, just keep this in mind and be as specific as you can be on the expect match strings.
Let's consider the following scenario:
>>> child.sendline('show run | i hostname')
22
>>> child.expect('iosv-1')
0
>>> child.before
b'show version | i V\r\nCisco IOS Software, IOSv Software (VIOS-ADVENTERPRISEK9-M), Version 15.6(3)M2, RELEASE SOFTWARE (fc2)\r\nProcessor board ID 9Y0KJ2ZL98EQQVUED5T2Q\r\n'
>>>
Hmm... Something is not quite right here. Compare it to the Terminal output before; the output you expect would be hostname iosv-1:
iosv-1#sh run | i hostname
hostname iosv-1
Taking a closer look at the expected string will reveal the mistake. In this case, we were missing the hash (#) sign behind the iosv-1 hostname. Therefore, the child application treated the second part of the return string as the expected string:
>>> child.sendline('show run | i hostname')
22
>>> child.expect('iosv-1#')
0
>>> child.before
b'#show run | i hostname\r\nhostname iosv-1\r\n'
You can see a pattern emerging from the usage of Pexpect after a few examples. The user maps out the sequence of interactions between the Pexpect process and the child application. With some Python variables and loops, we can start to construct a useful program that will help us gather information and make changes to network devices.
Our first Pexpect program
Our first program, chapter2_1.py, extends what we did in the last section with some additional code:
#!/usr/bin/env python
import pexpect
devices = {'iosv-1': {'prompt': 'iosv-1#', 'ip': '172.16.1.20'},
           'iosv-2': {'prompt': 'iosv-2#', 'ip': '172.16.1.21'}}
username = 'cisco'
password = 'cisco'
for device in devices.keys():
    device_prompt = devices[device]['prompt']
    child = pexpect.spawn('telnet ' + devices[device]['ip'])
    child.expect('Username:')
    child.sendline(username)
    child.expect('Password:')
    child.sendline(password)
    child.expect(device_prompt)
    child.sendline('show version | i V')
    child.expect(device_prompt)
    print(child.before)
    child.sendline('exit')
We use a nested dictionary in line 5:
devices = {'iosv-1': {'prompt': 'iosv-1#', 'ip': '172.16.1.20'},
           'iosv-2': {'prompt': 'iosv-2#', 'ip': '172.16.1.21'}}
The nested dictionary allows us to refer to the same device (such as iosv-1) with the appropriate IP address and prompt symbol. We can then use those values for the expect() method later on in the loop.
The output prints out the show version | i V output on the screen for each of the devices:
(venv) $ python chapter2_1.py
b'show version | i V\r\nCisco IOS Software, IOSv Software (VIOS-ADVENTERPRISEK9-M), Version 15.6(3)M2, RELEASE SOFTWARE (fc2)\r\nProcessor board ID 9Y0KJ2ZL98EQQVUED5T2Q\r\n'
b'show version | i V\r\nCisco IOS Software, IOSv Software (VIOS-ADVENTERPRISEK9-M), Version 15.6(3)M2, RELEASE SOFTWARE (fc2)\r\n'
Now that we have seen a basic example of Pexpect, let us go deeper into more features of the library.
More Pexpect features
In this section, we will look at more Pexpect features that might come in handy when certain situations arise.
If you have a slow or fast link to your remote device, the default expect() method timeout is 30 seconds, which can be increased or decreased via the timeout argument:
>>> child.expect('Username', timeout=5)
You can choose to pass the command back to the user using the interact() method. This is useful when you just want to automate certain parts of the initial task:
>>> child.sendline('show version | i V')
19
>>> child.expect('iosv-1#')
0
>>> child.before
b'show version | i VrnCisco IOS Software, IOSv Software (VIOS- ADVENTERPRISEK9-M), Version 15.6(2)T, RELEASE SOFTWARE (fc2)rnProcessor board ID 9MM4BI7B0DSWK40KV1IIRrn'
>>> child.interact()
show version | i V
Cisco IOS Software, IOSv Software (VIOS-ADVENTERPRISEK9-M), Version 15.6(3)M2, RELEASE SOFTWARE (fc2)
Processor board ID 9Y0KJ2ZL98EQQVUED5T2Q
iosv-1#sh run | i hostname
hostname iosv-1
iosv-1#exit
Connection closed by foreign host.
>>>
You can get a lot of information about the child.spawn object by printing it out in string format:
>>> str(child)
"<pexpect.pty_spawn.spawn object at 0x7f95f25ff780>\ncommand: /usr/bin/telnet\nargs: ['/usr/bin/telnet', '172.16.1.20']\nbuffer (last 100 chars): b''\nbefore (last 100 chars): b'                     *\\r\\n**************************************************************************\\r\\n'\nafter: b'iosv-1#'\nmatch: <_sre.SRE_Match object; span=(612, 619), match=b'iosv-1#'>\nmatch_index: 0\nexitstatus: 1\nflag_eof: False\npid: 5676\nchild_fd: 5\nclosed: False\ntimeout: 30\ndelimiter: <class 'pexpect.exceptions.EOF'>\nlogfile: None\nlogfile_read: None\nlogfile_send: None\nmaxread: 2000\nignorecase: False\nsearchwindowsize: None\ndelaybeforesend: 0.05\ndelayafterclose: 0.1\ndelayafterterminate: 0.1"
>>>
The most useful debug tool for Pexpect is to log the output in a file:
>>> child = pexpect.spawn('telnet 172.16.1.20')
>>> child.logfile = open('debug', 'wb')
Use child.logfile = open('debug', 'w') for Python 2. Python 3 uses byte strings by default. For more information on Pexpect features, check out: https://pexpect.readthedocs.io/en/stable/api/index.html
We have been working with telnet so far in our examples, which leave our communication in clear text during the session. In modern networks, we typically use secure shells (SSH) for management. In the next section, we will take a look at Pexpect with SSH.
Pexpect and SSH
If you try to use the previous Telnet example and plug it into an SSH session instead, you might find yourself pretty frustrated with the experience. You always have to include the username in the session, answering the ssh new key question, and much more mundane tasks. There are many ways to make SSH sessions work, but luckily, Pexpect has a subclass called pxssh, which specializes in setting up SSH connections. The class adds methods for login, logout, and various tricky things to handle the different situations in the ssh login process.
Let's generate the ssh-key for iosv-1 for ssh:
iosv-1(config)#crypto key generate rsa general-keys
The name for the keys will be: iosv-1.virl.info
Choose the size of the key modulus in the range of 360 to 4096 for your
General Purpose Keys. Choosing a key modulus greater than 512 may take a few minutes
How many bits in the modulus [512]: 2048
% Generating 2048 bit RSA keys, keys will be non-exportable...
[OK] (elapsed time was 2 seconds)
The procedures are mostly the same, with the exception of login() and logout():
>>> from pexpect import pxssh
>>> child = pxssh.pxssh()
>>> child.login('172.16.1.20', 'cisco', 'cisco', auto_prompt_reset=False)
True
>>> child.sendline('show version | i V')
19
>>> child.expect('iosv-1#')
0
>>> child.before
b'show version | i VrnCisco IOS Software, IOSv Software (VIOS- ADVENTERPRISEK9-M), Version 15.6(2)T, RELEASE SOFTWARE (fc2) Processor board ID 9MM4BI7B0DSWK40KV1IIRrn'
>>> child.logout()
>>>
Notice the auto_prompt_reset=False argument in the login() method. By default, pxssh uses the shell prompt to synchronize the output. But since it uses the PS1 option for most of bash-shell or c-shell, they will error out on Cisco or other network devices.
Putting things together for Pexpect
As the final step, let's put everything you have learned so far about Pexpect into a script. Putting code into a script makes it easier to use in a production environment, as well as easier to share with your colleagues. We will write our second script, chapter2_2.py.
You can download the script from the book GitHub repository, https://github.com/PacktPublishing/Mastering-Python-Networking-Third-Edition.
If ssh key has not been generated on the other routers, iosv-2, we should do so now:
iosv-2(config)#crypto key generate rsa general-keys
The name for the keys will be: iosv-2.virl.info
Choose the size of the key modulus in the range of 360 to 4096 for your General Purpose Keys.Choosing a key modulus greater than 512 may take a few minutes
How many bits in the modulus [512]: 2048
% Generating 2048 bit RSA keys, keys will be non-exportable...
[OK] (elapsed time was 2 seconds)
#!/usr/bin/env python
import getpass
from pexpect import pxssh
devices = {'iosv-1': {'prompt': 'iosv-1#', 'ip': '172.16.1.20'},
           'iosv-2': {'prompt': 'iosv-2#', 'ip': '172.16.1.21'}}
commands = ['term length 0', 'show version', 'show run']
username = input('Username: ')
password = getpass.getpass('Password: ')
# Starts the loop for devices
for device in devices.keys():
    outputFileName = device + '_output.txt'
    device_prompt = devices[device]['prompt']
    child = pxssh.pxssh()
    child.login(devices[device]['ip'], username.strip(), password.strip(), auto_prompt_reset=False)
    # Starts the loop for commands and write to output
    with open(outputFileName, 'wb') as f:
        for command in commands:
            child.sendline(command)
            child.expect(device_prompt)
            f.write(child.before)
    child.logout()
The script further expands from our first Pexpect program with the following additional features:
- It uses SSH instead of Telnet
- It supports multiple commands instead of just one by making the commands into a list (line 8) and loops through the commands (starting at line 20)
- It prompts the user for their username and password instead of hardcoding them in the script
- It writes the output in two files,
iosv-1_output.txtandios-2_output.txt, to be further analyzed
The Python Paramiko library
Paramiko is a Python implementation of the SSHv2 protocol. Just like the pxssh subclass of Pexpect, Paramiko simplifies the SSHv2 interaction between the host and the remote device. Unlike pxssh, Paramiko focuses only on SSHv2 with no Telnet support. It also provides both client and server operations.
Paramiko is the low-level SSH client behind the high-level automation framework Ansible for its network modules. We will cover Ansible in Chapter 4, The Python Automation Framework – Ansible Basics and Chapter 5, The Python Automation Framework – Beyond Basics. Let's take a look at the Paramiko library.
Installation of Paramiko
Installing Paramiko is pretty straightforward with Python pip. However, there is a hard dependency on the cryptography library. The library provides low-level, C-based encryption algorithms for the SSH protocol.
The installation instruction for Windows, Mac, and other flavors of Linux can be found at: https://cryptography.io/en/latest/installation/.
We will show the Paramiko installation of our Ubuntu 18.04 virtual machine in the following output. The following output shows the installation steps, as well as Paramiko successfully imported into the Python interactive prompt:
sudo apt-get install build-essential libssl-dev libffi-dev python3-dev
pip install cryptography
pip install paramiko
Let us test the library's usage by importing it with the Python interpreter:
$ python
Python 3.6.8 (default, Aug 20 2019, 17:12:48)
[GCC 8.3.0] on linux
Type "help", "copyright", "credits" or "license" for more information.
>>> import paramiko
>>> exit()
Now we are ready to take a look at Paramiko in the next section.
Paramiko overview
Let's look at a quick Paramiko example using the Python 3 interactive shell:
>>> import paramiko, time
>>> connection = paramiko.SSHClient()
>>> connection.set_missing_host_key_policy(paramiko.AutoAddPolicy())
>>> connection.connect('172.16.1.20', username='cisco', password='cisco', look_for_keys=False, allow_agent=False)
>>> new_connection = connection.invoke_shell()
>>> output = new_connection.recv(5000)
>>> print(output) b"r\n\***********************************************************************
***rn* IOSv is strictly limited to use for evaluation, demonstration and IOS *rn* education. IOSv is provided as-is and is not supported by Cisco's
*rn* Technical Advisory Center. Any use or disclosure, in whole or in part,
*rn* of the IOSv Software or Documentation to any third party for any *rn* purposes is expressly prohibited except as otherwise authorized by *rn* Cisco in writing.
*rn************************************************************************
**rniosv-1#"
>>> new_connection.send("show version | i V\n")
19
>>> time.sleep(3)
>>> output = new_connection.recv(5000)
>>> print(output)
b'show version | i VrnCisco IOS Software, IOSv Software (VIOS- ADVENTERPRISEK9-M), Version 15.6(2)T, RELEASE SOFTWARE (fc2)rnProcessor board ID 9MM4BI7B0DSWK40KV1IIRrniosv-1#'
>>> new_connection.close()
>>>
The time.sleep() function inserts a time delay to ensure that all the outputs were captured. This is particularly useful on a slower network connection or a busy device. This command is not required but is recommended depending on your situation.
Even if you are seeing the Paramiko operation for the first time, the beauty of Python and its clear syntax means that you can make a pretty good educated guess at what the program is trying to do:
>>> import paramiko
>>> connection = paramiko.SSHClient()
>>> connection.set_missing_host_key_policy(paramiko.AutoAddPolicy())
>>> connection.connect('172.16.1.20', username='cisco', password='cisco',
look_for_keys=False, allow_agent=False)
The first four lines create an instance of the SSHClient class from Paramiko. The next line sets the policy that the client should use regarding keys; in this case, iosv-1 is not present in either the system host keys or the application's keys. In our scenario, we will automatically add the key to the application's HostKeys object. At this point, if you log on to the router, you will see the additional login session from Paramiko:
iosv-1#who
Line User Host(s) Idle Location
*578 vty 0 cisco idle 00:00:00 172.16.1.1
579 vty 1 cisco idle 00:01:30 172.16.1.173
Interface User Mode Idle Peer Address
iosv-1#
The next few lines invoke a new interactive shell from the connection and a repeatable pattern of sending a command and retrieving the output. Finally, we close the connection.
Some readers who have used Paramiko before might be familiar with the exec_command() method instead of invoking a shell. Why do we need to invoke an interactive shell instead of using exec_command() directly? Unfortunately, exec_command() on Cisco IOS only allows a single command. Consider the following example with exec_command() for the connection:
>>> connection.connect('172.16.1.20', username='cisco', password='cisco', look_for_keys=False, allow_agent=False)
>>> stdin, stdout, stderr = connection.exec_command('show version | i V\n')
>>> stdout.read()
b'Cisco IOS Software, IOSv Software (VIOS-ADVENTERPRISEK9-M), Version 15.6(2)T, RELEASE SOFTWARE (fc2)rnProcessor board ID 9MM4BI7B0DSWK40KV1IIRrn'
>>>
Everything works great; however, if you look at the number of sessions on the Cisco device, you will notice that the connection is dropped by the Cisco device without you closing the connection:
iosv-1#who
Line User Host(s) Idle Location
*578 vty 0 cisco idle 00:00:00 172.16.1.1
Interface User Mode Idle Peer Address
iosv-1#
Because the SSH session is no longer active, exec_command() will return an error if you want to send more commands to the remote device:
>>> stdin, stdout, stderr = connection.exec_command('show version | i V\n')
Traceback (most recent call last):
File "<stdin>", line 1, in <module>
File "/usr/local/lib/python3.5/dist-packages/paramiko/client.py", line 435, in exec_command
chan = self._transport.open_session(timeout=timeout)
File "/usr/local/lib/python3.5/dist-packages/paramiko/transport.py", line 711, in open_session
timeout=timeout)
File "/usr/local/lib/python3.5/dist-packages/paramiko/transport.py", line 795, in open_channel
raise SSHException('SSH session not active') paramiko.ssh_exception.SSHException: SSH session not active
>>>
In the previous example, the new_connection.recv() command displayed what was in the buffer and implicitly cleared it out for us. What would happen if you did not clear out the received buffer? The output would just keep on filling up the buffer and would overwrite it:
>>> new_connection.send("show version | i V\n")
 19
>>> new_connection.send("show version | i V\n")
19
>>> new_connection.send("show version | i V\n")
19
>>> new_connection.recv(5000)
b'show version | i VrnCisco IOS Software, IOSv Software (VIOS- ADVENTERPRISEK9-M), Version 15.6(2)T, RELEASE SOFTWARE (fc2)rnProcessor
board ID 9MM4BI7B0DSWK40KV1IIRrniosv-1#show version | i VrnCisco IOS Software, IOSv Software (VIOS-ADVENTERPRISEK9-M), Version 15.6(2)T, RELEASE SOFTWARE (fc2)rnProcessor board ID 9MM4BI7B0DSWK40KV1IIRrniosv-1#show version | i VrnCisco IOS Software, IOSv Software (VIOS-ADVENTERPRISEK9-M), Version 15.6(2)T, RELEASE SOFTWARE (fc2)rnProcessor board ID 9MM4BI7B0DSWK40KV1IIRrniosv-1#'
>>>
For consistency of the deterministic output, we will retrieve the output from the buffer each time we execute a command.
Our first Paramiko program
Our first program will use the same general structure as the Pexpect program we have put together. We will loop over a list of devices and commands while using Paramiko instead of Pexpect. This will give us a good compare and contrast of the differences between Paramiko and Pexpect.
If you have not done so already, you can download the code, chapter2_3.py, from the book's GitHub repository at https://github.com/PacktPublishing/Mastering-Python-Networking-Third-Edition. I will list the notable differences here:
devices = {'iosv-1': {'ip': '172.16.1.20'}, 'iosv-2': {'ip': '172.16.1.21'}}
We no longer need to match the device prompt using Paramiko; therefore, the device dictionary can be simplified:
commands = ['show version', 'show run']
There is no sendline equivalent in Paramiko; instead, we manually include the newline break in each of the commands:
def clear_buffer(connection):
    if connection.recv_ready():
        return connection.recv(max_buffer)
We include a new method to clear the buffer for sending commands, such as terminal length 0 or enable, because we do not need the output for those commands. We simply want to clear the buffer and get to the execution prompt. This function will later be used in the loop, such as in line 25 of the script:
output = clear_buffer(new_connection)
The rest of the program should be pretty self-explanatory, similar to what we have seen in this chapter. The last thing I would like to point out is that since this is an interactive program, we place some buffer and wait for the command to be finished on the remote device before retrieving the output:
time.sleep(5)
After we clear the buffer, during the time between the execution of commands, we will wait five seconds. This will give the device adequate time to respond if it is busy.
More Paramiko features
We will look at Paramiko a bit later in Chapter 4, The Python Automation Framework – Ansible Basics, when we discuss Ansible, as Paramiko is the underlying transport for many of the network modules. In this section, we will take a look at some of the other features of Paramiko.
Paramiko for servers
Paramiko can be used to manage servers through SSHv2 as well. Let's look at an example of how we can use Paramiko to manage servers. We will use key-based authentication for the SSHv2 session.
In this example, I used another Ubuntu virtual machine on the same hypervisor as the destination server. You can also use a server on the VIRL simulator or an instance in one of the public cloud providers, such as Amazon AWS EC2.
We will generate a public-private key pair for our Paramiko host:
ssh-keygen -t rsa
This command, by default, will generate a public key named id_rsa.pub, as the public key under the user home directory ~/.ssh along with a private key named id_rsa. Treat the private key with the same attention as you would private passwords that you do not want to share with anybody else. You can think of the public key as a business card that identifies who you are. Using the private and public keys, the message will be encrypted by your private key locally and decrypted by the remote host using the public key. We should copy the public key to the remote host. In production, we can do this via out-of-band using a USB drive; in our lab, we can simply copy the public key to the remote host's ~/.ssh/authorized_keys file. Open up a Terminal window for the remote server so you can paste in the public key.
Copy the content of ~/.ssh/id_rsa.pub on your management host with Paramiko:
$ cat ~/.ssh/id_rsa.pub
ssh-rsa <your public key>
Then, paste it to the remote host under the user directory; in this case, I am using echou for both sides:
<Remote Host>$ vim ~/.ssh/authorized_keys
ssh-rsa <your public key>
You are now ready to use Paramiko to manage the remote host. Notice in this example that we will use the private key for authentication as well as the exec_command() method for sending commands:
>>> import paramiko
>>> key = paramiko.RSAKey.from_private_key_file('/home/echou/.ssh/id_rsa')
>>> client = paramiko.SSHClient()
>>> client.set_missing_host_key_policy(paramiko.AutoAddPolicy())
>>> client.connect('192.168.199.182', username='echou', pkey=key)
>>> stdin, stdout, stderr = client.exec_command('ls -l')
>>> stdout.read()
b'total 44ndrwxr-xr-x 2 echou echou 4096 Jan 7 10:14 Desktopndrwxr-xr-x 2
echou echou 4096 Jan 7 10:14 Documentsndrwxr-xr-x 2 echou echou 4096 Jan 7
10:14 Downloadsn-rw-r--r-- 1 echou echou 8980 Jan 7 10:03
examples.desktopndrwxr-xr-x 2 echou echou 4096 Jan 7 10:14 Musicndrwxr-xr-x
echou echou 4096 Jan 7 10:14 Picturesndrwxr-xr-x 2 echou echou 4096 Jan 7 10:14 Publicndrwxr-xr-x 2 echou echou 4096 Jan 7 10:14 Templatesndrwxr-xr-x
2 echou echou 4096 Jan 7 10:14 Videosn'
>>> stdin, stdout, stderr = client.exec_command('pwd')
>>> stdout.read()
b'/home/echoun'
>>> client.close()
>>>
Notice that in the server example, we do not need to create an interactive session to execute multiple commands. You can now turn off password-based authentication in your remote host's SSHv2 configuration for more secure key-based authentication with automation enabled. Some network devices, such as Cumulus and Vyatta switches, also support key-based authentication.
Putting things together for Paramiko
We are almost at the end of the chapter. In this last section, let's make the Paramiko program more reusable. There is one downside of our existing script: we need to open up the script every time we want to add or delete a host, or whenever we need to change the commands we want to execute on the remote host.
This is due to the fact that both the host and command information are statically entered inside of the script. Hardcoding the host and command has a higher chance of making mistakes. Besides, if you were to pass on the script to colleagues, they might not feel comfortable working in Python, Paramiko, or Linux.
By making both the host and command files be read in as parameters for the script, we can eliminate some of these concerns. Users (and a future you) can simply modify these text files when you need to make host or command changes.
We have incorporated the change in the script named chapter2_4.py.
Instead of hardcoding the commands, we broke the commands into a separate commands.txt file. Up to this point, we have been using show commands; in this example, we will make configuration changes. In particular, we will change the logging buffer size to 30000 bytes:
$ cat commands.txt
config t
logging buffered 30000
end
copy run start
The device's information is written into a devices.json file. We chose JSON format for the device's information because JSON data types can be easily translated into Python dictionary data types:
$ cat devices.json
{
"iosv-1": {"ip": "172.16.1.20"},
"iosv-2": {"ip": "172.16.1.21"}
}
In the script, we made the following changes:
with open('devices.json', 'r') as f:
    devices = json.load(f)
with open('commands.txt', 'r') as f:
    commands = f.readlines()
Here is an abbreviated output from the script execution:
(venv) $ python chapter2_4.py
Username: cisco
Password:
b'terminal length 0\r\niosv-1#config t\r\nEnter configuration commands, one per line.  End with CNTL/Z.\r\niosv-1(config)#'
b'logging buffered 30000\r\niosv-1(config)#'
b'end\r\niosv-1#'
<skip>
Do a quick check to make sure the change has taken place in both running-config and startup-config:
iosv-1#sh run | i logging
logging buffered 30000
iosv-1#sh start | i logging
logging buffered 30000
iosv-2#sh run | i logging
logging buffered 30000
iosv-2#sh start | i logging
logging buffered 30000
The Paramiko library is a general-purpose library that is intended for working with interactive command line programs. For network management, there is another library, Netmiko, that is a fork from Paramiko that is purpose-built for network device management. We will take a look at it in the upcoming section.
The Netmiko library
Paramiko is a great library to do low-level interactions with Cisco IOS and other vendor devices. But if you have noticed from previous examples, we are repeating many of the same steps between iosv-1 and isov-2 for device login and execution. Once we start to develop more automation commands, we also start to repeat ourselves to capture outputs and format them into a usable format. Wouldn't it be great if somebody could write a Python library that simplifies these low-level steps and share it with other network engineers?
Ever since 2014, Kirk Byers (https://github.com/ktbyers) has been working on open source initiatives to simplify the management of network devices. In this section, we will take a look at an example of the Netmiko (https://github.com/ktbyers/netmiko) library that he created.
First, we will install the netmiko library using pip:
(venv) $ pip install netmiko
We can use the example published on Kirk's website, https://pynet.twb-tech.com/blog/automation/netmiko.html, and apply it to our labs. We will start by importing the library and its ConnectHandler class. Then we will define our device parameter as a Python dictionary and pass it to the ConnectHandler. Notice that we are defining a device_type of cisco_ios in the device parameter.
>>> from netmiko import ConnectHandler
>>> ios_v1 = {'device_type': 'cisco_ios', 'host': '172.16.1.20', 'username': 'cisco', 'password': 'cisco'}
>>> net_connect = ConnectHandler(**ios_v1)
This is where the simplification begins. Notice that the library automatically determines the device prompt as well as formatting the returned output from the show command:
>>> net_connect.find_prompt()
'iosv-1#'
>>> output = net_connect.send_command('show ip int brief')
>>> print(output)
Interface                  IP-Address      OK? Method Status                Protocol
GigabitEthernet0/0         172.16.1.20     YES NVRAM  up                    up
GigabitEthernet0/1         10.0.0.5        YES NVRAM  up                    up
Loopback0                  192.168.0.1     YES NVRAM  up                    up
Let's see another example for the second Cisco IOS device in our lab, but this time we will define the iosv-2 parameter when we initiate the ConnectHandler object and send a configuration command instead of a show command. Note that the command attribute is a list that can contain multiple commands:
>>> net_connect_2 = ConnectHandler(device_type='cisco_ios', host='172.16.1.21', username='cisco', password='cisco')
>>> output = net_connect_2.send_config_set(['logging buffered 19999'])
>>> print(output)
config term
Enter configuration commands, one per line.  End with CNTL/Z.
iosv-2(config)#logging buffered 19999
iosv-2(config)#end
iosv-2#
>>> exit()
The netmiko library is a great time saver and is used by many network engineers. In the next section, we will take a look at the Nornir (https://github.com/nornir-automation/nornir) framework, which aims to simplify low-level interactions.
The Nornir framework
Nornir (https://nornir.readthedocs.io/en/latest/) is a pure Python automation framework intended to be used directly from Python. We will discuss another automation framework written in Python, Ansible, in Chapter 4, The Python Automation Framework – Ansible Basics, and Chapter 5, The Python Automation Framework – Beyond Basics. I wanted to introduce the framework in this chapter as a way to demonstrate another way to automate devices with low-level interaction. However, if you are just starting out on the automation journey, the framework might make more sense after you have finished reading Chapter 5, The Python Automation Framework – Beyond Basics. Please feel free to scan through the example and come back to it later.
Of course, we will start with installing nornir in our environment:
(venv) $ pip install nornir
Nornir expects us to define an inventory file, hosts.yaml, consisting of the device information in a YAML format. The information specified in this file is no different than what we have previously defined using the Python dictionary in the Netmiko example:
---
iosv-1:
    hostname: '172.16.1.20'
    port: 22
    username: 'cisco'
    password: 'cisco'
    platform: 'cisco_ios'
iosv-2:
    hostname: '172.16.1.21'
    port: 22
    username: 'cisco'
    password: 'cisco'
    platform: 'cisco_ios'
We can use the netmiko plugin from the nornir library to interact with our device, as illustrated in the chapter2_5.py file:
from nornir import InitNornir
from nornir.plugins.tasks.networking import netmiko_send_command
from nornir.plugins.functions.text import print_result
nr = InitNornir()
result = nr.run(
    task=netmiko_send_command,
    command_string="show arp"
)
print_result(result)
The execution output is shown as follows:
(venv) $ python chapter2_5.py
netmiko_send_command************************************************************
* iosv-1 ** changed : False ****************************************************
vvvv netmiko_send_command ** changed : False vvvvvvvvvvvvvvvvvvvvvvvvvvvvvvvvvvv INFO
Protocol  Address          Age (min)  Hardware Addr   Type   Interface
Internet  10.0.0.5                -   fa16.3e0e.a3a3  ARPA   GigabitEthernet0/1
Internet  10.0.0.6               40   fa16.3ed7.1041  ARPA   GigabitEthernet0/1
^^^^ END netmiko_send_command ^^^^^^^^^^^^^^^^^^^^^^^^^^^^^^^^^^^^^^^^^^^^^^^^^^
* iosv-2 ** changed : False ****************************************************
vvvv netmiko_send_command ** changed : False vvvvvvvvvvvvvvvvvvvvvvvvvvvvvvvvvvv INFO
Protocol  Address          Age (min)  Hardware Addr   Type   Interface
Internet  10.0.0.5               40   fa16.3e0e.a3a3  ARPA   GigabitEthernet0/1
Internet  10.0.0.6                -   fa16.3ed7.1041  ARPA   GigabitEthernet0/1
^^^^ END netmiko_send_command ^^^^^^^^^^^^^^^^^^^^^^^^^^^^^^^^^^^^^^^^^^^^^^^^^^
There are other plugins in Nornir besides Netmiko, such as the popular NAPALM library (https://github.com/napalm-automation/napalm). Please feel free to check out Nornir's project page for the latest plugins: https://nornir.readthedocs.io/en/latest/plugins/index.html.
We have taken a pretty huge leap forward in this chapter in automating our network using Python. However, some of the methods we have used feel like workarounds for automation. We attempted to trick the remote devices into thinking they were interacting with a human on the other end. Even if we use libraries such as Netmiko or the Nornir framework, the underlying approach remains the same. Just because somebody else has done the work to help abstract the grunt work of the low-level interaction, we are still susceptible to the downsides of dealing with CLI-only devices.
Looking ahead, let us discuss some of the downsides of Pexpect and Paramiko compared to other tools in preparation for our discussion on API-driven methods in the next chapters.
Downsides of Pexpect and Paramiko compared to other tools
The biggest downside of our method for automating CLI-only devices so far is that the remote devices do not return structured data. They return data that is ideal for fitting on a terminal to be interpreted by a human, not by a computer program. The human eye can easily interpret a space, while a computer only sees a return character.
We will take a look at a better way in the upcoming chapter. As a prelude to Chapter 3, APIs and Intent-Driven Networking, let's discuss the idea of idempotency.
Idempotent network device interaction
The term idempotency has different meanings, depending on its context. But in this book's context, the term means that when a client makes the same call to a remote device, the result should always be the same. I believe we can all agree that this is necessary. Imagine a scenario where each time you execute the same script, you get a different result back. I find that scenario very scary. How can you trust your script if that is the case? It would render our automation effort useless because we need to be prepared to handle different returns.
Since Pexpect and Paramiko are blasting out a series of commands interactively, the chance of having a non-idempotent interaction is higher. Going back to the fact that the return results needed to be screen scraped for useful elements, the risk of difference is much higher. Something on the remote end might have changed between the time we wrote the script and the time when the script is executed for the 100th time. For example, if the vendor makes a screen output change between releases without us updating the script, the script might break.
If we need to rely on the script for production, we need the script to be idempotent as much as possible.
Bad automation speeds bad things up
Bad automation allows you to poke yourself in the eye a lot faster, it is as simple as that. Computers are much faster at executing tasks than us human engineers. If we had the same set of operating procedures executed by a human versus a script, the script would finish faster than humans, sometimes without the benefit of having a solid feedback loop between procedures. The internet is full of horror stories of when someone pressed the Enter key and immediately regretted it.
We need to make sure the chances of bad automation scripts screwing things up are as small as possible. We all make mistakes; carefully testing your script before any production work and having a small blast radius are two keys to making sure you can catch your mistake before it comes back and bites you. No tool or human can eliminate mistakes completely, but we can strive to minimize the mistakes. As we have seen, as great as some of the libraries we have used in this chapter are, the underlying CLI-based method is inherently faulty and error-prone. We will introduce the API-driven method in the next chapter, which addresses some of the CLI-driven management deficiencies.
Summary
In this chapter, we covered low-level ways to communicate directly with network devices. Without a way to programmatically communicate and make changes to network devices, there is no automation. We looked at two libraries in Python that allow us to manage devices that were meant to be managed by the CLI. Although useful, it is easy to see how the process can be somewhat fragile. This is mostly due to the fact that the network gear in question was meant to be managed by human beings and not computers.
In Chapter 3, APIs and Intent-Driven Networking, we will look at network devices supporting API and intent-driven networking.


![The Complete Python Course [Video]](https://static.packt-cdn.com/products/9781839217289/cover/9781839217289-original.jpeg)
