Download code from GitHub
Hello Flutter!
Welcome to this adventure learning Flutter!
The approach that we'll be following during this book is learn by doing. In each chapter of the book, you'll create a project from scratch, and in each project you'll learn something new and build an app that you'll be able to use immediately on your Android or iOS device.
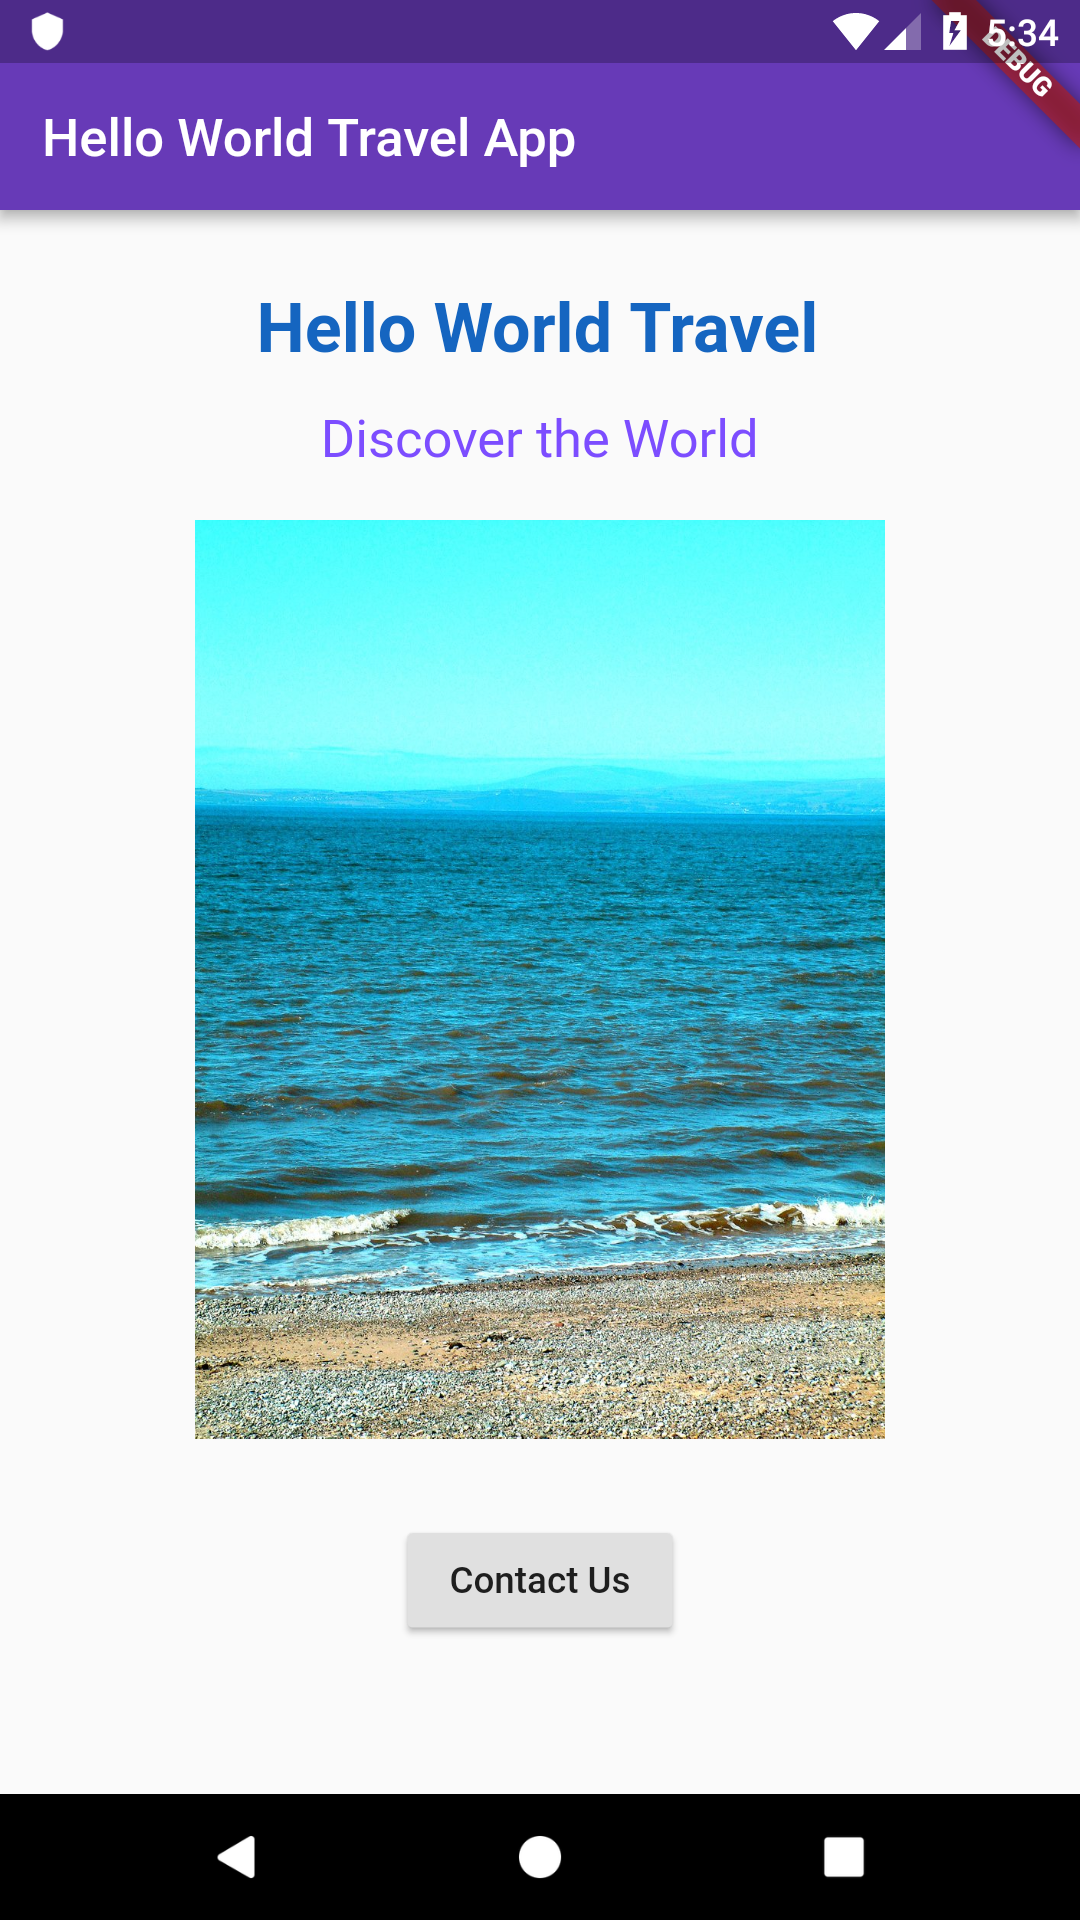
The first project that most developers encounter while learning a new language or framework is a Hello World app, and this book is no exception. This Hello World project assumes that you have no knowledge whatsoever of Flutter or Dart. If you have already created apps with Flutter before, you can probably skip this chapter and go straight to the next one. By the end of this chapter, you'll be able to build the presentation screen of the Hello World Travel company, as shown here:
In order to create the app, you'll have to complete several steps. We will go through them in this chapter, one by one:
- Understanding the Dart language basics
- Creating your first Flutter app:
- Using some basic widgets: Scaffold, AppBar, RaisedButton, and Text
- Downloading an image and showing it to the user
- Responding to a button click and showing a dialog
So during this project, you'll learn all this and more.
This project should take no longer than 2 hours to complete. You should probably add 2 more hours to complete the setup process described in the appendix if you haven't completed it yet, but this estimate may vary a lot, depending on your system.
Technical requirements
In order to start your Flutter adventure, you will need a few tools:
- A PC with a recent Windows version, or a Mac with a recent version of the macOS or Linux operating system. You can also use a Chrome OS machine, with a few tweaks. Currently, the only way to build apps that target iOS devices is using a Mac, unless you use a third-party service. Of course, you can write your code on any operating system, but the .ipa file, which is the iOS installation file, can only be created from a Mac.
- A GitHub account.
- An Android/iOS setup. You'll need to set up your Android and iOS environments to build apps.
- The Flutter SDK. It's free, light, and open source.
- Physical device/emulator/simulator. In order to try your code, you will need an Android or iOS device. Alternatively, you can also install an Android emulator or iOS simulator.
- Your favorite editor. The supported editors at this time are:
- Android Studio/IntelliJ IDEA
- Visual Studio Code
Actually, you could use any other text editor, combined with the Flutter CLI, but using the supported editors will make your life much easier as you get code completion, debugging support, and several other advantages.
The detailed steps for setting up your environment to build Flutter Projects are given in the Appendix section.
You can find the code files of this chapter on GitHub at https://github.com/PacktPublishing/Google-Flutter-Projects.
Let's get started with some basic Dart concepts!
Understanding the Dart language basics
When you write Flutter apps, you use Dart, a programming language that was developed by Google. It's relatively new; the first version of Dart was released on November 14, 2013, and version 2.0 was released in August 2018.
It's now also an official ECMA standard. It's open source, object oriented, strongly typed, class defined, and uses a C-style syntax… which is to say, it's like many other modern programming languages, including Java or C#, and to some extent, even JavaScript.
So, you might be wondering (and you are not alone): why another language? I'm sure there isn't a unique answer to that question, but there are some features worth mentioning here that make Dart noteworthy, even without considering Flutter:
- It's easy to learn: If you have some knowledge of Java, C#, or JavaScript, Dart will be extremely easy to learn, as you'll see in the next few pages.
- It's aimed at productivity: Its syntax is exceptionally concise and easy to read and debug.
- It can transpile to JavaScript, in order to maximize compatibility with web development.
- It has a general purpose: You can use it for client-side, server-side, and mobile development.
- As an added bonus, Google is deeply involved in this project and has some big plans for Dart, including a new operating system, called Google Fuchsia.
As the approach of this book is extremely practical, this is all the theory you'll get. Let's see Dart in action, with a few code examples, which will make it easier to build your first Flutter project later in this chapter.
The goal of this section is to give you a jump-start on using Dart, so that when you write your first Flutter app, you'll be able to focus on Flutter and not too much on Dart itself. This is certainly not a comprehensive guide, but hopefully just enough to get you started.
Hello Dart
For the examples in this section, we'll be using DartPad. It's an online tool that lets you play with Dart code from any browser, without having to install anything on your system. You can reach it at https://dartpad.dartlang.org/.
In this Hello Dart example, you'll see how to use DartPad, write the simplest Dart app, declare variables, and concatenate strings. Let's look at the steps for how we can go about it:
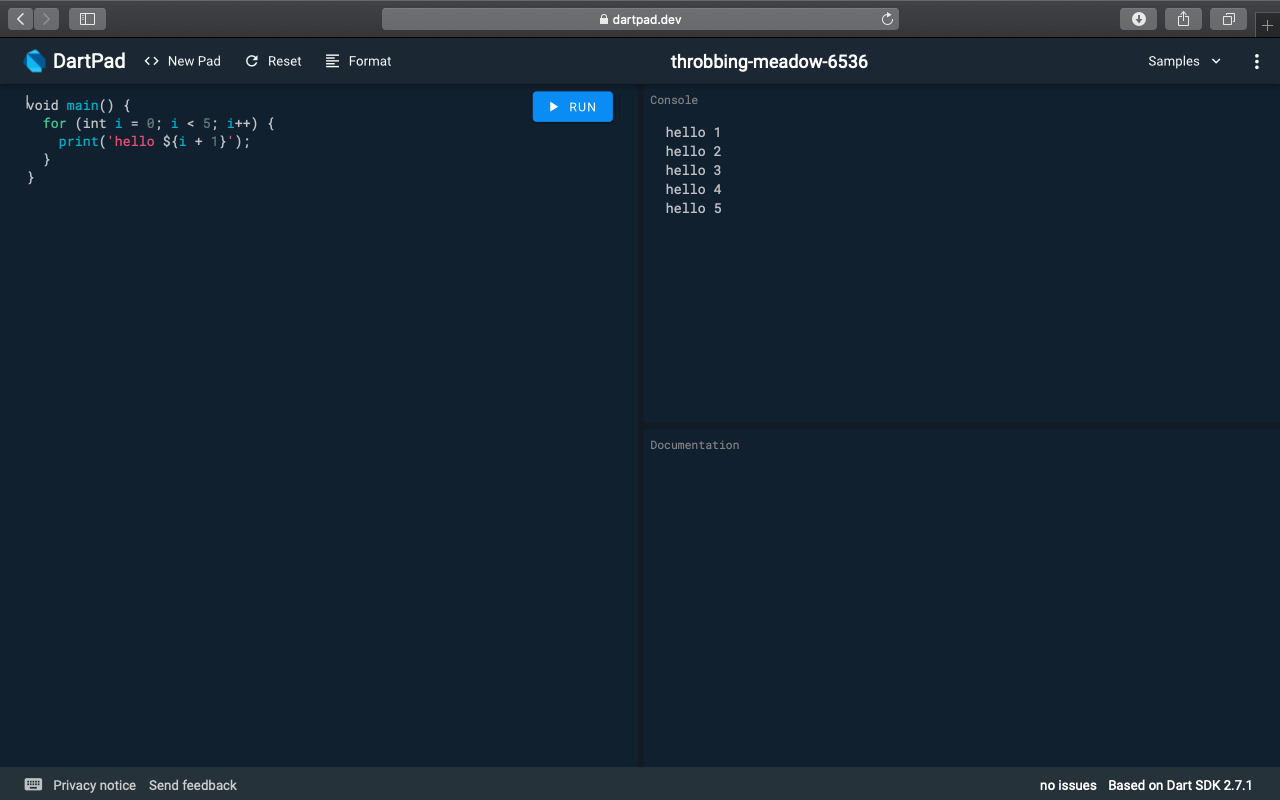
- When you open the tool for the first time, you should see something very close to the following image. On the left, you have your code, and when you click on the RUN button, you'll see the result of your code on the right:
- For our first example, let's delete the default code and write the following:
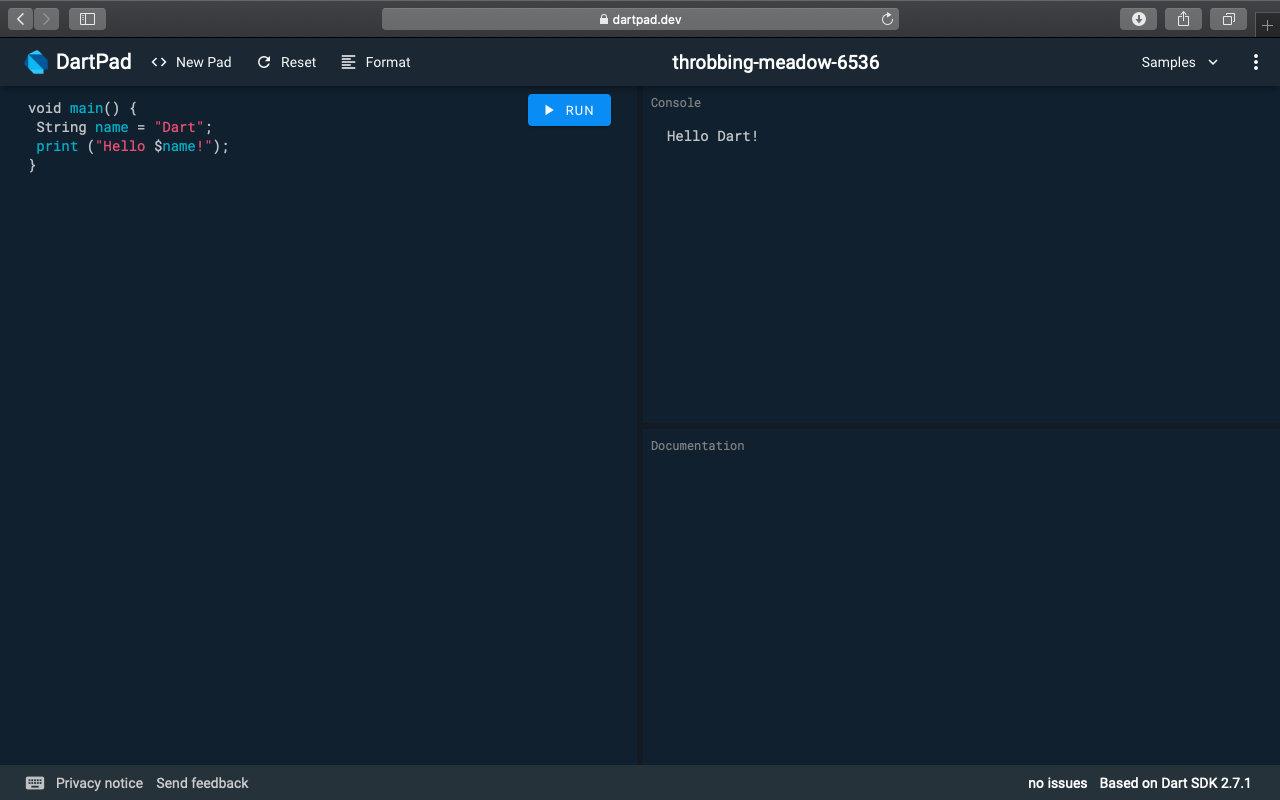
void main() {
 String name = "Dart";
 print ("Hello $name!");
}
If you run this code, you should see Hello Dart! on the right of your screen:
- The main() function is the starting point of every Dart application. This function is required, and you'll also find it in every Flutter app. Everything begins with the main() function.
- The String name = "Dart"; line is a variable declaration; with this instruction, you are declaring a variable called name, of type String, whose value is "Dart". You can use single (') or double (") quotation marks to contain strings, as follows:
String name = 'Dart';
The result would be identical:

- The print ("Hello $name!"); line calls the print method, passing a string. The interesting part here is that instead of doing a concatenation, by using the $ sign, you are inserting a variable into the string without closing it nor using the + concatenation operator. So, this is exactly like writing the following code:
print ("Hello " + name + "!");
There's also a generic variable declaration, in which you don't specify any type; you could write the same code like this:
void main() {
 var name = "Dart";
 print ("Hello $name!");
}
- In this case, you might think that name is a dynamic variable, but this is not the case. Let's try to change the variable type and see what happens:
void main() {
 var name = "Dart";
 name = 42;
 print ("Hello $name!");
}
If you try running this code, you'll receive a compilation error as follows:
Error: A value of type 'int' can't be assigned to a variable of type 'String'. name = 42; Error: Compilation failed.
Actually, you can declare a dynamic type as follows, although I believe you should avoid it in most cases:
void main() {
 dynamic name = "Dart";
 name = 42;
 print ("Hello $name!");
}
If you try this code, you'll see Hello 42 in the console.
So the name variable, which was a string when we first declared it, has now become an integer. And as we are talking about numbers, let's delve into those next.
Area calculator
In this example, you'll see the use of numbers, functions, and parameters in Dart.
There are two types of numbers in Dart:
- int: Contains integer values no larger than 64 bits
- double: Contains 64 -bit, double-precision floating-point numbers
You also have the num type: both int and double are num.
Consider the following example:
void main() {
 double result = calculateArea(12, 5);
 print ('The result is ' + result.toString());
}
In this code, we are declaring a variable called result, of a type called double, which will take the return value of a function called calculateArea, which we'll need to define later. We are passing two numbers—12 and 5—to the function.
After the function returns its value, we will show the result, after converting it to a string.
Let's write the function:
double calculateArea(double width, double height) {
 double area = width * height;
 return area;
}
In this case, the width and height parameters are required. You can also add optional parameters to functions, by including them in square brackets. Let's insert an optional parameter to the calculateArea() function, so that the function can also calculate the area of a triangle:
double calculateArea(double width, double height, [bool isTriangle]) {
 double area;
 if (isTriangle) {
 area = width * height / 2;
 }
 else {
 area = width * height;
 }
 return area;
}
Now, from the main() method, we can call this function twice, with or without the optional parameter:
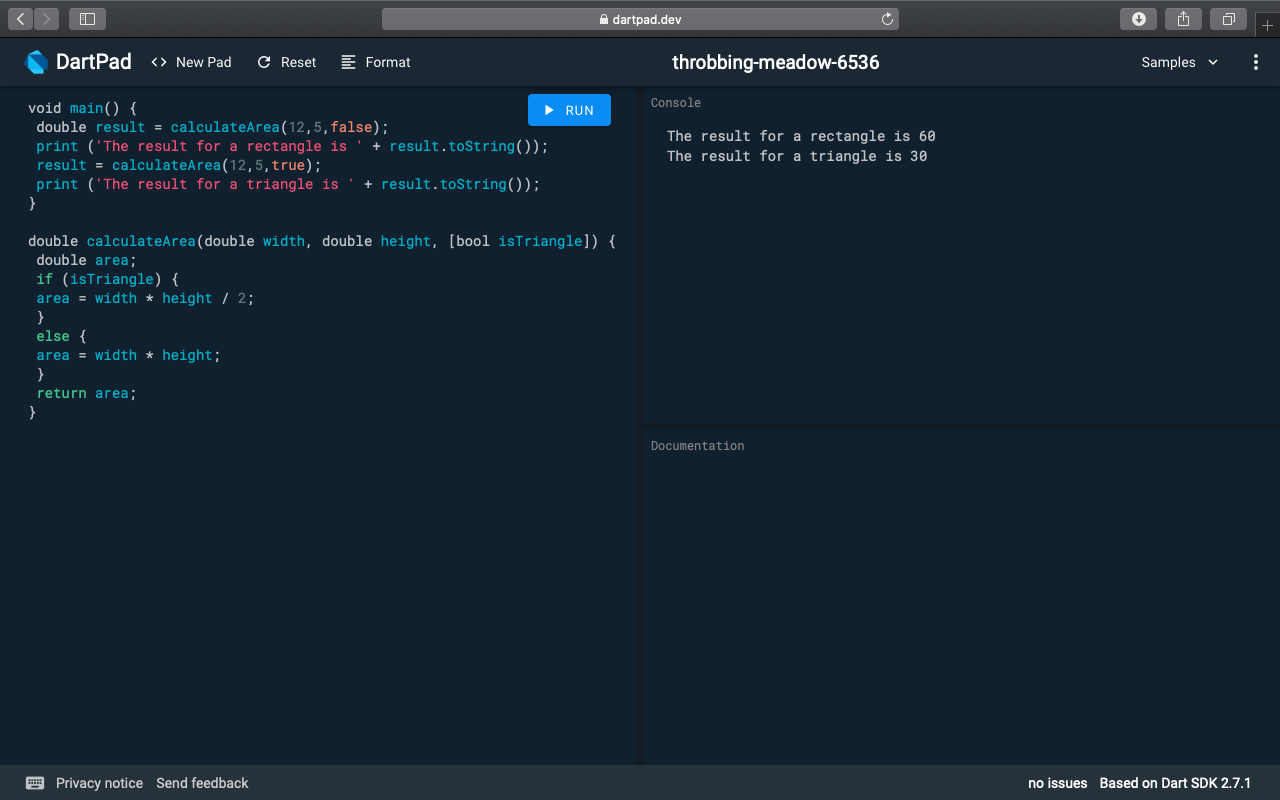
void main() {
 double result = calculateArea(12,5,false);
 print ('The result for a rectangle is ' + result.toString());
 result = calculateArea(12,5,true);
 print ('The result for a triangle is ' + result.toString());
}
The full function with the expected result is shown here:
At this time, function overloading is not supported in Dart.
For loops and strings
Dart supports the same loops as many other C-influenced languages: the for, while, and do while loops. In this example, you'll see a for loop, which you'll use to reverse a string.
Strings can be included in single quotes ('Dart') or double quotes ("Dart"). The escape character is \. So, for instance, you could write the following:
String myString = 'Throw your \'Dart\'';
And the myString variable would contain Throw your 'Dart'. For our example, let's begin with the main() method:
void main() {
    String myString = 'Throw your Dart';
    String result = reverse(myString);
    print (result);
}
Nothing major to note here. We are just setting a string and calling a reverse method, which will reverse the string, to print the result.
So let's write the reverse() method next:
String reverse(String old) {
    int length = old.length;
    String res = '';
    for (int i = length-1; i>=0; i--) {
        res += old.substring(i,i + 1);
    }
    return res;
}
Strings are actually objects, so they have properties, for example, length. The length property of a string, quite predictably, contains the number of characters of the string itself.
Each character in a string has a position, beginning at 0. In the for loop, first, we declare an i variable and set it to an initial value of the length of the string, minus one. The next two steps are setting the condition (or exit criteria) and the increment. The loop will keep repeating until i is equal to, or bigger than, 0, and at each repetition, it will decrease the value of i by one.
What this means is that starting at the end of the string, we will loop until we reach the beginning of the string.
The += operator is a concatenation. This is a shortened syntax for res = res + old.substring(i,i + 1);.
The substring() method returns part of a string, starting at the position specified at the first parameter, included, and ending at the position specified at the second parameter. So, for example, the following code would print Wo:
String text = "Hello World";
String subText = text.substring(5,8);
print (subText);
There's actually another way that we could extract a single character from a string, instead of using the substring() method: using the position of the character itself in the string.For example, instead of writing this:
res += old.substring(i,i + 1);
We could also write the following code:
res += old[i];
The end result of the full code that we have written is shown here:
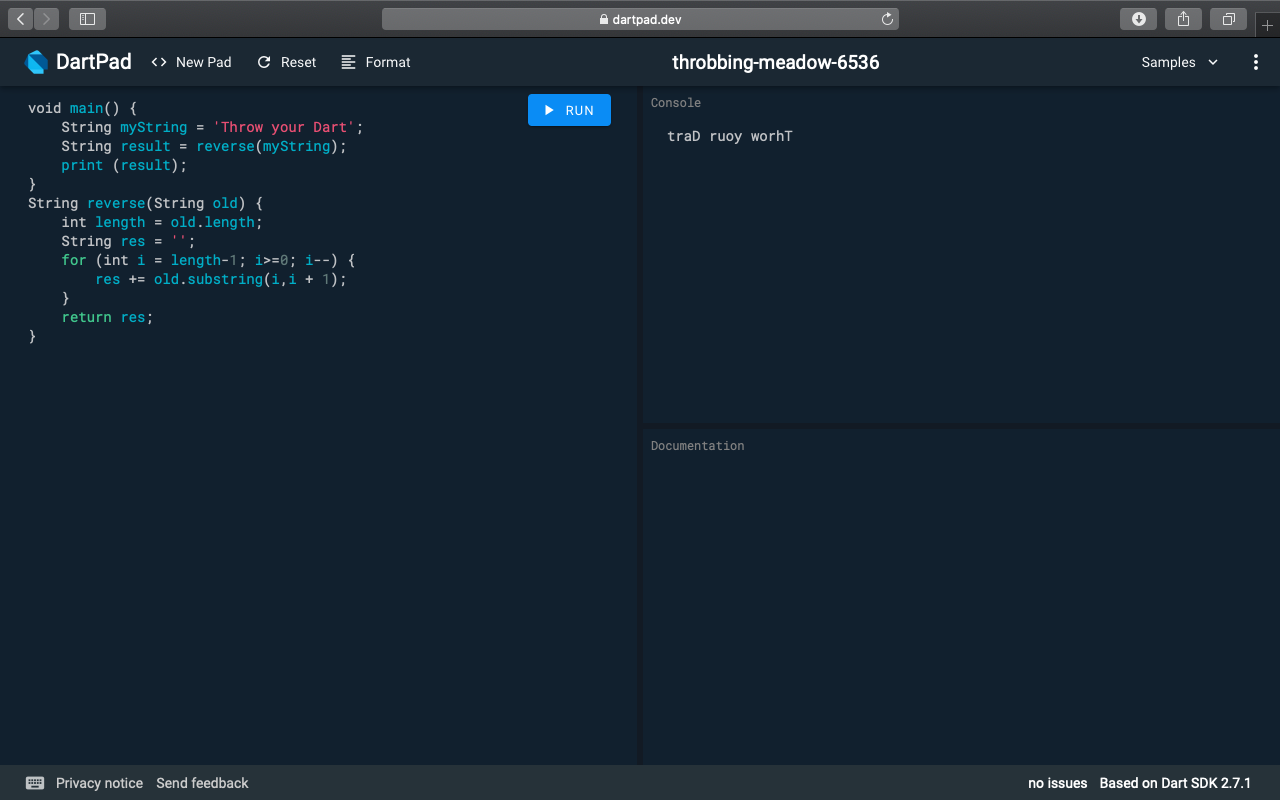
You'll never need to write a code like this in a real-world application. You can achieve the same result just by writing this:
String result = myString.split('').reversed.join();
Next, you'll see two features that we will use extensively throughout the book: the arrow syntax and the ternary operator.
The Arrow syntax and the ternary operator
The arrow syntax is a concise and elegant way to return values in a function.
Take, for instance, the following function. It takes an integer as an argument (value), and if value is zero, it returns false, otherwise, it returns true. So every number that you pass, except zero, will return true:
bool convertToBoolLong(int value) {
 if (value == 1) {
  return false;
 }
 else {
  return true;
 }
}
With the => notation and the ternary operator, you can write the same function in a single line of code, as follows:
bool convertToBool(int value) => (value == 0) ? false : true;
Chances are you'll probably see this kind of syntax quite often in Dart and Flutter.
The => arrow operator is a shortcut that allows you to simplify writing a method, particularly when it has a single return statement. Here, you can see an example of what the arrow syntax does:
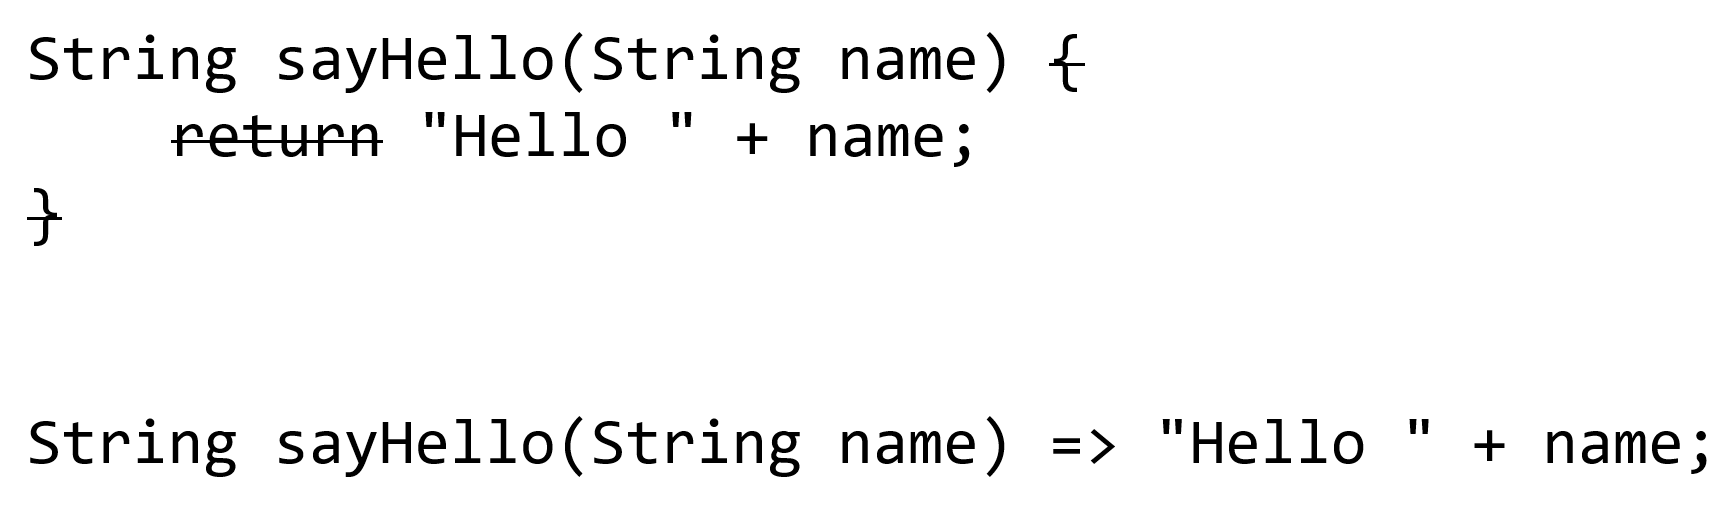
In short, you could say that with the arrow syntax, you can omit the curly braces and the return statement, and instead write everything in a single line.
The ternary operator is a concise way to write an if statement. Consider the following code:
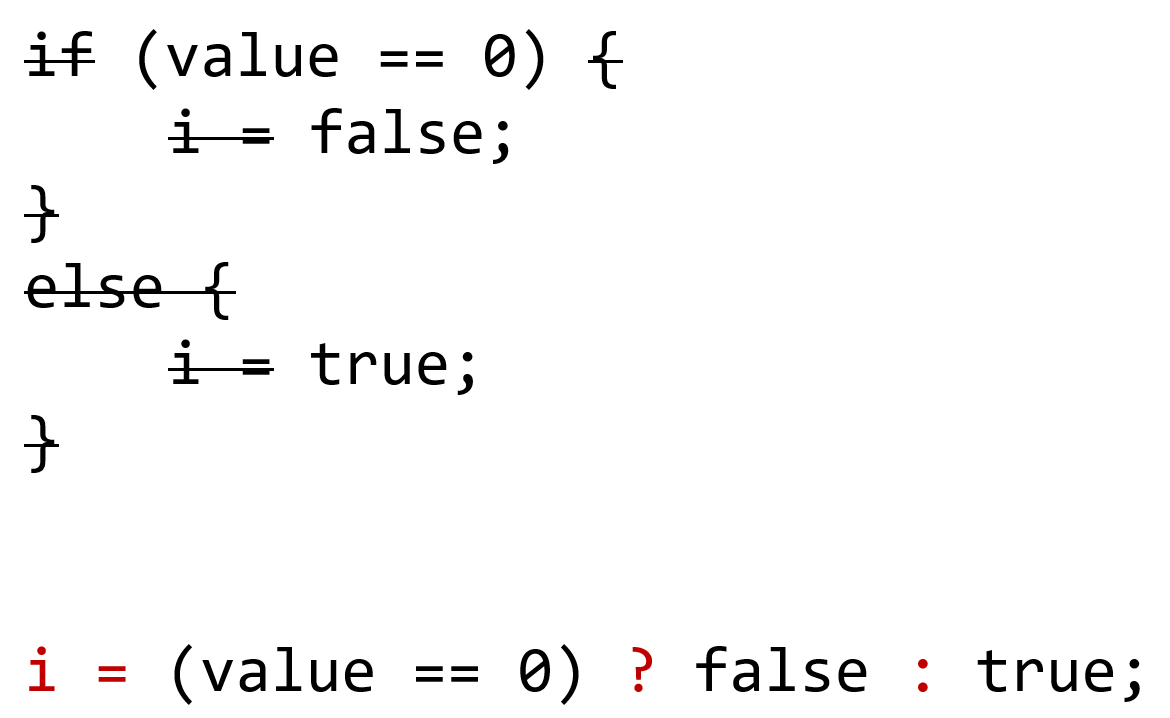
With the ternary operator, you can omit the if statement, the curly braces, and the else statement. In the optional parentheses, you put the Boolean control expression, value == 0.
Together, the arrow syntax and the ternary operator are a powerful and elegant combination.
While loops, lists, and generics
One of the first features that you generally meet when you learn a new language are arrays. In Dart, you use List objects when you want to define a collection.
Consider the following code:
void main() {
 String mySongs = sing();
 print (mySongs);
}

String sing() {
 var songs = List<String>();
 var songString = '';
 songs.add('We will Rock You');
 songs.add('One');
 songs.add('Sultans of Swing');
 int i=0;
 while (i < songs.length) {
 songString += '${songs[i]} - ';
 i++;
 }

 return songString;
}
In the main() method, we are calling the sing() method and printing its result. The sing() method defines a list of strings:
var songs = List<String>();
A list can contain several types of objects. You could have a list of integers, Booleans, or even user-defined objects. You can also avoid specifying the kind of object that is contained in a list by just writing the following:
var songs = List();
The <String> after List is the generic syntax. The use of generics enforces a restriction on the type of values that can be contained in the collection, creating a type-safe collection.
Lists implement several methods. You use the add() method to insert a new object into the collection:
songs.add('We will Rock You');
The new object is added to the end of the list. You could reach exactly the same result by writing the following code:
var songs = ['We will Rock You', 'One', 'Sultans of Swing'];
The songs variable would still be a list of strings. If you tried to add a different data type, such as songs.add(24), you would get an error. This is because an integer cannot be inserted into a list of strings, and type safety is enforced by default.
The while statement contains the condition that needs to be true for the loop to continue:
while (i < songs.length) {
When the condition (i < songs.length) becomes false, the code in the loop won't execute anymore.
As you've already seen before, the += operator is a concatenation of strings. The $ character allows you to insert expressions into quotes:
songString += '${songs[i]} - ';
Here is the end result of the full code:
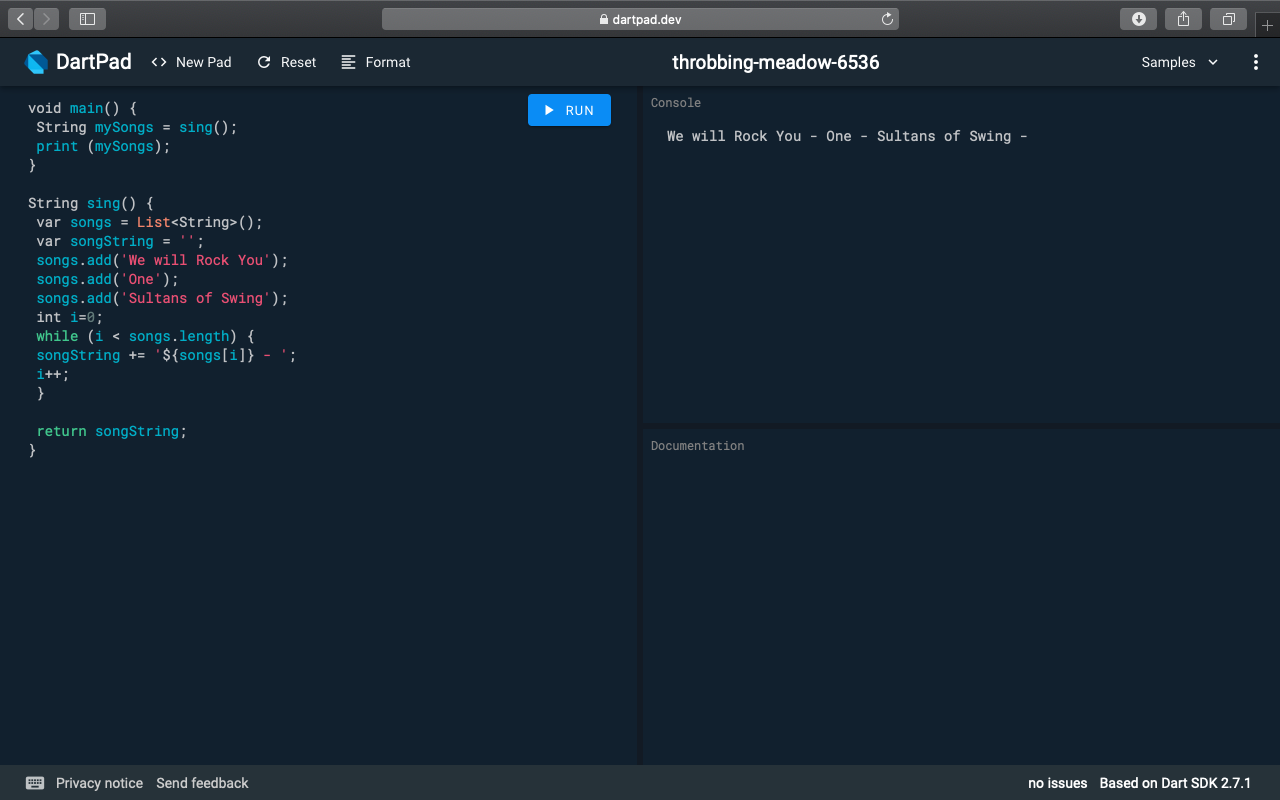
As you can see, the three wonderful songs are concatenated, and after each song, you've added a - sign.
Now, let's see a few interesting features that you can leverage while using lists in Dart.
foreach()
The for and while loops can be generally used for any type of loop, but lists also have some specific methods that help you write elegant and readable code.
The foreach method of a list lets you run a function on each element in the array. So, you could delete the while loop and use the following code instead, in order to achieve the same result:
songs.forEach((song) => songString += song + " - ");
The foreach method takes a function as a parameter. This function may be anonymous. This anonymous function takes an argument (song in this case), of the same data type as the list itself. So, as the songs list is a list of strings, song will be a string as well.
You've seen the => arrow syntax in the previous topic. In this case, instead of returning a value, we are setting the value of a variable, and this is totally acceptable as well.
map()
The map() method transforms each element in a list and returns the result of the transformation in a new list. Let's see this method in action by editing our code:
void main() {
 String mySongs = sing();
 print (mySongs);
}

String sing() {
 var songs = List<String>();
 songs.add('We will Rock You');
 songs.add('One');
 songs.add('Sultans of Swing');
 var capitalSongs = songs.map((song)=> song.toUpperCase());
 return capitalSongs.toString();
}
The result of this code is that the songs are now printed in uppercase, but the interesting part of the code is the following line:
var capitalSongs = songs.map((song)=> song.toUpperCase());
Here, you can see the map() method of a list in action. For each element of the list, in this case a song, the element is transformed into song.toUpperCase(), and the end result is passed to a new variable, called capitalSongs. The toString() method transforms a list into a string. The result that you'll see printed on the screen is as follows:
(WE WILL ROCK YOU, ONE, SULTANS OF SWING)
where()
The last method that I'd like to introduce in this short overview is the where() method. Let's change the sing() function, using the where method as shown in the following example:
String sing() {
 var songs = List<String>();
 songs.add('We will Rock You');
 songs.add('One');
 songs.add('Sultans of Swing');
 var wSongs = songs.where((song)=>song.contains('w'));
 return wSongs.toString();
}
The where() method only returns the elements that satisfy the song.contains('w') test expression. This test will only return the songs that contain the "w". So, the end result that you'll see printed on the screen is as follows:
(We will Rock You, Sultans of Swing)
There are several other methods that can help you sort and transform lists, and find elements inside lists. We'll certainly use some of them throughout this book, but for now, you can leverage the foreach(), map(), and where() methods to start using lists in your Dart and Flutter code.
Classes and objects
Dart is an object-oriented programming language, and objects and classes are important parts of what you'll be creating in Dart and Flutter. If you are not familiar with OOP concepts, I suggest reading an excellent article at the following address: https://medium.freecodecamp.org/object-oriented-programming-concepts-21bb035f7260.
Here, we'll have a quick overview of creating classes and objects in Dart. Let's begin by creating a Person class with two fields, name and surname:
class Person {
 String name;
 String surname;
}
You can create instances of the Person class from the main method, and set the name and surname as follows:
main() {
 Person clark = Person();
 clark.name = 'Clark';
 clark.surname = 'Kent';
 print ('${clark.name} ${clark.surname}');

}
There are a couple of interesting features in this code that are worth noting. Name and surname are both accessible from outside the class, but in Dart, there are no identifiers such as Private or Public. So, each property of a class is considered public unless its name begins with an underscore character (_). In this case, it becomes inaccessible from outside its library (or file).
In the Person clark = Person(); line, you are creating an instance of a Person() class, and the resulting object is contained in the clark variable. In Dart, you don't need to explicitly specify the new keyword, as it is implied. So writing Person clark = new Person(); would be exactly the same.
You'll find the omission of the new keyword extremely common with Dart developers, especially when developing in the Flutter framework.
Using getters and setters
Getters and setters are the methods that are used to protect data in your classes: a getter method returns a property value of an instance of the class, while a setter sets or updates its value. In this way, you can check values before reading (getters) or writing (setters) them in your classes.
You specify getters and setters by adding the get and set keywords before the field name. The getter returns a value of the type that you specify, and the setter returns void:
main() {
 Person clark = Person();
 clark.name = 'Clark';
 clark.surname = 'Kent';
 clark.age = 30;
 print ('${clark.name} ${clark.surname} ${clark.age}');

}
class Person {
 String name, surname;
 int _age;

 void set age(int years) {
  if (years > 0 && years < 120) {
   _age = years;
  }
  else {
   _age = 0;
  }
 }

 int get age {
  return _age;
 }
}
In this example, we protect our data in the setter by making sure that the years are a number between 0 and 120; the getter just returns _age without any update.
Constructors
Classes can have constructors. A constructor is a special method that is automatically called when an object of a class is created. It can be used to set initial values for properties of the class. For instance, let's change our code to use a constructor to build a Person instance:
main() {
 Person clark = Person('Clark', 'Kent');
 print ('${clark.name} ${clark.surname}');

}
class Person {
 String name, surname;
 Person(String name, String surname) {
  this.name = name;
  this.surname = surname;
 }
}
Person(name, surname) is a constructor method that requires two parameters: name and surname. You are required to pass both parameters when you create a new instance of the class. For example, if you try to create a Person instance, without passing two strings, you receive an error. You can make positional parameters optional by enclosing them in square brackets:
Person([String name, String surname]) {
Now, what if you want to add a second constructor that takes no parameters? You could try to add the second constructor as follows:
Person();
However, you would get an error: "The default constructor is already defined." That's because, in Dart, you can have only one unnamed constructor, but you can have any number of named constructors. In our example, we could add the following code:
Person.empty() {
This would create a second named constructor. In the following screenshot, you can see an example of a class with an unnamed constructor, Person(), and a named constructor, person.empty():
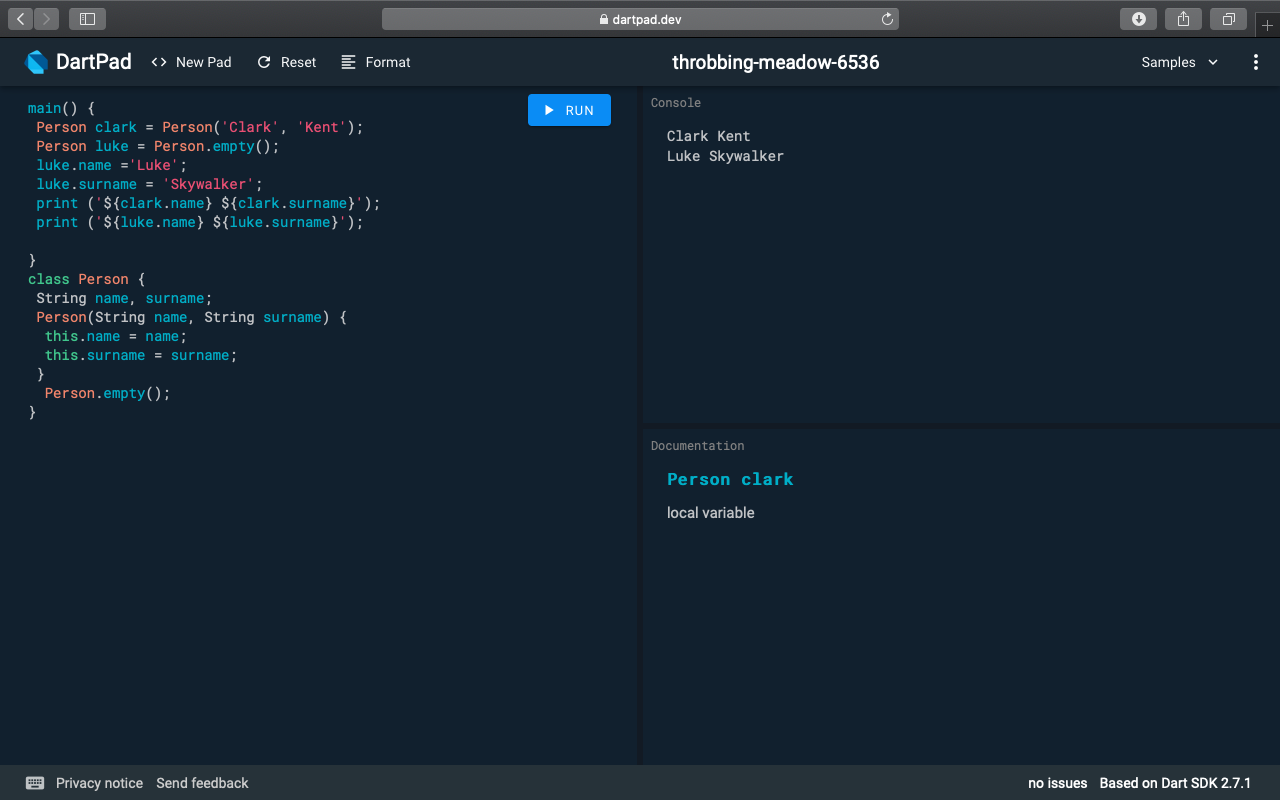
In this case, the difference between the two is that when you call the default (unnamed) constructor, you also need to pass the two required parameters, name and surname, while the named constructor allows you to create an empty object and then set the name and surname later in your code.
This keyword
The task of assigning a constructor argument to an object variable is something that we probably do very often, and Dart makes it extremely easy with the this shortcut. For example, here is the code for writing the Person constructor, which we used previously:
 Person(String name, String surname) {
  this.name = name;
  this.surname = surname;
 }
However, you could also just write the following code:
Person(this.name, this.surname) {}
With classes and objects, you have all the Dart tools that you need to get started with your first Flutter project. There are many other features and topics in Dart that you'll see throughout this book, but we'll cover them when they are needed for our projects. So, let's build your first Flutter project, the "Hello World Travel" company app!
Creating your first Flutter app
A Flutter application is made of widgets, and widgets are the description of a part of the user interface. Every user interaction, and everything that the user sees when navigating your app, is made of widgets. The app itself is a widget!
That's why when you begin using Flutter, one of the concepts that you'll hear most often is that "in Flutter almost everything is a Widget." This is mostly true.
You use Dart to write widgets. If you have some experience in mobile or web programming, then you may find this a bit unsettling. Most of the other mobile frameworks use some form of XML or HTML to describe the user interface, and a full programming language for business logic. In Flutter, you use Dart to describe both—the user interface, as well as the business logic of your app.
The app we'll build in this chapter is a single-screen app, with some text, a picture, and a button that, when clicked, gives the user a message. So, even if the app is extremely simple, you'll get to see many features of Flutter, including the use of widgets, styling text, downloading images from the web, and the creation of alerts.
Running your first Hello World app
For this first project, we'll be using the Flutter CLI to create the app. So, to get started, let's make sure everything's ready in your system:
- Open your terminal window and type flutter doctor.
You should see a few messages, such as in the following screenshot (this is from a Windows machine that was set up for Android):
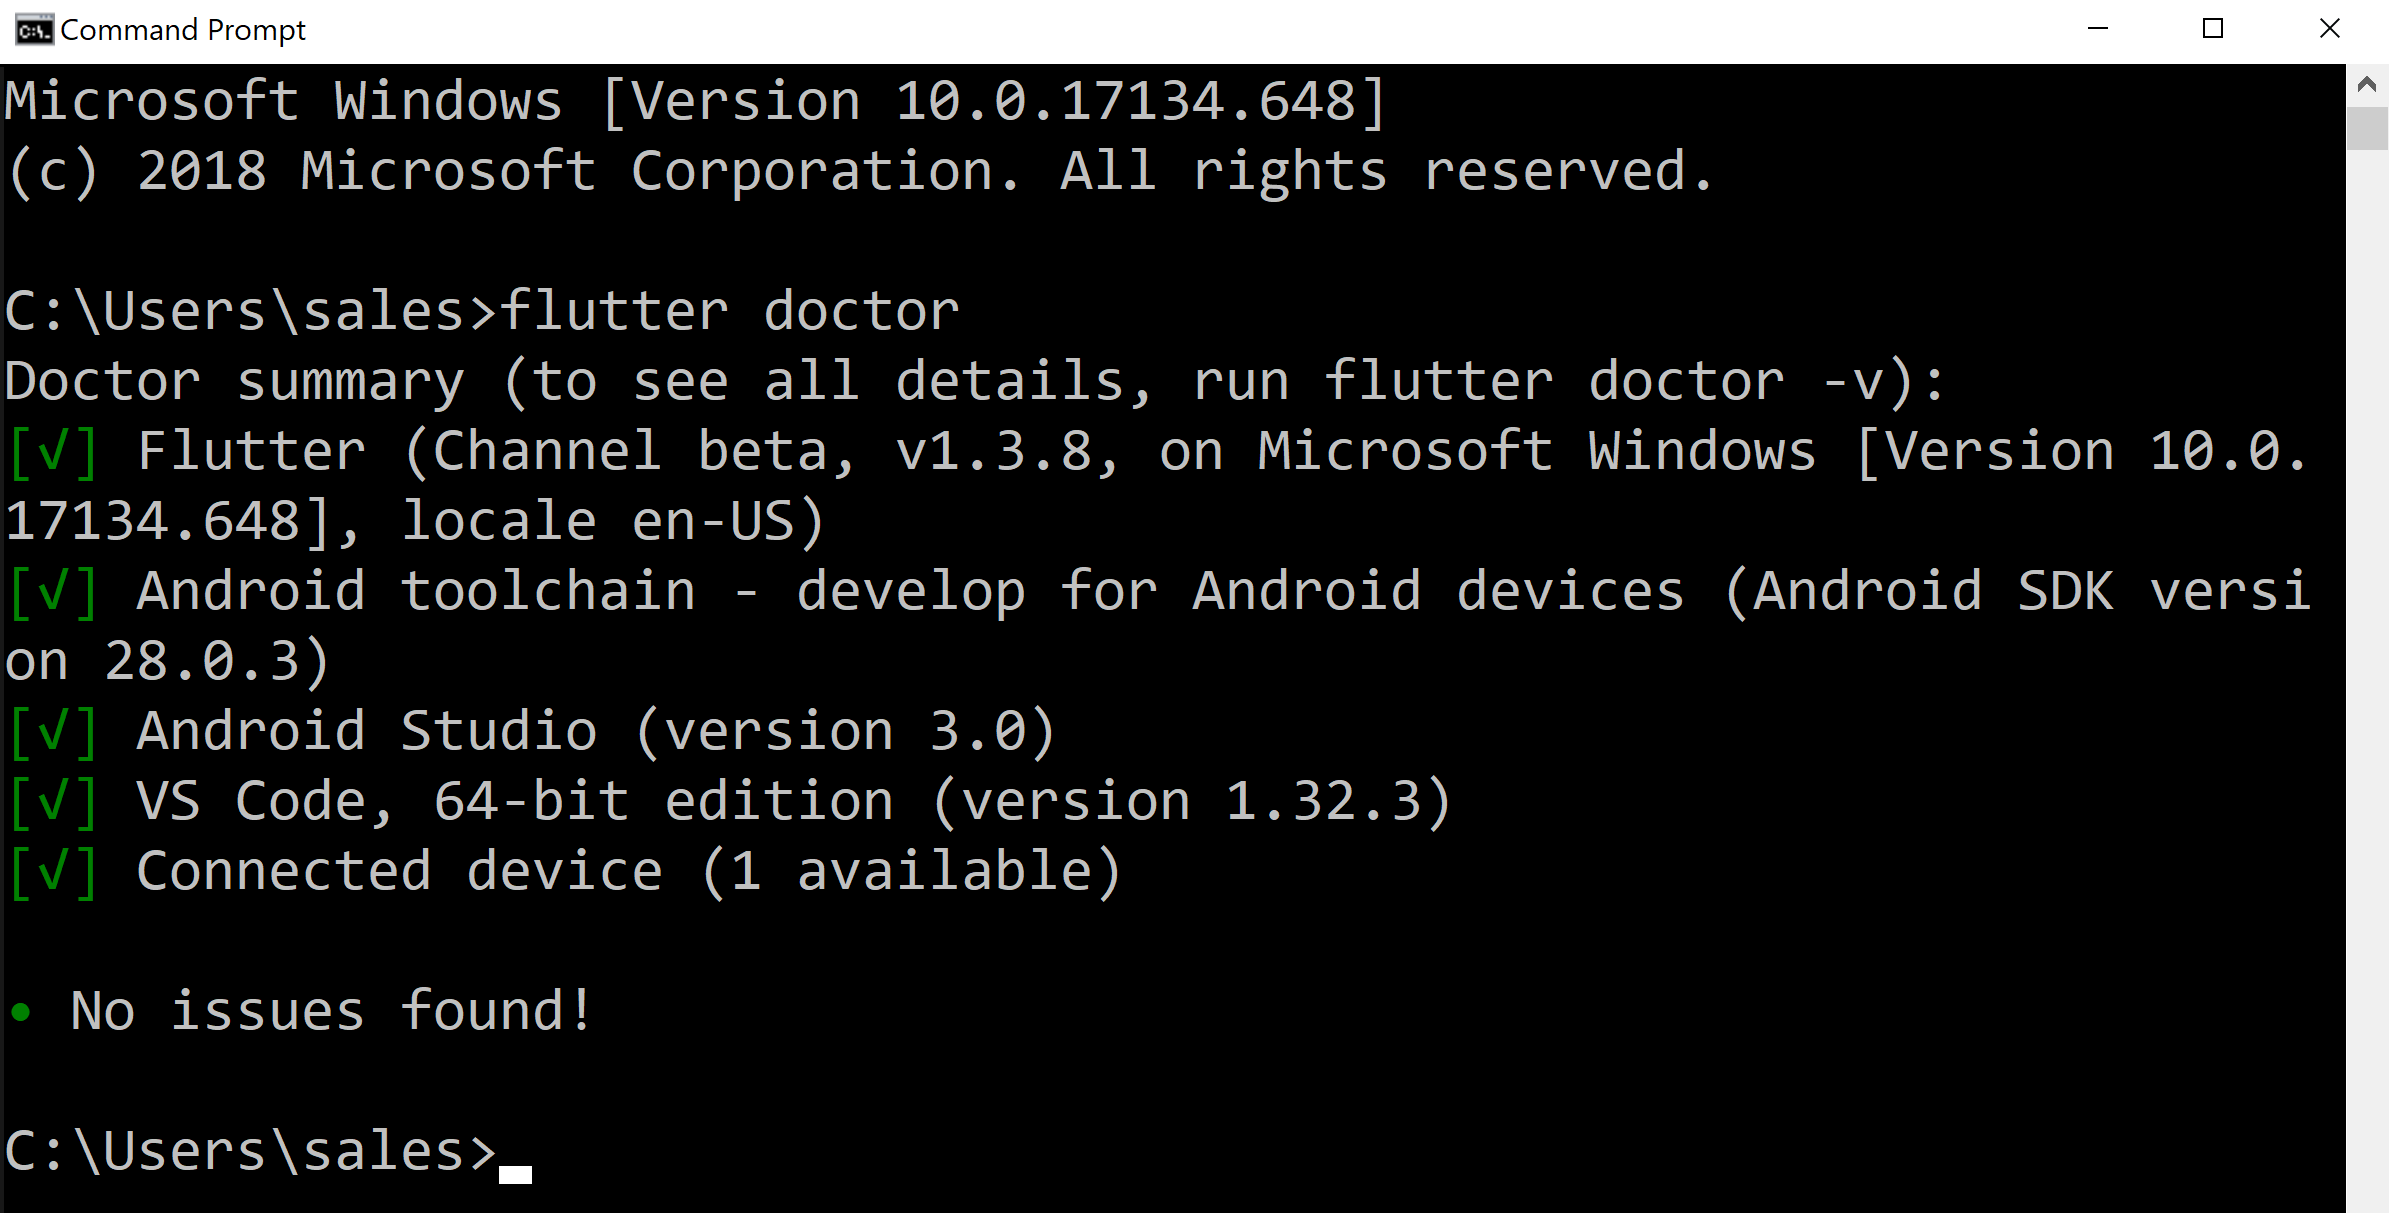
If you see some errors here, please make sure that an emulator/simulator is currently loaded, or that a physical device is correctly connected. If that doesn't solve your issues, please review the installation steps in the appendix.
- Then, type the flutter create CLI command in order to create a new app:
flutter create hello_world
flutter create creates a new project, called hello_world. The rule for naming projects is lowercase_with_underscores. The flutter create command should have created a new folder, called hello_world, which contains all the default project's files that are required for the execution of your app.
- To see the result of this step, from your terminal, type the following code:
cd hello_world
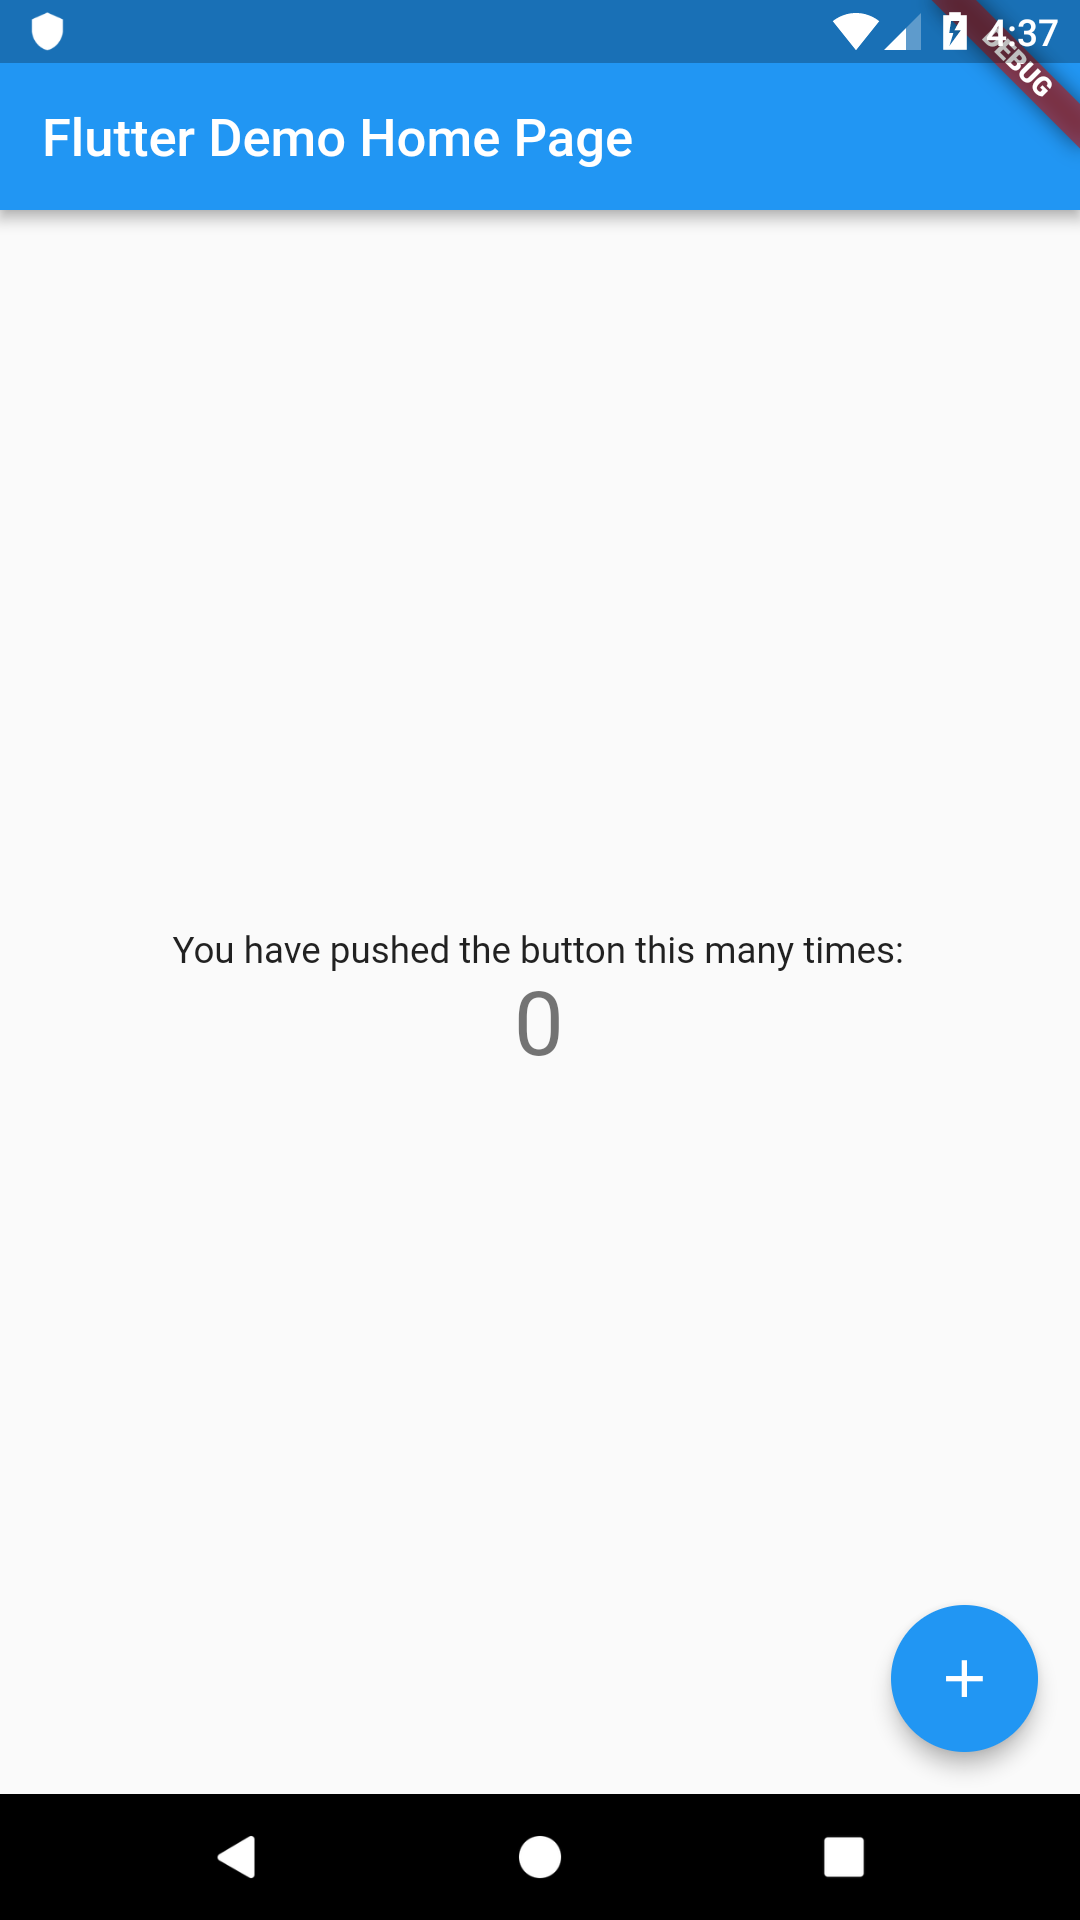
flutter run
After a few seconds, you should see the Flutter default app, similar to the following screenshot:
Now, we need to change this project so that it serves our Hello World Travel agent. In order to do this, continue with the following steps:
- Let's stop the project by typing, Ctrl + C on your terminal, and then Y.
- Next, open your editor. For this chapter, we'll use Android Studio.
- From the Android Studio File menu, select Open..., then navigate to the project folder and click the OK button:
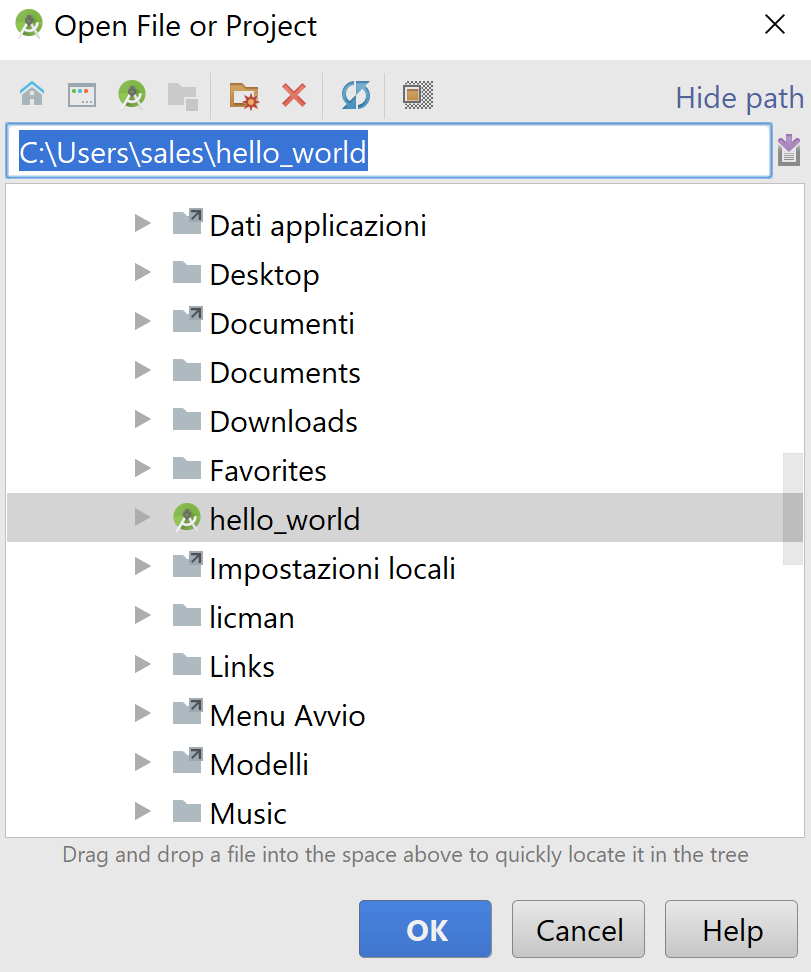
This will open the Flutter project in the IDE.
- In the editor, you should see a file called main.dart, which contains the code of the default app. Let's delete all the content of the main.dart file, and type the following code:
import 'package:flutter/material.dart';
void main() => runApp(MyApp());
class MyApp extends StatelessWidget {
@override
Widget build(BuildContext context) {
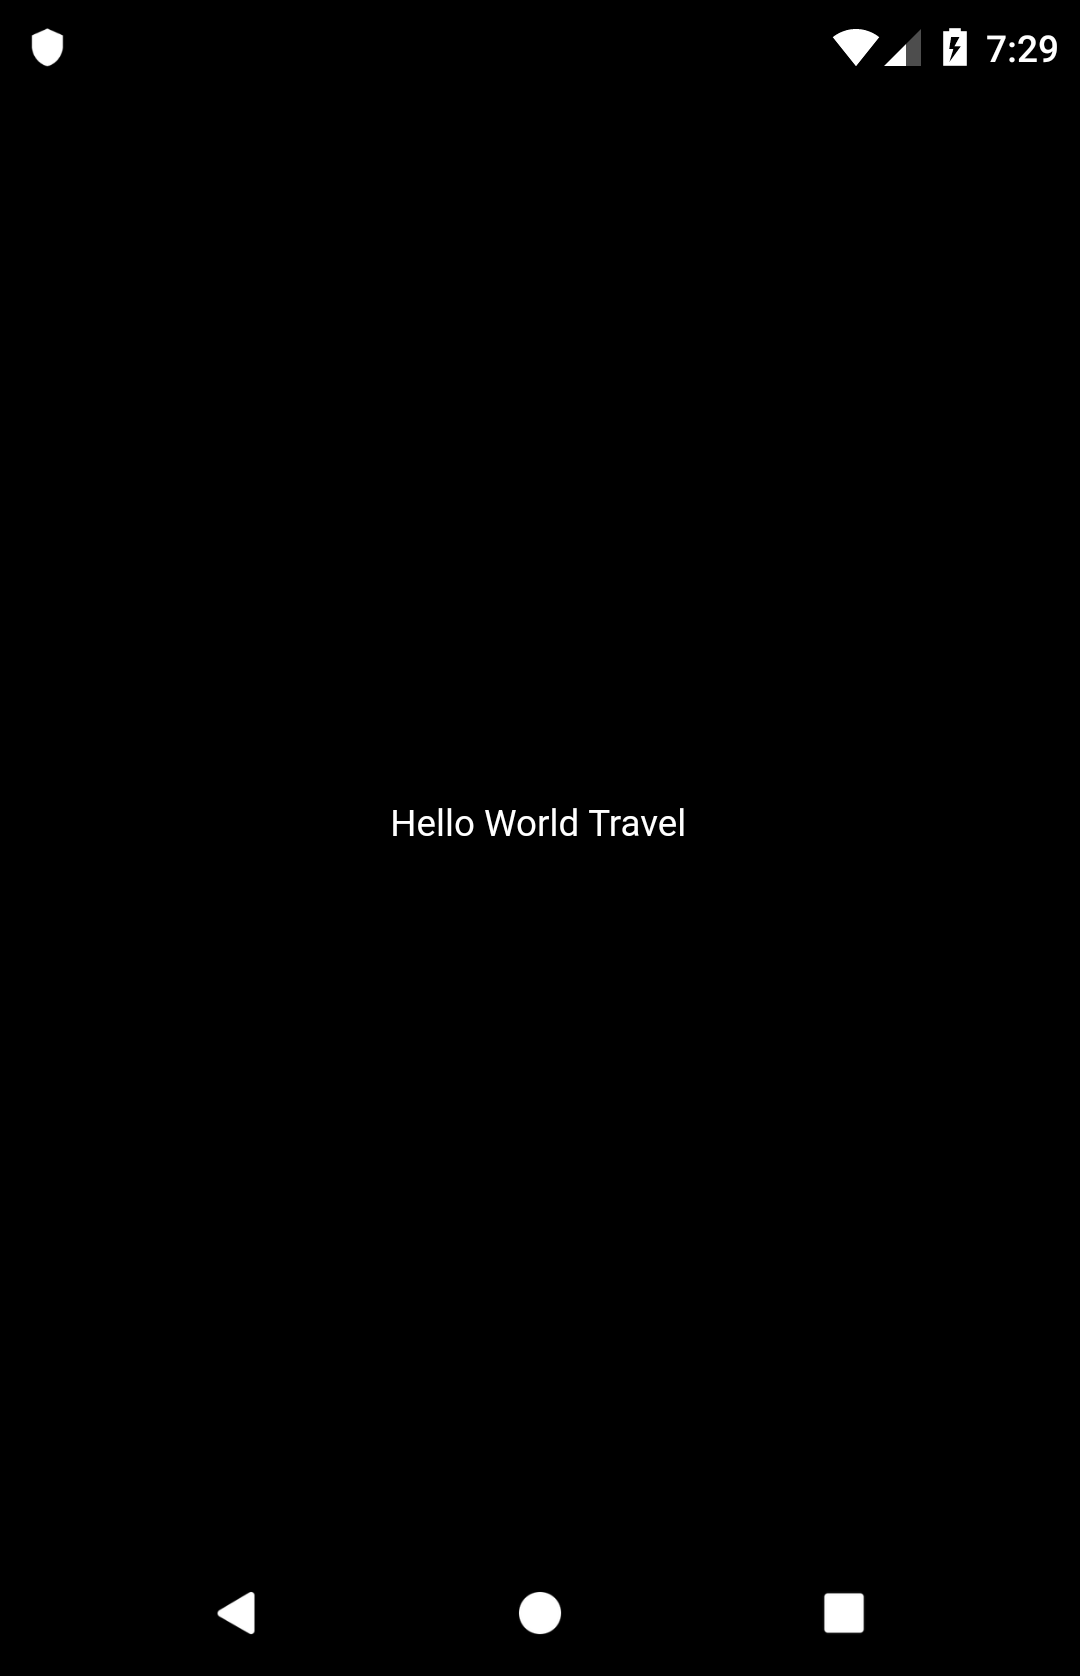
return Center(
child: Text('Hello World Travel',
textDirection: TextDirection.ltr,),
);
}
}
You can try out this code by pressing the Run button on the Android Studio toolbar, or by using the Shift + F10 keyboard shortcut. You should see that the app now looks like the following screenshot:
Let's see the code that we have written, line by line:
import 'package:flutter/material.dart';
In the first line, we import the material.dart package. A package is a library that contains reusable code. The material.dart package is a container of widgets, and in particular, material widgets that implement Material Design. Material Design is a visual design language that was developed by Google.
Next, we create a method, called main:
void main() => runApp(MyApp());
As you've seen in the Dart examples, this is the entry point of any Dart app, and this is the same for Flutter apps.
For the main() method, we use the arrow syntax to call runApp(). The runApp() method inflates a widget and attaches it to the screen. To put it simply, the runapp() method will show the widgets that you have placed inside the app on the screen.
The following line states that MyApp is a class that extends StatelessWidget:
class MyApp extends StatelessWidget {
In Flutter, there are two kinds of widgets: stateless and stateful. You use stateless widgets when you do not need to change the widget after its creation. In this case, the text in the screen ("Hello World Travel") will never change during the app lifecycle, so a stateless widget is enough for this app. On the other hand, you'll use stateful widgets when their content (or state) needs to change.
While HTML pages have the DOM, or Document Object Model, Flutter calls the hierarchical list of widgets that makes the UI a "widget tree."
The build() method in the following line of code is automatically called by the Flutter framework when a widget is inserted into the widget tree:
Widget build(BuildContext context) {
In our example, the widget tree is made of only two widgets: the Center widget and the Text widget. The build() method returns a widget.
Center is a positional widget that centers its content on the screen:
return Center(
So, whatever you put inside a Center widget will be centered horizontally and vertically.
child is a property that allows you to nest widgets inside other widgets. Text is a widget to show text:
child: Text('Hello World Travel',
          textDirection: TextDirection.ltr,),
Note that in this case, you also need to specify a textDirection instruction. ltr means left to right. So, you are using the child property of the Center widget, to put a Text widget in the center of the screen. By default, the background color of the screen is black.
This is probably not the most beautiful app that you've ever seen, but we'll keep working on it, and, most importantly, congratulations! You have written your first Hello World app!
Using MaterialApp and Scaffold
A black screen with small white text doesn't really look like a real app. We'll try to fix that by taking the following steps:
- Let's introduce the MaterialApp widget, which is the container that you'll use when creating Material Design apps. Material Design is a design language that Google developed in 2014, based on "materials," such as ink or paper, with an implementation that was even more advanced than physical materials. Flutter fully supports Material Design.
- For most of your apps, you'll probably wrap your content in a MaterialApp widget. This also allows you to give a title to your app. So let's change our code like this:
import 'package:flutter/material.dart';
void main() => runApp(MyApp());
class MyApp extends StatelessWidget {
@override
Widget build(BuildContext context) {
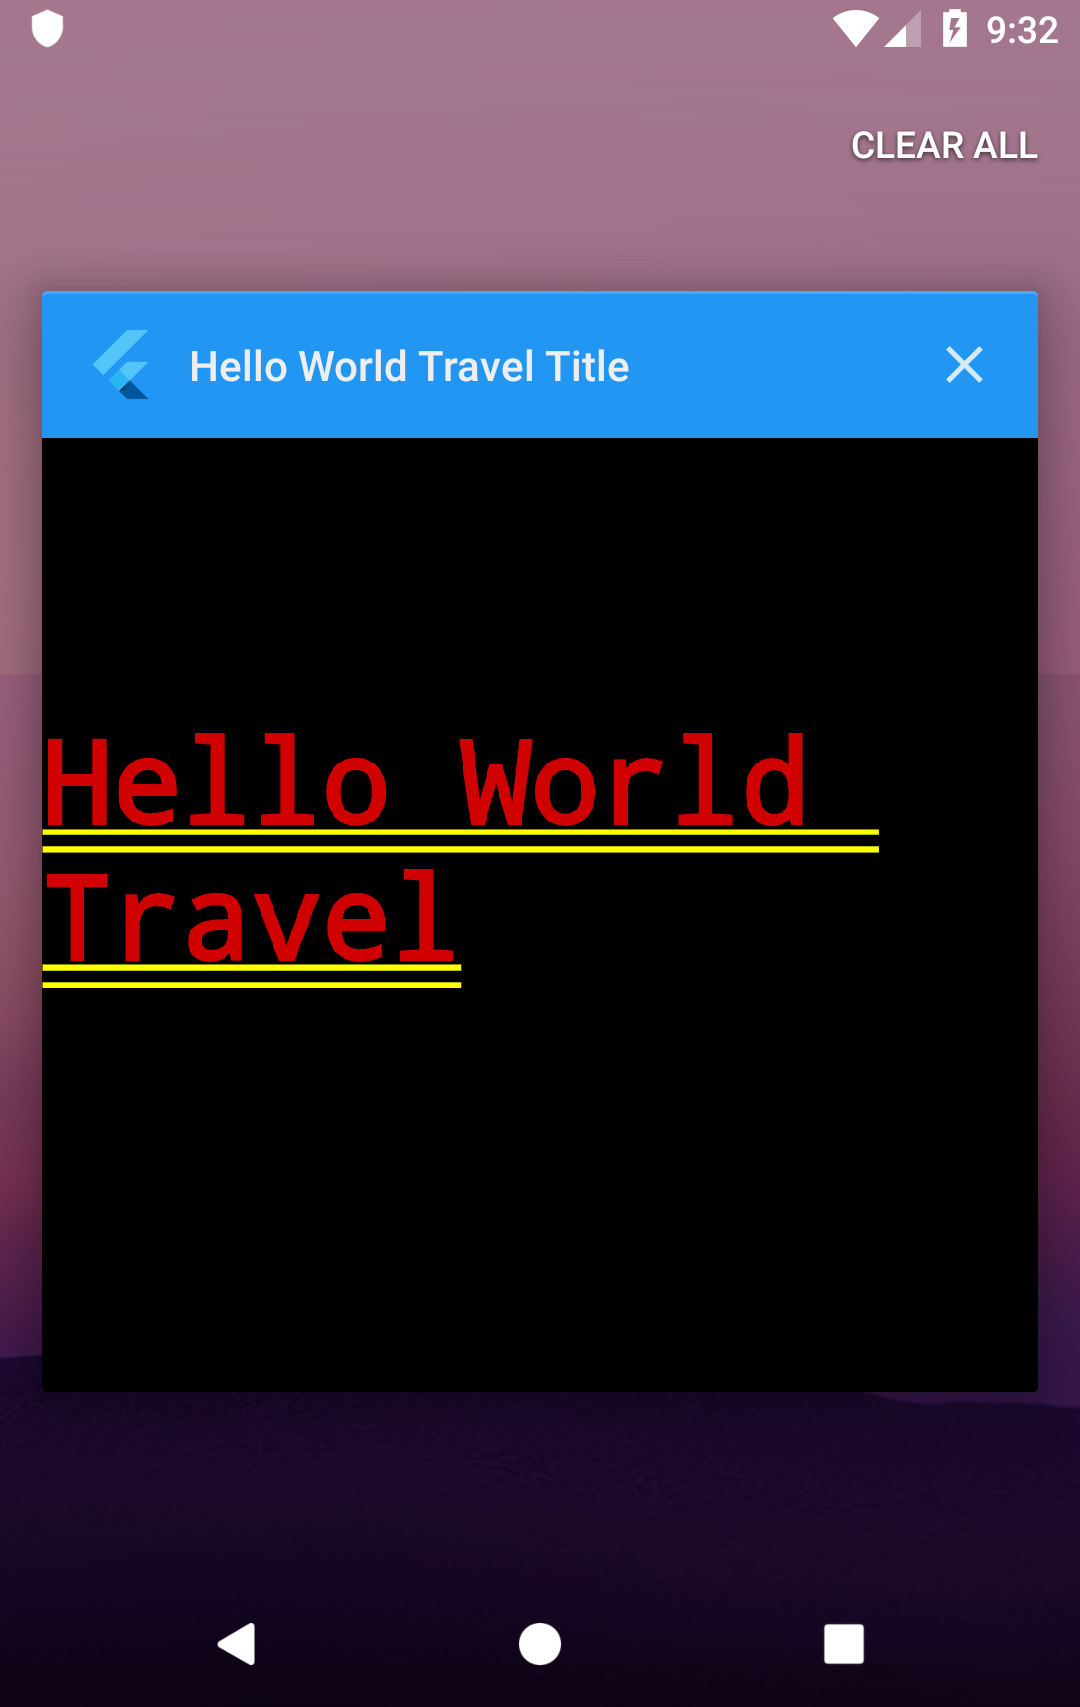
return MaterialApp(
title: "Hello World Travel Title",
home: Center(
child: Text('Hello World Travel')
));
}
}
- Instead of returning a Center widget, we are now returning MaterialApp, which has two properties: title and home. Home is what the user will actually see on the screen of the app. You may notice that when you use MaterialApp, you don't need to specify the text direction, as the text direction is chosen based on the device's locale information.
- If you run the app, you'll see that a couple of things changed in it. If you are using Android, you will now see the app title if you scroll through your apps, and the font size has changed:
- It looks even worse than before. Let's quickly add a Scaffold widget. A Scaffold widget represents a screen in a MaterialApp widget, as it may contain several Material Design layout widgets, including AppBar, a bottom navigation bar, floating action buttons, and the body of the screen. We'll use those widgets extensively throughout the book.
- A Scaffold widget allows you to add an application bar to your app. In the appBar property, we'll place an AppBar widget, which will contain the text that you want to show in the application bar.
- Let's set the text to be added to the Hello World Travel App, as shown in the following code block:
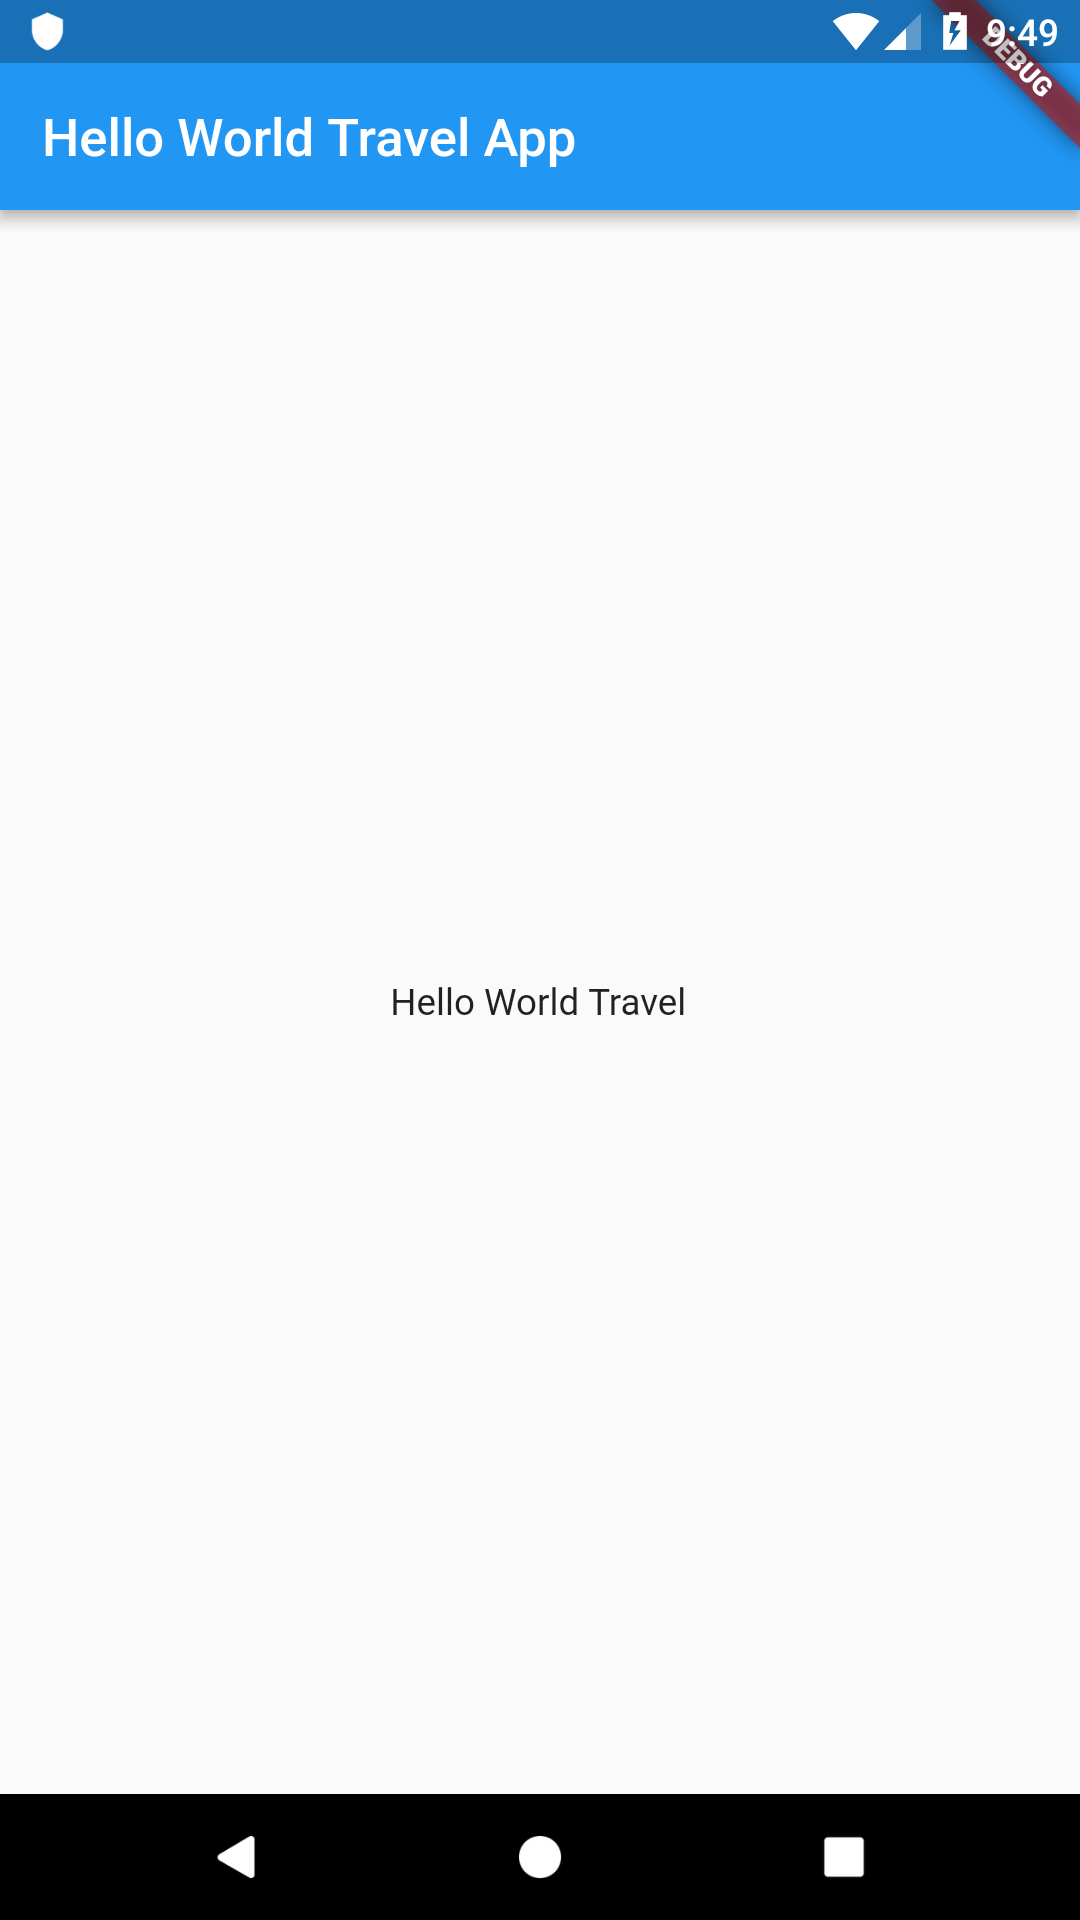
class MyApp extends StatelessWidget {
  @override
  Widget build(BuildContext context) {
    return MaterialApp(
        title: "Hello World Travel Title",
       home: Scaffold(
            appBar: AppBar(title: Text("Hello World Travel App")),
            body: Center(
              child: Text('Hello World Travel')
        )));
  }
}
The Scaffold widget has two properties that we used: appBar, which contains an application bar, and body, which contains the main content of the screen.
So, our app now definitely looks more like an app, even though it only contains a small amount of text:
Let's now add a few more widgets to make our app more interesting.
Formatting Text and Using Columns
Our customer, Hello World Travel, loves blue and purple, and so we need to change the colors of our app, as well as the formatting of our text. Let's change the MyApp class code as shown here:
class MyApp extends StatelessWidget {
  @override
  Widget build(BuildContext context) {
    return MaterialApp(
        title: "Hello World Travel Title",
        home: Scaffold(
            appBar: AppBar(
              title: Text("Hello World Travel App"),
              backgroundColor: Colors.deepPurple,),
            body: Center(
              child: Text(
                'Hello World Travel',
                style: TextStyle(
                    fontSize: 26,
                    fontWeight: FontWeight.bold,
                    color: Colors.blue[800]),)
        )));
  }
}
We've added a couple of features to the app. First, we added a background color for the AppBar as shown here:
backgroundColor: Colors.deepPurple,
The Colors class contains several colors that we can use out of the box, including deepPurple, which we used there. In the color, you can also choose a shade, which is generally a number from 100 to 900, in increments of 100, plus the color 50. The higher the number, the darker the color. For example, for the text, we chose a color of blue[800], which is rather dark:
style: TextStyle(   fontSize: 26,
                    fontWeight: FontWeight.bold,
                    color: Colors.blue[800]),)
In the Text widget, we used the style property to add a TextStyle class, and there we chose a bigger fontSize, a bold fontweight, and of course, color.
Our app is definitely getting better, but we aren't finished yet. We now need to add a second piece of text below the first one. The problem right now is that the Center widget only takes one child, so we cannot add a second Text widget there. The solution is choosing a container widget that allows more than one child, and as we want to place our widgets on the screen, one below the other, we can use a Column container widget. A Column has the children property, instead of child, which takes an array of widgets. So let's change the body of the Scaffold widget, like this:
body: Center(
    child: Column(children: [
  Text(
    'Hello World Travel',
    style: TextStyle(
        fontSize: 26,
        fontWeight: FontWeight.bold,
        color: Colors.blue[800]),
  ),
  Text(
    'Discover the World',
    style: TextStyle(
        fontSize: 20,
        color: Colors.deepPurpleAccent),
  )
]))
Now, the Center widget still contains a single child, but its child is a Column widget that now contains two Text widgets, 'Hello World Travel' and 'Discover the World.'
Showing images and using buttons
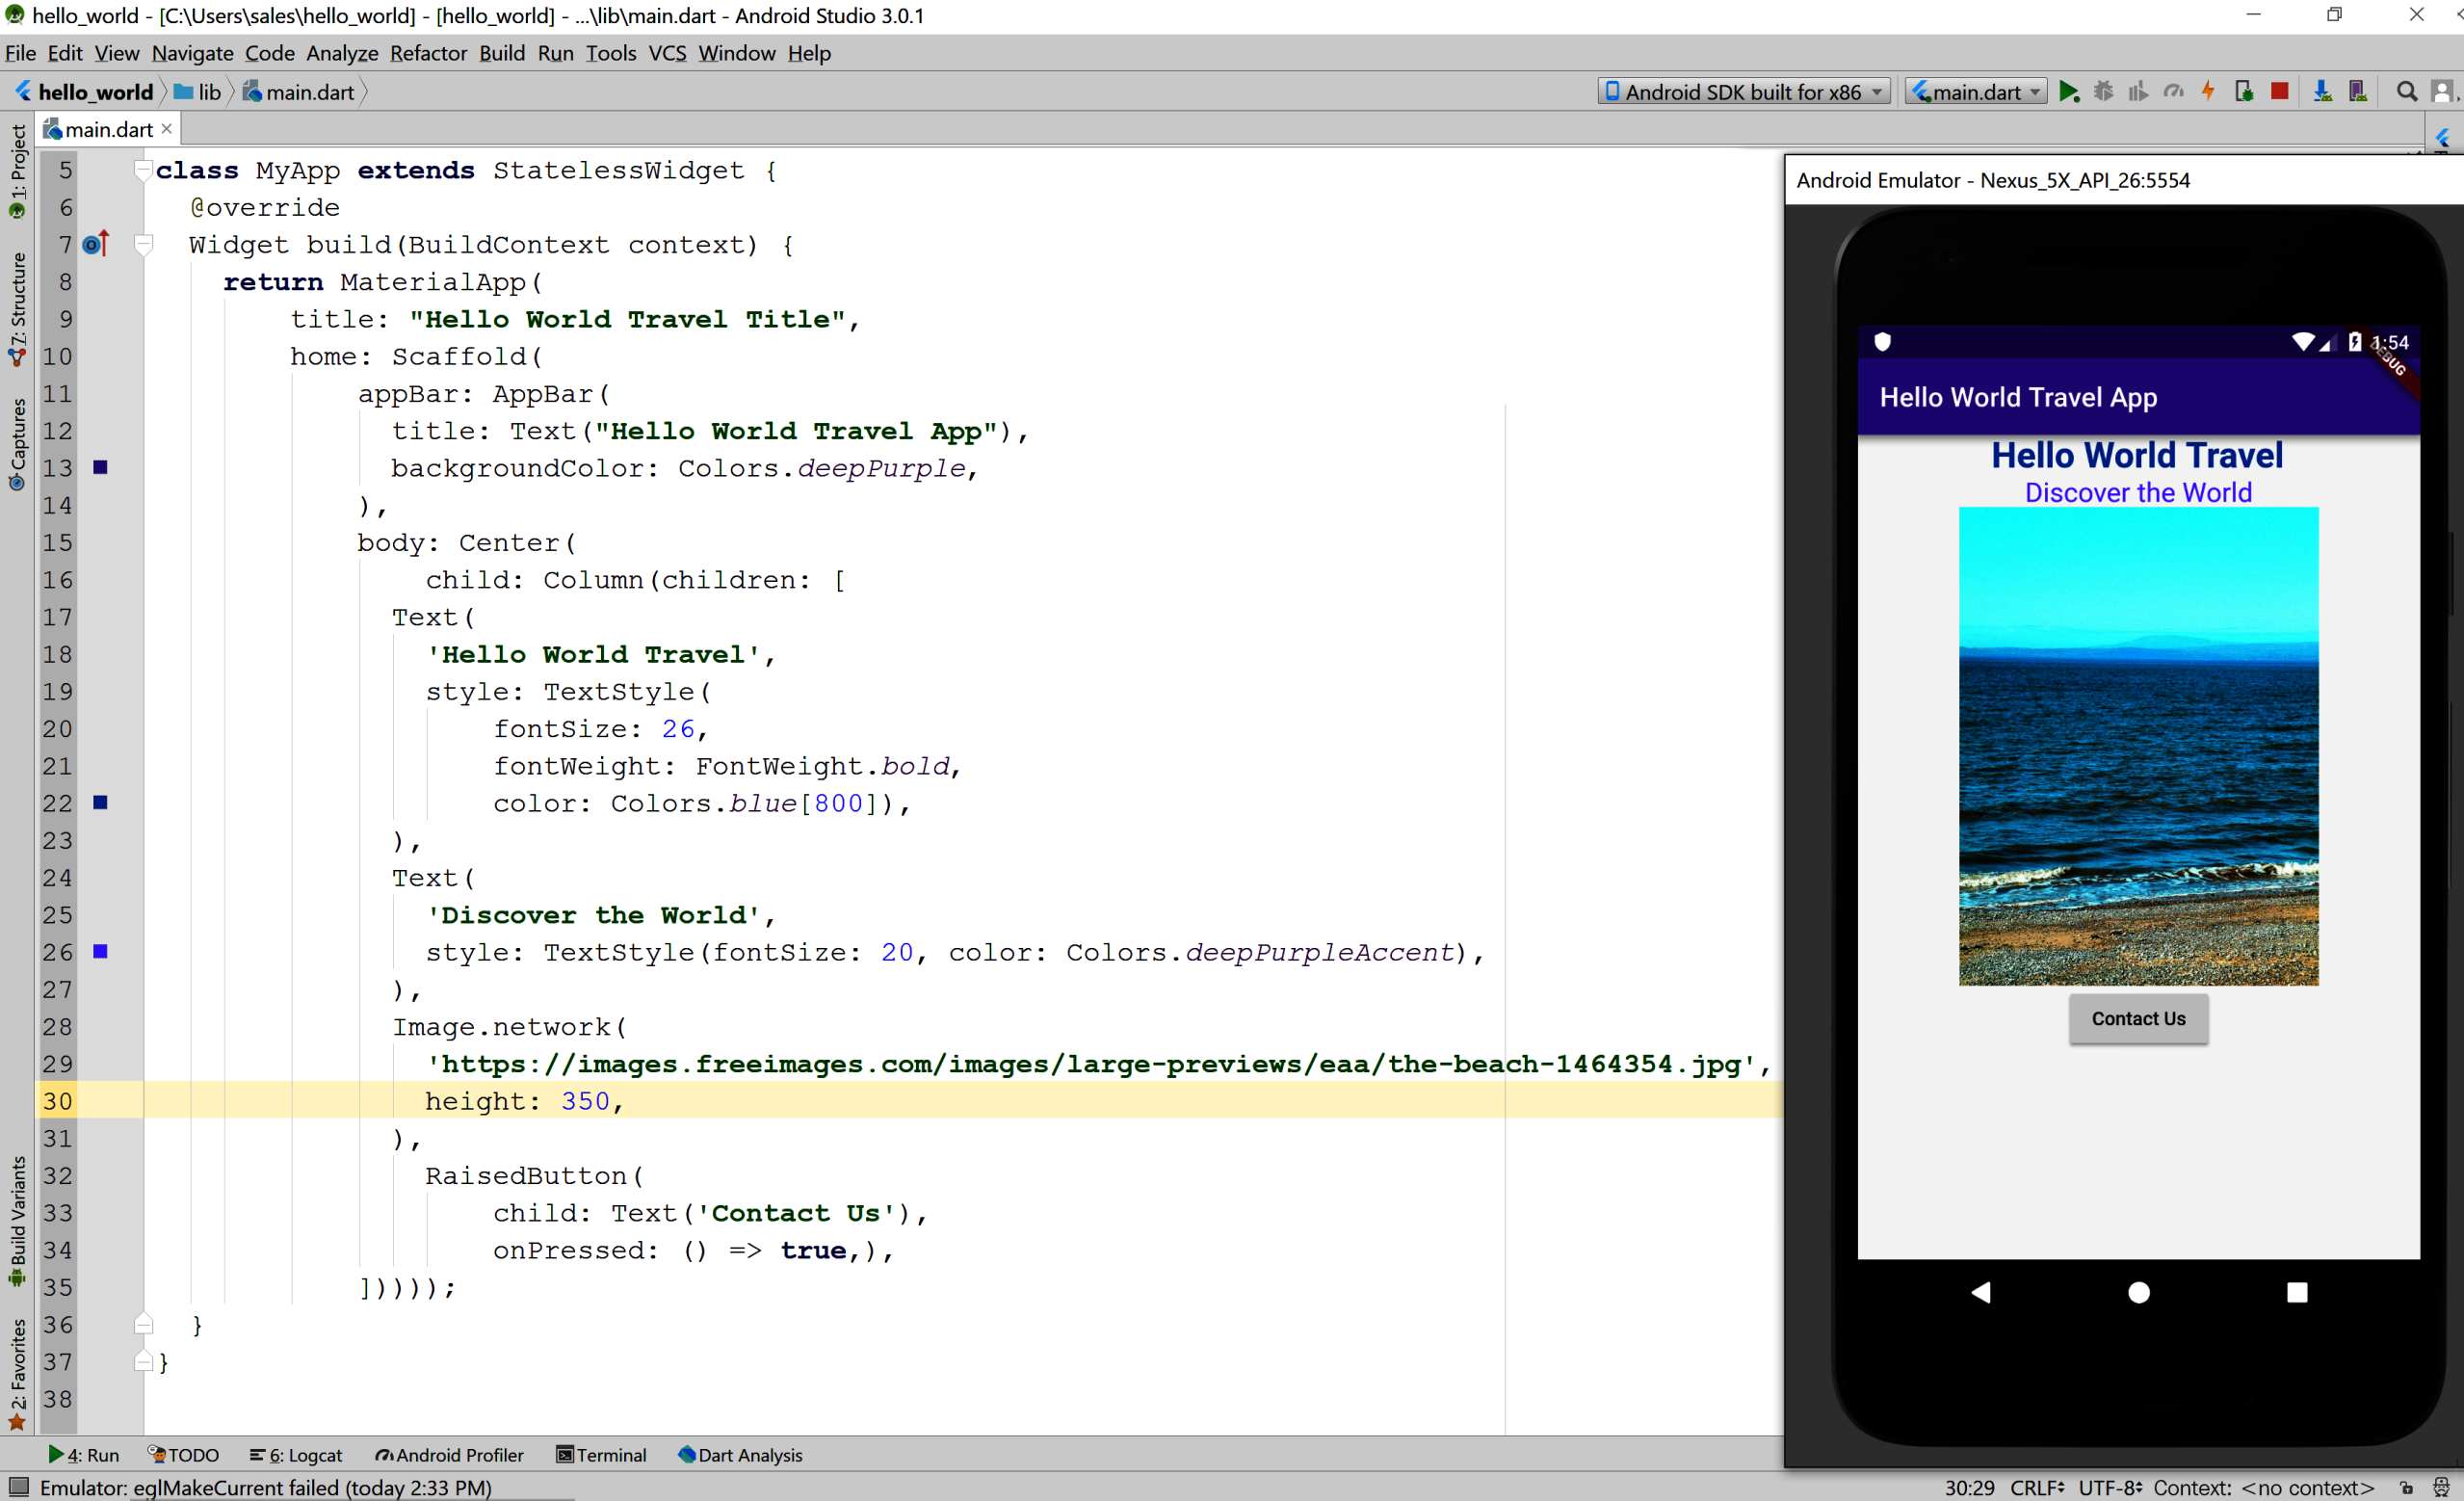
Let's now add an Image widget under the two texts, as follows:
Image.network(
  'https://images.freeimages.com/images/large-previews/eaa/the-beach-1464354.jpg',
  height: 350,
),
Image is a widget that has a network() constructor, which automatically downloads an image from a URL with a single line of code. The image is taken from FREEIMAGES (https://www.freeimages.com/), which contains a stock of free photos for personal and commercial use.
The height property of an image specifies its height, depending on the pixel density of the screen. By default, the width will be resized proportionally.
Physical pixels are the actual number of pixels that a device has. But, there are several form factors, and the resolution of a screen may vary substantially.
For example, the Sony Xperia E4 has a screen size of 5'', and a resolution of 960 * 540 pixels. The Xperia X has the same screen size of 5'', but a resolution of 1920 * 1080. So, if you wanted to draw a square of 540 pixels per side, it would be much smaller on the second device. That's why there's the need for logical pixels. Each device has a multiplier, so that when you use logical pixels, you don't have to worry too much about the resolution of a screen.
Let's also put a button under the image:
RaisedButton(
    child: Text('Contact Us'),
    onPressed: () => true,),
RaisedButton shows a button that a user can press (or click). Inside Raisedbutton, we have placed Text as the widget child, and in the onPressed property, we have created an anonymous () function with an arrow operator, and in the function, we are just returning true. This is only temporary. When the user presses the button, we want to show a message, and we'll do that later.
Next, you can see the code of the MyApp class so far, and the result on an Android emulator:
We have almost reached the end result that we wanted to achieve, but there are a couple of things that we need to fix. We should add some space between the widgets, and show a message when the user selects the Contact Us button. Let's begin with the message.
Showing an AlertDialog box
AlertDialogs are widgets that you use to give feedback or to ask for some information from your user. It is a small window that stays on top of the current screen, and only covers part of the user interface. Some use cases include asking for confirmation before deleting an item (Are you sure?), or giving some information to the user (Order completed!). In our code, we'll show our user the contact information of the Hello World Travel company.
Showing an AlertDialog widget requires a few steps:
- Calling the showDialog() method
- Setting context
- Setting builder
- Returning the AlertDialog property
- Setting the AlertDialog properties
Let's write a new method, called contactUs, at the end of the MyApp class:
void contactUs(BuildContext context) {
  showDialog(
    context: context,
    builder: (BuildContext context) {
      return AlertDialog(
        title: Text('Contact Us'),
        content: Text('Mail us at hello@world.com'),
        actions: <Widget>[
          FlatButton(
            child: Text('Close'),
            onPressed: () => Navigator.of(context).pop(),
          )
        ],
      );
    },
  );
}
We are creating a contactUs method, that takes a context parameter. We then call the showDialog() function, which is required in order to show a message to the user. The showDialog function has a few properties that we need to set. The first one is context, which is basically where the dialog should be shown. This is passed to our method through the context parameter.
Next, we need to set the builder property. This requires a function, so we need to create a function that accepts a single argument of the BuildContext type, and returns a widget—in our example, AlertDialog, as shown here:
builder: (BuildContext context) {
      return AlertDialog(
An AlertDialog widget has several properties that set the behavior of the message that you show to the user. The three properties that we are using in this example are title, content, and actions. In the following screenshot, you can see the result of using those properties:
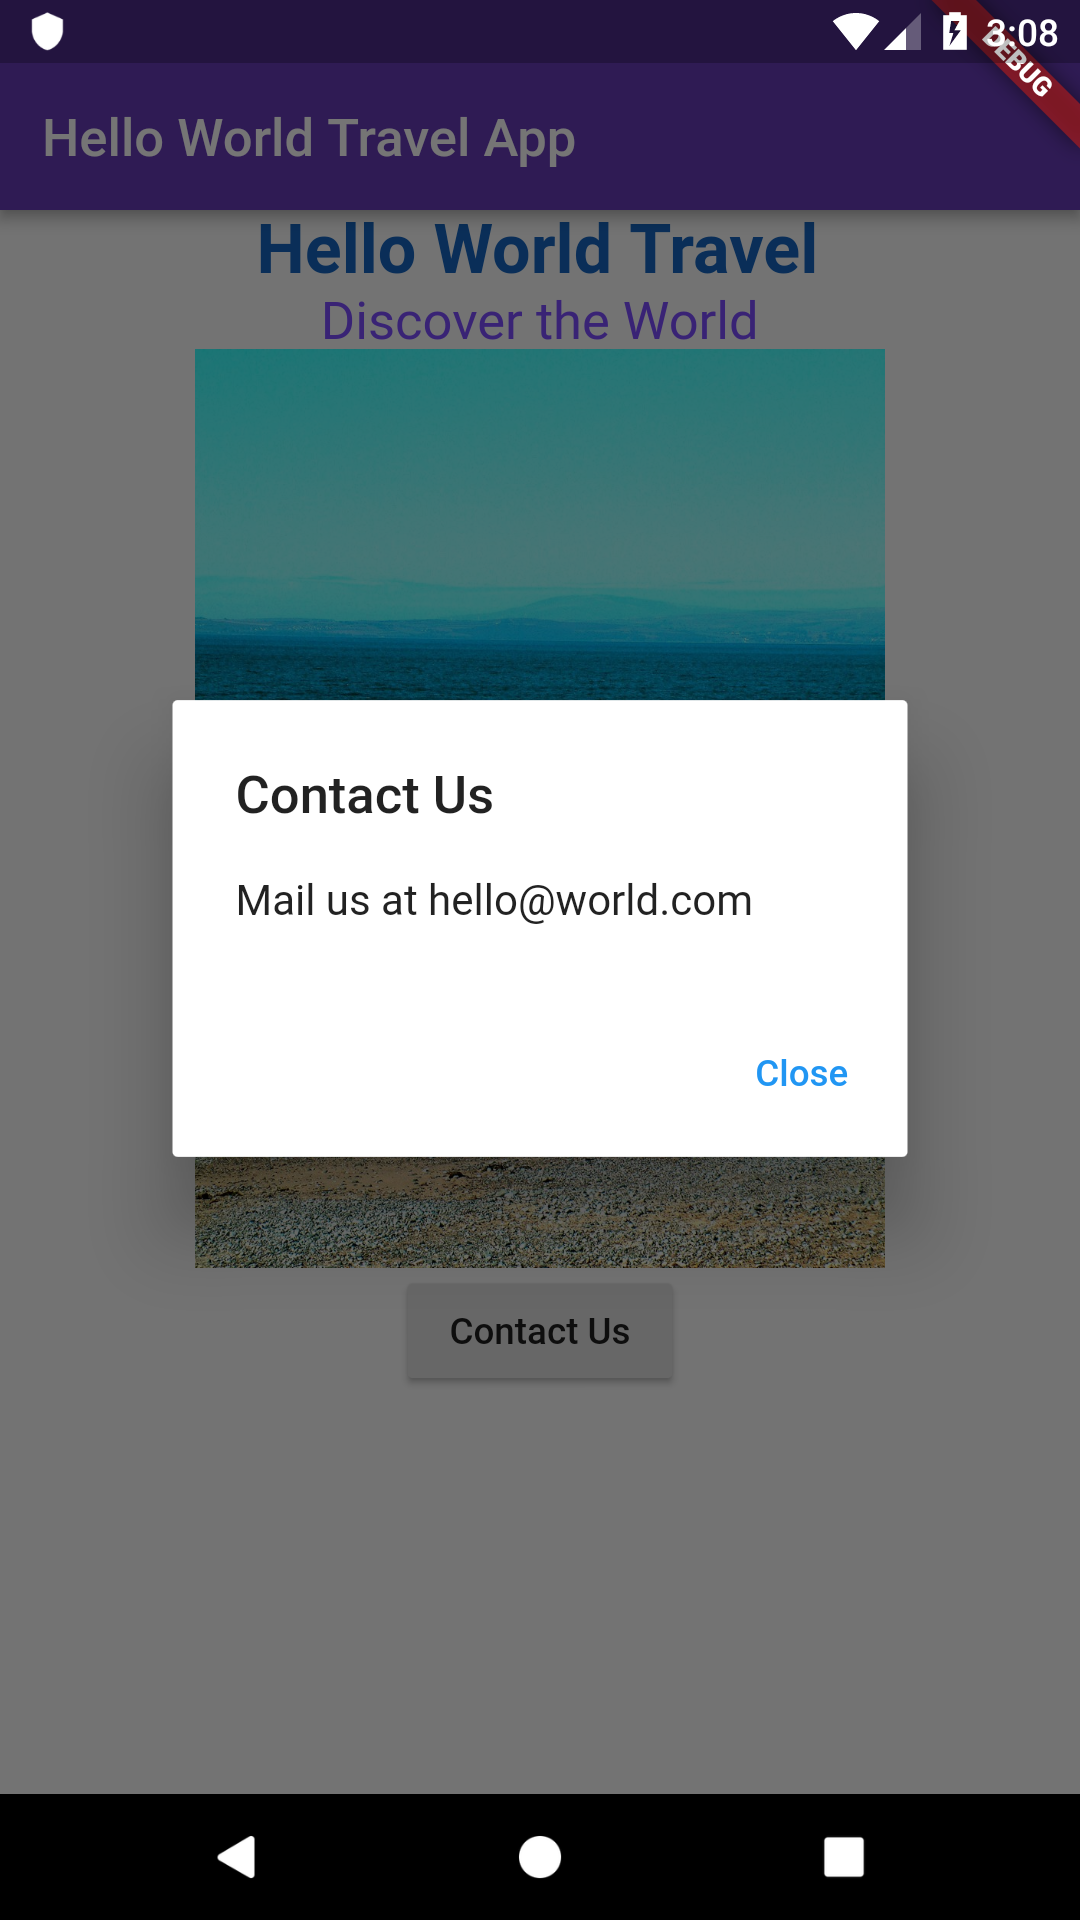
You can see the Contact Us title, the Mail us at hello@world.com content, and the actions—the Close button. In the actions, when you have more than one choice, you can place more than one button.
In the following excerpt of the code, the pop() method of the Navigator class will close AlertDialog. We'll talk more about screens and navigation in Flutter in the other projects in this book:
 return AlertDialog(
        title: Text('Contact Us'),
        content: Text('Mail us at hello@world.com'),
        actions: <Widget>[
          FlatButton(
            child: Text('Close'),
            onPressed: () => Navigator.of(context).pop(),
          )
        ],
Our AlertDialog is not showing yet. We need to make a couple of changes before you can use it. The first change is that we need to call the contactUs function that we have just created. We'll do that in the onPressed property of the RaisedButton widget:
onPressed: () => contactUs(context),
The second change that we need to perform is enclosing the Center widget in the body of the Scaffold widget in a Builder widget. This allows us to take the context of the Scaffold so that we can pass it to the showDialog method, as shown here:
body: Builder(builder: (context)=>Center(
For your reference, here is the final code that we have written so far:
import 'package:flutter/material.dart';

void main() => runApp(MyApp());

class MyApp extends StatelessWidget {
  @override
  Widget build(BuildContext context) {
    return MaterialApp(
        title: "Hello World Travel Title",
        home: Scaffold(
            appBar: AppBar(
              title: Text("Hello World Travel App"),
              backgroundColor: Colors.deepPurple,
            ),
            body: Builder(builder: (context)=>Center(
                child: Column(children: [
              Text(
                'Hello World Travel',
                style: TextStyle(
                    fontSize: 26,
                    fontWeight: FontWeight.bold,
                    color: Colors.blue[800]),
              ),
              Text(
                'Discover the World',
                style: TextStyle(fontSize: 20, color:
                 Colors.deepPurpleAccent),
              ),
              Image.network('https://images.freeimages.com/
               images/large-previews/eaa/the-beach-1464354.jpg',
                height: 350,
              ),
              RaisedButton(
                child: Text('Contact Us'),
                onPressed: () => contactUs(context),
              ),
            ])))));
  }

  void contactUs(BuildContext context) {
    showDialog(
      context: context,
      builder: (BuildContext context) {
        return AlertDialog(
          title: Text('Contact Us'),
          content: Text('Mail us at hello@world.com'),
          actions: <Widget>[
            FlatButton(
              child: Text('Close'),
              onPressed: () => Navigator.of(context).pop(),
            )
          ],
        );
      },
    );
  }
}
Note that, should you get lost when writing your code while following any project in this book, you can always check the final version of the app at the GitHub repository. In particular, the project for this chapter is available at https://github.com/PacktPublishing/Google-Flutter-Projects.
In the next section, let's see how to use padding to add some space to our app.
Using padding
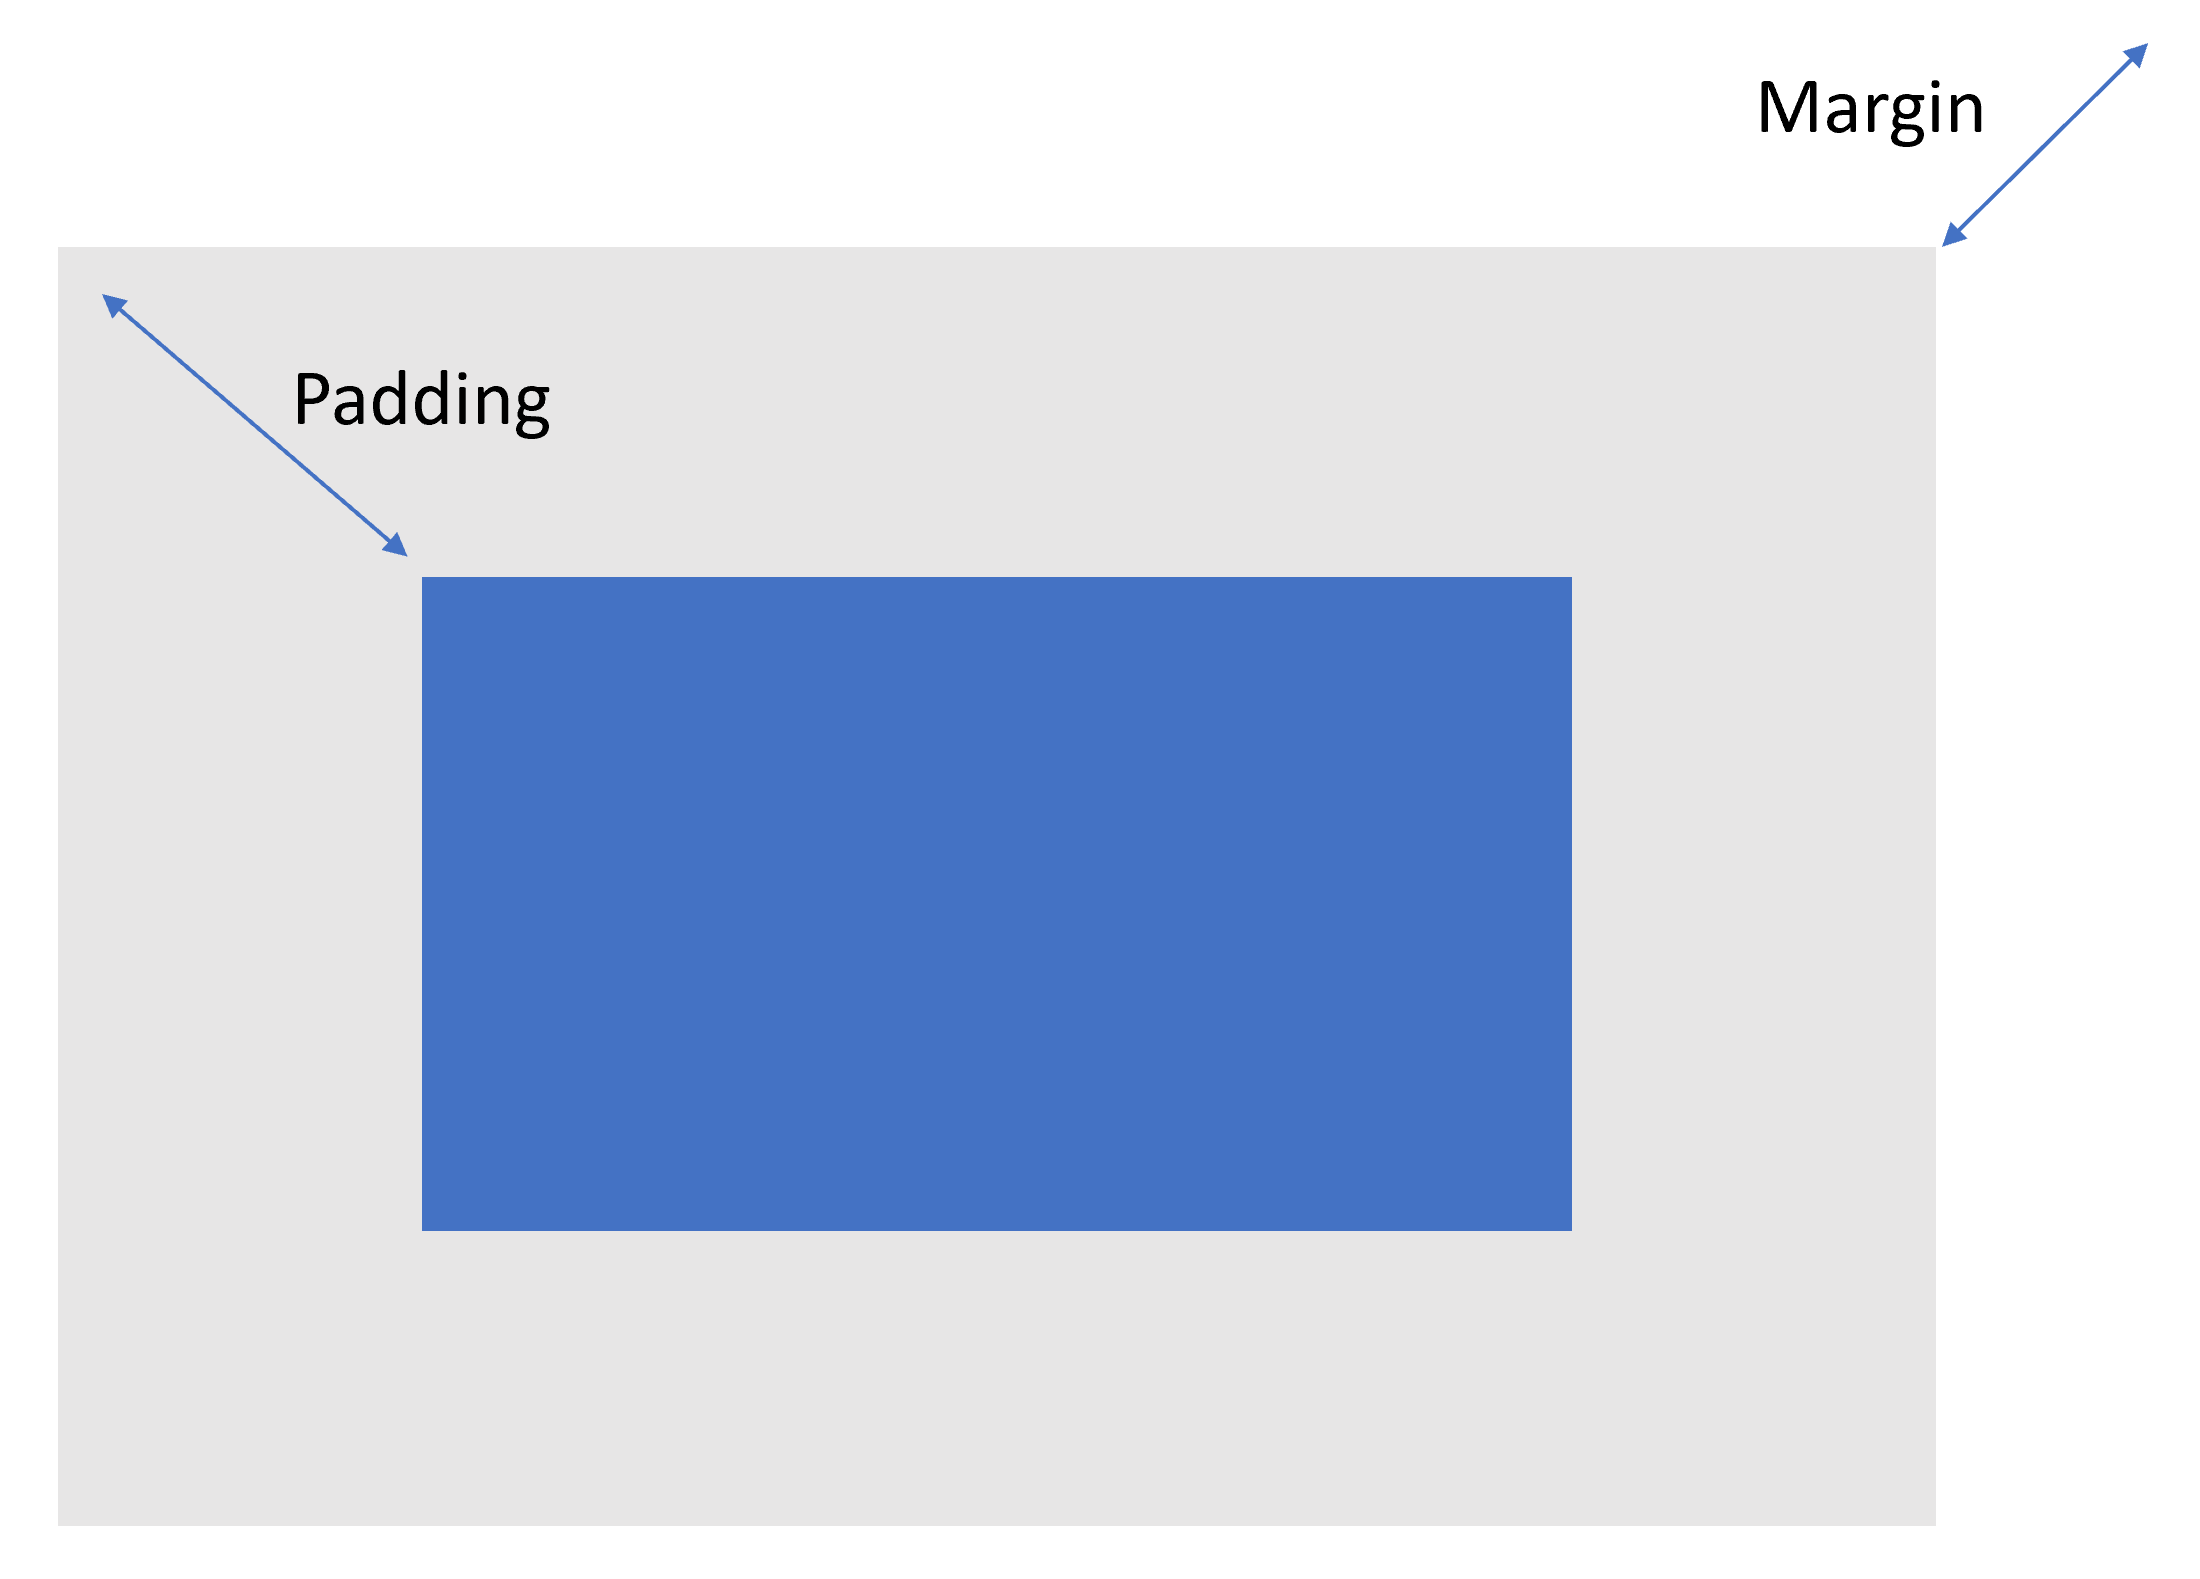
All the functions of our app are there, but everything seems too crowded on our screen. Let's add some space between the widgets. Generally speaking, you can create space between elements through padding and margin properties. In Flutter, some widgets have a padding and a margin property to deal with the space. Padding is the space between the content and the border of a widget (which may also not be visible), and the margin is the space outside the border, as shown in the following diagram:
Flutter also has a widget that has been specifically created to deal with space: the Padding widget. In order to specify the distance (also called the offset), you use the EdgeInsets class. This class specifies offsets, for the margin or the padding, from left, top, right, and bottom. There are several named constructors for the EdgeInsets class.
The Edgeinsets.all constructor creates an offset on all four sides of a box: top, right, bottom, and left. In the next example, it creates an offset of 24 logical pixels on all sides of a box:
EdgeInsets.all(24)
In order to choose the side, or sides, for the offset, you can use the only() constructor. In the following example, you see on the screen, for instance, that you are creating a margin of 80 pixels on the right of a widget:
EdgeInsets.only(right:80)
The EdgeInsets.symmetric(vertical: 48.5) constructor allows you to create symmetrical vertical and horizontal offsets. All the constructors take double values as parameters:
EdgeInsets.symmetric(vertical:48.5)
So, in our code, let's add some spacing now:
- Let's enclose Center itself into a Padding widget, giving it an EdgeInsets.all class with 20 logical pixels on each side:
body: Builder(
    builder: (context) => Padding(
        padding: EdgeInsets.all(20),
        child: Center(
            child: Column(children: [
- Then, we'll repeat the same process for the two Text widgets—Image and RaisedButton. Let's begin by giving a 10-pixel padding to the 'Hello World Travel' text:
Padding(
    padding: EdgeInsets.all(10),
    child: Text(
      'Hello World Travel',
- Next, let's add the padding to the 'Discover the world' text:
Padding(
    padding: EdgeInsets.all(5),
    child: Text(
      'Discover the World',
- Next, we add padding to the Image widget:
Padding(
    padding: EdgeInsets.all(15),
    child: Image.network(
- Finally, we add padding to the button:
Padding(
    padding: EdgeInsets.all(15),
    child: RaisedButton(
If you try the app right now, depending on your device, everything might look okay, but we still have a problem. Let's see what it is in the next section.
Using SingleChildScrollView
Now that we added some space into the screen, we might run into a problem. Try to rotate your device so that you have horizontal view. You should see something like the following screenshot:
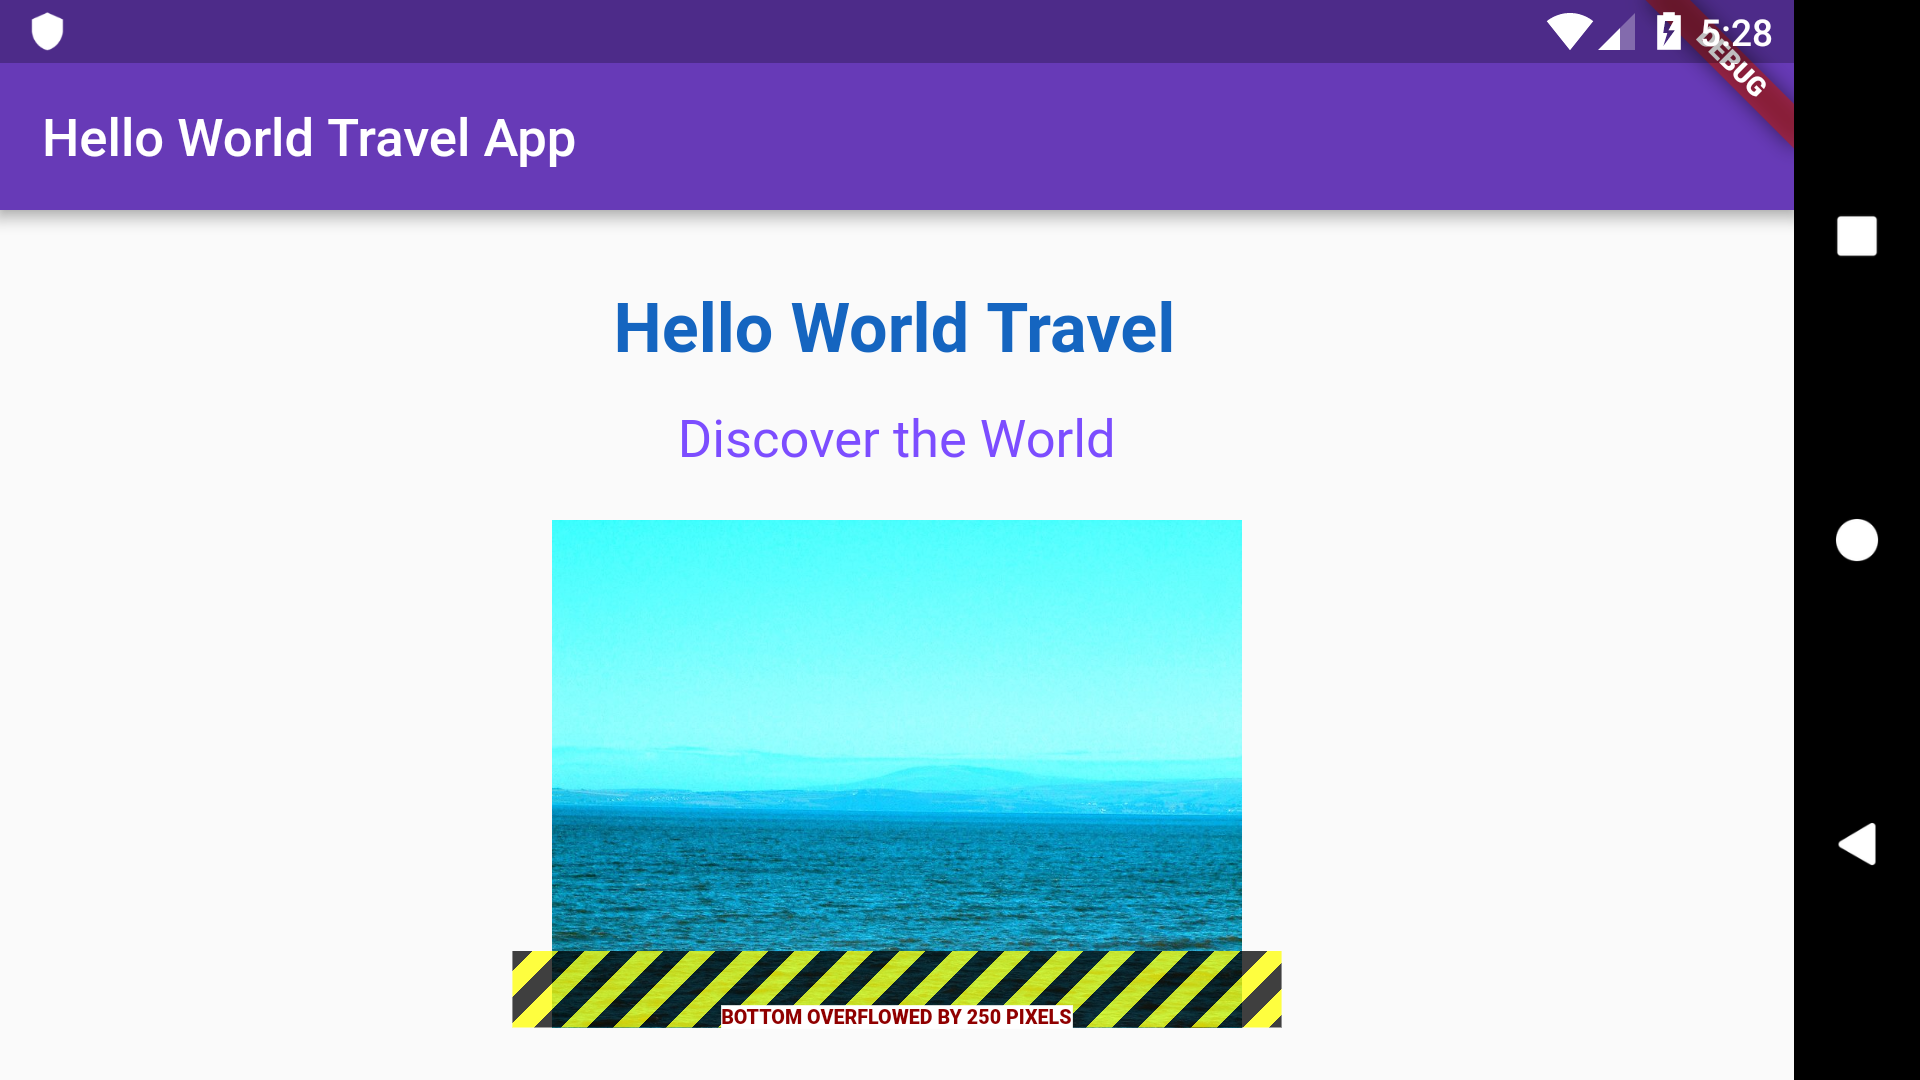
We have an error: Bottom overflowed by 250 pixels. This happens because the size of the UI is bigger than the size of the screen.
Always check your app in every orientation when developing for mobile.
There's an easy solution for this. We need to enclose everything in SingleChildScrollView:
builder: (context) => SingleChildScrollView(
   child: Padding(
SingleChildScrollView is a widget that scrolls and has a single child, in our example, Padding. This is especially useful when your widget might take more space than the available space on the screen and you want to enable scrolling for the overflowing content.
If you try this now, you'll see that everything is working perfectly, and the user can scroll up and down if needed.
You have completed your first project in this book! Congratulations, you are well on your way to becoming a Flutter developer.
Summary
In this first chapter, we've covered several of the basics that you'll build upon on your journey learning Flutter. The content covered here included how to use the Flutter CLI and how to test your installation with the flutter doctor command. You also saw how to try your apps on an emulator (Android) or a simulator (iOS).
We introduced Dart and its syntax: using the DartPad online tool, we looked at some of the Dart syntax, including variables, loops, using strings, the arrow syntax, lists, generics, and the Map() method.
We've touched upon the basics of object-oriented programming with classes and objects, including constructors, properties, and methods. Finally, we introduced Flutter and created our first Hello World app. We saw that almost every piece of UI in Flutter is a widget, and we introduced several basic widgets, including Center, Text, MaterialApp and Scaffold, Column, RaisedButton, and Image.
We modified the style of our app using the widgets' properties, such as choosing colors and sizing fonts. We also saw how to deal with the space on the screen with padding, and how to respond to events such as the click of a button.
Finally, we used an AlertDialog widget in order to give feedback to the user.
The topics introduced in this chapter will be the foundation of your progress in Flutter, and the skills that you have acquired here will allow you to follow along with the remaining projects of this book, and will be invaluable when developing your own apps.
In the next chapter, we'll introduce the concept of state, which will allow you to create interactive apps with Flutter.
Questions
At the end of each project, you'll find a few questions to help you remember and review the content that has been covered in the chapter, and this first chapter makes no exception. Please try to answer the following questions, and if in doubt, have a look at the content in the chapter itself, you'll find all the answers there!
- What is a widget?
- What is the starting point of a Dart and Flutter app?
- How many named constructors can you have in a Dart/Flutter class?
- Can you name three EdgeInsets constructors?
- How can you style the text in a Text widget?
- What is the purpose of the flutter doctor command?
- What widget would you use to contain several other widgets, one below the other?
- What is the "arrow syntax"?
- Which widget can you use to create space between widgets?
- How can you show an image to the user?
Further reading
- In technology, things change very fast, so the information provided for the installation of Flutter may have changed when you read this book. For the up-to-date process for installing Flutter on a Windows, Mac, or Linux machine, have a look at the following link: https://flutter.dev/docs/get-started/install.
- Chrome OS is not officially supported at the time of writing this book, but there are several blog articles and guides that show the process of successfully installing the Flutter SDK on Chrome OS. To install Flutter on a Pixelbook that is running, for example, Chrome OS have a look at this link: https://proandroiddev.com/flutter-development-on-a-pixelbook-dde984a3fc1e.
- Material Design is a fascinating topic. For a full description of the design patterns, rules, and tools visit the comprehensive Material Design website at https://material.io/.
- With this book, I truly hope to transfer to you some of the passion for the Flutter technology that I have. I often find inspiration and great ideas at the Flutter community website on Medium. You can find it at https://medium.com/flutter-community.