

For our final chapter, we'll unleash the Raspberry Pi from the wall socket and send it out into the world equipped with a few add-on peripherals for stealthy reconnaissance missions. We'll make sure your Pi stays protected and that you'll be able to stay in touch with the Pi throughout its mission.

When sending your Pi away on outdoor missions, the two main concerns that need to be addressed are the supply of power and protection against moisture. A lithium polymer battery pack is a good choice for powering the Pi off-road. They are usually marketed as portable smartphone chargers, but as long as yours operates at 5V and provides one or more USB ports with around 1000mA of output, it should keep your Pi happy and running, usually for five to ten hours. If you need a USB hub for your peripherals, make sure it can be powered by one of the USB ports on the battery pack.
When it comes to housing your spy kit, there are no rules except one—moisture will spoil your fun. A plastic food container with a tight lid is a good start for housing. It'll have to be transparent plastic if you plan to include a webcam with the kit obviously. You might also want to line the insides with something soft, such as bubble wrap, to make the ride less...
When you take your headless Pi outside into the real world, chances are you'll want to communicate with it from a netbook or laptop from time to time. Since you won't be bringing your router or access point along, we need a way to make a direct point-to-point connection between your Pi and the other computer.
As there won't be a DHCP server to hand out IP addresses to our two network devices, what we want to do is assign static IP addresses on both Pi and laptop. We can pick any two addresses from the private IPv4 address space we saw in the Mapping out your network with Nmap section in Chapter 4, Wi-Fi Pranks – Exploring your Network. In the following example, we'll use 192.168.10.1 for the Pi and 192.168.10.2 for the laptop.
Type in the following command on the Pi to open up the network interfaces configuration:
pi@raspberrypi ~ $ sudo nano /etc/network/interfacesNow, find the line that says
iface eth0 inet dhcpand...
Go right ahead and connect your GPS gadget to the USB port. Most GPS units appear to Linux as serial ports with device names starting with tty then commonly followed by ACM0 or USB0. Type in the following command and focus on the last line:
pi@raspberrypi ~ $ dmesg -T | grep tty
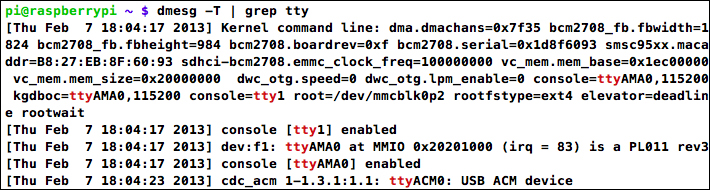
USB GPS receiver identifying as ttyACM0
The first couple of lines talk about the serial port built into the Pi (ttyAMA0). On the last line, however, a USB device is identified which is most likely our GPS unit and will be accessible as /dev/ttyACM0. We can confirm that it's a GPS by trying to read from it using the following command, where [XXXX] should be replaced by the name of your device:
pi@raspberrypi ~ $ cat /dev/tty[XXXX]
A GPS conforming to the NMEA standard will start flooding your screen with sentences beginning with a code such as $GPGGA followed by comma-separated data (see http://aprs.gids.nl/nmea/ if you're curious about those messages). Even if your GPS outputs...
There is something oddly satisfying about controlling a small device remotely from another small device. To do this with a headless Pi and a smartphone, all we need is a Wi-Fi adapter on the Pi with SSH running and a remote control app for the phone that knows how to send commands through an SSH connection. In this example, we'll focus on an Android phone, but there's a similar app for iPhone called NetIO (http://netio.davideickhoff.de). You could also use a regular SSH client app and make use of aliases and other shortcuts to quickly send commands to the Pi.
We'll be using an application called Coversal—Linux Remote Control.
Search for it and install it from the Google Play Store or download it directly from the developer's page at http://www.coversal.com.
On first startup, you'll be presented with a list of plugins that Coversal can use to control different things. We'll be focusing on the SSH Custom plugin, so find that in the list and press the...
When you send your Raspberry Pi out in the world on stealthy missions, you might not be able to stay connected to it at all times. However, as long as the Pi has Internet access via a Wi-Fi network or USB modem, you'll be able to communicate with it from anywhere in the world.
In this example, we'll be using Twitter, a popular social networking service for sharing short messages. We're going to make the Pi send regular tweets about the mission and its whereabouts. If you do not already have a Twitter account, or you'd like a separate account for the Pi, you'll need to sign up at https://twitter.com first.
Before you post anything on Twitter, you should consider enabling tweet privacy. This means the messages won't be publicly visible and only selected people on Twitter will be able to read them.
To enable tweet privacy, go to the Account settings (https://twitter.com/settings/account) and check the Protect my tweets checkbox, then click on the Save changes...
In this section, we'll create a file container, you can think of it as a vault, and we encrypt whatever is put inside. As long as the vault is unlocked, files can be added to or deleted from it just like any regular filesystem, but once we lock it, no one will be able to peek inside or guess what's in the vault.
We'll be using a tool called
cryptsetup that will help us create and manage the encrypted containers. Type the following command to install cryptsetup and the optional dosfstools
if you'd like your vault to be accessible on a Windows machine:
pi@raspberrypi ~ $ sudo apt-get install cryptsetup dosfstools
This technique will give you an encrypted vault mounted under a directory. You can then add files to it as you wish, and once locked, you can copy it and open it up on Windows.
First, we need to create an empty file to hold our vault. Here you'll have to decide how much storage space to allocate to your vault....
We kicked off our final chapter with a few words of advice about taking your Pi outside the house. We learned that a battery pack is a good source of power for the Pi and that you can be very creative with your housing as long as the container is resistant to moisture.
As you wouldn't bring a router or access point with you outside, we looked at how to connect a laptop directly to the Pi using either a wired connection with static IP addressing or an ad hoc Wi-Fi network.
We then expanded our outdoor adventure with a GPS receiver and learned how to track the Pi's position in real-time on Google Earth. We also learned how to log waypoints along the route so that the journey can be retraced on Google Earth at a later time and how to massage GPS data collected from Kismet into an access point map. Finally, we explored the GPS as an alternative time source for the Pi and how all the GPS features we've covered could be started at boot time with a simple script.
We moved over to our smartphone...
The rest of the chapter is locked
You have been reading a chapter from
Raspberry Pi for Secret AgentsPublished in: Apr 2013Publisher: PacktISBN-13: 9781849695787
Register for a free Packt account to unlock a world of extra content!
A free Packt account unlocks extra newsletters, articles, discounted offers, and much more. Start advancing your knowledge today.
undefined
Unlock this book and the full library FREE for 7 days
Get unlimited access to 7000+ expert-authored eBooks and videos courses covering every tech area you can think of
Renews at $15.99/month. Cancel anytime