Chapter 6. Using File and Email Transports
In this chapter, we will cover:
Using the File or FTP Transport to trigger a proxy service upon arrival of a new file
Using the File JCA adapter to read a file within the message flow
Using the File or FTP Transport to write a file
Using Email Transport to receive e-mail
Using Email Transport to send e-mail
In this chapter, we will cover the so called Poll-based transports, the File or FTP Transport, the Email Transport, as well as the File JCA adapter.
As the name implies, the File or FTP Transport can be used to do operations on files. When using the File Transport, the file needs to be local to the OSB Server or reachable via a file share, whereas when using the FTP Transport
, the file can be on any FTP server reachable from the OSB. When using these transports on a proxy service, then the given location will be constantly polled for new files, and each file will be processed by the message flow of the proxy service. When the two transports are used on a business service, then a file will be written to the configured location upon invoking the business service.
The File JCA adapter allows treating the operation on a file as a service, which also allows for the reading of a file through a service invocation in the message flow of a proxy service.
The Email Transport
supports both...
Using the File or FTP transport to trigger a proxy service upon arrival of a new file
In this recipe, we will trigger a proxy service upon arrival of a file in a certain location. We will implement both, a proxy service listening on a folder in a local filesystem as well as one listening to a remote location via FTP.
In order to make working with the FTP example as simple as possible, we first install a simple local FTP server:
From http://coreftp.com/server/index.html, download the Core FTP Server.
Start the installer and click through it (leave all options on default).
Create a folder C:\work\ftp.
Launch the Core FTP Server executable.
Click on Setup.
Click on New.
Enter OSB in the Domain Name field.
Enter localhost in the Domain IP/Address field.
Enter C:\work\ftp in the Base directory field.
Click on OK
.
Back on the main setup window, select the newly created domain and click New on the lower half of the window, to create a user.
Enter osb in the User name field.
Enter osb in the...
Using the File JCA adapter to read a file within the message flow
If there is a need to read the contents of a file inside a message flow of an already active proxy service, then neither the File Transport nor the FTP transport can be of any help. Reading a file with the File or FTP Transport is always only available inbound, implemented as a polling operation and starting a new message flow/proxy service upon detecting a new file.
This recipe will show how we can use the File JCA adapter to read a file at runtime, for example, to enrich data at runtime or to retrieve some configuration information. The JCA adapters are available since OSB 11g and are the same ones we know from the SOA Suite.
We will create a business service wrapping the artifacts created by the JCA adapter wizard in JDeveloper. By that the business service is just as any other business service seen so far and can be invoked from a proxy service using a Routing or Service Callout action as shown in this recipe.
The scenario...
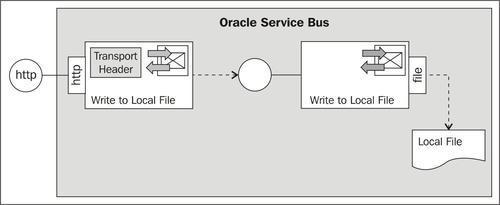
Using the File Transport to write to a file
In this recipe, we will write a file to the local filesystem (local to the OSB server). We will implement a business service which uses the File Transport to do that. Additionally, we will create a proxy service and control the filename of the file being written by using a Transport Header action.
No special actions necessary.
We begin with a business service writing a file to a local folder. In Eclipse OEPE, perform the following steps:
Create a new OSB project and name it using-file-transport-to-write-to-file.
Create a business folder in that new project.
In the business folder create a new business service named WriteToLocalFile.
On the General tab select Messaging Service as the Service Type option.
Navigate to the Messaging tab and select Text as the Request Message Type.
Leave the Response Message Type on None.
Navigate to the Transport tab and select file from the Protocol drop-down list.
Enter file:///C:/work/destination...
Using Email Transport to receive e-mail
Oracle Service Bus offers the Email Transport for both receiving and sending e-mails.
In this recipe, we will show how we can set up a proxy service to listen on a mailbox for new e-mail messages. For each new e-mail message, the message processing as defined in the message flow of the proxy service is executed.
In order to be able to receive e-mails on the OSB, we need a running mailserver. We could connect to an already existing e-mail server, but for this recipe to be standalone, we will use the Apache James mailserver. Perform the following steps for the installation of Apache James on the local machine:
Download the latest version of Apache James binary from: http://james.apache.org/download.cgi#Apache_James_2.3.2_is_the_stable_version.
Unzip the file into a local folder.
Navigate to the bin folder within the Apache James binaries.
Locate and execute the run.bat.
Open a command window and open a telnet session by entering telnet localhost...
Using Email Transport to send e-mail
In this recipe, we will show how the Email Transport can be used to send e-mails. We will first implement a business service, which sends a message to a given e-mail address. The e-mail address is hardcoded in the endpoint of the business service.
In order to make the sending more flexible, we will also show how to use the Transport Headers action to dynamically set the e-mail address, the subject, and the mail body in a proxy service, before invoking the business service.
Make sure that the mail server is installed and configured as shown in the Using Email Transport to consume e-mails recipe.
First we will create the SMTP Server object, holding the reference to the SMTP server. In Eclipse OEPE, perform the following steps:
Add a new SMTP Server to the configuration project and name it SMTPServer.
Enter localhost in the Server URL field.
Enter osbuser into the User Name field.
Enter osbuser into the Password and Confirm Password...