


Deploying the OSB configuration from Eclipse OEPE
Before we can test an OSB service, we need to deploy it to a running OSB server. Such a server can either be locally on the same machine or it can be on another, remotely accessible server. In this recipe, we will only use the functionality provided by Eclipse OEPE to deploy our service, because it's the simplest of the possible options for deployment. Of course there exists other, more automatic and repeatable ways for deployment through WLST or Apache Ant, but in this book, the deployment through Eclipse OEPE as shown here is good enough.
Getting ready
Make sure that the OSB server is running locally on your machine. The easiest way to check that it's up and running is navigating to the OSB console in a browser window. Enter the URL http://[OSBServer]:[Port]/sbconsole (replacing [OSBServer] with the name of the server and [Port] with the port of your installation) and you should get the login window of the OSB console. Check if the OSB server is up and running, especially when running the OSB on a managed server.
Make sure that the Oracle Service Bus perspective is the active one in Eclipse OEPE. The perspective is visible in the top-right corner of the Eclipse window.
Make sure that the project with the result from the previous recipe is available in Eclipse OEPE. If not then it can be imported from here: \chapter-1\getting-ready\pass-through-proxy-service-created.
How to do it...
First we need to create the server reference inside Eclipse OEPE and after that we can deploy the OSB configuration with its projects to the server.
In Eclipse OEPE, perform the following steps to create a server:
Switch to the Servers tab and right-click in the empty window.
Select New | Server.
In the Define a New Server window, select the right WebLogic Server version (Oracle WebLogic Server 11gR1 PatchSet 3 in our case, this might vary).
Click on the Next button twice.
Select the Local option and select the Domain Directory of the local OSB server installation. If the Domain Directory drop-down list is empty, then click on Browse button to navigate to the domain directory on your machine:

Click on the Finish button.
Now the local OSB server is configured in Eclipse OEPE. The next step is to deploy the OSB configuration to this sever. Still in Eclipse OEPE, perform the following steps:
On the Servers tab, right-click on the server item that you just created and select Add and Remove.
In the Available list on the left, click on the osb-cookbook-configuration OSB configuration.
Click on Add to move it to the Configured list on the right and click on the Finish button.
The OSB configuration is deployed to the running OSB server and after a while the status will change from [Started] to [Started, Republish].
Right-click on the OSB server and select Publish.
After a while the status will change to [Started, Synchronized], indicating that Eclipse OEPE and the OSB server are synchronized.
Expand the tree and the status of each single OSB project withinthe OSB configuration is shown:

The OSB configuration is now successfully deployed and ready to be used.
How it works...
Behind the scenes, Eclipse OEPE is creating a JAR file (a Java Archive) with all the artifacts which belong to the OSB configuration and deploys that archive to the OSB server.
The mechanism to deploy directly from Eclipse should only be used during development. Later when deploying to integration, quality assurance, or a production system, of course, a more automatic and reproducible way is necessary. This can be achieved through Apache Ant and WLST.
There's more...
In this section, we will show the alternative ways for deploying a project to an OSB server.
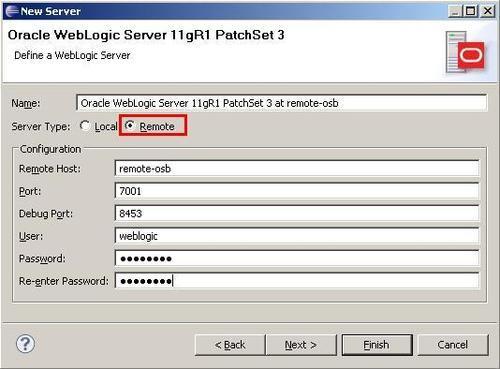
Deploying to a remote server from Eclipse OEPE
Eclipse OEPE can also be used to deploy to a remote server. Just click on the Remote option when defining the WebLogic Server in the New Server wizard:
Creating an OSB Configuration Jar and use the OSB console to deploy it
An OSB configuration can also be deployed by using the OSB console. In Eclipse OEPE, perform the following steps:
In the Project Explorer, right-click on the OSB Configuration that you want to deploy to and select Export | Oracle Service Bus – Configuration Jar.
In the pop-up window, select the resources to export, enter the location of the configuration jar into the Jar File field and click on the Finish button.

In the OSB console, perform the following steps to import theConfiguration Jar that we just created:
Select the menu System Administration on the left-hand side. You might have to use the scroll bar in order to see all the menu items.
Click on Create in the Change Center to start a new change session.
Click on the Import Resources button and use Browse to select the file created in the export (
c:\temp\sbconfig.jar).Click on the Next button.
Check that the right sources will be imported:

Click on the Import button to start the import.
The successful import is confirmed by the message the import was completed successfully.
Click on the Activate button in the Change Center.
Enter a text describing the changes into the Description field and click on the Submit button to activate the changes.
If we need to adapt some properties like endpoint URI to match the target environment, we can use a customization file and apply that when doing the deployment.


