


In this chapter, we're going to explore layer masks and some of the new selection tools that are available in Manga Studio 5.0.5. In addition to the usual rectangle, ellipse, and lasso tools, there are some handy new features that are bound to make your workflow a little faster when you need to make adjustments and edits.
Let's get started!
A Layer Mask is a feature that allows us to hide parts of a layer without erasing them for good. This allows us to fine-tune a drawing or a part of a drawing without losing what we've already done. Layer masks can be adjusted over and over, so we can hide part of a drawing and then bring it back later if we decide that we want it visible again.
Think of a Layer Mask like a Halloween mask. If we put a mask on, our face is still there but it can't be seen.
I find this feature to be very handy if I want to see different versions of a drawing, say, a character with a different hairstyle. The applications are pretty limitless, and it's much less nerve-wracking than completely erasing something that you may want to bring back in the future!
You will need a file open, with at least one layer with content (a sketch, an ink drawing, a photo, and so on) inside of it.
Now that we have a Layer Mask, it's time to learn how to hide and restore content with it!
Again, you will need a file open with at least one layer with content (a sketch, an ink drawing, a photo, and so on) inside of it. Follow the instructions given in the Adding a Layer Mask recipe to make a mask before following this recipe.
Here is how to edit the content on the layer with the layer mask:
To hide the content on the layer, select an Eraser(E) tool. Erase the section of the layer to be hidden. The area will show up in the layer thumbnail as black space. The following screenshot illustrates this; note the black area where artwork has been erased. This black area is the masked area.

To make hidden content visible again, select any pen or brush tool. Draw again over the area with the Pen(P) or Brush(B) tool to bring back the hidden content. Here is a screenshot that shows a white area inside the previous black area, where the content has now been...
Using selection tools and layer masks, we can quickly hide or show parts of our drawing.
You will need a file open with at least one layer with content (a sketch, an ink drawing, a photo, and so on) inside of it.
The following steps will lead us through making a mask using a selection tool:
First, make a selection using one of the selection tools. In the following screenshot, the details on the robot's torso have been selected using the Lasso tool:

Go to Layer | Layer Mask | Mask Selection(D) to mask the inside of the selection. In this screenshot, the selected details on the robot have now been hidden with this option:

Go to Layer | Layer Mask | Mask Outside Selection(V) to hide everything outside of the selection. In the following screenshot, only the torso details remain, as they were inside of the selection:

Make any necessary edits to the mask, as detailed in the Editing the Layer Mask recipe.
The Selection pen is a quick, easy way to make organic selections.
Again, you will need a file open, and it should have at least one layer with content (a sketch, an ink drawing, a photo, and so on) inside of it.
Select the Marquee(M) tool from the toolbox, and then select the Selection pen subtool.
Draw over the area that is to be selected. The selection area will be highlighted as the pen is used, as shown in this screenshot:
When the mouse button or stylus is released, the perimeter of the highlighted area will be turned into a selection, as shown here:

You will need a file open, with at least one layer with content (a sketch, an ink drawing, a photo, and so on) inside of it. You will also need an active selection, such as the one made by the Selection pen in the Using the Selection pen recipe.
Select the Marquee(M) tool from the toolbox. Then, select the Clear selection subtool.
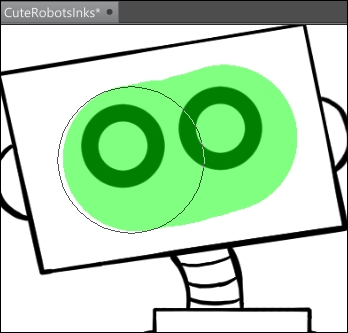
Draw over the area to be deselected. The area will be highlighted in green, as shown here:

When the mouse button or stylus is released, the highlighted area will be subtracted from the currently active selection, as shown in the following screenshot:

Making a precise selection can be frustrating and time-consuming. The Shrink selection tool solves this problem by allowing us to draw a rough selection and then having the program refine it automatically. Let's learn how to use it now!
You will need a file open, and it should have at least one layer with content (a sketch, an ink drawing, a photo, and so on) inside of it.
Follow these steps to use the Shrink selection tool:
Select the Marquee(M) tool from the toolbox. Then, select the Shrink selection subtool.
Using the mouse or stylus, draw around the area to be selected. In the following screenshot, the robot's facial features are what I want to select, so I've drawn a rough area around them with the tool:

When the selection is completed, the tool will automatically shrink down to select the outer edges of all areas inside the area we drew around in step 2. Refer to the next screenshot and note how the facial features are now cleanly...