Chapter 6. Building a Web Monitor and Controlling Devices from a Dashboard
In this chapter, we will talk about a very important part of this book, creating a web page that can control different kinds of devices from a dashboard. In an automated home there are different kinds of devices that could be controlled, for example: lamps, doors or windows, washing machines, and so on.
In this chapter, we will cover the following topics:
Configuring MySQL database server
Installing phpMyAdmin for administrating databases
Datalogger with MySQL
Dimming a LED
Controlling the speed of a DC motor
Controlling lights with electrical circuits
Controlling door locks
Controlling watering plants
Remote access from anywhere to your Raspberry Pi Zero
Controlling lights and measuring current consumption
Controlling and monitoring Arduino, Wi-Fi and Ethernet shields, connected devices, and sensors from the Raspberry Pi Zero
Configuring MySQL database server
In this section, you will learn how to configure MySQL server in order to create a database and integrate everything in your dashboard, for recording data in a database.
Our Raspberry Pi Zero is being configured like a web server. In this section, we will install MySQL database server with the following command, so we can receive connections from clients, display data stored in a database, and use queries in SQL:
sudo apt-get install mysql-server
In the middle of the process it will ask you for the password of the root user:
After the installation is complete, connect to MySQL and type the following command:
mysql -u root -p
Type the following command:
show databases;
Here we can see databases of the system that are now installed in the server:
Installing MySQL driver for PHP
It's important to install our driver to communicate PHP5 with MySQL database server, to do that we will need MySQL driver for PHP to access MySQL database, execute this...
Installing PhpMyAdmin for administrating databases
In this section, we will talk about how to configure your PhpMyAdmin to administrate your database from a remote panel. It's important that we install the client and the module PHP5 in the Apache server, so type the following command:
sudo apt-get install mysql-client php5-mysql
Next we will install the phpmyadmin package with the following command:
sudo apt install phpmyadmin
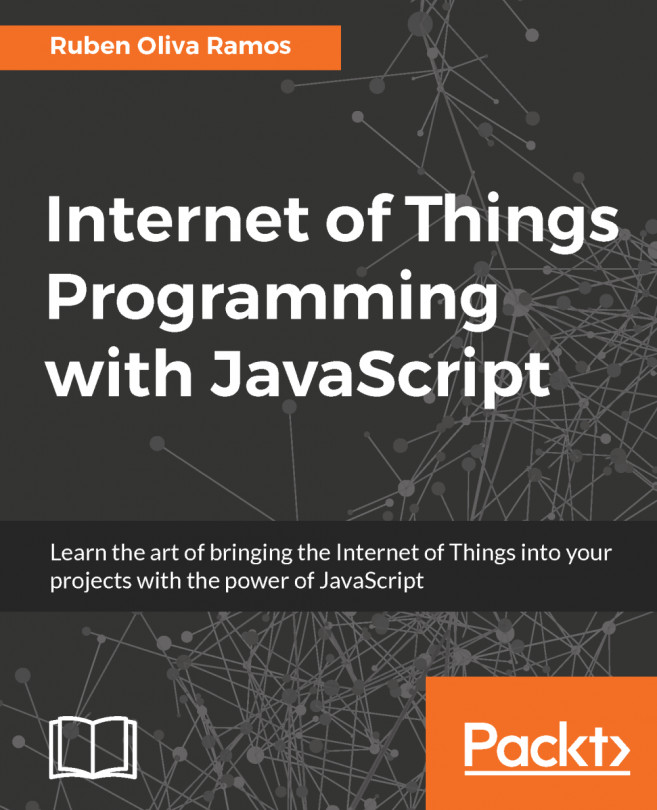
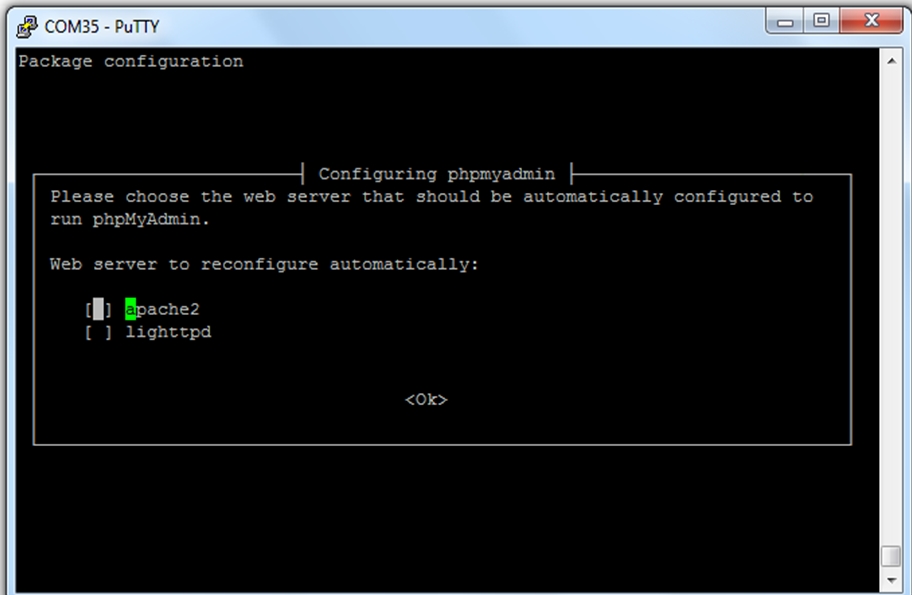
In the following screenshot, we can see the configuration of the server; in this case, we need to select apache2:
We choose the apache2 server:
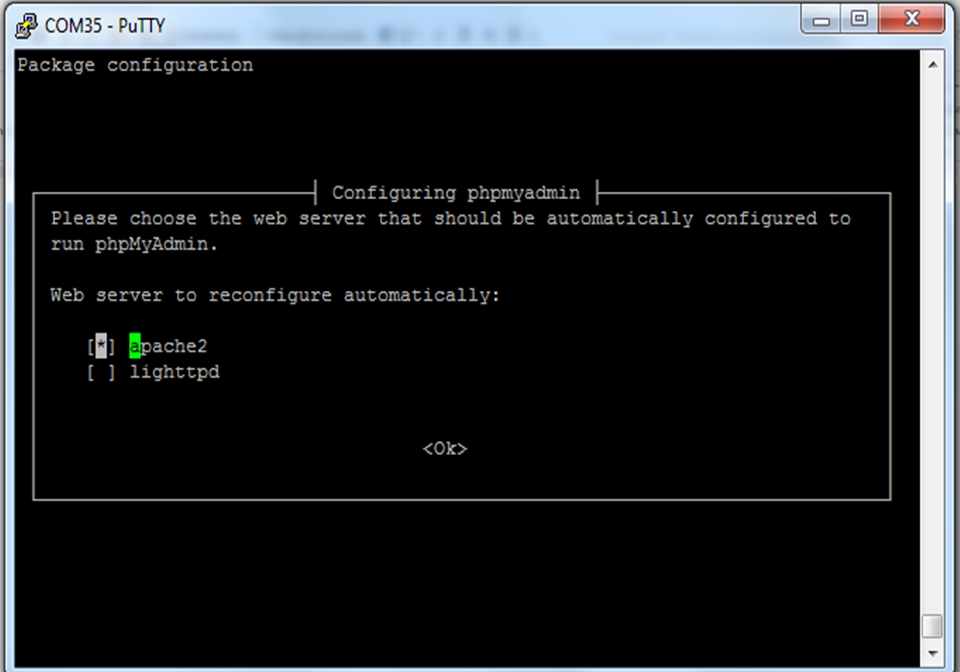
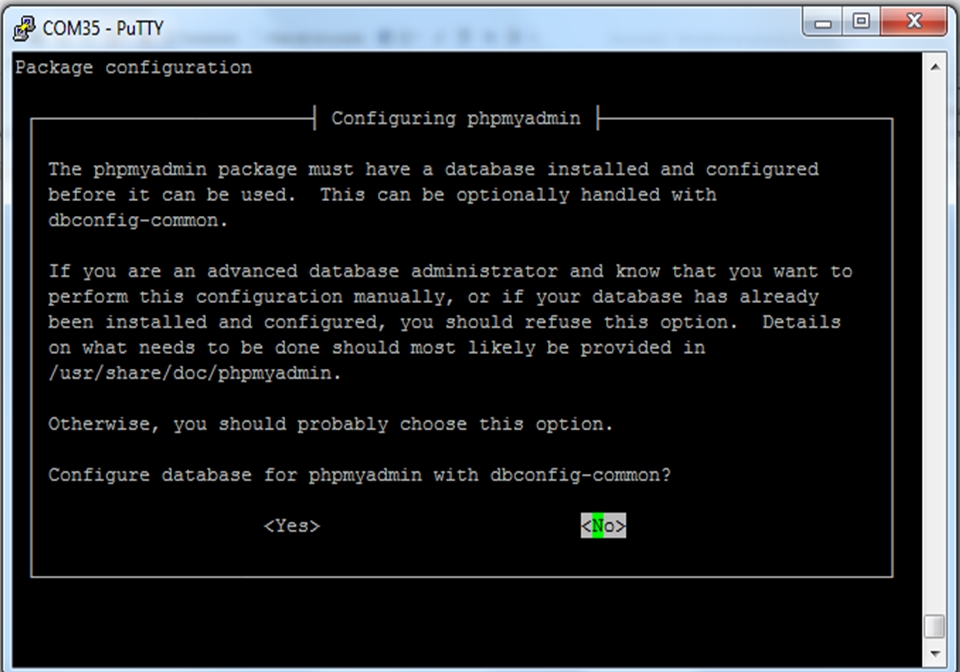
After that we can select the database:
We choose the option <No>:
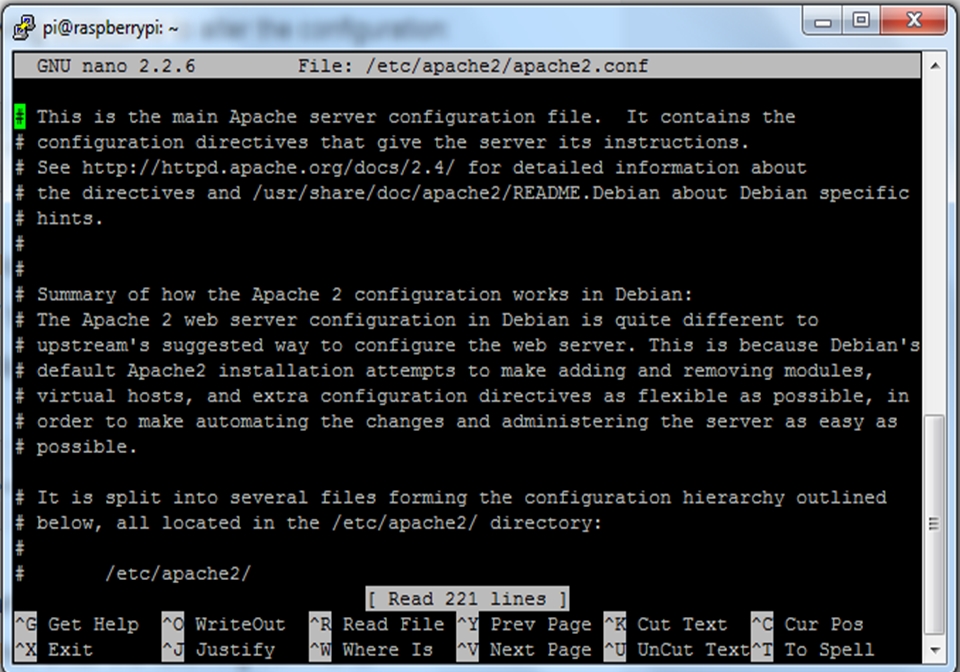
Configuring the Apache server
It's necessary that we make the configuration of the file apache2.conf. First go to the Terminal on your Pi:
sudo nano /etc/apache2/apache2.conf
In the following screen, we need to add the code:
Include /etc/phpmyadmin/apche.conf
We include the following line in the bottom of the file:
Include /etc/phpmyadmin/apche.conf...
In the following section, we will build a Datalogger that will record the data temperature and humidity in the server so that we can get data whenever we want and display it in a web page.
Programming the script software
In the following code, we have a script that will communicate with the Arduino board, and it is installed in the server.
You can now either copy the code inside a file called datalogger1.php, or just get the complete code from the folder for this project:
<?php
if (isset($_GET["temp"]) && isset($_GET["hum"])) {
$temperature = intval($_GET["temp"]);
$humidity = intval($_GET["hum"]);
$con=mysql_connect("localhost","root","ruben","arduinobd");
mysql_select_db('arduinobd',$con);
      if(mysql_query("INSERT INTO measurements (temperature, humidity) VALUES ('$temperature', '$humidity');")){
        echo "Data were saved";
      }
      else {
      echo "Fail the recorded data";
 ...
Data queries from the database
It's important to have data recorded and to make some queries to have the data show in the web page.
Here we have the scripts that we used to show the data in the page:
You can now either copy the code inside a file called query1.php, or just get the complete code from the folder for this project:
<!DOCTYPE html>
  <html>
    <body>
<h1>Clik on the buttons to get Data from  MySQL</h1>
<form action="query1.php" method="get">
<input type="submit" value="Get all Data">
</form>
</br>

<form action="query2.php" method="get">
<input type="submit"value="Humidity <= 15">
</form>
</br>

<form action="query3.php" method="get">
<input type="submit" value="Temperature <=25">
</form>
</br>
<?php

$con=mysql_connect("localhost...
Controlling and dimming a LED
In this section, we will discuss a project that can be applied to a home automation. We will dim an LED of DC, this can done to a lamp in a house. The LED will change its brightness, and we connect the LED to the GPIO18 of the Raspberry Pi in series with a resistor of 330 ohms.
First we need to install the pigpio package. In the Terminal, type the following:
wget abyz.co.uk/rpi/pigpio/pigpio.zip
Then unzip the package:
unzip pigpio.zip
After that, navigate to the unzipped folder with the following:
cd PIGPIO
Type the following to execute the command:
Make
Finally install the file:
sudo make install
In this section, we will test the sensor with a script in Node.js:
var Gpio = require('pigpio').Gpio;

// Create led instance
var led = new Gpio(18, {mode: Gpio.OUTPUT});
var dutyCycle = 0;
// Go from 0 to maximum brightness
setInterval(function () {
  led.pwmWrite(dutyCycle);
  dutyCycle...
Controlling the speed of a DC motor
It's common to have a window or a garage door in a house. We need to automate these kinds of devices, so that we can move these objects with a DC motor. In this section, we will see how to connect a DC motor to the Raspberry Pi. To do this, we will use a L293D circuit to control the motor.
First we will see how to connect the motor to our Raspberry Pi Zero board. In the following diagram, we can see the pins out of the LD293 chip:
We basically need to connect the components of the circuit, as follows:
GPIO14 of the Raspberry Pi to pin 1A
GPIO15 of the Raspberry Pi to pin 2A
GPIO18 of the Raspberry Pi to pin 1, 2EN
DC motor to pin 1Y and 2Y
5V of the Raspberry Pi to VCC1
GND of the Raspberry Pi to GND
Adapter regulator to VCC2 and GND
The following image shows the results:
We will now test the speed of the DC motor from 0 to the highest speed:
// Modules
var Gpio = require('pigpio').Gpio;
// Create motor instance
var motorSpeed = new Gpio(18, {mode...
Controlling Lights with electrical circuits
In the following sections, you will find ideas on how to dive into more projects that control other devices in the house.
In houses we have electrical appliances, for example, lamps, washing machines, heaters, and other appliances that we only need to turn on or off. In this section, we will learn how to control a lamp connected to the Raspberry Pi Zero, using electrical circuits for interfacing the signal. We will use an optocoupler such as MOC3011, and a Triac. The following figure shows the circuit of the application:
Here we have the final project connected to the Raspberry pi Zero:
Here we have the JavaScript code for controlling the device:
// Modules
var express = require('express');

// Express app
var app = express();

// Pin
var lampPin = 12;

// Use public directory
app.use(express.static('public'));

// Routes
app.get('/', function (req, res...
In this section, we will show other applications that you can consider creating and controlling, and then use them in the home or different areas.
In this section, we will see other appliances that can be controlled from an interface and connected to the Raspberry pi. In the house we can control a door lock from a web interface:
Another appliance that we can control is watering plants with a Plastic Water Solenoid Valve - 12V, connected to the Raspberry Pi:
With this project we can make an automated watering system, add a humidity sensor, and program the time that the plants of the garden will be watered.
Remote access from anywhere to your Raspberry Pi Zero
If we want access to our Raspberry Pi from outside our network, we need to do the following:
Check if our modem has a public IP address
Investigate the address that we'll be using in our browser
Type http://whatismyipaddress.com/ in our browser
IP provided by the ISP are genteraly dynamic IP which changes after some time. In our cases we need to have static addresses which does not change occasionally.
How to access our modem to configure it
Access our modem via the Ip address (gateway) and go to the port addressing part. Configure port 80 that points to our web server (put the IP address of our account), this IP address is the one that automatically assigns the DHCP server of our system.
Here we have some ports that can be forwarded from the modem-router:
To get the gateway IP address, type the ipconfig command, you need to have admin rights. After this, type http://gatewayip_addres in the web browser of your router.1:
This is an example of what...
Controlling lights and measuring current consumption
Now in this section we will explain how to control and monitor your current consumption when the light is on or off. Using your Arduino Wi-Fi shield from a web page, we will monitor this variable. When the light is off it looks as follows:
When the light is on it looks as follows:
You can now either copy the code inside a file called Controlling_lights_Current_Consumption.ino, or just get the complete code from the folder of this book.
Define variables and functions to monitor and control:
#define NUMBER_VARIABLES 2
#define NUMBER_FUNCTIONS 1
Import libraries to use:
#include <Adafruit_CC3000.h>
#include <SPI.h>
#include <CC3000_MDNS.h>
#include <aREST.h>
Configure the relay to activate:
const int relay_pin = 8;
Variables to calculate the current:
float amplitude_current;
float effective_value;
float effective_voltage = 110;
float effective_power;
float...
Controlling and monitoring Arduino, Wi-Fi, and Ethernet shields on connected devices and sensors
In previous sections, we saw how to control and monitor our Arduino boards from a web page using node.js running on a computer in Windows. In this section, we will use our fantastic Raspberry Pi Zero with Node.js installed on it and run the JavaScript application inside the board.
I have seen the potential of the board instead of using a personal computer installed as a web server, with this experience making this projects I want tell that the application is more efficient using our Raspberry Pi Zero running on it.
We will see how to control more than one device in a single dashboard using different devices, such as the following:
Wi-Fi shield
ESP8266 module
Ethernet shield
Building the code to control and monitor devices from a single interface
You can now either copy the code inside a file called app.js, or just get the complete code from the folder for this project.
Configure the outputs of the devices...
In this chapter, you learned how to integrate and build a dashboard for monitoring and controlling using Raspberry Pi Zero with Arduino and the technologies seen in previous chapters. This chapter gave to you the basics and the necessary tools that can help you to create your own system of Internet of Things for different applications and areas that can be developed for these kinds of systems by applying all the tools, web server, database server, devices connected, and setting up your router to control your Raspberry Pi from anywhere in the world.
In the next chapter, you will build very nice devices for the Internet of Things; you will learn how to make different mini home domotics projects.