


Now let us get going with the real stuff. You must be pretty excited to have installed and started your MongoDB server quickly, right? So what is next? We will first do a quick comparison with the relational database then import data in it and execute some basic queries. Ok, so let us get started.
Assuming that most of us have some familiarity with the relational databases, a quick comparison of various terminologies of these two should help. Following is a table of various terms used in Relational world and Mongo world. The terms Mongo and MongoDB will be used interchangeably (I personally prefer saying Mongo over MongoDB and save the effort of typing two extra characters).
|
Relational world |
Mongo world |
|---|---|
|
Database |
Database |
|
Table |
Collection |
|
Record |
Document |
|
Column |
Field |
|
Primary Key |
Primary Key |
|
Index |
Index |
As we can see, except for Table, Record, and Column in relational databases, everything else means the same in Mongo.
Another big difference in relational model and Mongo is, unlike the create table for tables in relational databases, Mongo doesn't need the user to create the collections explicitly. A collection will automatically be created when the first document is inserted in it. Collections in Mongo are schema less. They can contain documents with disparate fields (so there is nothing stopping you from putting a document of a bicycle and a book in the same collection, one might actually do it for maintaining a product catalogue of an online store and that's the beauty of Mongo). The only field mandatory for all documents is the _id, which if not provided in the document inserted, will be automatically generated by the Mongo Server. So unlike relational databases, we simply insert documents in the collections without creating it. Inserting documents in a collection implicitly creates one. Ironically, even though Mongo is schemaless, schema designing is a crucial aspect. We will see in a later section what thought needs to be put into schema design.
Now having laid a foundation for our work and compared the relational model and Mongo, let us import some sample data into our database. This is the test data on which we would be performing various query operations. You need to download the files IndiaCitiesPopulation.csv and IndiaStates.json from http://www.packtpub.com/support/13523. These files contain all the cities in India whose population is above 100,000 as per 2011 census and states of India with various cities in each state respectively. There are 495 records in the CSV and 29 documents in the JSON file, not a lot of data but good enough for us to practice. You may open the files in your favorite editor and take a look at its content; the CSV file has a header and each of these headers (which are comma separated) will be used as the name of the field for each document (we have already seen in the first section how a document looks like). When we import the file, each line in the file excluding the header line, will be one document and hence we shall have 495 documents inserted in the collection. The JSON file will be imported as is with each line in the file as a separate document in the collection. You'll have to open a new terminal to execute these imports.
We shall call our database census and the collections in which the data will be imported as cities and states. Use the following command to import the data in the cities collection:
> mongoimport -d census -c cities --file IndiaCitiesPopulation.csv --type csv --headerline

The command was executed with the .csv file to be imported in the current directory. You can provide the absolute path of the file name too. On executing the import command the data gets imported within no time and you see the output as shown in the preceding screenshot.
Let us first see what those various command line arguments are to the mongoimport utility:
-d: The database to which the data will be imported to. Note that we have not created a databasecensusexplicitly before importing. Similar to the collection that gets created implicitly, the database too gets created.-c: This will be the collection in the database, into which the documents will be imported. The name is arbitrary and is chosen by us; the collection gets created when we import the documents in it.--file: The file from which the documents will be imported to the collection. Only three formats JSON, CSV, and TSV are supported. In this case we are importing from a.csvfile.--type: The default type of the input file is JSON and we need to explicitly mention the type if CSV or TSV is used. In above case we did, as the file is a.csvfile.--headerline: Indicates that the first line in the file is the header, applicable to.csvand.tsvfiles only.
Now that we know what those command line arguments mean, we will try to import documents in the states collection. This is a .json file and the command is slightly different.
> mongoimport -d census -c states --file IndiaStates.json
This time we skip the --type argument as the default is JSON (so is our file) and the --headerline which is irrelevant for JSON files. After the import, you should have 29 objects in the states collection.
For our import to work, we need to have the Mongo server we started after the installation up and running. Let us connect to the database from the shell. The shell is a client application that ships with Mongo installation and will let you connect to the database and perform various operations, such as execute queries, update or insert documents, perform database administration operations, and so on. You need to execute mongo executable to start the shell. This executable is present in the bin directory of our Mongo installation. On executing Mongo, it would by default connect to the Mongo server running on localhost and would connect to the port 27017, which is the default port on which Mongo listens for new connections. On executing the command you should see a prompt which will be a >.
Type in db and hit Enter, we shall see the name of the database to which it is connected. The shell has a JavaScript engine and you can execute any valid JavaScript in Mongo shell. The shell has an implicit variable db that references the current database, test by default. We have our data in the census database. We will switch to that database by typing in the following command:
> use census
This will change the current active database to census. This means that any queries now executed from the shell will be executed on the database census. Typing in db and hitting Enter will confirm that the current database in use is indeed census. Next we will see what all collections are present in the current database (census that is). The command to do that is show collections (similarly to show all the databases you can use the show dbs command).
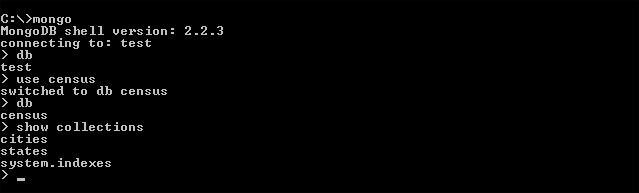
As we see from the preceding screenshot, there are three collections in the database. The two collections cities and states, which we have created by importing the documents and a third is the system.indexes, which is a system generated collection used to store information about all the indexes on various collections in the database. The first operation will find the number of documents in the cities collection; we know it should be 495, let us check by executing the code.
> db.cities.count()
We should see 495 as the count which we expected. This is similar to the select count(*) query in a relational database. Remember, all the queries we will be executing will begin with db.<name of the collection> and then the function we would like to perform such as count, find, update, insert, remove, and so on. Easy, isn't it? The shell does offer us a good help. To see what possible operations we can execute on a collection, Execute the following command on the Mongo shell:
> db.cities.help()
Let us take a look at all the documents in the cities collection. As you must have guessed (and must be waiting to execute this), it is synonymous to executing a select * on a relational table without a where condition.
> db.cities.find()
Following is the result on executing the find:
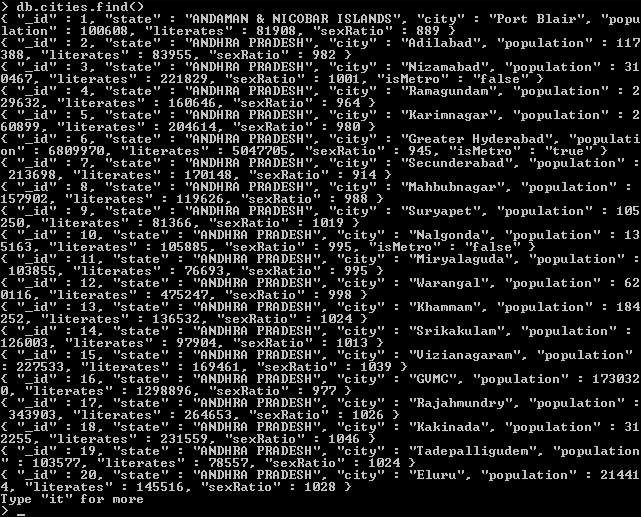
It is not difficult to guess what the query structure is. The query again starts with db.cities which tells that the function to be executed will be on the cities collection in the current database. The find function here does not accept any parameter and hence selects (finds) all the documents.
A couple of things to note here:
Not all documents are fetched; the shell just fetches the top 20 documents. You need to iterate to get the next 20 documents or the remaining documents in the collection, whichever is less. Now type the following command and hit Enter. You should see the next 20 documents (records) from the result set.
> ititstands for iterate. It is similar to the user requesting the next page of results where it fetches the next 20 documents. If there are more in the requested result set, typingitwill keep on retrieving the next 20 documents in the result set or the remaining number of documents whichever is less.The documents are not well indented and might get difficult to read. Things become worse when we have nested documents or the documents are large. To indent the JSON document you need to invoke
.pretty()on the result of the find. Now type in the following command and hit Enter to see the output:> db.cities.find().pretty()
What we saw in this section is some comparison between the Relational world and Mongo world. We also imported the data in our census database, started the Mongo shell, connected to the running Mongo server and queried the collection to find the data. This process of finding the data is not powerful unless we add various conditions to it to fetch the limited set of data we wish to query. In the next section we will see a variety of operators and its combination to write powerful queries to retrieve data from Mongo. We will also see how to insert, update, and delete documents from the collection. Stay tuned for more interesting things coming up.


