


Installation
In this section we will take a look at installing the MongoDB server and starting it up.
Step 1 – basic requirements
Following are the three steps you need to know or check before you start the MongoDB installation:
MongoDB is built to run on commodity hardware and can run on any x86 /x86_64 processor family.
The archive downloaded for MongoDB (2.4.3 at the time of writing this book) is about 90MB and needs around 300MB after extracting. That is the minimum you will need just to extract the archive.
The database files take up additional space and are pre allocated as soon as one is created. The files follow the convention <name of the database>.<running number starting from 0>. The first file allocated is of 64MB and the subsequently created files when the current data file gets full are doubled in size than the previous one but up to a maximum of 2GB, after which all files will be of size 2GB. The pre allocation of files is done in order to prevent disk fragmentation. It just fills up the file with 0 (zeros) and occupies disk space which later is used by the data that goes in the file.
Note
MongoDB 2.2 and above no longer supports Windows XP. You need to use newer version of Windows or use MongoDB 2.0 if you plan to continue using Windows XP. In the latter case, you will not be able to use the new features from version 2.2 onwards.
Step 2 – installing MongoDB
The installation of MongoDB is very simple. Once the binaries are downloaded, the server can be up and running in a matter of seconds.
The first step is to visit the site http://www.mongodb.org/downloads to download MongoDB. Always prefer the latest stable build, download the right set of binaries based on your platform. 32 bit version should only be used for development purpose only use 64 bit for production deployments. Since MongoDB uses memory mapped files for data files, the database size is restricted to a total of 2 gigabytes on 32 bit machines. The steps and screenshots I will be giving are for 32 bit Windows platform. For other platforms the steps for installation will remain same.
On Windows you can get the architecture of your platform by typing in the following command into the command prompt:
wmic os get osarchitecture.
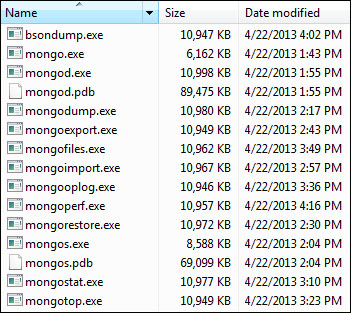
Once the binary archive is downloaded and saved to your local disk, we need to extract it. On Windows use any file for archiving. On extracting the archive, go into the bin folder. You should see the content as shown in the following screenshot on a Windows platform. The names of the executables would be same on other platforms. mongo and mongod are the only executables we are interested in for now.
Next, we need to start the MongoDB server by executing the mongod executable from the shell. You may add the bin folder of the extracted folder in your operating system's path variable. Let's us start by typing in the following command:
> mongod

Step 3 – server fails to start
The server didn't start as we didn't provide the path for the database files on startup. By default the path used is /data/db and we don't have that folder on our file system. We can either create this directory or provide a custom location for the database.
Let's provide a custom path. Say we use c:\Mongo\Database as our database and try to start the MongoDB server once again. This time around we however provide the --dbpath parameter. So type in the following command (in your case provide the appropriate path you have chosen for the database) to start the MongoDB server:
> mongod --dbpath C:\Mongo\Database
If all goes well, the server now must have started and should be listening for connections on port 27017. This is the default port on which the mongod process listens for new connections.
And that's it
To stop the server you can press Ctrl + C. This will stop the server in a clean manner.
We should not be too worried about the warning related to journaling. Since we have started the server for development purposes, we do not need journaling. Journaling is a means to ensure that the data files of the database don't go in an inconsistent state even if there is an improper shutdown of the server such as in cases of power failures. In the absence of journaling and unclean shutdown, there are bright chances that your data files will be inconsistent on restart. To know more about journaling, refer to the link http://docs.mongodb.org/manual/administration/journaling/, but don't worry if some of those things don't make much sense for now.
To know all the possible options you can provide while starting the Mongo server, use the --help option as follows:
> mongod --help


