


Installing MXNet, Gluon, GluonCV, and GluonNLP
In order to get the maximum performance out of the available software (programming languages) and hardware (CPU and GPU), there are different MXNet library versions available to install. We shall learn how to install them in this recipe.
Getting ready
Before getting started with the MXNet installation, let us review the different versions available of the software packages that we will use, including MXNet. The reason we do that is that our hardware configuration must map to the chosen versions of our software packages in order to maximize performance:
- Python: MXNet is available for different programming languages – Python, Java, R, and C++, among others. We will use MXNet for Python, and Python 3.7+ is recommended.
- Jupyter: Jupyter is an open source web application that provides an easy-to-use interface to show Markdown text, working code, and data visualizations. It is very useful for understanding deep learning, as we can describe concepts, write the code to run through those concepts, and visualize the results (typically comparing them with the input data). Jupyter Core 4.5+ is recommended.
- CPUs and GPUs: MXNet can work with any hardware configuration – that is, any single CPU can run MXNet. However, there are several hardware components that MXNet can leverage to improve performance:
- Intel CPUs: Intel developed a library known as Math Kernel Library (MKL) for optimized math operations. MXNet has support for this library, and using the optimized version can improve certain operations. Any modern version of Intel MKL is sufficient.
- NVIDIA GPUs: NVIDIA developed a library known as Compute Unified Device Architecture (CUDA) for optimized parallel operations (such as matrix operations, which are very common in deep learning). MXNet has support for this library, and using the optimized version can dramatically improve large deep learning workloads, such as model training. CUDA 11.0+ is recommended.
- MXNet version: At the time of writing, MXNet 1.9.1 is the most up-to-date stable version that has been released. All the code throughout the book has been verified with this version. MXNet, and deep learning in general, can be considered a live ongoing project, and therefore, new versions will be released periodically. These new versions will have improved functionality and new features, but they might also contain breaking changes from previous APIs. If you are revisiting this book in a few months and a new version has been released with breaking changes, how to install MXNet version 1.8.0 specifically is also described here.
Tip
I have used Google Colab as the platform to run the code described in this book. At the time of writing, it provides Python 3.10.12, up-to-date Jupyter libraries, Intel CPUs (Xeon @ 2.3 GHz), and NVIDIA GPUs (which can vary: K80s, T4s, P4s, and P100s) with CUDA 11.8 pre-installed. Therefore, minimal steps are required to install MXNet and get it running.
How to do it...
Throughout the book, we will not only use code extensively but also clarify comments and headings in that code to provide structure, as well as several types of visual information such as images or generated graphs. For these reasons, we will use Jupyter as the supporting development environment. Moreover, in order to facilitate setup, installation, and experimentation, we will use Google Colab.
Google Colab is a hosted Jupyter Notebook service that requires no setup to use, while providing free access to computing resources, including GPUs. In order to set up Google Colab properly, this section is divided into two main points:
- Setting up the notebook
- Verifying and installing libraries
Important note
If you prefer, you can use any local environment that supports Python 3.7+, such as Anaconda, or any other Python distribution. This is highly encouraged if your hardware specifications are better than Google Colab’s offering, as better hardware will reduce computation time.
Setting up the notebook
In this section, we will learn how to work with Google Colab and set up a new notebook, which we will use to verify our MXNet installation:
- Open your favorite web browser. In my case, I have used Google Chrome as the web browser throughout the book. Visit https://colab.research.google.com/ and click on NEW NOTEBOOK.
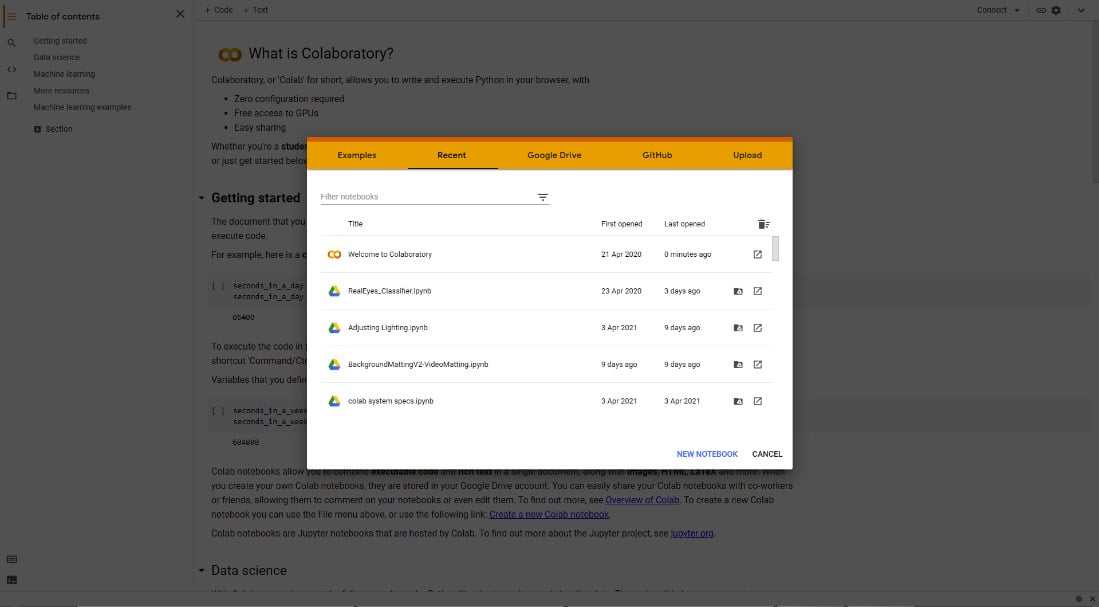
Figure 1.1 – The Google Colab start screen
- Change the title of the notebook – for example, as you can see in the following screenshot, I have changed the title to
DL with MXNet Cookbook 1.1Installing MXNet.

Figure 1.2 – A Google Colab notebook
- Change your Google Colab runtime type to use a GPU:
- Select Change runtime type from the Runtime menu.
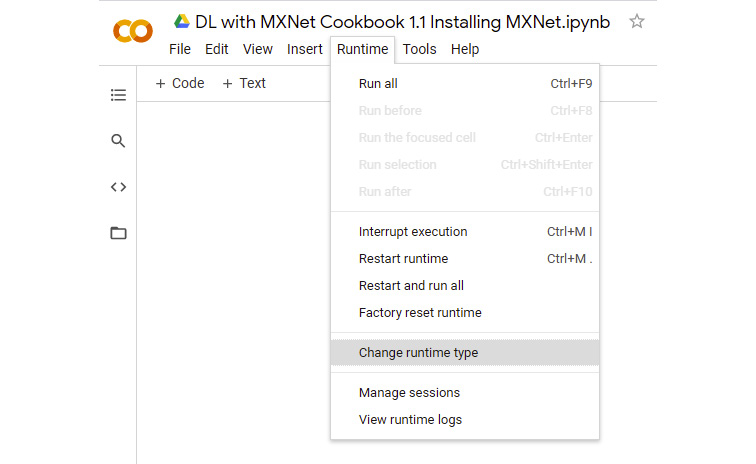
Figure 1.3 – Change runtime type
- In Notebook settings, select GPU as the Hardware accelerator option.
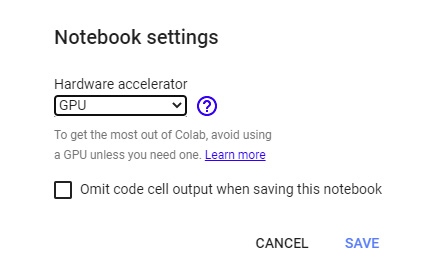
Figure 1.4 – Hardware accelerator | GPU
Verifying and installing libraries
In this section, go to the first cell (make sure it is a code cell) and type the following commands:
- Verify the Python version by typing the following:
import platform
platform.python_version()
This will yield an output as follows:
3.7.10
Check the version, and make sure that it is 3.7+.
Important note
In Google Colab, you can directly run commands as if you were in the Linux Terminal by adding the ! character to the command. Feel free to try other commands such as !ls.
- We now need to verify the Jupyter version (Jupyter Core 4.5.0 or above will suffice):
!jupyter --version
This is one potential output from the previous command:
jupyter core : 4.5.0
jupyter-notebook : 5.2.2
qtconsole : 4.5.2
ipython : 5.5.0
ipykernel : 4.10.1
jupyter client : 5.3.1
jupyter lab : not installed
nbconvert : 5.5.0
ipywidgets : 7.5.0
nbformat : 4.4.0
traitlets : 4.3.2
Tip
Jupyter, an open source notebook application, is assumed to be installed, as is the case for Google Colab. For further instructions on how to install it, visit https://jupyter.org/install.
- Verify whether an Intel CPU is present in the hardware:
!lscpu | grep 'Model name'
This will yield a similar output to the following:
Model name: Intel(R) Xeon(R) CPU @ 2.20GHz
The more up to date the processor the better, but for the purposes of this book, the dependency is larger with the GPU than with the CPU.
- Verify the NVIDIA GPU is present in the hardware (there are devices listed below) and that NVIDIA CUDA is installed:
!nvidia-smi
This will yield a similar output to the following:
+-----------------------------------------------------------------+
| NVIDIA-SMI 460.67 Driver Version: 460.32.03 CUDA Version: 11.2  |
|---------------------------+--------------+----------------------+
|GPU Name      Persistence-M|Bus-Id  Disp.A| Volatile Uncorr. ECC |
|Fan Temp Perf Pwr:Usage/Cap|  Memory-Usage|  GPU-Util Compute M. |
|                           |              |               MIG M. | |===========================+==============+======================|
|   0 Tesla T4          Off |0:00:04.0 Off |                    0 |
| N/A  37C  P8     9W / 70W |0MiB/15109MiB |      0%      Default |
                |              |                  N/A |
+---------------------------+--------------+----------------------+
+-----------------------------------------------------------------+
| Processes:                                                      |
|  GPU    GI  CI      PID  Type  Process  name         GPU Memory |
      ID  ID                                       Usage      | |=================================================================|
| No running processes found                                      |
+-----------------------------------------------------------------+
Important note
CUDA 11.0 has known issues with the NVIDIA K80. If you have an NVIDIA K80 and are having issues with the examples described, uninstall CUDA 11.0 and install CUDA 10.2. Afterward, install MXNet for CUDA 10.2 following the steps described here.
- Verify that the CUDA version is 11.0 or above:
!nvcc --version
This will yield a similar output to the following:
nvcc: NVIDIA (R) Cuda compiler driver
Copyright (c) 2005-2020 NVIDIA Corporation
Built on Wed_Jul_22_19:09:09_PDT_2020
Cuda compilation tools, release 11.0, V11.0.221
Build cuda_11.0_bu.TC445_37.28845127_0
- Install MXNet, depending on your hardware configuration. The following are the different MXNet versions that you can install:
- Recommended/Google Colab: The latest MXNet version (1.9.1) with GPU support:
!python3 -m pip install mxnet-cu117
- No Intel CPU nor NVIDIA GPU: Install MXNet with the following command:
!python3 -m pip install mxnet
- Intel CPU without NVIDIA GPU: Install MXNet with Intel MKL, with the following command:
!python3 -m pip install mxnet-mkl
- No Intel CPU with NVIDIA GPU: Install MXNet with NVIDIA CUDA 10.2, with the following command:
!python3 -m pip install mxnet-cu102
- Intel CPU and NVIDIA GPU: Install MXNet with Intel MKL and NVIDIA CUDA 11.0, with the following command:
!python3 -m pip install mxnet-cu110
- Recommended/Google Colab: The latest MXNet version (1.9.1) with GPU support:
Tip
pip3, a Python 3 package manager, is assumed to be installed, as is the case for Google Colab. If a different installation method for MXNet is preferred, visit https://mxnet.apache.org/versions/master/get_started for instructions.
After version 1.6.0, MXNet is released by default with the Intel MKL library extension; therefore, there is no need to add the mkl suffix anymore when installing the most recent versions, as seen previously in the recommended installation.
- Verify that the MXNet installation has been successful with the following two steps:
- The following commands must not return any error and must successfully display MXNet version 1.9.1:
import mxnet
mxnet.__version__
features = mxnet.runtime.Features()
print(features)
 print(features.is_enabled('CUDA'))
 print(features.is_enabled('CUDNN'))
 print(features.is_enabled('MKLDNN'))
The output will list all the features and
Truefor each one. - Install GluonCV and GluonNLP:
!python3 -m pip install gluoncv gluonnlp
This command will install the latest versions of GluonCV and GluonNLP, which at the time of writing were, respectively, 0.10 and 0.10.
How it works...
The training, inference, and evaluation of deep learning networks are highly complex operations, involving hardware and several layers of software, including drivers, low-level performance libraries such as MKL and CUDA, and high-level programming languages and libraries such as Python and MXNet.
Important note
MXNet is an actively developed project, part of the Apache Incubator program. Therefore, new versions are expected to be released, and they might contain breaking changes. The preceding command will install the latest stable version available. Throughout this book, the version of MXNet used is 1.9.1. If your code fails and it uses a different MXNet version, try installing MXNet version 1.9.1 by running the following:
!python3 -m pip install mxnet-cu117==1.9.1
By checking all the hardware and software components, we can install the most optimized version of MXNet. We can use Google Colab, which easily transfers to other local configurations such as the Anaconda distribution.
Moreover, we can identify the right combination of CUDA drivers and MXNet versions that will maximize performance and verify a successful installation.
There’s more…
It is highly recommended to always use the latest versions of all the software components discussed. Deep learning is an evolving field and there are always improvements such as new functionalities added, changes in the APIs, and updates in the internal functions to increase performance, among other changes.
However, it is very important that all components (CPU, GPU, CUDA, and the MXNet version) are compatible. To match these components, it is highly recommended to visit https://mxnet.apache.org/versions/master/get_started and check for the latest CUDA and MXNet versions you can install to maximize your hardware performance.
As an example, for a Python 3-based Linux distribution, installed using pip3, these are the MXNet versions available (note with/without CPU acceleration and/or with GPU acceleration).
If you are interested in knowing more about Intel’s MKL, the following link is a very good starting point: https://software.intel.com/content/www/us/en/develop/articles/getting-started-with-intel-optimization-for-mxnet.html.