

In this chapter, we will use a software package called Yaler to monitor our home network and alarm system from anywhere in the world where we can get an IP address. That's right; you can be at a café on the sidewalk in Paris and turn on the lawn sprinklers back in Houston.

Yaler is an Internet relay site, which allows you to access your BeagleBone from any device with a web browser or an SSH client, or both. The Yaler project was set up specifically to serve the users of BeagleBone and Raspberry Pi. Yaler allows you to access your BeagleBone even though it is shielded by your home or office firewall.

Normal access
Under normal circumstances, your firewall or mobile router blocks the access to your alarm system. In this case, Yaler acts as a secure "man in the middle", who handles two-way communication between your web client and your alarm system.
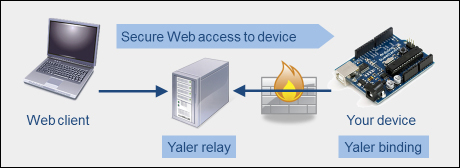
Yaler access
The first step in installing YalerTunnel is to get a domain name. You can do this for free by going to www.yaler.net and following the instructions on the website.
On the BeagleBone:
Create a YalerTunnel directory:
$ mkdir yalertunnel
$ cd yalertunnel
Download the YalerTunnel source:
$ curl -LO http://hg.yaler.org/yalertunnel2/downloads/YalerTunnel2.src.tar.gzUnzip the source into the directory:
$ tar xfzmv YalerTunnel2.src.tar.gzConfigure and create the code:
$ ./configure && makeWe can now enable either SSH or web access. If you want to have both web and SSH access, you will require two separate Yaler tunnels (domain names).
In order to enable web access on your BeagleBone, you need to perform the following steps:
Download the
yalertunnel.servicestartup script.$ curl -L http://yalertunnel.s3.amazonaws.com/yalertunnel.service -o /lib/systemd/system/yalertunnel.serviceCreate a symbolic link:
$ ln -s /lib/systemd/system/yalertunnel.service /etc/systemd/system/multi-user.target.wants/yalertunnel.serviceEdit the script using the built in editor called Nano to set
YOUR_RELAY_DOMAIN, as well as the local IP (default:localhost), and port (default:80) of the local web service you want to make accessible via Yaler (to save your changes press Ctrl + X, then Y, and then Enter).Note
$ nano /lib/systemd/system/yalertunnel.service

[Unit]
Description=yalertunnel on port 80
ConditionPathExists=|/home/root/yalertunnel

[Service]
Working directory=/home/root/yalertunnel
ExecStart=/home/root/yalertunnel server localhost:80try.yaler.net:80 <YOUR_RELAY_DOMAIN> -min-listeners 4

[Install]
Wantedby...
It is also possible to access your BeagleBone with SSH (Secure Shell). A Secure Shell will allow you to run all sorts of terminal-based programs, such as Kismet for wireless device monitoring or Wireshark for network monitoring.
In order to install SSH access, we must perform the following steps:
Download the
yalertunnel-ssh.servicestartup script:$ curl -L http://yalertunnel.s3.amazonaws.com/yalertunnel-ssh.service -o /lib/systemd/system/yalertunnel-ssh.serviceCreate a symbolic link:
$ ln -s /lib/systemd/system/yalertunnel-ssh.service /etc/systemd/system/multi-user.target.wants/yalertunnel-ssh.serviceAs with the web interface, we must edit the script to set
YOUR_RELAY_DOMAIN, the local IP (default:localhost), and port (default:22) of the local SSH service that you want to make accessible via Yaler.$ nano /lib/systemd/system/yalertunnel-ssh.service [Unit] Description=yalertunnel on port 22 ConditionPathExists=|/home/root/yalertunnel [Service] WorkingDirectory=/home/root...
Now that we have the firmware installed, it is time to access it using PuTTY. In order to do this, we must first configure PuTTY:
To start PuTTY, select the Session category and set the Connection type to SSH. Enter
/<relay_domain>in Host Name (or IP address) and22in Port. For example, for my relay domain,williamprettysecurity-system1-ssh, the Host Name would be seen as in the following screenshot:
Session category
Select the Connection category and set Seconds between keepalives (0 to turn off) to
5.
Connection category
Check the Disable Nagle's algorithm (TCP_NODELAY option) checkbox. (This will make the connection more responsible.)
Navigate to Connection | Proxy and set Proxy type: to HTTP. Enter
try.yaler.netin Proxy hostname and80in Port.
Proxy page
Navigate to Connection | Data and enter
rootin Auto-login username.
Data page
Select the Session category, enter a name such as
SSH via Yalerin Saved Sessions and click Save.
You can see which wireless networks are active in your neighborhood. This is handy if you are monitoring an office environment for Rouge APs installed against the company's policy.
To do this, type the following code in the SSH terminal:
iwlist wlan0 scan
You will see the following code listing:
Cell 01 - Address: 00:11:22:33:44:55
          ESSID:"bills_network"
          Mode:Master
          Channel:11
          Frequency:2.462 GHz (Channel 11)
          Quality=100/100  Signal level:-47dBm  Noise level=- 100dBm
          Encryption key:off
          .
          .
          .
You can see your wireless hub's link quality continuously on the screen by entering the following code:
watch -n 1 cat /proc/net/wireless
Or only once by entering the following code:
cat /proc/net/wireless
Bluetooth monitoring can be done in much the same way as WiFi monitoring, with a few simple terminal commands.
To scan for Bluetooth devices within range, we use the scan command:
hcitool scan
Scanning ...
        00:60:57:10:29:50       Joe's 6310i
By running the previous command, we have found Joe's phone and now we can ask some basic questions:
root@beaglebone:~# hcitool  info  00:60:57:10:29:50
Requesting information ...
        BD Address:  00:60:57:10:29:50
        Device Name: Joe's 6310i
        LMP Version: 1.1 (0x1) LMP Subversion: 0x22c
        Manufacturer: Nokia Mobile Phones (1)
        Features: 0xbf 0x28 0x21 0x00 0x00 0x00 0x00 0x00
                <3-slot packets> <5-slot packets> <encryption> <slot offset>
                <timing accuracy> <role switch> <sniff mode> <SCO link>
                <HV3 packets> <CVSD>
We can also "ping" Joe's phone (or any other Bluetooth device where we know the...
In this chapter we learned how to install and use some basic Linux commands to monitor wireless devices in proximity to our alarm system. We also installed a simple WiFi monitoring software package.
Many of you are probably wondering why I didn't use common packages such as Kismet or Aircrack. That is because there are already a number of good online tutorials about how to install these packages. Also, the purpose of these packages, Aircrack in particular, is not so much that of an intrusion detection (ID) system as just penetration testing.
My search on the Web turned up a number of wireless and wired intrusion detection packages. Unfortunately, they were either intended for X86-based systems or another Linux package distribution such as Ubuntu or Debian.
In the next chapter we will look at just some of the many more cool things you can do with your system, now that you have it up and running.
The rest of the chapter is locked
You have been reading a chapter from
Building a Home Security System with BeagleBonePublished in: Dec 2013Publisher: PacktISBN-13: 9781783559602
Register for a free Packt account to unlock a world of extra content!
A free Packt account unlocks extra newsletters, articles, discounted offers, and much more. Start advancing your knowledge today.
undefined
Unlock this book and the full library FREE for 7 days
Get unlimited access to 7000+ expert-authored eBooks and videos courses covering every tech area you can think of
Renews at $15.99/month. Cancel anytime