

By now, we have seen how to develop applications in Bonita Open Solution by leveraging the ease of the Studio and the power of the Execution Engine. The next step for creating any application is to deploy it on a server so that the end users can access it and utilize the application for their purposes. We will deploy Bonita Open Solution 5.10 on a Tomcat 6.0.35 server.
Bonitasoft has bundled the Execution engine along with a Tomcat 6.0.35 bundle. The advantage of using this bundle is that the entire Bonita Execution Engine is packaged and deployed as an application in Tomcat. We have the ability to change the various parameters, such as databases used from this bundle. We can also deploy other apps through a war file in Tomcat. Thus, this Tomcat bundle is a customized bundle which incorporates Bonita Open Solution on top of a vanilla Tomcat installation.
You can download the Bonita Tomcat bundle from the following link:
http://www.bonitasoft.com/products/download/other-versions-bos
Click on Version 5.10 and in the Bundles tab select the Tomcat bundle to download it. Unzip the file into a folder of your destination. Let's call the main folder of Tomcat as TOMCAT_HOME. If you explore the contents of the folder, you would find the default folders that are present in any vanilla Tomcat bundle. Let us now have a look at the various options available in this Tomcat bundle.
The TOMCAT_HOME folder has the following folders:
bin: This binary folder includes all the executable and binary files, including thedllfiles necessary for Tomcat to runbonita: This folder contains the configuration files needed for the Bonita application, as well as storage for temporary files and the place where the default file-based database stores its filesconf: This folder contains the configuration files for Tomcat as well as the Bonita configurationexternal: This folder contains the Java Authentication and Authorization Service (JAAS) configuration fileslib: All the JAR files needed by Tomcat, Bonita, and other external applications are present in thelibfoldertemp: This folder is used as a temporary folder by Java Virtual Machine (JVM)webapps: All the webapps running on Tomcat are deployed in this directorywork: This is a temporary working directory for web applications
The preceding are the main folders of Tomcat. However, we will get into the details of these shortly.
You need Java installed to run Tomcat as it runs on a JVM. If you have JDK installed along with the JAVA_HOME environment variable, you're all set. In the bin folder, there are two executable files, startup.bat and shutdown.bat, for Windows and startup.sh and shutdown.sh for Linux. These bat commands and shell scripts are used to start and shut down the Tomcat server. While starting up Tomcat, the environment variables are checked and set in setenv.bat or setenv.sh. You can add your own environment variables by modifying this script.
Let us run startup.bat and see what happens. After you execute the file, the Tomcat server starts up and you would be able to see the status of the server. It deploys all the Web applications it has and then the server starts up. If you check the webapps folder, you will see two war files: bonita.war and bonita-app.war.
These are the application files that are required for Bonita Open Solution to run on Tomcat. The first time you start up, it will take some time as Tomcat explodes the war into different folders. Subsequent startups of Tomcat will not take as much time as these two files would have already been exploded.
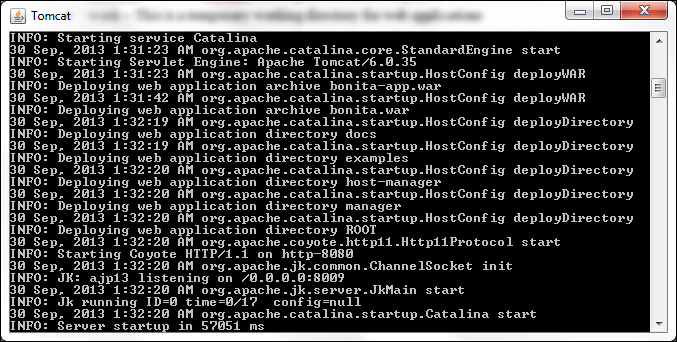
Figure 8.1: Starting Tomcat 6.0.35
Open up your browser and hit http://localhost:8080/. 8080 is the default port that is specified in the bundle. We will look at how to change this port later. The default Tomcat page opens up. You can read the information specified on this page as well as look at the examples provided by Tomcat if you're not familiar with servlets and JSPs.
Now, let us have a look at the Bonita application. The Bonita application was exploded in the Bonita folder. Hence, to access it, we need to hit http://localhost:8080/bonita. You will be redirected to a Bonita login page, the same page that you encounter when you log out of the Bonita studio while running the User Experience. Here, enter the admin credentials of admin and click on Log in. You will now be able to view the User Experience of Bonita. This User Experience is similar to the one that was available with Bonita Studio.
By default, Bonita Open Solution uses the file-based h2 database for its internal operations. Let us look at the places where this is configured and also change the connections to make sure that it uses MySQL instead. This practice will allow us to learn about the configurations files as well as setting up our MySQL server as Bonita's internal database.
In the TOMCAT_HOME folder, open up the conf folder. Here, you will find the Tomcat configuration files as well as the database files for Bonita. Let us now look at the internal database used by Bonita. Open up the file context.xml in any editing tool, such as Sublime Text. In this file, we can see that the default datasource is the one used by the h2 database. Beneath that, there is a commented datasource to be used for MySQL. Let us comment the h2 datasource and uncomment the MySQL datasource. We need to change a few parameters for the MySQL datasource, too.
Tip
The way to comment in an XML file is to include the comment text commented within a <!-- opening tag and a --> closing tag.
There are two databases that Bonita uses internally for all its purposes. One is called
bonita journaland one isbonita history.Firstly, we need to change the username and password for the MySQL server that we would be using. In the Username and password fields, enter your MySQL username and password.
MySQL uses port 3306 by default, and the default names for the databases used are
bonita_journalandbonita_history. You can change this in the URL parameter of both the datasources. Create the two databases that you mentioned in the URL parameter in your MySQL server. You can let the other parameters remain the same.
This defines the data source that has to be used for Bonita. Now, we have to define the other database and hibernate properties, which we should do in two other files. These are the bonita-journal.properties and bonita-history.properties files present in the TOMCAT_HOME/bonita/server/default/conf/ directory.
Open the bonita-journal.properties file to find the different configurations for database access. The default database connections are made using the h2 database. This file has the other hibernate properties that are used to connect to the database. At the end of the file, there are commented sections that have the code for other databases. Let us uncomment the lines for MySQL, that is, line numbers 101 and 102.
The file now looks like the following code:
##
# MYSQL

hibernate.dialect                    org.hibernate.dialect.MySQL5InnoDBDialect
bonita.hibernate.interceptor org.ow2.bonita.env.interceptor.MySQLDescNullFirstInterceptor
Make sure that the bonita.hibernate.interceptor property and the value MySQLDescNullFirstInterceptor are on the same line. Now, we have uncommented the section for MySQL, so we need to comment out the sections for h2. Comment out the corresponding h2 database connection properties, found on lines 17 and 20.
You can leave the other properties unchanged; these are primarily hibernate properties. One property that you may change later is the property on line 23: hibernate.hbm2ddl.auto. This specifies that the tables required by Bonita should be created/updated as and when the database connection is made. This option is a must during the initial setup when the tables aren't set up, but it isn't needed later on when everything is up and running properly.
Make similar changes to the bonita-history.properties file. Now that we have changed all the properties, one thing that remains is the appropriate driver for MySQL. We have defined the driver com.mysql.jdbc.Driver in the context.xml file, but we do not know where to find this driver. Hence, we need to download the MySQL JAR that contains this driver class. We can download the latest MySQL Connector 5.0.8 from the following website:
http://dev.mysql.com/downloads/connector/j/
Download the platform-independent version and extract the zip file. You will find a JAR file, such as mysql-connector-java-5.1.26-bin.jar (the version may be different). Copy this jar into the lib folder of TOMCAT_HOME.
Now run startup.bat from the bin folder of Tomcat. When you navigate to http://localhost:8080/bonita, you will have to log in using the admin credentials. The first time it will be slow, as all the required tables will be created in the database. Thereafter, you will be navigated to the user inbox.
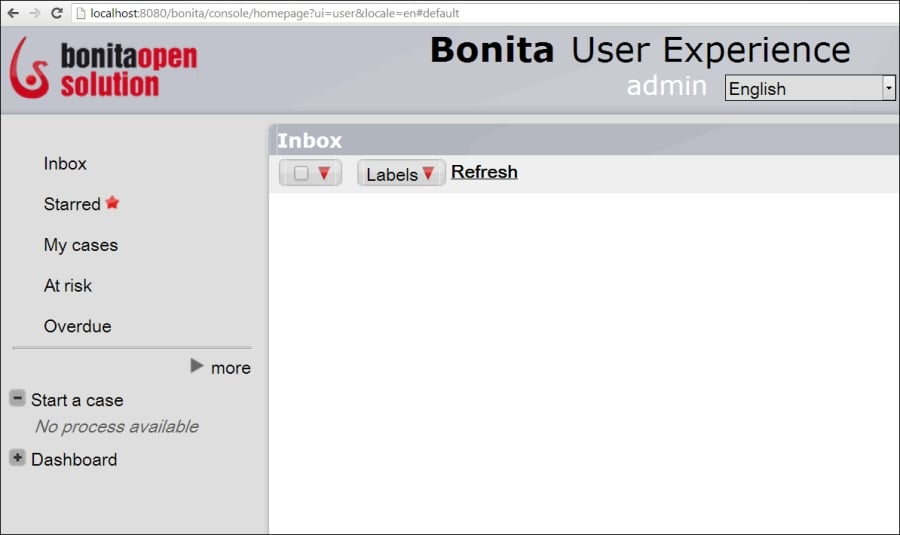
Figure 8.2: User Experience on the Tomcat server
Log is an important part of troubleshooting and debugging. With the Tomcat container, there are various levels of log that can be set for different purposes. In the TOMCAT_HOME/log folder, you will find the following types of logs:
Tomcat log: These are present in the files
catalina.logandlocalhost.log. All the Tomcat engine logs are present incatalina.logand the virtual host that is configured by Tomcat, which is localhost, is present in thelocalhost.logfile.Bonita log: The log generated by the Bonita Execution Engine are present in the
bonita.logfile. This contains the information related to every action that is done on the user experience.
The logging levels can be changed from the logging.properties files in the TOMCAT_HOME/conf folder.
A lot of the Tomcat setup is customizable and is present in the config files. By changing these XML config files, we can change the behavior of Tomcat to suit our purpose. Let us first have a look at the Tomcat server config file and the various customizations.
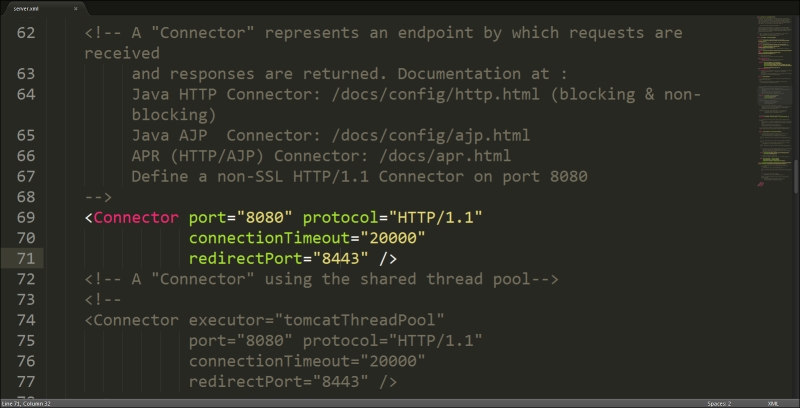
Figure 8.3: Tomcat server configuration file
Here the connector for the HTTP/1.1 protocol is defined in the previous screenshot. We can change the port and also change the connection timeout, along with the other settings, such as the redirect port. A front-end Apache server can also be installed to work as a reverse proxy for Tomcat. You can read more about this at http://tomcat.apache.org/connectors-doc/generic_howto/proxy.html. In the commented code beneath, there is a connector for HTTP/1.1 over SSL. There is also a Valve defined for Bonita login. Bonita uses JAAS for logging in users.
We have the ability to change the default login page of Bonita. Open the file login.jsp present in TOMCAT_HOME/webapps/bonita/console. Here, the HTML page can be modified to suit your purpose. I've changed the HTML page and here is how it looks after modification.
Figure 8.4: Modifying the login page
Here, only a basic modification is shown, but with HTML and Javascript/JQuery, the login page can be jazzed up a lot. We can integrate Bootstrap and other css classes, too.
If we're creating an application in Bonita that many users will use, then these users need to be created in Bonita and entered in the internal database. Often, it is quite possible that the user information is stored in a separate database. Manually adding those users into Bonita is a tedious task. Hence, we can create a separate application for this purpose that will be run only once: to input users into Bonita's internal database. For this purpose, we will leverage the Bonita APIs, which are useful in performing tasks with the Bonita Execution Engine. The Bonita APIs are Java-based and have extensive documentation here at http://www.bonitasoft.org/docs/javadoc/bpm_engine/5.10/.
Let us create a new process in Bonita Studio and use the Groovy editor to leverage these APIs. Let us have only two steps in the process, one to add roles and the other to add users to the database. The workflow should look like the following screenshot when completed:
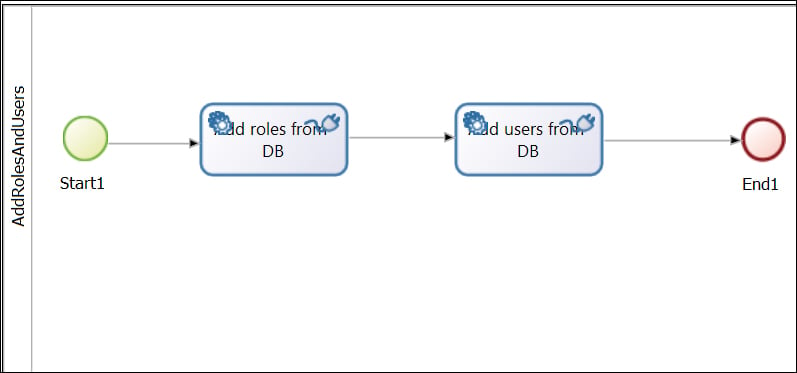
Figure 8.5: New process for adding roles and users
In the Add roles from DB step, create a database connector, such as MySQL, enter the required information for connecting to it, and thereafter, enter the SQL query for selecting the role names.
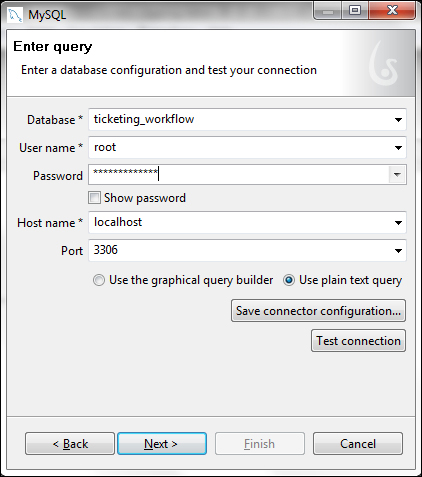
Figure 8.6: MySQL connection properties
The SQL query might look something like this:
Select name
 from TICKETING_WORKFLOW.role
In the next step of the connector, where the connection output is meant to go to a destination variable, select Edit expression... in the connector output to bring up the Groovy editor.
Here, let us write the following piece of code to add a role with a particular name into Bonita:
import org.ow2.bonita.facade.IdentityAPI;
IdentityAPI identityAPI = apiAccessor.getIdentityAPI();
i=0;
// We have to iterate over each value that rowSet contains
rowSet.getValues().each {
  try {
    // We had selected the name of the role in the SQL Query
    // Hence, we call the toList method of rowSet to get this value
    identityAPI.addRole(rowSet.toList("NAME").get(i));
  } catch(Exception E) {
    // The Exception may be caused due to the same role being added twice
    // We don't catch any exception here, but it is generally recommended
  }
  i=i+1;
}
try {
  identityAPI.addGroup("ticketingworkflow", "Ticketing Workflow", "This is the group for the application Ticketing Workflow", null);
} catch (Exception E) {
}
Here, we get the identity API from the apiAccessor method. This API has the method to add a role based on a name. We iterate through the values of rowSet, which contains all the role names, and we keep adding these roles via the identity API. Thus, at the end of this connector, we would have added all the roles returned by the SQL query into our Bonita database. In addition, we are also adding a group called ticketingworkflow. We are doing this just to group all the users under multiple roles into a single group.
In the next step, we have to add users to the database. Now, there are specific pieces of information related to every user, such as his/her role and group and also his/her user information. Let us assume that we have all the necessary information in three tables in our database, called users, role, and user_role_mapper. The users table has information such as user_id, username, first name, and last name, and the role table has information such as role_name and description. The user_role_mapper table maps users to their roles.
Now create a connector in the next service step and insert the following SQL query:
Select
u.username as USERNAME, u.password as PASSWORD, u.firstname as FIRSTNAME,
u.lastname as LASTNAME,  u.email as EMAIL, r.name as NAME
from TICKETING_WORKFLOW.user_role ur
join TICKETING_WORKFLOW.users u on ur.user_id= u.user_id
join TICKETING_WORKFLOW.role r on ur.role_id = r.role_id
Thus, we get all the required fields using this SQL query. Now, in the next step of the connector, we need to save the connector output. Here, let us enter the following code in the Groovy editor:
import org.ow2.bonita.facade.IdentityAPI;
import org.ow2.bonita.facade.identity.Group;
import org.ow2.bonita.facade.identity.Membership;
import org.ow2.bonita.facade.identity.Role;
import org.ow2.bonita.facade.identity.User;
import org.ow2.bonita.facade.exception.UserAlreadyExistsException

IdentityAPI identityAPI = apiAccessor.getIdentityAPI();

// getGroupUsingPath method expects a list of String
ArrayList<String> groupList = new ArrayList<String>();
list.add("ticketingworkflow");
i=0;
rowSet.getValues().each {
  if(rowSet.toList("USERNAME").get(i)!=null) {
    try {
      User user;
      // We try to add the user, but if the user already exists, then in the catch block, we just find the user
      try {
        // We give the default password as bpm. The individual users can change their passwords later on
        user = identityAPI.addUser(rowSet.toList("USERNAME").get(i),"bpm", rowSet.toList("FIRSTNAME").get(i),rowSet.toList("LASTNAME").get(i), rowSet.toList("EMAIL"));
      } catch (UserAlreadyExistsException e) {
        user =identityAPI.findUserByUserName(rowSet.toList("USERNAME"));
      }
      Role role = identityAPI.findRoleByName(rowSet.toList("NAME").get(i));
      Group group = identityAPI.getGroupUsingPath(groupList);
      // We define a membership with a specific role and group
      Membership membership = identityAPI.getMembershipForRoleAndGroup(role.getUUID(),group.getUUID());
      identityAPI.addMembershipToUser(user.getUUID(),membership.getUUID());
    } catch (Exception e) {
    }
  }
  i=i+1;
}
We have to package the entire process diagram into a business archive file for Bonita Execution Engine to run the workflow. You can export both the process definition and the Web application in a single BAR (Business Archive) file. After exporting the bar file, we can install it using the User Experience. Refer to Chapter 1, Installing and Getting Started with Bonita for knowing how to install BAR files. Click on the menu item Process and select Export. Choose the folder you want the BAR file to be created in and click on OK. We've already seen how to install a process in Chapter 1, Installing and Getting Started with Bonita through the administrative view.
Thus, we have seen how to deploy Bonita Open Solution on a Tomcat server. The other parameters can be tweaked and played around with for optimal performance and troubleshooting. We can also host external applications on the same Tomcat server and use the redirect to external URL option inside Bonita Studio instead of the inbuilt web form. Thus, we can customize things according to our need.
In this section, we have learned how to deploy Bonita Open Solution on a Tomcat server, how to customize the database used, and to tweak certain parameters of the Tomcat server to optimize performance. In addition, we have had a look at using the Bonita APIs to make life simpler. As we have seen throughout the book, Bonita Open Solution is a powerful tool for Business Process Modelling and creating swell applications out of it. It is comprehensive software with a powerful engine and a lot of customization options available to make sure that everyone can make use of this tool to solve complex problem statements.
The rest of the chapter is locked
You have been reading a chapter from
Bonita Open Solution 5.x EssentialsPublished in: Nov 2013Publisher: PacktISBN-13: 9781782167082
Register for a free Packt account to unlock a world of extra content!
A free Packt account unlocks extra newsletters, articles, discounted offers, and much more. Start advancing your knowledge today.
undefined
Unlock this book and the full library FREE for 7 days
Get unlimited access to 7000+ expert-authored eBooks and videos courses covering every tech area you can think of
Renews at $15.99/month. Cancel anytime