Reader small image

You're reading from  Apple Motion 5 Cookbook

Product typeBook
Published inMay 2013
PublisherPackt
ISBN-139781849693806
Edition1st Edition
Tools
Right arrow
Author (1)
Nicholas Harauz
Nicholas Harauz
author image
Nicholas Harauz

Nick Haurauz has directed and filmed a host of celebrities such as Nelly Furtado, Lady Gaga, and Richard Branson. He was responsible for crafting video magic for clients such as Diageo, Virgin Mobile, United Way, and Procter and Gamble. He has an uncanny ability to engage his students and create a level of relatedness that keeps them coming back for more. As an FCP X, Motion 5, After Effects, Premiere Pro, and an Avid-certified trainer, he is able to put his BA in Film and Sociology from the University of Toronto to good use. In 2005, Nick founded Inconscience Productions and continues to work with domestic and international brands to shoot, produce, and cut masterpieces. In 2010, he was handed the opportunity of a lifetime to co-edit a feature documentary entitled My Father and the Man in Black; the untold story of a bad boy Johnny Cash, his talented but troubled manager, Saul Holiff, and a son searching for his father in the shadow of a legend. When he is not busy impressing his students at Witz Education and travelling to or from post-production conferences, this half Ukrainian, half Trinidadian can be found playing tennis. This is his first book!
Read more about Nicholas Harauz

Right arrow

Launching and customizing a template


One of my favorite things to do when I first started learning Motion was to open some of the templates the application shipped with and try to figure out how it was created. This gave me a real feel for the inner workings of Motion and the possibilities! Let's open one of Motion 5's templates and customize some of the features.

How to do it...

  1. Launch Motion from the Dock or the Applications folder.

  2. From the left-hand side of the Project Browser, choose the Skyline template folder.

  3. Select the Skyline Menu project, and from the bottom-right hand side, choose Open a copy.

  4. Press Shift + Z in the Canvas window to fit the project and press the Space bar to play it back.

  5. The project starts off with a radial background where buildings and a ribbon grow from offscreen to onscreen followed by a few titles fading in over top of them. After reviewing, we've decided we'd like to change the color of our background, the color of the ribbon, and put in some text to suit the project better. Move your playhead to an area where you can see all of your elements onscreen, or double-click in the Time field and enter 3.25.

  6. In the Layers tab, reveal the content of the Background Group by clicking the disclosure triangle. You will see a single layer that is a still image; it has a radial gradient, as shown in the following screenshot:

  7. Since this is a still image from another application, we have to add a filter to change its color. Press Command + 2 to go to the Libraries tab of the Inspector. Go to the Filters category, select the Color Correction folder and locate Colorize (use the following screenshot as your guide). Drag it to the Background Elements layer. Press F3 to go to the Filters tab of the Inspector. Control-click the Remap White value and select a blue color of your liking.

  8. Let's repeat this step for the ribbon. Click the disclosure triangle to close the Background group. Click the disclosure triangle to reveal the content of the Graphics group and the Ribbon group, as shown in the following screenshot:

  9. The Ribbon group is composed of three rectangle objects that have behaviors animating them onscreen. While we can locate the original rectangle shapes and tweak their color, it's a lot easier if we add a filter to the group and change the color for all the elements within that group. Press Command + 2 to go to the Library tab. Go to the Filters category, select the Color Correction folder, and locate Colorize. Drag it to the Ribbon group in the Layers tab, as shown in the following screenshot:

  10. Press F3 to go to the Filters tab of the Inspector. Right-click on the Remap White value and select a yellow color of your liking. Repeat this step for Remap Black with a slightly off yellow color from your previous selection.

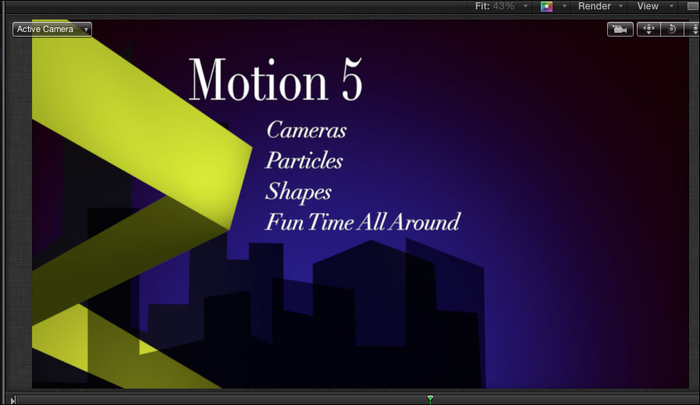
  11. Click the disclosure triangle to close the Graphics group. Open the Text group. There are five text elements, one for each text line onscreen. To change the text, select the Title here group. Press F4 to go to the Text tab of the Inspector. At the bottom, change Title info here to Motion 5. Repeat this step for the subtitle layers. The following screenshot shows the Format Pane tab in the Inspector for the Subtitle group:

The following is a shot of the Canvas showing the template once all subtitle groups have been changed:

How it works...

When you open a template, you never switch the original file on the system. That's why in this recipe when you selected the template, Motion only gave you the option to open a copy. The original templates will never be overwritten.

There's more...

Motion also allows us to solo our layers.

Let solo be your friend

Having trouble differentiating what every item is? Here comes solo to the rescue. Simply select a group or layer and go to Object | Solo or press Ctrl + S. You can see that item all by its lonesome. To unsolo, go back to the Object menu and click Solo again.

Tip

Motion is a big program but with a little practice you'll get better everyday!

Don't be intimidated

Motion is all about playing. If you didn't understand how everything worked in this recipe, relax. There is a lot of content in it we did not cover. Simply have fun by looking and playing with a few properties. With time, it's going to get easier and easier.

See also

  • The Moving and trimming layers in the Timeline and the mini-Timeline recipe.

Previous PageNext Page
You have been reading a chapter from
Apple Motion 5 Cookbook
Published in: May 2013Publisher: PacktISBN-13: 9781849693806
Register for a free Packt account to unlock a world of extra content!
A free Packt account unlocks extra newsletters, articles, discounted offers, and much more. Start advancing your knowledge today.
undefined
Unlock this book and the full library FREE for 7 days
Get unlimited access to 7000+ expert-authored eBooks and videos courses covering every tech area you can think of
Renews at $15.99/month. Cancel anytime

Author (1)

author image
Nicholas Harauz

Nick Haurauz has directed and filmed a host of celebrities such as Nelly Furtado, Lady Gaga, and Richard Branson. He was responsible for crafting video magic for clients such as Diageo, Virgin Mobile, United Way, and Procter and Gamble. He has an uncanny ability to engage his students and create a level of relatedness that keeps them coming back for more. As an FCP X, Motion 5, After Effects, Premiere Pro, and an Avid-certified trainer, he is able to put his BA in Film and Sociology from the University of Toronto to good use. In 2005, Nick founded Inconscience Productions and continues to work with domestic and international brands to shoot, produce, and cut masterpieces. In 2010, he was handed the opportunity of a lifetime to co-edit a feature documentary entitled My Father and the Man in Black; the untold story of a bad boy Johnny Cash, his talented but troubled manager, Saul Holiff, and a son searching for his father in the shadow of a legend. When he is not busy impressing his students at Witz Education and travelling to or from post-production conferences, this half Ukrainian, half Trinidadian can be found playing tennis. This is his first book!
Read more about Nicholas Harauz